
Related Manuals for Primera FX400


Summary of Contents for Primera FX400
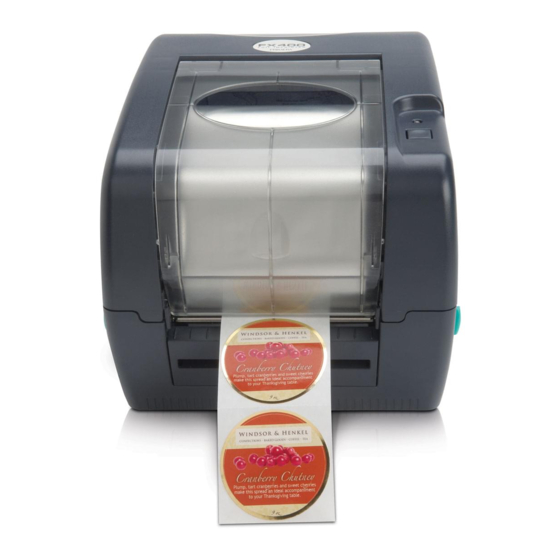
- Page 1 Printer and Stand Introduction Install Software and Setup the Stand Install Media Design and Print ...
-
Page 2: Table Of Contents
Table of Contents 1. Software Install and Stand Setup 2. Install Foil or Laminate 3. Design, Print and Imprint a. Design the LX Label b. Design the Foil Label c. Design a Laminate Label d. Print with PTFoil Software 4. Adjusting offsets 5. - Page 3 FX400 with a Primera LX400, LX800 or LX810 printer. Using your LX printer and the FX400 you can first print a full color label and print gold or silver borders, accents, and text or laminate the label to protect against water and fading.
- Page 4 You must click Continue Anyway to finish the installation. B. Setup the Stand: The stand is designed to easily support the LX Printer and the FX400. The stand is separated into two parts for shipping purposes. Remove these two parts and the FX 400 from the box.
- Page 5 2. Attach the stand pieces together using the included screws. Do not tighten the screws. The stand may need adjustment once the printers are in place. The LX printer stand (larger stand) should be on the left side. 3. Place the LX printer on the larger stand. There are two sets of indents in the top of the stand which correspond to the rubber feet of the LX printer.
- Page 6 Place the FX400 onto the smaller stand. There are also four indents on the FX400 stand that correspond to the rubber feet on the FX400. 6. Connect power and USB to the FX400 using the included power cord and converter.
-
Page 7: Install Foil Or Laminate
Section 2: Install Foil or Laminate Install only Primera approved media. Other media may have thermal properties that may not be compatible with the FX400. Follow these instructions to install the media. 1. Push down on the ribbon access window to release the lock. Lift the window to access the ribbon area. - Page 8 3. The media will come with two cores. One will have the media supply (foil or laminate) and the other will be an empty core. Insert one of the spindles into the empty core. This will be the rewind core. 4.
- Page 9 6. Place the media supply core on the back set of hubs. The flange on the spindle should be on the right side of the printer. First, insert the left side of the core onto the spring-loaded hub. Then, place the right side of the core on the hub. 7.
- Page 10 8. Pull the loose end of the media from the supply core over the print head. Feed it back toward the rewind core. Attach the loose end on the media to the rewind core using tape or the adhesive strip on the rewind core. Note: Make sure the media is flat against the print head with no folds or wrinkles.
-
Page 11: Design, Print And Imprint
Section 3: Design, Print and Imprint A. Design the LX Label Design your LX label according to the instructions that come with you printer. Keep in mind there are variations in the placement of the foil. Foil can be printed over the top of areas that have already been printed on with the LX printer. -
Page 12: Design A Laminate Label
C. Design a Laminate Label If you are using your FX400 as a label laminator create a solid black box in the same size as your LX page size and label. Save it as a JPG, BMP or TIF file. See example below: D. - Page 13 6. Print the header to be fed into the foil printer by clicking the button on the screen. This allows the FX400 enough label stock to start printing without getting ahead of the LX printer and causing tension on the label stock.
- Page 14 7. Feed the header into the FX400 Printer. Note: Make sure at least one label is sticking out of the front. Failure to do this could cause feeding/alignment issues when sending the print job.
- Page 15 11. Once you are sure the label is properly aligned, set the number of copies and press “Start the Job”. Both the LX Printer and FX400 will be sent the same number of prints. The software will regulate the speeds.
-
Page 16: Adjusting Offsets
1. Go to Start – Printers and Faxes. Right click on the FX400. Choose Printing Preferences. 2. Go to the Page Setup Tab. - Page 17 3. Choose Advanced Options. Use the graphic below as a guide:...
-
Page 18: Foil/Laminate Only
Section 5: Foil/Laminate Only 1. Attach the external paper roll mount to the bottom of the printer. 2. Install the roll of label stock onto the roll mount. Note: Skip Steps 1 and 2 if you have fan-fold labels that are not on a roll. Use steps 3-6 to foil only to these labels. - Page 19 The design should be monochrome black only. 6. To imprint foil or laminate, go to the file menu of the design application, choose print. Choose the FX400 as the printer. Set the number of copies and print. Note: You can also choose to print from the PTFoil application by checking the FOIL ONLY box.
-
Page 20: Specifications
With LX810: 17”W x 40”L x 13.625”H (432mmW x 1016mmL x 346mmH) Foil Supplies: TuffCoat Gold Foil, TuffCoat Silver Foil, TuffCoat Clear Foil ©2009 Primera is a registered trademark of Primera Technology Inc. All other trademarks are the property of their respective companies. Specifications are subject to change without notice.
Need help?
Do you have a question about the FX400 and is the answer not in the manual?
Questions and answers