
Related Manuals for Worx WG150


Summary of Contents for Worx WG150
- Page 1 Li.e Trimmer m:NG Pag 02 D6bro.ssai||e.se Pag 12 Desma|ezadora Pag 20 CTC-WG150-M-060418.indd 2006-4-20 14:39:53...
- Page 2 CTC-WG150-M-060418.indd 2006-4-20 14:39:53...
- Page 3 CTC-WG150-M-060418.indd 2006-4-20 14:39:54...
- Page 4 CTC-WG150-M-060418.indd 2006-4-20 14:39:58...
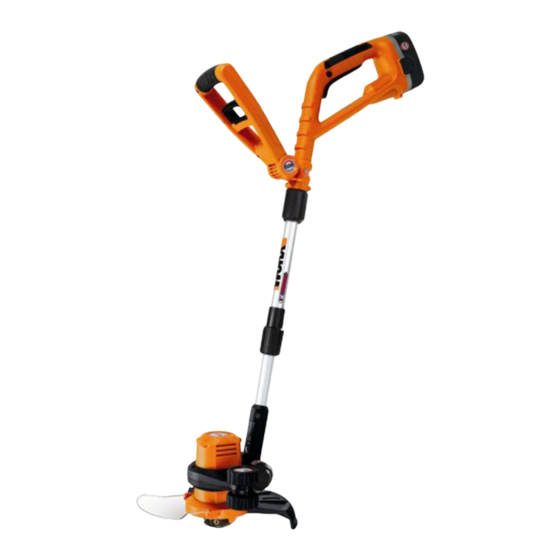
- Page 5 18. BATTERY PACK RELEASE LATCH 19. CHARGER 20. CHARGED INDICATOR LIGHT(GREEN) 21. CHARGING INDICATOR LIGHT(RED) TECNNICAL 9ATA Model No. WG150 Rated Voltage Rated No-Load Speed 8200min -1 Cutting Diameter 10" Line Diameter 0.065" Machine Weight 6.81bs ACCESSORIES Uattery: _ I.?Ah...
- Page 6 Ground Fault Circuit Interrupter (GFCI) protection should he provided on the circuit|s) or outlet(s) used gardening appliance. Receptacles are available having built-in GFCI protection and may be used for an added measure safety. CTC-WG150-M-060418Jndd 2006-4-20 14:40:02...
- Page 7 A guard or other part that is damaged should be properly repaired or replaced an authorized service center unless indicat- ed elsewhere in this manual. 3. EDGER-TRIMMERS a) Keep guards in p|ace in wor_ng order. b) Keep hands and feet away f¥o.. cutt_,nfj area. CTC-WG150-M-O60418.indd 2006-4-20 14:40:02...
- Page 8 Note: green = power ing sure the sides are located into the grooves red = charging, on the trimmer head (See B). Uattcry pack Jnse_ed +green = charging Secure the safety guard onto the trimmer head comp|eted CTC-WG150-M-060418.indd 2006-4-20 14:40:04...
- Page 9 Hold the lever and rotate the auxiliary handle Adjust trimmer head angle to be the lowest to the most comfortable and balanced position horizontal setting. Then position the wheel (See I). the ground for edge mode.The guard has two CTC-WG150-M-060418Jndd 2006-4-20 14:40:04...
- Page 10 Keep all areas of the cap and spool holder clean. Press firmly down towards the spool holder to ensure cap is fully located. Check that the cap is correctly fitted by trying to remove it without depressing the two latches. CTC-WG150-M-060418.indd 2006-4-20 14:40:05...
- Page 11 If for any reason you are dissatisfied with WORX product, can return the product, along with proof of purchase, within 30 days for a full refund. If your WORX product becomes defective to faulty materials or workmanship within specified warranty period of;...
- Page 12 19. CHARGER 20. CHARGED INDICATOR LIGHT (GREEN) 21. CHARGING INDICATOR LIGHT (RED) FICME: TECNNIQU : Modele no. WG150 Tension nominale 18V ---'= Vitesse a vide nominale 8200min -1 Diametre de coupe 10" Diametre de cordon de coupe 0.065" Poids de la machine 6.81bs...
- Page 13 _ Grosseur minimum de fi| cordons portez pas des v_tements I_ches ou des pro|o_ga_eurs bijoux. IIs peuvent se prendre dans pieces en mouvement. I'utilisation de gants de caoutchouc et chaussures 6paJsses est recommand6e Iors de travaux ext6rieurs. CTC-WG150-M-060418.indd 2006-4-20 14:40:07...
- Page 14 II va faire un o_re fonctionnemen_. meilleur travail et avec moins de dsques Gardez mains pieds hors I'aire coupe. de blessure en travaillant au taux de charge pour lequel il a 6t_ con£ut. N" essayez pas d'utiliser I"apparell hers CTC-WG150-M-060418.indd 2008-4-20 14:40:08...
- Page 15 PR|NCi- PALl: ST DU MANCHE (Voir A) Tourner le bouton sup_rieur d'ajustement dans le sens des aiguilles d'une montre, pour le desserrer. Ins_rez le manche t61escopique dans la poign_e principale jusqu'a ce qu'elle clique en place (Voir CTC-WG150-M-060418.indd 2006-4-20 14:40:09...
- Page 16 (B). Votre avec votre s6cateur a gazon. Apres cela la per- commutateur est maintenant {{ ON >>. Pour formance de votre bloc-pile s'am61iorera. commuter a {{ OFF >>, rel_chez le commutateur ON/OFF >> (Voir F). CTC-WG150-M-060418Jndd 2006-4-20 14:40:t0...
- Page 17 |e s_cateur _ gazo.. surcz-vous que |€ motcur a attei.t sa p|e- completement le s6cateur, puis red6marrez, i.c _tcsse ava.t (meto.drc. permettant au moteur d'atteindre sa pleine vitesse. R6p6tez cela jusqu'a ce que vous en- Awe_isseme.t Utilisez seulement CTC-WG150-M-060418Jndd 2006-4-20 14:40:tl...
- Page 18 Ja bobine. Votre s6cateur est congu pour utiJiser seuJement un cordon de coupe ay- ant un diametre de 0.065" |MPORTANT - Toujours embobiner |e cow don de coupe sur |a section sup_rJeure |a bobJne en premier lieu. CTC-WG150-M-060418Jndd 2006-4-20 14:40:tl...
- Page 19 Cette garantie s'applique seulement a I'acheteur WORX, vous pouvez retourner le produit avec original et ne peut 6tre transf6r6e. preuve d'achat en dedans de 30 jours pour un Toutes les r6pa rations et outils de rem placement remboursement complet.
- Page 20 DE _S BATER|AS 19. CARGADOR 20. LUZ |NDBCADORA DE CARGA COMPLETA (VERDE) 21. LUZ |NDiCADORA DE CARGA (ROJA) DATOS TE:CNICOS Modelo WG150 Voltaje nominal 18V -_-'= Velocidad nominal sin carga 8200min 4 Diametro de corte 10" Diametro del hilo 0.065"...
- Page 21 Em- plee protecci6n adecuada para contener cabello largo. e) Uti|ice fJafas de seguridad. Emplee siem- pre mascara para la cara o mascara anti-pol- CTC-WG150-M-060418.indd 2006-4-20 14:40:t3...
- Page 22 No se e_raiimite. Mant6ngase firme y con buen equilibrio en todo memento. o) Permanezca alerta. Ponga siempre aten- ci6n en Io que esta haciendo. Utilice el sen- CTC-WG150-M-060418.indd 2006-4-20 14:40:14...
- Page 23 EL MANGO TELESC6P|CO (V&ase A) Afioje la perilla superior de traba (3) en sentido horario. Inserte el mango telesc6pico dentro del mango principal hasta escuchar un "click" (V_ase A). Ajuste la perilla superior detraba en sentido anti- horario. CTC-WG150-M-060418.indd 2006-4-20 14:40:t5...
- Page 24 (21)indicando que la carga ha comen- zado. _ Una bateria descargada a temperatura 8. AJIUSTE DEL MANGO AUXILIAR ambiente normal demorara aproximadamente Tire de la paianca de liberaci6n del mango (5), CTC-WG150-M-060418Jndd 2006-4-20 14:40:t6...
- Page 25 Con unamano, rote haga contacto. No fuerce el hilo de corte en el el carrete en sentido contra horario hasta que area de trabajo. se detenga. Sostenga el carrete en su lugar. Con la otra mano, presione completamente CTC-WG150-M-060418.indd 2006-4-20 14:40:t7...
- Page 26 Garantia de Satisfacci6n por 30 DiAS Si por algQn motivo Ud. no queda satisfecho |MPORTANTI_ - |MPORTANTE - Siempre con cualquiera de los productos WORX, puede e.ro||e 4"(1OOmm) hi|o comenzando solicitar el reembolso de su dinero devolviendo |a parte superior |a bobina.
- Page 27 Puede consultar el centro de servicio autorizado mas cercano contactandonos Positec USA, Inc. Charlotte, NC 28216 PHONE: 1-866-354-WORX (9679) Esta garantia no es aplicable a los accesorios. Esta garantia es aplicable...
- Page 28 you've got the power Desig.ed |ta|y. Made China Con_u |ta|ie° Fabriqu_ Chi.e Dise_ado |ta|ia. Fabricado en China...
Need help?
Do you have a question about the WG150 and is the answer not in the manual?
Questions and answers
do the wg150 and the wg150.2 use the same string spools