Table of Contents
Advertisement
ModeJ N o. NTEX4196.0
SerialNo.
Serial N umber
Decal
QUESTmONS?
As a manufacturer,
we are com-
mitted to providing
complete
customer
satisfaction,
if you
have questions,
or if parts are
damaged
or missing, PLEASE
CONTACT OUR CUSTOMER
SERVICE DEPARTMENT
DIRECTLY,
CALL TOLL-FREE:
1°888°825°2588
Mon.=Fri., 6 a.m.=6 p.m. MST
ON THE WEB:
www.nordictrackservice.com
Read all precautions and instruc-
tions in this manual before using
this equipment.
Keep this manuaJ
for future reference,
ER'S
_our
website
a_-
www.nordictrack.com
new products,
prizes,
fitness
tips, and much
more!
Advertisement
Table of Contents

Related Manuals for NordicTrack AudioStrider R400 NTEX4196.0


Summary of Contents for NordicTrack AudioStrider R400 NTEX4196.0
- Page 1 1°888°825°2588 Mon.=Fri., 6 a.m.=6 p.m. MST ON THE WEB: www.nordictrackservice.com _our website Read all precautions and instruc- tions in this manual before using www.nordictrack.com this equipment. Keep this manuaJ for future reference, new products, prizes, fitness tips, and much more!
- Page 2 TABLE OF CONTENTS IMPORTANT PRECAUTIONS ..............BEFORE YOU BEGIN ..............ASSEMBLY ................HOW TO OPERATE THE EXERCISE CYCLE ............ MAINTENANCE AND TROUBLESHOOTING ........... CONDITIONING GUIDELINES ............... PART LIST ................EXPLODED DRAWING ..............ORDERING REPLACEMENT PARTS ..........Back Cover LIMITED WARRANTY ..............
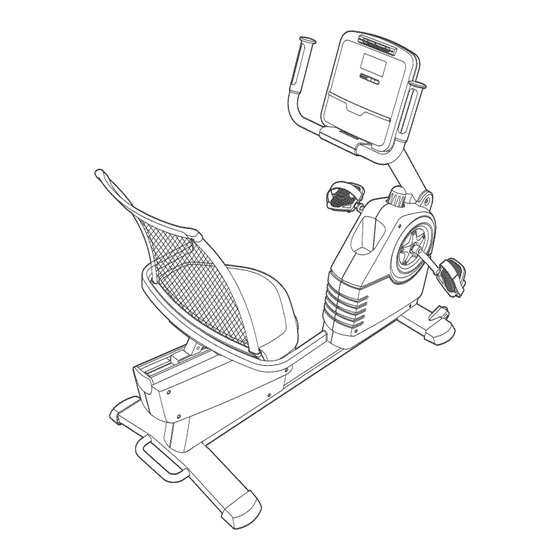
- Page 3 If you have questions Handlebar Console Pulse Sensor Upright Knob _r Bottle Holder* Backrest Pedal/Strap Seat Wheel Seat Handle Leveling Foot Seat Handlebar Handle *No water bottle is included NordicTrack is a registered trademark of ICON IP, Inc.
- Page 4 Assembly requires two persons. Place all parts of the exercise cycle in a cleared area and remove the packing materials. Do not dispose of the packing materials until assembly is completed. Assembly requires the included tooJs and your own adjustable wrench and Phillips screw-...
- Page 5 Whileanother person liftstherearofthe Frame (1), attach the RearStabilizer ( 16)to theFrame withfour M8x 50mmButton Screws (52)andfourM8Split Washers (55). 3. Tighten the Upright K nob(7)intothe Frame (1). 4. Whileanother p erson holds the Upright ( 2)nearthe Frame (1),usethewiretie in theUpright t o pullthe Avoid pinching Upper WireHarness (42)through theUpright.
- Page 6 Attach the Handlebar (39) to the Upright (2) with four M6 x 3OHm Button Screws (37). While another person holds the Console (4) near the Handlebar (39), connect the console wire harness to ConsoJe Wire the Upper Wire Harness (42). Next, connect the pulse Harness wire on the Console to the Pulse Wire (51) in the Handlebar.
- Page 7 9, AttachtheBackrest (8)totheSeatBracket ( 11)with fourM8x 41mmButton Bolts(45)andfourM8Nylon Locknuts ( 60),StartaHfour ButtonBolts andNylon Locknuts before you tighten any of them. 10, Attach the Seat (9) to the Seat Bracket (11) with four M6 x 16mm Button Screws (81) and four M6 Washers (75), 11, Attach the Seat Bracket (11) to the Seat Carriage (41) with four M8 x 19mm Button Screws (77) and four M8...
- Page 8 12. Identify the Left Pedal (22), which is marked with an "L." Using an adjustable wrench, firmly tighten Left Pedal counterclockwise into the Left Crank Stra Arm (24). Tighten the Right Pedal (not shown) clock- wise into the Right Crank Arm (not shown), important: Tighten both Pedals as firmly as possible.
- Page 9 CONSOLE DIAGRAM t ...... SPEED DISTANCE Interactive - Card - Workout - Technology OneTouch OnoTouoh Resistance Resistance FEATURES OF THE CONSOLE enables the console to accept iFIT Cards containing workout programs designed to help you achieve specif- The advanced console offers an array of features ic fitness goals.
- Page 10 The lower left corner of the display will show your HOW 3"0 USE THE MANUAL MODE pedaling speed, in miles or kilometers per hour. The upper right corner of the display will show Note: If there is a sheet of clear plastic on the face of your heart rate when you use the handgrip pulse the console, remove the plastic.
- Page 11 Turn on the fan if desired. Measure your heart rate if desired. tf there are To turn on the fan at high speed, press the Fan sheets of dear Contacts button, To turn on the fan at low speed, press the plastic on the Fan button a second time, To select the auto metal contacts...
- Page 12 As you exercise, you HOW TO USE A _RESET _ROGRAM will be prompted to _ _--Arrow keep your pedaling mU, J pace near the target SPEED Press any button on the console or begin pace setting for the pedaling to turn on the console. current segment.
- Page 13 HowTo USE AHEAR'r RATE F 'ROGRAM Heart rate program 2 is divided into 30 one= minute segments. One target heart rate setting is programmed for each segment. Note: The same target heart rate setting may be programmed for Press any button on the console or begin consecutive segments.
- Page 14 If you stop pedaling for several seconds, a series iHOWTOUSE AN IFIT PROGRAM of tones wiU sound and the program will pause, To restart the program, simply resume pedaling, The program will continue until the last segment of the Press any button on the consoJe or begin program ends, pedaling to turn on the eonsote.
- Page 15 MAINTENANCE AND TROUBLESHOOTING HANBGRIP PULSE SENSOR TROUBLESHOOTING Inspect and tighten all parts of the exercise cycle reg- ularly. Replace any worn parts immediately. If the handgrip pulse sensor does not function properly, To clean the exercise cycle, use a damp cloth and a see step 5 on page 11.
- Page 16 CONDmTmONmNG GUmDELmNES The following guidelines will help you to plan your During the first few minutes of exercise, your body exercise program, Remember that proper nutrition uses easily accessible carbohydrate calories for ener- and adequate rest are essential for successful results. gy, Only after the first few minutes of exercise does your body begin to use stored fat calories for energy, If your goal is to burn fat, adjust the intensity of your...
- Page 17 PART LIST-- Model No. NTEX4196.0 R100GA Key No. Qtyo Description Key No. Qtyo Description Frame M8 x 41mm Button Bolt Reed SwitchfWire Upright Drive Belt Eddy Mechanism Console Rear Stabilizer Endcap Crank Cover Foam Grip Accent Ring Flange Screw Pulse Wire Upright Knob Backrest M8 x 50mm Button Screw...
- Page 18 EXPLODED DRAWING A--Model No. NTEX4196.0 R100GA...
- Page 19 EXPLODED DRAWING B--Model No. NTEX4196.0 m00GA 17 63 24 28...
- Page 20 • the KEY NUMBER and DESCRIPTION of the part(s) (see the PART LIST on page 17) LIMITED WARRANTY WHAT IS COVERED--The entire NordicTrack exercise cycle ("Product") is warranted to be free of all defects in material and work- manship. WHO IS COVERED--The original purchaser or any person receiving the Product as a gift from the original purchaser.
Need help?
Do you have a question about the AudioStrider R400 NTEX4196.0 and is the answer not in the manual?
Questions and answers