Table of Contents
Advertisement
DTDIF-051601
Version:
Table of Contents
Introduction . . . . . . . . . . . . . . . . . . . . . . . . . . . . . . . . . . . . . . . . . . . . . . . . . . . . . . .3
What's in the Box? . . . . . . . . . . . . . . . . . . . . . . . . . . . . . . . . . . . . . . . . . . . . . . . . . .3
About the Delta TDIF PCI Audio Card . . . . . . . . . . . . . . . . . . . . . . . . . . . . . . . . . . .3
Product Features & Specifications . . . . . . . . . . . . . . . . . . . . . . . . . . . . . . . . . . . . . .4
Minimum System Requirements . . . . . . . . . . . . . . . . . . . . . . . . . . . . . . . . . . . . . . . .5
Delta TDIF PCI Audio Card: . . . . . . . . . . . . . . . . . . . . . . . . . . . . . . . . . . . . . . . . . .5
Delta TDIF PCI Breakout Cable: . . . . . . . . . . . . . . . . . . . . . . . . . . . . . . . . . . . . . . .6
Hardware Installation . . . . . . . . . . . . . . . . . . . . . . . . . . . . . . . . . . . . . . . . . . . . . . . .7
Delta Driver Software Installation . . . . . . . . . . . . . . . . . . . . . . . . . . . . . . . . . . . . . .8
Windows ME or 98 Installation . . . . . . . . . . . . . . . . . . . . . . . . . . . . . . . . .8
Windows 95 Installation . . . . . . . . . . . . . . . . . . . . . . . . . . . . . . . . . . . . . .9
Windows NT/2000 Installation . . . . . . . . . . . . . . . . . . . . . . . . . . . . . . . . .9
Macintosh Installation . . . . . . . . . . . . . . . . . . . . . . . . . . . . . . . . . . . . . . .10
Verifying Windows Driver Installation . . . . . . . . . . . . . . . . . . . . . . . . . . . . . . . . . .11
Verifying Delta Control Panel Software Installation, PC and Mac . . . . . . . . . . . . . .12
Delta System Basics . . . . . . . . . . . . . . . . . . . . . . . . . . . . . . . . . . . . . . . . . . . . . . . .12
Delta TDIF's Inputs/Outputs . . . . . . . . . . . . . . . . . . . . . . . . . . . . . . . . . .12
The Digital Monitor Mixer . . . . . . . . . . . . . . . . . . . . . . . . . . . . . . . . . . .13
The Patchbay / Router . . . . . . . . . . . . . . . . . . . . . . . . . . . . . . . . . . . . . . .14
Using the Delta TDIF with your Music Software Application . . . . . . . . . . . . . . . . .15
Delta TDIF Control Panel Software . . . . . . . . . . . . . . . . . . . . . . . . . . . . . . . . . . . .18
Monitor Mixer Page . . . . . . . . . . . . . . . . . . . . . . . . . . . . . . . . . . . . . . . .19
Patchbay/Router Page . . . . . . . . . . . . . . . . . . . . . . . . . . . . . . . . . . . . . . .22
Hardware Settings Page . . . . . . . . . . . . . . . . . . . . . . . . . . . . . . . . . . . . . .25
S/PDIF Page . . . . . . . . . . . . . . . . . . . . . . . . . . . . . . . . . . . . . . . . . . . . . .29
About Page . . . . . . . . . . . . . . . . . . . . . . . . . . . . . . . . . . . . . . . . . . . . . . .30
Save, Delete, Load Buttons; H/W Installed . . . . . . . . . . . . . . . . . . . . . . .30
Delta TDIF Recording Tutorials . . . . . . . . . . . . . . . . . . . . . . . . . . . . . . .31
Typical Setup #1 . . . . . . . . . . . . . . . . . . . . . . . . . . . . . . . . . . . . . . . . . . . . . . . . . . .32
Transferring from Tascam TDIF to Computer . . . . . . . . . . . . . . . . . . . . .32
Typical Setup #2 . . . . . . . . . . . . . . . . . . . . . . . . . . . . . . . . . . . . . . . . . . . . . . . . . . .36
Typical Setup #3 . . . . . . . . . . . . . . . . . . . . . . . . . . . . . . . . . . . . . . . . . . . . . . . . . . .40
Typical Setup #4 . . . . . . . . . . . . . . . . . . . . . . . . . . . . . . . . . . . . . . . . . . . . . . . . . . .44
Troubleshooting . . . . . . . . . . . . . . . . . . . . . . . . . . . . . . . . . . . . . . . . . . . . . . . . . . .51
Troubleshooting Tips for Frequently Asked Questions . . . . . . . . . . . . . . . . . . . . . .54
Appendix A - Technical Specs . . . . . . . . . . . . . . . . . . . . . . . . . . . . . . . . . . . . . . . .56
Appendix B . . . . . . . . . . . . . . . . . . . . . . . . . . . . . . . . . . . . . . . . . . . . . . . . . . . . . .57
Appendix C . . . . . . . . . . . . . . . . . . . . . . . . . . . . . . . . . . . . . . . . . . . . . . . . . . . . . .57
Limited Lifetime Warranty . . . . . . . . . . . . . . . . . . . . . . . . . . . . . . . . . . . . . . . . . . .58
Delta TDIF
. . . . . . . . . . . . . . . . . . . . . . . . . . . . . . . . . . . . . . . . . . .14
1
MANUAL
™
Advertisement
Table of Contents
Troubleshooting

Subscribe to Our Youtube Channel
Related Manuals for M-Audio Delta TDIF


Summary of Contents for M-Audio Delta TDIF
-
Page 1: Table Of Contents
Delta TDIF Control Panel Software ........18... -
Page 2: Introduction
Delta TDIF. The Delta TDIF PCI Audio Card is part of the Delta family of audio devices, and therefore enjoys the benefits of proven Delta technology, plus advanced and extensive Delta driver development. Once you’re up and running, you will quickly discover the power and brilliance in sound, quality and design, of your Delta TDIF PCI Audio Card. -
Page 3: Product Features & Specifications
You can record instruments or a stereo signal to the Delta TDIF’s Analog inputs, or record a digital audio signal from your DAT, MiniDisc, CD, or external A/D converter via the Delta TDIF’s S/PDIF input. -
Page 4: Minimum System Requirements
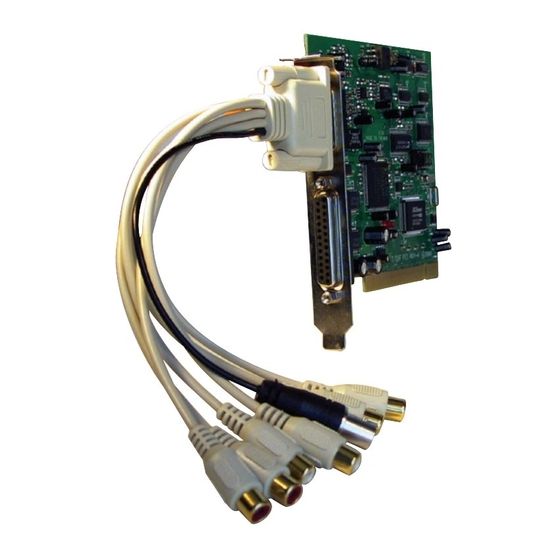
• UDMA EIDE or ATA 33/66. Delta TDIF PCI Audio Card: 1. Delta TDIF Audio Card: This is the PCI “host card” that installs into your computer’s PCI slot. 2. 15-pin D-sub connector: This 15-pin D-sub connector attaches to the supplied breakout cable, which provides additional I/O connectors. -
Page 5: Delta Tdif Pci Breakout Cable
3. Word Clock Out (black): This female BNC connector outputs a word clock signal that is in-sync with the present sample rate clock of the Delta TDIF. The output circuitry is designed to drive a word clock signal across 75-ohm coaxial cables and into a device with 75-ohm termination. -
Page 6: Hardware Installation
5 above. 8. Place the cover back on your computer. Now it is time to connect the Delta TDIF’s breakout cable to the PCI host card that you have just installed. Never attach the break-out cable with the computer turned on. -
Page 7: Delta Driver Software Installation
1. Unwrap the Delta TDIF breakout cable. Locate the 15-pin D-sub connector on the Delta TDIF PCI Host card. 2. Connect D-sub end of the breakout cable to the 15-pin D-sub connector on the Delta TDIF PCI Host card that now resides in your computer. Delta Driver Software Installation The Delta TDIF system includes a driver CD for Windows 98/95/NT and Macintosh, containing all drivers, and Delta Control Panel software. -
Page 8: Windows 95 Installation
CD drive and respond “Yes”. The system will restart and your Delta TDIF is ready for play. Windows 95 Installation 1. After installation of the Delta TDIF hardware, boot your system and start Windows. During the Windows boot procedure, new hardware will be automatically detected. -
Page 9: Macintosh Installation
Command (Apple key)+M. Then, drag the alias to the desktop. 4. With the Delta TDIF PCI card installed, restarting the computer will load the Delta TDIF extension. You will be able to visually see the Delta extension icon pass by as your system loads extension. -
Page 10: Verifying Windows Driver Installation
Panel | System | Device Manager. With the Device Manager displayed, click on the "+" next to "Sound, video and game controllers" to open a list of devices, the Delta TDIF being a device of that nature. Below is an example view of the Device Manager. -
Page 11: Verifying Delta Control Panel Software Installation, Pc And Mac
Installation, PC and Mac In Windows, open the Windows Control Panel (do so via Start | Settings | Control Panel ). If your Delta TDIF hardware and Delta Control Panel software are properly installed, the Windows Control Panel should display an "M Audio Delta H/W" icon. By double-clicking on that icon, you can launch the Delta Control Panel software. -
Page 12: The Digital Monitor Mixer
TDIF sample rate, whether that sample rate is derived from the Delta TDIF’s internal clock, S/PDIF input, or TDIF input. Analog jacks on the Delta TDIF breakout cable, two for input and two for output, are RCA phono type female jacks. Although the RCA jacks... -
Page 13: The Patchbay / Router
The reason for this is simple – a S/PDIF data stream coming from an external source is rarely going to be in sync with the Delta TDIF card (or other digital audio devices in the system for that matter), even if the sample rates are set the same. -
Page 14: Using The Delta Tdif With Your Music Software Application
TDIF digital audio to the Delta TDIF card may be "locked" to the word clock emitted from the Delta TDIF card. In these cases, the Delta TDIF and the external TDIF device are in- sync, and the TDIF data would therefore be in-sync with the Delta TDIF system when the Delta TDIF card is set to “Internal Xtal.”... - Page 15 “active” input must be selected in the control panel). The “Mon. Mixer” device allows stereo recording from the digital "monitor" mixer built-into the Delta TDIF card. The audio data recorded from this device is the mix of input and output streams that is set up in the Delta Control Panel software’s Monitor Mixer (see Delta...
- Page 16 (i.e., “Sound Manager”). The Delta TDIF Audio Card is by nature a multichannel card. You can see how using only the Sound Manager drivers can be limiting. Therefore, we recommend the use of a music program that is ASIO compliant.
-
Page 17: Delta Tdif Control Panel Software
Delta TDIF as its default audio device, allowing system sounds to be sent out the Delta TDIF. This also enables you to use the Delta TDIF with the sound applets included with Windows. To set this up, go to Control Panel | Multimedia. -
Page 18: Monitor Mixer Page
Monitor Mixer Page The Monitor Mixer is the first page that appears when the Delta Control Panel is opened, and controls the digital mixer built into the Delta TDIF’s PCI controller chip. As described in previous sections, the output of this... - Page 19 The Monitor Mixer Page is essentially a collection of volume level faders, audio level (or ‘peak’) meters, and solo/mute controls. For each mixer output and input channel there is one of each: a volume fader, a peak meter, a solo control, and a mute control. LEVEL FADERS: Each volume fader may be controlled by dragging the fader ‘handle’...
- Page 20 (you might use the monitoring capability of the Delta TDIF to let your ears be the judge). On all output level meters, 0dB indicates full-scale output. Unlike the inputs, clipping is impossible on the outputs because of the 36-bit resolution built into the mixer hardware.
-
Page 21: Patchbay/Router Page
TDIF’s hardware outputs (4 pairs of TDIF outputs and 1 pair of analog output channels that is identical to the S/PDIF digital output) to specific audio sources within the Delta TDIF board. To display this page, click the "Patchbay/Router" tab of the Delta Control Panel. - Page 22 "Monitor Mixer Page". 3. The third option, "SP/ANA In", connects TDIF ports OUT1 and OUT2 directly to the hardware Analog or S/PDIF inputs on the Delta TDIF PCI host card (whichever input is selected in the Hardware Settings page will be the active input).
- Page 23 S/PDIF outputs on your Delta TDIF PCI host card’s breakout cable. 2. The second option, "Monitor Mixer", connects the Analog and S/PDIF Out ports to the outputs of the Delta TDIF monitor mixer. For more information on the capabilities of the monitor mixer, please see the section "Monitor Mixer Page".
-
Page 24: Hardware Settings Page
Patchbay/Router columns. Hardware Settings Page The Hardware Settings page of the Delta Control Panel gives you control over miscellaneous features of the Delta TDIF PCI Audio Card. display this page, click the "Hardware Settings" tab of the Delta Control Panel. - Page 25 This means that any application that attempts to open the Delta TDIF driver at a sample rate other than the one selected here will fail to do so and will post an error message.
- Page 26 This buffer size must be set in the Delta Control Panel before you launch your music software. When using ASIO with the Delta TDIF, set the buffer size in the control panel, then exit the control panel. After doing so, launch your music software.
- Page 27 With the Sound control panel set to built-in, these Sound Manager settings in the Delta Control Panel will have no effect. The Sound Manager driver limits you to using only one of the Delta TDIF stereo input pairs for audio input and only one of the stereo output pairs for output.
-
Page 28: S/Pdif Page
"S/PDIF" tab of the Delta Control Panel software. DIGITAL INPUT: This group box displays the current S/PDIF input status. The Delta TDIF’s S/PDIF receiver is capable of recognizing a valid input signal versus an invalid, corrupt or non-present one. When a valid signal is detected at S/PDIF In, this group box displays "Valid Input Detected."... -
Page 29: About Page
to successfully record the audio data. Different manufacturers’ products may interpret these codes differently and require you to set these bits by "trial-and-error" until proper operation is achieved. CONSUMER FORMAT ADVANCED SETTINGS (Emphasis): This status bit is used to indicate if pre-emphasis has been applied to the outgoing digital audio signal. -
Page 30: Delta Tdif Recording Tutorials
In this section we will explore a few sample setups for recording and playback using the Delta TDIF PCI Audio Card. This is by no means an exhaustive tutorial but its intent is to help you understand most of the Delta TDIF’s feature set. -
Page 31: Typical Setup #1
Typical Setup #1 Let’s look at a setup that involves a typical transfer of information from TDIF to computer, and back to TDIF. Here, we’ll be using the Delta TDIF Audio Card’s 25-pin TDIF I/O, plus the analog output stereo pair for monitoring. - Page 32 (see section “Hardware Settings Page”). 3. Because you will be recording from the TDIF input, you will need to set up the Delta TDIF to synchronize its master clock with the TDIF input. To do this, open the Hardware Settings page of the control panel software.
- Page 33 TDIF,” then “PCM In Left 3/4,” “PCM In Right 3/4,” etc. If you are using ASIO, these input devices will appear with different names. Consult the section, “Using the Delta TDIF With Your Music Software.” 8. Start your software recording and then start your Tascam multitrack material playing.
-
Page 34: Transferring From Computer To Tascam Tdif, Monitoring With Dat
3. Because you will be playing back at the recorded sample rate, you will want to set the Delta TDIF’s master clock to use the internal crystal. Do this by opening the Hardware Settings page of the Delta Control Panel software and under Master Clock, selecting "Internal Xtal."... -
Page 35: Typical Setup #2
Tascam outputs, and consequently at the Delta TDIF inputs. Because of this, we can monitor in a similar fashion to our Tascam to Delta TDIF setup, which is described in the first part of this tutorial. - Page 36 We have 8-busses in our digital mixer, and the TDIF connection on the Delta TDIF PCI Audio Card is capable of eight audio input and output streams. The guitar and bass will take up two of these streams, so we have six left for the drums (we could have used just six mics, but we’re not limited to that if we combine some of the drum...
- Page 37 H/W Out 1/2 (the leftmost column), select H/W In 1/2 as the source. Doing so will allow you to monitor the digital mixer’s buss out 1 and 2 through the Delta TDIF hardware inputs, and back to the digital mixer’s tape returns. On H/W Out 3/4 select H/W In 3/4 as the source, set H/W Out 5/6 to H/W In 5/6, and set H/W Out 7/8 to H/W In 7/8 as their monitoring sources.
- Page 38 See Appendix C for more information on this, and other choices you may have for synchronizing the Delta TDIF with your digital mixer. We suggest that you use the Delta TDIF’s Wordclock output on the breakout cable to send clock to the digital mixer (if it has wordclock input), and set the external sync in the digital mixer to receive its clock from the wordclock input.
-
Page 39: Typical Setup #3
Typical Setup #3 Let’s look at a setup that involves a typical transfer of information from DAT to computer and back to DAT. Here, we’ll be using the Delta TDIF’s S/PDIF I/O, plus the analog output stereo pair. NOTE: Because improper connections can potentially make very loud noises, it’s a good idea to have monitor levels down while... - Page 40 In this example, we will connect a DAT to the Delta TDIF’s breakout cable using coaxial S/PDIF cables (75-ohm impedance RCA-to-RCA). We’ll also connect the Delta TDIF’s analog outputs to a sound system for monitoring purposes. A setup like this might be used to transfer a number of mixes from a DAT into an audio editing program, performing the appropriate edits, and then transferring the edited material back to DAT.
- Page 41 Once this assignment is made, you may play the DAT material at any time and verify that the signal is making it into the Delta TDIF successfully. This can be done regardless of whether or not your recording software is open.
- Page 42 6. Within your recording software, select "SP/ANA In Delta-TDIF," as the audio input device. The Delta input appears as a stereo pair, or as left and right inputs (see the section, “Using the Delta TDIF with your Music Software Application”).
-
Page 43: Typical Setup #4
The pre-amp and direct box are required for the mic and guitar. Many instruments, such as MIDI modules or keyboards, may be connected directly to the Delta TDIF’s analog inputs. NOTE: Because improper connections may potentially make very loud noises, it’s a good idea to have all monitor levels set low or muted while hooking up audio equipment -- you may even choose to turn your computer off before making the connections. - Page 44 1. Plug the guitar into the channel-1 Line input of the pre-amp. Plug the microphone into the channel-2 Mic input. 2. Plug the outputs 1 & 2 of the pre-amp into the Delta TDIF’s analog inputs. Use a high quality shielded cable with a 1/4” phone plug on one end, and a male RCA plug on the other.
- Page 45 7. Under "CODEC Sample Rate," verify that the "Rate Locked" checkbox is not activated. This will allow your application software to set the Delta TDIF sample rate as it pleases. 8. Since this example will include the use of the monitor mixer, we will activate the "Reset Rate When Idle"...
- Page 46 Now click on the Delta Control Panel’s "Patchbay/Router" tab. In the very last column of the Patchbay/Router page, click the radio button "Monitor Mixer" to connect the monitor mixer’s stereo output directly to Delta analog outputs. Now, everything that we hear at the analog outputs will reflect our settings in the Monitor Mixer page.
- Page 47 These are not to be confused with the levels that are recorded by the software – these levels are merely monitor levels that appear in the mixer outputs (in this case at the Delta TDIF analog outs). Click on the left fader handle of H/W In SP/ANA, and drag it about halfway up.
- Page 48 17. When you are done playing, stop the recording software and rewind the take. Before playing back what you’ve recorded, you will need to assign the recorded tracks to output devices on the Delta TDIF. Note: For efficiency’s sake, this step could have taken place while you were setting up the recording track assignments.
- Page 49 21. When you are done playing, stop the recording software and rewind the take. Before playing back what you’ve recorded, you will need to assign the newly recorded tracks to output devices on the Delta TDIF. You could have all four recorded tracks playing to the same software outputs, namely the SP/ANA output, but you can also choose other outputs like H/W Out 1/2.
-
Page 50: Troubleshooting
(or software acting as “virtual” hardware) in the system. The Delta TDIF has been carefully designed to minimize the number of resources consumed (it requires just one IRQ and does not require any DMA channel resources). It is also capable of sharing an IRQ in some cases. - Page 51 One of the quickest ways to change the resources assigned to a PCI card like the Delta TDIF is to merely relocate the card to another PCI slot. With the computer’s power off, remove the Delta TDIF from its current PCI slot, move it to another available PCI slot, and turn your computer back on.
- Page 52 Delta TDIF) is normal. If you see another device showing up on the same IRQ as the Delta TDIF (such as a video card, SCSI adapter, or USB Host Controller), then it is possible that this is the source of the conflict.
-
Page 53: Troubleshooting Tips For Frequently Asked Questions
Possible Cause 5: Improper connections of the audio accessories. Verify that the Delta TDIF analog audio outputs are properly connected to a mix deck or external mixer/amplifier, that the S/PDIF Out is connected to an external digital audio device capable of receiving S/PDIF, or that the TDIF connector is connected to an external digital audio device capable of receiving TDIF. - Page 54 Possible Cause 1: Input levels are too "hot," causing clipping or input distortion. Make sure you have the proper signal levels set on the inputs to the Delta TDIF. If you find that you are still clipping, you will need to turn down the audio at the source.
- Page 55 Possible Cause: The current Delta TDIF sample rate is too low. The monitor mixer is a digital device that runs at the current sample rate of the Delta TDIF board.
-
Page 56: Appendix A - Technical Specs
Appendix A - Technical Specs Analog Audio Peak Analog Signal: +2dBV(consumer setting), -2dBV(-10 setting). THD: less than 0.002% @ 0dBFS Freq. Response: 22Hz-44kHz, -0.4,-0.4dB (96kHz sample rate) Dynamic Range (a-weighted): D/A 104.0dB, A/D 100.4dB Input Impedance: 10k ohms minimum. Connectors: Gold-plated RCA female, on break-out cable. -
Page 57: Appendix B
Appendix B Please check our website, www.m-audio.com, for Appendix B. Go to the Tips and Tricks section and look for Delta TDIF. Appendix C Please check our website, www.m-audio.com, for Appendix B. Go to the Tips and Tricks section and look for Delta TDIF. -
Page 58: Limited Lifetime Warranty
Limited Lifetime Warranty MIDIMAN warrants that this product is free of defects in materials and workmanship under normal use so long as the product is: owned by the original purchaser; the original purchaser has proof of purchase from an authorized MIDIMAN dealer;...
Need help?
Do you have a question about the Delta TDIF and is the answer not in the manual?
Questions and answers