Table of Contents
Advertisement
Advertisement
Table of Contents

Related Manuals for La Crosse Technology WS-9117U-IT


Summary of Contents for La Crosse Technology WS-9117U-IT
- Page 1 WS-9117U-IT Wireless 915 MHz Temperature Station Instruction Manual...
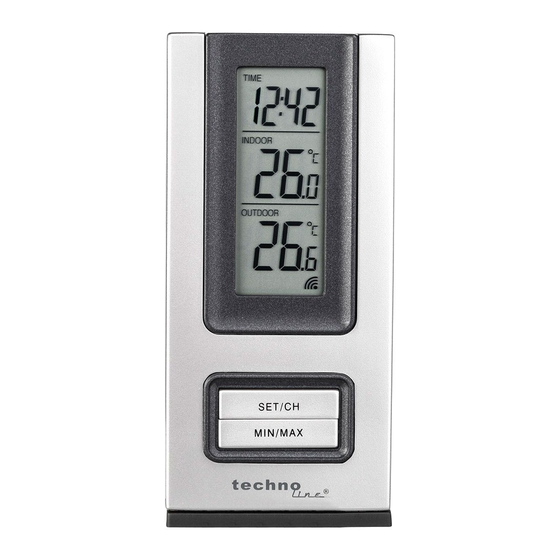
- Page 2 TABLE OF CONTENTS Topic Page Inventory of Contents Quick Setup Detailed Setup Guide Battery Installation Setting the Time Features Minimum and Maximum Temperatures Resetting Minimum and Maximum Temperatures Additional remote temperature sensors (optional) Mounting Troubleshooting Maintenance and Care Specifications Warranty Information...
-
Page 3: Inventory Of Contents
This product offers: INSTANT TRANSMISSION is the state-of- the-art wireless transmission technology, exclusively designed developed by LA CROSSE TECHNOLOGY. INSTANT TRANSMISSION offers you an immediate update (every 4 seconds!) of all your outdoor data measured from the transmitters: follow your climatic... -
Page 4: Quick Setup
Figure 1 Figure 2 ADDITIONAL EQUIPMENT (not included) 1 Philips screwdriver. 2 Fresh AAA 1.5V batteries. 2 Fresh AA 1.5V batteries QUICK SETUP Hint: Use good quality Alkaline Batteries and avoid rechargeable batteries. Have the indoor temperature station and remote temperature sensor 3 to 5 feet apart. - Page 5 Place the batteries into the remote temperature sensor first then into the indoor temperature station. (All remote temperature sensors must be started before the indoor temperature station) DO NOT PRESS ANY BUTTONS FOR 15 MINUTES. In this time the indoor temperature station and remote temperature sensor will start to talk to each other and the display will show both the indoor temperature and an outdoor...
- Page 6 walls, floors, ceilings, thick trees, etc.) will effectively cut signal range in half. Example: A wireless weather station with a 330 feet range is mounted on an interior wall, so that the signal has to pass through one interior wall, one exterior wall, and across the 10 feet width of the room between the 2 walls.
-
Page 7: Complete The Set Up
To complete the set up of your indoor temperature station after the 15 minutes have passed please follow the steps below. Press and hold the “SET/CH” button for 5 seconds. Note: A “12h” or “24h” will appear on the top line. (“12h” for AM/PM, “24h” for military time) To change between “12h”... -
Page 8: Battery Installation
When the correct hour is shown, press and release the “SET/CH” button once. Press and release the SET button once more and you are done. DETAILED SETUP GUIDE BATTERY INSTALLATION - When one Temperature sensor is being used First, insert the batteries to the Temperature sensor (see “A. -
Page 9: Remote Temperature Sensor
temperature and humidity should then be displayed on the Temperature Station. If this does not happen after 2 minutes, the batteries will need to be removed from both units and reset from step 1 and the signal reception icon is no longer shown. REMOTE TEMPERATURE SENSOR Remove the mounting... - Page 10 a. Remove the battery cover on the backside. To do this, push up and pull out. Battery Cover b. Observing the correct polarity, install 2 AAA batteries. Replace battery cover. d. Wait 15 minutes to allow both the indoor and outdoor temperatures are shown on the indoor temperature station.
- Page 11 Sensor signal reception icon * * When the signal is successfully received by the Temperature Station, the icon will be switched on. (If not successful, the icon will not be shown in LCD) So the user can easily see whether the last reception was successful (icon on) or not (icon off).
-
Page 12: Setting The Time
910MHz. This will also be done for re- synchronization. SETTING THE TIME Press and hold the “SET/CH” button for 5 second, “12h” will appear in the TIME LCD. Press and release the “MIN/MAX” button to select either 12h time (am/pm) or 24h time Press and release the “SET/CH”... - Page 13 there is no display here it is AM. Make sure you set the time accordingly. Note: if “12h” is selected, the temperature is displayed in degree Fahrenheit. If “24h” is selected, the temperature is displayed in degree Celsius FEATURES MINIMUM & MAXIMUM TEMPERATURES Press and release the “MIN/MAX”...
- Page 14 ADDING ADDITIONAL REMOTE SENSORS (OPTIONAL) The WS-9117U-IT is able to receive signals from 2 additional temperature sensors. The following are instructions for the set-up of temperature sensor units with the WS-9117U- IT. These extra sensors can be purchased through the same dealer as this unit.
- Page 15 this does not happen and the signal reception icon is not shown, after 2 minutes, the batteries will need to be removed from both units and reset from step 1. Insert the batteries to the second sensor as soon as the outdoor temperature readings from the first sensor are displayed on the Temperature station.
- Page 16 received. If this is not happen, user shall restart the setting up from step 1. NOTE: You must insert the batteries into the third sensor within 45 seconds of reception of the second sensor. IMPORTANT: Transmission problems will arise if the setting for multiple sensors is not followed as described above.
- Page 17 button will toggle through the minimum and maximum indoor temperature, and the minimum and maximum outdoor temperature. To reset the Minimum/Maximum readings, press and hold the “MIN/MAX” button for four seconds. MOUNTING Note: To achieve a true temperature reading, avoid mounting in direct sunlight. We recommend that you mount the remote temperature sensor on an outside North- facing wall.
- Page 18 To wall mount: Remove the mounting bracket from the temperature sensor. Mount using either screws or adhesive tape. Reattach the temperature sensor to the mounting bracket. THE TEMPERATURE STATION The indoor temperature station comes with the table stand already mounted. If you wish to use the table-stand, all that is required is to place the indoor temperature station in an appropriate...
-
Page 19: Troubleshooting
TROUBLESHOOTING NOTE: For problems not solved, please contact La Crosse Technology via e-mail or phone, or visit our website, www.lacrossetechnology.com Problem: The LCD is faint Solution: Replace batteries Problem: No outdoor temperature I displayed. Solution: 1) Remove all batteries, reinsert into remote temperature sensor first, and then into the indoor temperature station. -
Page 20: Maintenance And Care
conditions; so two temperature sensors could be as much as 2 degrees different. However, the difference can be exaggerated further because the temperature sensors are designed for different working environments. The indoor sensor is less responsive to ambient air currents because of the shielding effect of the display's case. -
Page 21: Specifications
Do not subject the units to unnecessary heat or cold by placing them in the oven or freezer. Opening the casings invalidates the warranty. Do not try to repair the unit. Contact La Crosse Technology for repairs. SPECIFICATIONS Transmitting 915MHz... -
Page 22: Warranty Information
(128.3 x 38.2 x 21.2 mm) Sensor Battery life Approximately 24 months WARRANTY INFORMATION La Crosse Technology, Ltd provides a 1-year limited warranty on this product against manufacturing defects in materials and workmanship. This limited warranty begins on the original... - Page 23 Crosse Technology, Ltd. Replacement parts and products assume the remaining original warranty, or ninety (90) days, whichever is longer. La Crosse Technology, Ltd will pay all expenses for labor and materials for all repairs covered by this warranty. If necessary...
- Page 24 La Crosse Technology, Ltd product to a La Crosse Technology, Ltd authorized service center. La Crosse Technology, Ltd will pay ground return shipping charges to the owner of the product to a USA address only.
- Page 25 LA CROSSE TECHNOLOGY, LTD WILL NOT ASSUME LIABILITY FOR INCIDENTAL, CONSEQUENTIAL, PUNITIVE, OR OTHER SIMILAR DAMAGES ASSOCIATED WITH THE OPERATION OR MALFUNCTION OF THIS PRODUCT.
- Page 26 La Crosse Technology 2809 Losey Blvd. S. La Crosse, WI 54601 Phone: 608.782.1610 Fax: 608.796.1020 e-mail: support@lacrossetechnology.com (warranty work) sales@lacrossetechnology.com (information on other products) web: www.lacrossetechnology.com Questions? Instructions? Please visit: www.lacrossetechnology.com/9117 All rights reserved. This handbook must not be reproduced in any form, even in excerpts,...
- Page 27 corrections made in the next issue. We accept no liability for technical mistakes or printing errors, or their consequences. All trademarks and patents are acknowledged. FCC ID: OMOTX29U (transmitter) RF Exposure mobile: The internal / external antennas used for this mobile transmitter must provide a separation distance of at least 20 cm (8 inches) from all persons and must not be co-located or...
- Page 28 NOTE: This equipment has been tested and found to comply with the limits for a Class B digital device, pursuant to Part 15 of the FCC Rules. These limits are designed to provide reasonable protection against harmful interference in a residential installation. This equipment generates, uses and can radiate radio frequency energy and, if not installed and used in accordance with the instructions,...
Need help?
Do you have a question about the WS-9117U-IT and is the answer not in the manual?
Questions and answers