Roland MC-808 Owner's Manual
Hide thumbs
Also See for MC-808:
- Owner's manual (1 page) ,
- Attachment manual (2 pages) ,
- Sound list (68 pages)
Table of Contents
Advertisement
Quick Links
Owner's Manual
Thank you, and congratulations on your choice of the Roland MC-808 Sampling Groovebox.
201a
Before using this unit, carefully read the sections entitled: "USING THE UNIT SAFELY" and
"IMPORTANT NOTES" (pp. 10–13). These sections provide important information concerning the
proper operation of the unit. Additionally, in order to feel assured that you have gained a good
grasp of every feature provided by your new unit, Owner's manual should be read in its entirety. The
manual should be saved and kept on hand as a convenient reference.
Convention used in this manual
• Words enclosed in square brackets indicate buttons on the panel.
• (p. **) indicates a reference page.
985
* The explanations in this manual include illustrations that depict what should typically be shown by the
display. Note, however, that your unit may incorporate a newer, enhanced version of the system (e.g., includes
newer sounds), so what you actually see in the display may not always match what appears in the manual.
202
Copyright © 2006 ROLAND CORPORATION
All rights reserved. No part of this publication may be reproduced in any form without the
written permission of ROLAND CORPORATION.
Advertisement
Table of Contents

Related Manuals for Roland MC-808


Summary of Contents for Roland MC-808
- Page 1 Owner’s Manual Thank you, and congratulations on your choice of the Roland MC-808 Sampling Groovebox. 201a Before using this unit, carefully read the sections entitled: “USING THE UNIT SAFELY” and “IMPORTANT NOTES” (pp. 10–13). These sections provide important information concerning the proper operation of the unit.
-
Page 3: Main Features
516 MB of sample MC-808 gives you a total package that’s easy to understand and memory (102 minutes of monaural sampling). easy to use. -
Page 4: Table Of Contents
2-0 Preparing an empty pattern ......................29 2-1 Selecting a sound (patch) ........................29 2-2 Using the MC-808’s sounds to create a pattern ................30 2-3 Making effect settings for each part ....................36 2-4 Adjusting the volume balance and pan of the parts ..............36 2-5 Adding a final polish to the pattern (Mastering) ................ - Page 5 Contents Pattern Mode ...........41 Playing patterns ..................42 Selecting and playing a pattern ......................42 Basic playback operation ......................43 Changing the BPM (Tempo)......................44 Viewing the number of measures in a pattern ................. 44 Turning the metronome (click) on/off..................44 Muting a pattern ............................
- Page 6 Contents Editing patterns (Pattern Edit) .............70 Basic procedure for pattern editing ....................... 70 Copying a portion of a pattern (COPY) ..................71 Erasing unwanted performance data (ERASE) ................ 71 Deleting unwanted measures (DELETE)................... 72 Inserting blank measures (INSERT) ................... 72 Transposing the pitch (TRANSPOSE)..................
- Page 7 Contents Patch/Sample Mode.........85 Editing patches (Patch Edit) ..............86 How a patch is organized........................86 How a tone is organized ......................86 Selecting a patch ............................87 Types of patch..........................87 Selecting a patch ..........................87 Selecting patches by category (Category Lock) ................ 88 Patch editing procedure ..........................
- Page 8 Contents Song Mode ..........105 Playing songs..................106 Playing a song ............................106 Basic playback operation ......................106 Song reset ............................. 106 Selecting a song to play ......................106 Changing the BPM or mute status.................... 106 Recording a song................107 Recording procedure ........................107 Editing the setup parameters ....................
- Page 9 Exchanging MIDI messages with your computer (MIDI mode)............. 136 Driver installation and settings....................136 Using MC-808 editor ................137 Installing MC-808 editor into your computer ..................137 Making connections ..........................137 About PC Mode ............................137 MC-808 editor system requirements ....................138 System requirements (Windows) .....................
-
Page 10: Using The Unit Safely
(except when this manual provides specific instructions directing you to do so). Refer • This unit, either alone or in combination with an all servicing to your retailer, the nearest Roland amplifier and headphones or speakers, may be Service Center, or an authorized Roland capable of producing sound levels that could distributor, as listed on the “Information”... - Page 11 Roland Service Center, their proper ventilation. or an authorized Roland distributor, as listed on ......................102c the “Information” page when: •...
-
Page 12: Important Notes
• Use a cable from Roland to make the connection. If using some • Depending on the material and temperature of the surface on other make of connection cable, please note the following precau- which you place the unit, its rubber feet may discolor or mar the tions. - Page 13 ™ * Roland Corporation is an authorized licensee of the CompactFlash The sound recordings contained in this product are the original works of Roland Corporation. Roland is not responsible for the use of and CF logo ( ) trademarks. the sound recordings contained in this product, and assumes no liability for any infringement of any copyright of any third party arising out of use of the sounds, phrases and patterns in this product.
-
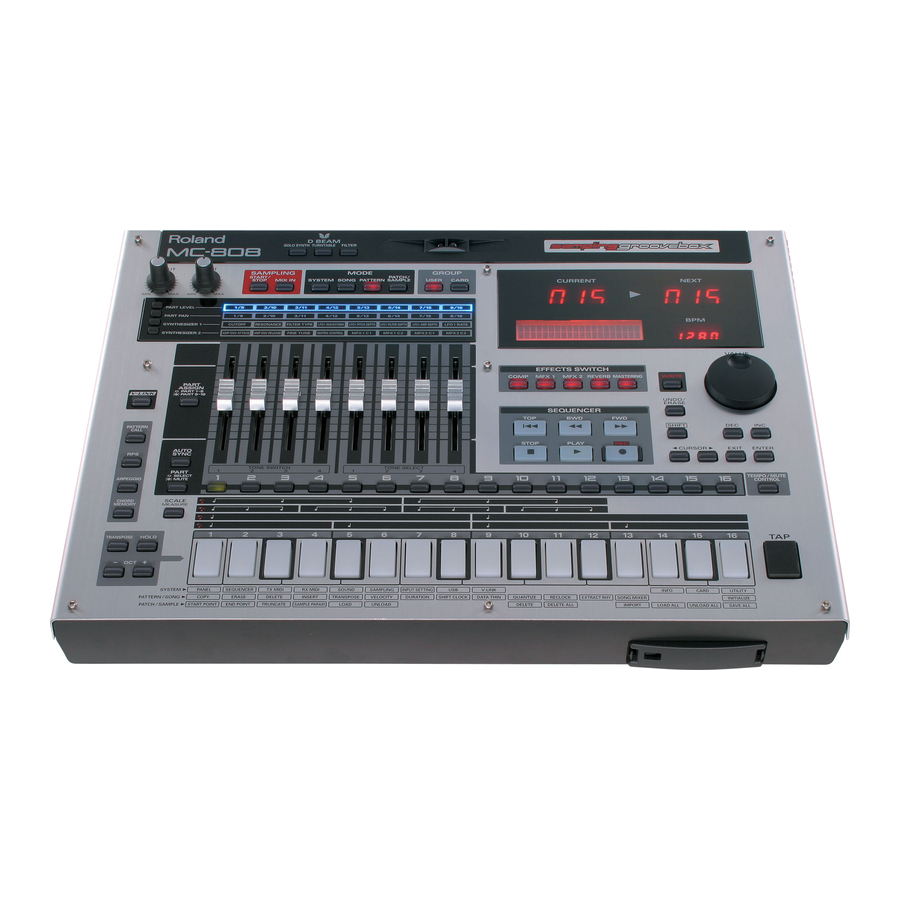
Page 14: Panel Descriptions
Panel descriptions Top panel fig.panel_j-001 MODE D BEAM [SYSTEM] Switches the MC-808 to System mode (p. Switches the D BEAM on/off. D BEAM 118). (D Beam Control- You can modify the patterns or sounds by lers) passing your hand over these (p. 58). - Page 15 Panel descriptions [V-LINK] Switches V-LINK on/off (p. 129). CURRENT display Indicates the currently playing pattern (p. 42). [PATTERN CALL] After pressing this button, you can use the keyboard pads to select patterns (p. 49). NEXT display Indicates the pattern that will play next (p.
-
Page 16: Rear Panel
This connector lets you use a USB cable USB connector to connect your computer to the MC-808 (p. 132). Ground termi- Depending on the circumstances of a partic-... -
Page 17: Getting Ready
Making connections The MC-808 is not equipped with an internal amp or speakers. To hear sound, you will need to connect it to a keyboard amp or audio system, or connect headphones. Refer to the following figure when connecting the MC-808 with external devices. -
Page 18: Turning On/Off The Power
By turning on devices in the wrong order, you risk causing malfunction and/or damage to speakers The MC-808’s power must be off when you insert or remove the and other devices. CompactFlash card. If you insert or remove the card with the... - Page 19 Getting ready Preventing theft of the CompactFlash card A card protector for preventing theft of the CompactFlash card is included with the MC-808. You can install the card protector as follows. Insert the CompactFlash card into the memory card slot.
-
Page 20: An Overview Of The Mc-808
An overview of the MC-808 The MC-808’s four modes The MC-808 has four modes. You’ll switch between these modes depending on how you want to play the MC-808 or according to the operations you want to perform. fig.02-004.e Pattern mode (p. 41) Song mode (p. -
Page 21: The Structure Of The Sounds
CD as “samples.” * Assign a patch to each part. The MC-808 lets you change the pitch of a sampled sound, A pattern contains 1–998 measures of performance data that apply a filter to it, or modify its envelope, treating sampled plays the sounds (patches or rhythm sets) of up to sixteen parts. -
Page 22: About The Sequencer Section
“pattern sequencer.” Recording and playing back your performance The MC-808 contains 256 preset patterns. You can enjoy pattern playback simply by playing back these patterns. You can also create original patterns, either starting from a preset pattern or completely from scratch. -
Page 23: About The Motorized Faders
An overview of the MC-808 About the motorized faders Saving your data The MC-808 lets you use the eight motorized faders to control the After editing settings or recording a performance, you must save volume, panning, etc. of each part in real time. -
Page 24: Basic Operation Of The Mc-808
Basic operation of the MC-808 Adjusting the display contrast Modifying a value (LCD Contrast) Use the VALUE dial to make large changes in a value, or use the [INC] [DEC] to change a value in steps of one. If you find the display difficult to read, use the following procedure An underline character is shown under the location where you can to adjust the display contrast. -
Page 25: Canceling The Previous Action (Undo/Redo)
(Factory Reset) “Undo” means to return the modified performance data to the state Here’s how to restore the settings of the MC-808 to their factory-set state. prior to your most recent change, and “Redo” means to cancel the Undo operation so that your change is re-applied. -
Page 27: Quick Start
Reference pages are given for each item, so you can easily look up the details when you’re ready to learn more. We hope this will help you grasp the essentials of the MC-808. -
Page 28: Listening To Patterns
1. Listening to patterns The MC-808 provides approximately 256 patterns containing carefully selected sounds from a wide range of categories. All of them were newly created by artists that are active in today’s music scene. The patterns are categorized by artist. -
Page 29: Creating An Original Pattern
2. Creating an original pattern Now let’s try creating an original pattern. 2-1 Selecting a sound (patch) In this example we’re going to use the MC-808’s sequencer function to create a four-measure pattern. On the MC-808, a “pattern” consists of sixteen “parts.” When you change the patch used by a pattern, you’re specifying “which patch... -
Page 30: Using The Mc-808'S Sounds To Create A Pattern
2. Creating an original pattern Press the keyboard pads to make 1, 5, 9, and 13 light. fig.qs-010 2-2 Using the MC-808’s sounds to create a pattern You can also use the Undo function (p. 25). Enter the closed hi-hat 2-2-1 Using TR-REC to enter the rhythm Select the closed hi-hat “B 4.”... - Page 31 (in this case, a rest) you enter. On the MC-808, one beat is 480 ticks. You’ll be in standby mode for step recording. fig.qs-018-1_50 Press keyboard pad 2 “C1,” pad 14 “C2,” and pad 14 “C2.”...
-
Page 32: Using The Arpeggio Function
2. Creating an original pattern 2-2-3 Turning one measure of data 2-2-4 Using the Arpeggio function into four measures (Copy) for realtime recording It’s convenient to use the Copy function (p. 71) when you need to By using the Arpeggio function (p. 53) you can play a complex repeat the same data. - Page 33 2. Creating an original pattern Stop recording 2-2-5 Using the Chord Memory Press [STOP] to stop recording. function for realtime recording Press [CHORD MEMORY] to turn off its illumination. By using the Chord Memory function (p. 56) you can play complex chords in real time with a single finger.
- Page 34 Prepare for recording Connect your external keyboard. Use a MIDI cable to make connections as follows. Select part 11. fig.qs-040.e MC-808 Press [REC]. The recording menu screen will appear. MIDI IN Use [CURSOR ] to select “TR-Rec,” and press [ENTER].
- Page 35 2. Creating an original pattern Stop recording 2-2-8 Entering other phrases Press [STOP] to stop recording. Recording the fader movement As desired, you may wish to enter phrases like the following to part 6. fig.qs-041_90 Next, you’ll use the fader to record a volume change in real time. Press [PART LEVEL].
-
Page 36: Making Effect Settings For Each Part
2. Creating an original pattern 2-3 Making effect settings 2-4 Adjusting the volume for each part balance and pan of the parts For each part, you can edit the Output Assign setting to specify whether that part will be sent through an effect. Next, we’ll play back the pattern, and adjust the volume and pan Here we’re going to apply a multi-effect to part 3. -
Page 37: Adding A Final Polish To The Pattern (Mastering)
The mastering effect is applied to the entire MC-808. It is not a You can create a song by connecting patterns in this way. -
Page 38: Other: Using Audio Phrases To Create Patterns
“Adjusting the Mix In settings” (p. 57) Importing an external sample (Import Audio) If you have audio phrases (.WAV or .AIF files) you obtained from the Web or a CD-ROM, you can import these files into the MC-808. “Importing WAV/AIFF data (IMPORT)” (p. 100) -
Page 39: Other: Creating Original Sounds
2. Creating an original pattern Other: Creating original sounds The MC-808 has motorized faders that show the current settings at a glance, and these faders will move to follow changes in the settings in real time. This simplifies operation, and makes it easy to edit sounds. -
Page 40: Playing Patterns
DJ mix. In addition to cutoff and resonance, the MC-808 provides multi- effects that can transform a sound into a completely different one. -
Page 41: Pattern Mode
Pattern Mode In this mode you can play, record, and edit patterns. -
Page 42: Playing Patterns
Press [STOP] to stop pattern playback. * When the MC-808 is shipped from the factory, there are some patterns that contain no data (EMPTY PATTERN). If you select an empty Press either [USER] or [CARD] to select the desired group. -
Page 43: Basic Playback Operation
* Press [STOP] twice to return to the beginning of the pattern. On the MC-808, settings for the following parameters are stored individually with each pattern. When you play back patterns successively, the settings of these parameters will also change each time the pattern changes. -
Page 44: Changing The Bpm (Tempo)
Playing patterns Changing the BPM (Tempo) Viewing the number of measures in a pattern BPM stands for Beats Per Minute, and indicates the number of quarter-note beats in each minute. Here’s how you can view the total number of measures in the current pattern and check the current playback location. -
Page 45: Muting A Pattern
Playing patterns Muting a pattern A pattern contains sixteen parts. You can mute each part or rhythm tone in real time. Muting a specific part (Part Mute) Various ways to mute fig.03-011 Playing the next pattern with the current mute settings preserved (Mute Remain) Here’s how you can preserve the current mute settings when you play the next pattern. -
Page 46: Using The Motorized Faders To Edit The Pattern Settings
Using the motorized faders to edit the pattern settings You can use the MC-808’s eight motorized faders to adjust settings such as volume and pan for each part in real time. Of course you can also record fader movements into the pattern (p. 65). -
Page 47: Transposing During Playback (Realtime Transpose)
Playing patterns Transposing during playback (Realtime Transpose) Using the VALUE dial or [INC] [DEC] Using the keyboard pads fig.03-012 Make sure that both the [PATTERN CALL] and [RPS] indicators are dark. Hold down [TRANSPOSE] and press a keyboard pad to specify the desired transposition. -
Page 48: Using The Keyboard Pads To Play Sounds
Playing patterns Using the keyboard pads to play sounds fig.03-016 Sustaining the notes you play (Hold) If you press [HOLD] so it’s lit, the notes will be sustained even after you take your hand off the keyboard pads. The sound will stop when you press [HOLD] once again and turn off the indicator. -
Page 49: Various Ways To Use The Keyboard Pads
Playing patterns Various ways to use the keyboard pads Using the keyboard pads to recall patterns (Pattern Call) You can use the sixteen keyboard pads as buttons to select patterns. The patterns that are registered to each of the sixteen keyboard pads are handled as one “pattern set.” You are free to edit the contents of a pattern set, and can store 50 different sets. -
Page 50: Using The Keyboard Pads To Play Phrases (Rps)
Playing patterns Using the keyboard pads to play phrases (RPS) Any phrase that’s been assigned to one of the sixteen pads will continue playing as long as you hold down its pad. The phrases that are registered to the sixteen pads are handled as one “RPS set.” You are free to edit the contents of an RPS set, and can store 50 different sets. - Page 51 When using RPS during pattern playback, patterns and phrases may not play back in precise alignment, depending on the timing at which you press the keyboard pads. On the MC-808 you can specify the playback timing of the phrase, so it will play back in precise synchronization with the pattern (“RPS Trig...
- Page 52 Playing patterns Adjusting the settings of the RPS parts RPS realtime modify (RPS mixer) You can use the faders to modify the sound of the phrase being played by RPS. RPS playback uses dedicated RPS parts that are separate from conventional pattern playback.
-
Page 53: Pressing A Chord To Play An Arpeggio (Arpeggiator)
Pressing a chord to play an arpeggio (Arpeggiator) The MC-808’s Arpeggiator function lets you perform arpeggios just by playing the chords, using the notes in the chords you play. Not only can you use the factory-set arpeggio styles, which determine the way the arpeggio is played, but you can also freely rewrite styles. - Page 54 Playing patterns Parameter Range Description Parameter Range Description Motif UP(L ), Selects the method used to play Duration 30–120%, Determines whether the sounds UP(L&H), sounds when you have a greater are played staccato (short and FULL UP(_ ), number of notes than pro- clipped), or tenuto (fully drawn DOWN(L ), grammed for the Arpeggio Style.
- Page 55 Playing patterns Creating an arpeggio style To input data, press a pad that corresponds to the timing at which you want to input a note, so the pad’s indicator lights. (Arpeggio Edit) To delete a note you’ve input, press the corresponding pad so its indicator goes out.
-
Page 56: Playing A Chord By Pressing A Single Pad (Chord Memory)
Playing patterns Playing a chord by pressing a single pad (Chord Memory) You can play a specified chord form simply by pressing a single pad. You can use factory-set chord forms, or freely create your own. Using chord memory Inputting a chord form fig.03-060 Hold down [SHIFT] and press [CHORD MEMORY]. -
Page 57: Mix In
Playing patterns Use [CURSOR ] to select a parameter, and turn the Mix In VALUE dial or use [INC] [DEC] to set the value. Parameter Range Description The sound of a device connected to the INPUT jacks can be mixed Input LINE IN L/R , Input source of the external... -
Page 58: Moving Your Hand Above The D Beam To Change The Tone (D Beam Controller)
Playing patterns Moving your hand above the D Beam to change the tone (D Beam controller) The D Beam controllers let you perform control operations simply by passing your hand over the controller. Three different uses (such as solo synth and turntable) for this controller are offered as presets, but by editing the settings you can use these controllers to apply a wide range of other effects. -
Page 59: Editing The D Beam Controller Settings
Playing patterns Editing the D Beam controller settings Hold down [SHIFT] and press one of the D BEAM [SOLO SYNTH]/[TURNTABLE]/[FILTER] buttons. The Setup screen will appear. fig.03-058 Use [CURSOR ] to select a parameter, and turn the VALUE dial or use [INC] [DEC] to set the value. Parameter Range Description... -
Page 60: Synchronizing The Tempo Of A Sample With The Pattern Tempo (Auto Sync)
The tempo of the sample that’s playing will automatically synchronize with the BPM of the pattern. You can turn Auto Sync on/off individually for each part. Auto Sync consumes twice the usual polyphony. This means that if you turn Auto Sync on, the MC-808’s overall polyphony will decrease. -
Page 61: Applying Effects
Applying effects The MC-808 lets you apply a total of six effects simultaneously; two multi-effects, reverb, compressor, an external input effect, and a mastering effect. The following diagram shows the signal flow for these effects. Effect routing fig.03-070.j ON/OFF DIRECT... -
Page 62: Effect On/Off
Applying effects Effect on/off Playing pitches using the sound of an external device (Input Effect) Use the ON/OFF buttons of the Effects section to switch each effect on/off. If you set “Mix-In” (p. 57) to “PADS,” you’ll be able to use the fig.03-071 keyboard pads to play pitches using the sound of an external input source. -
Page 63: Multi-Effects (Mfx)
Applying effects Multi-effects (MFX) These are general-purpose multi-effect processors that can transform the sound itself, giving it a completely different character. MFX1 and 2 each provide 47 types of effects to choose from. These types include distortion, flanger, and many more effects. The multi-effect types also include a compressor, but this is independent of the compressor mentioned earlier. -
Page 64: Reverb
This is a stereo compressor (limiter) that is applied to the final sounds are played in a hall. You can choose from four types of output of the MC-808. It processes the high, mid, and low-range reverberation as appropriate for your situation. -
Page 65: Creating An Original Pattern
Creating an original pattern The MC-808 lets you create original patterns by recording your performance into the internal sequencer. You can use the following four types of recording. • Realtime recording .... The data from the keyboard pads and faders, and the performance data from an external MIDI device will be recorded in real time (p. -
Page 66: Practicing While You Record (Rehearsal)
Creating an original pattern Parameter Range Description Rec Mode MIX, Whether the recorded data Practicing while you record (Rehearsal) REPLACE will be added to, or replace the existing data You can temporarily suspend actual recording while staying in MIX: Newly recorded data will be added to the previ- realtime recording mode. -
Page 67: Using The Keyboard Pads To Record (Tr-Rec)
(TR-REC) fig.03-083.e Location of the note you This method lets you use the MC-808’s keyboard pads to enter notes will enter using pad 1 in a way similar to programming a rhythm machine. To enter or remove notes, press the relevant keyboard pads so they are lighted or extinguished. -
Page 68: Consecutively Recording Notes One At A Time (Step Recording)
Creating an original pattern About the Timing Scale Consecutively recording notes Each time you press [SCALE MEASURE], the scale will change in one at a time (Step Recording) the following order, letting you select the type of note values to be entered. -
Page 69: Recording Tempo Changes And Mute Operations (Tempo/Mute Recording)
Creating an original pattern Recording tempo changes Parameter Range Description Note Type 1/32–1/1 Choose the note value to be and mute operations input. Velocity 1–127 Specify the velocity (volume) (Tempo/Mute Recording) of the note data to be input. Gate Time 5–200 % Specify the gate time (the du- ration that the note will be... -
Page 70: Editing Patterns (Pattern Edit)
Editing patterns (Pattern Edit) The MC-808 provides various ways for you to edit the performance data of a pattern one measure at a time. These operations let you modify the content of the performance data in existing patterns, or to combine various patterns to make completely different patterns. -
Page 71: Copying A Portion Of A Pattern (Copy)
Editing patterns (Pattern Edit) Erasing unwanted performance data Copying a portion of a pattern (COPY) (ERASE) This operation copies a portion (or all) of the current pattern to another pattern. This operation erases all or part of the data from a pattern. This is a convenient way to combine portions of various patterns into You can use the part buttons to select multiple parts simultaneously. -
Page 72: Deleting Unwanted Measures (Delete)
Editing patterns (Pattern Edit) Deleting unwanted measures (DELETE) Inserting blank measures (INSERT) This operation deletes unwanted measures from a pattern, and joins This operation inserts blank measures between the specified the remaining measures together. measure of a pattern and the following measure. If you want to add more playing in the middle of a existing performance, use this If a part contains data following the deleted region, the performance operation to insert one or more blank measures, and then record the... -
Page 73: Transposing The Pitch (Transpose)
Editing patterns (Pattern Edit) Transposing the pitch (TRANSPOSE) Modifying the note length (DURATION) This operation shifts the note numbers (pitch) of one or more parts in This operation modifies the duration (the length that the note is the pattern. You can transpose the notes in a range of +/-2 octaves. held) of the notes recorded in the pattern. -
Page 74: Making Slight Shifts In The Timing (Shift Clock)
Editing patterns (Pattern Edit) Making slight shifts in the timing Thinning out unneeded data (SHIFT CLOCK) (DATA THIN) This operation shifts the timing of the performance data recorded in Since data such as pitch bend or control change varies the value the pattern backward or forward in units of one tick (1/480th of a continuously, it can occupy an unexpectedly large amount of beat). -
Page 75: Correcting The Timing Of A Pattern (Quantize)
Editing patterns (Pattern Edit) Groove Template List Correcting the timing of a pattern 16 Beat Dance type (QUANTIZE) Dance-Nm-L.Ac exact/low dynamics Dance-Nm-H.Ac exact/high dynamics Dance-Nm-L.Sw exact/light swing This operation corrects the timing of the pattern’s performance data Dance-Nm-H.Sw exact/strong swing in the way that you specify. -
Page 76: Converting The Note Timing Of A Pattern (Reclock)
Editing patterns (Pattern Edit) 8 Beat Rhumba type Rhumb-Nm-L.Ac exact/low dynamics Converting the Note Timing of a Rhumb-Nm-H.Ac exact/high dynamics Pattern (RECLOCK) Rhumb-Nm-L.Sw exact/light swing Rhumb-Nm-H.Sw exact/strong swing Rhumb-Hv-L.Ac dragging/low dynamics This operation doubles or halves the note values of performance Rhumb-Hv-H.Ac dragging/high dynamics data recorded in the pattern. -
Page 77: Moving Data Of A Specific Note Number To Another Part (Extract Rhy)
Editing patterns (Pattern Edit) Moving data of a specific note number Setting the part parameters to another part (EXTRACT RHY) (PART PARAM) This operation extracts data of a specific note number from the Here you can make settings for each part within the pattern. specified part, and moves it to a different part. -
Page 78: Initializing A Pattern (Initialize)
Editing patterns (Pattern Edit) Initializing a pattern (INITIALIZE) This operation initializes the performance data of the pattern to an empty state (blank pattern). All the data of that pattern will be lost when you execute the initialize operation. Please be aware that you can’t use Undo to recover from this operation. -
Page 79: Editing A Pattern In Detail (Microscope)
* Polyphonic aftertouch is data transmitted independently from each key to indicate the force with which each key is being pressed down after it is played. Since the MC-808 is not able to transmit polyphonic aftertouch, these events cannot be recorded from the MC-808’s keyboard. -
Page 80: Editing The Recorded Events
While editing an exclusive message, you can press [ENTER] to set it so the checksum is calculated automatically. When you press [ENTER] after editing the message, the MC-808 will automatically calculate the checksum and will write this value as the byte... -
Page 81: Inserting An Event (Create Event)
Editing patterns (Pattern Edit) Inserting an event (Create Event) Depending on the event that you want to insert, execute one of the following. • To insert one of the following events Note Note Program Change Program Change Control Change Control Change Pitch Bend Pitch Bend Poly Aftertouch... -
Page 82: Microscope Utilities
Editing patterns (Pattern Edit) Microscope Utilities In addition to the Create/Erase Event operations, you can use microscope utility operations to do the following things. Specifying the types of events to Moving an event (Move Event) view (View Switch) In the Microscope screen, display the event that you want to move. -
Page 83: Copying An Event (Copy)
Editing patterns (Pattern Edit) Copying an event (Copy) If you execute copy, that event will be temporarily saved, allowing you to paste it to the desired location. In the Microscope screen, display the event that you want to copy. fig.03-121 Hold down [SHIFT] and press [REC]. -
Page 84: Saving A Pattern
Saving a pattern Pattern settings that you edit will be lost if you edit another pattern or turn off the power. If you want to keep the edited data, you must save it as follows. Select the pattern that you want to save. Use VALUE dial or [INC] [DEC] to select the pattern to which the data will be written. -
Page 85: Patch/Sample Mode
Patch/Sample Mode This mode lets you edit sounds. -
Page 86: Editing Patches (Patch Edit)
How a tone is organized Tones are the smallest programmable unit of sound on the MC-808, and are the basic building blocks that make up a Patch. You can’t play a Tone by itself–it can only be played as part of a patch. A Tone consists of the following five components. -
Page 87: Selecting A Patch
Editing patches (Patch Edit) Selecting a patch Types of patch The MC-808’s patches are stored in banks that each contain 128 patches; user group banks A–H and card group banks A–H. Group Bank Description A–H This is the group of rewritable banks in the MC-808’s internal memory. Patch- (User group) es you create can be saved in this group of banks. -
Page 88: Selecting Patches By Category (Category Lock)
Selecting patches by category current rhythm set) is shown. (Category Lock) fig.04-003.e Patch category The MC-808 provides a patch search function that lets you quickly Patch group/ find a desired patch by specifying the desired patch category. Patch type bank/number You can choose from the following categories. -
Page 89: Patch Editing Procedure
• Select a patch that is similar to the sound you wish to create. The MC-808 lets you use the motorized faders to edit a patch. It’s hard to create a new sound that’s exactly what you want if When you’ve come up with a sound you like, save the patch (p. 91). -
Page 90: Patch Editing Parameters
The patches of the MC-808 contain many other parameters in addition to those listed here. You can use the dedicated editor that’s included to edit these additional parameters. For details on how to install and use the editor, refer to “Using MC-808 editor” (p. 137). -
Page 91: Saving A Patch
If you want to keep your edits, you must use the following procedure to save the data. All of the MC-808’s patches are rewritable. In other words, when you save a patch, the patch data that previously occupied the save destination will be overwritten and lost. However, you can restore the factory-set internal data by carrying out a Factory Reset (p. -
Page 92: Editing Rhythm Sounds (Rhythm Edit)
Rhythm Tone, and determines how the pitch of the Rhythm Tone Patch group/ Patch type bank/number will change. The MC-808 has 622 different waveforms, and four waveforms can be assigned to each Rhythm Tone. Patch number Refer to “Waveform list” (p. 2) in “Sound & Parameter List.”... -
Page 93: Selecting The Wave(S) That Will Sound
Using the faders to edit Turn “on” the wave(s) that you want to sound. If you want to hear The MC-808 lets you use the panel faders to edit a rhythm set. just a specific wave, turn the other waves “off.”... -
Page 94: Rhythm Editing Parameters
The patches of the MC-808 contain many other parameters in addition to those listed here. You can use the dedicated editor that’s included to edit these additional parameters. For details on how to install and use the editor, refer to “Using MC-808 editor” (p. 137). -
Page 95: Saving A Rhythm Set
All of the MC-808’s rhythm sets are rewritable. In other words, when you save a rhythm set, the rhythm set data that previously occupied the save destination will be overwritten and lost. -
Page 96: Editing Samples (Sample Edit)
Editing samples (Sample Edit) On the MC-808, waveforms (samples) that you’ve sampled, loaded, or imported can be easily selected and edited in the same way as patches or rhythm sets. The sample settings you edit will be lost when you turn off the power. If you want to keep your edits, you must save them (p. 101). -
Page 97: Setting The Start/End Points Of The Sample
After specifying the start point and end point, you can execute Truncate (p. 97) to delete unwanted portions at the beginning The MC-808 has numerous other parameters in addition to and end of the sample. those listed here, and these parameters can be edited using the dedicated editor that’s included. -
Page 98: Specifying How A Sample Will Play (Loop Mode)
Editing samples (Sample Edit) Specifying how a sample will play Calculating the BPM of a sample (Loop Mode) (BPM Calculator) Here’s how to specify the original tempo of a sample. About the loop mode Select the sample patch that you want to edit (p. 96). FWD (Forward) Hold down [SHIFT] and press keyboard pad [4]. -
Page 99: Loading A Sample (Load)
Editing samples (Sample Edit) Loading a sample (LOAD) Deleting a sample (DELETE) Here’s how you can load a sample to the memory. Here’s how to completely delete a sample file. Press [PATCH/SAMPLE] to enter Patch/Sample mode. Press [PATCH/SAMPLE] to enter Patch/Sample mode. Select the sample you want to load. -
Page 100: Importing Wav/Aiff Data (Import)
Loading all samples (IMPORT) (LOAD ALL) You can connect the MC-808 to your computer via USB and copy Load all samples from the user bank and card bank. audio files from your computer into the MC-808. The audio files (WAV/AIFF) will be imported into the MC-808’s memory as All samples that have not been saved will be erased as a result samples. -
Page 101: Erasing All Samples (Unload All)
Editing samples (Sample Edit) Erasing all samples (UNLOAD ALL) This operation erases (unloads) the samples from sample memory. This will not delete the saved sample files themselves. Press [PATCH/SAMPLE] to enter Patch/Sample mode. Press a GROUP [USER]/[CARD] button to select the group containing the samples you want to erase. -
Page 102: Saving A Sample
Use the VALUE dial or [INC] [DEC] to select the save- All of the MC-808’s sample patches can be rewritten. destination sample. In other words, when you execute the Save operation, the sample patch data that previously occupied the save destination Press [ENTER]. -
Page 103: Regarding The Locations Where Samples Are Stored
Regarding the locations where samples are stored The MC-808 can use two types of memory; sample memory and DIMM whose contents are lost when you turn off the power, and user area and CompactFlash card whose contents are preserved even when the power is off. -
Page 105: Song Mode
Song Mode In this mode you can play, record, and edit songs. -
Page 106: Playing Songs
Playing songs Two or more patterns connected in the order of playback are called a song. When you play back a song, the patterns will switch automatically—you don’t need to select each pattern yourself. In one song, you can register up to 50 patterns in the desired order of playback. The number describing the order in which the patterns are arranged is called the step. -
Page 107: Recording A Song
Recording a song You can input patterns one by one to specify the order in which the patterns will be played back. A song does not contain the actual performance data of the patterns in the song; it merely stores the playback order of the patterns. This means that if you modify one of the patterns that’s used by a song, the playback of that song will be affected. -
Page 108: Editing Songs (Song Edit)
Editing songs (Song Edit) “Song editing” is the process of editing individual steps of performance data for a song. * You must stop the song playback before you can edit the song. Copying a song (COPY) Inserting a step (INSERT STEP) This operation copies song data to a different song. -
Page 109: Initializing A Song (Initialize)
Editing songs (Song Edit) Initializing a song (INITIALIZE) Song mixer (SONG MIXER) This operation clears all the previously entered steps, so the song is You can edit the level, pan, key shift, reverb, mute, and tempo in an empty state. This is convenient when you want to create a song settings for each step. -
Page 110: Saving A Song
Saving a song Songs that you record will be lost if you turn off the power. If you want to keep the song data, you must save it as follows. Select the song that you want to save. Press [WRITE]. The song name entry screen will appear. -
Page 111: Sampling
Sampling... -
Page 112: Sampling Procedure
Sampling procedure Press [PATCH/SAMPLE] to enter Patch/Sample mode. Make the settings for things such as the input source of the sound to be sampled, and triggering. Press SAMPLING [START/STOP]. Use [CURSOR ] to select a parameter, and turn the The sampling menu screen will appear. VALUE dial or use [INC] [DEC] to set the value. - Page 113 If this happens, use connection cables that do not contain resistors, such as those from the Roland PCS series. * The level meter shows the level after the signal has passed through the effects (compressor, multi-effects, reverb) and the mastering effect.
- Page 114 Sampling procedure If you selected Sampling, Resampling, Mix, or If you selected Solo or Solo with FX Auto Divide Specify the location at which the sample is to be assigned. The following message will appear. Use [CURSOR ] to select a parameter, and turn the fig.07-005 VALUE dial or use [INC] [DEC] to set the value.
- Page 115 Sampling procedure About the sample numbers chosen during sampling The samples created when you execute the sampling operation are placed in an area where there are at least 256 consecutive unused numbers in the sample patch. * You cannot perform sampling if there are not at least 256 consecutive unused numbers in the sample patch.
-
Page 117: System Mode
System Mode Here you can make settings that affect the entire system, such as those for tuning and synchronization. -
Page 118: System Mode
System mode Settings that affect the entire operating environment of the MC-808, such as tuning and MIDI message reception, are referred to as system functions. This section explains how to make settings for the System functions and describes the functions of the different System parameters. -
Page 119: Settings Related To Sequencer Operation (Sequencer)
When using RPS during pattern playback, patterns and phrases may not play back in precise (RPS Trigger Quantize) 16TH, alignment, depending on the timing at which you press the keyboard pads. On the MC-808 8TH, you can specify the playback timing of the phrase, so it will play back in precise synchroniza- QUARTER, tion with the pattern. -
Page 120: Settings Related To Midi Transmission (Tx Midi)
(Remote Keyboard Switch) instead of the MC-808’s keyboard pads. * Set it to “OFF” to control the MC-808 from an external sequencer, as a multi-timbre sound generator with sixteen parts. Patches can be played back by part, according to the channel used for sending MIDI data from the external sequencer. -
Page 121: Settings Related To Tuning And How The Sound Is Produced (Sound)
Metronome Level 0–10 Adjusts the volume of the metronome. Master Key Shift -12–+12 Shifts the overall pitch of the MC-808 in semitone steps. Patch Remain OFF, Specifies whether currently sounding notes will continue sounding when an- (Patch Remain Switch) other patch or rhythm set is selected (ON), or not (OFF). -
Page 122: Settings Related To The Input Source (Input Setting)
MIDI: MIDI mode. Select this if you want to exchange MIDI messages with a sequencer or other program. * You must switch the USB Mode before you connect the MC-808 to your computer via the USB cable. If you change this setting while the MC-808 is connected, the computer may fail to recognize it correctly. -
Page 123: Settings Related To V-Link (V-Link)
System mode Settings related to V-LINK (V-LINK) Parameter Range Description Note Tx Ch A 1–16 Specifies the MIDI channels on which V-LINK devices will be controlled. (*) Note Tx Ch B Note Tx Ch C D Beam Assigns a V-LINK function to the D Beam controller. The operation selected by [D BEAM] will occur regardless of whether V-LINK is on or off. -
Page 124: Viewing The System Information (Info)
INFO sample memory. must have approximately 64 MB of free space. User Indicates the amount of free user memory. Insert a CompactFlash into the slot with the MC-808’s Card Indicates the amount of free power turned off. card memory. VERSION Indicates the version of the Turn on the MC-808’s POWER switch. -
Page 125: Recovering Backed-Up User Data (User Restore)
Here’s how user data previously saved on a CompactFlash card If you’re using a CompactFlash card for the first time, you must using the User Backup operation can be restored into the MC-808’s format it on the MC-808. The MC-808 won’t recognize a user area. -
Page 126: Performing A Factory Reset (Utility)
Reset)” (p. 25). Protecting individual patch banks (UTILITY) The MC-808’s internal patches are all user patches that can be overwritten. For this reason, there’s a “protect” setting that you can apply to each patch bank so that you won’t inadvertently write over data that you actually wanted to keep. -
Page 127: V-Link
V-LINK Performing music and video... -
Page 128: About V-Link
• Use the MC-808’s faders to make time settings for transition effects (such as overlap or wipe). * In order to use V-LINK with the MC-808 and EDIROL V-4, you will need to make connections using a commercially-available MIDI cable. -
Page 129: Using V-Link
In this state, you can operate the keyboard pads and D beam to D Beam Controls the image according to the manipulate images in sync with the playback of the MC-808. D Beam settings. Refer to p. 123 for details on how to... -
Page 131: Connecting The Mc-808 To A Computer
Connecting the MC-808 to a computer... -
Page 132: Connecting To Your Computer Via Usb (Usb Mode)
Turn the VALUE dial or use [INC] [DEC] to select “MIDI.” fig.10-002 USB Storage mode is selected. MIDI mode is selected. If you want the MC-808 to start up in USB Storage mode the next time it is powered up, press [WRITE] to save the Press to select “USB-MIDI Thru.”... -
Page 133: Transferring Files To Or From Your Computer (Storage Mode)
Transferring files to or from your computer (Storage mode) If you’ve connected the MC-808 to your computer via a USB cable, WAV/AIFF files created on the MC-808 can be used by software on your computer, or conversely WAV/AIFF files created by software on your computer can be used in the MC-808. -
Page 134: Specify The Connection-Destination
Importing audio file Specify the connection-destination Here’s how to import an audio file (WAV/AIFF). Before connecting the MC-808 to your computer, you must first choose whether the connection destination is to be the MC-808’s internal user memory or the CompactFlash card. -
Page 135: Caution Regarding Folders And Files
Drag the MC-808 drive icon into the trash. SMPL Canceling USB communication If you want to power off the MC-808 when it is connected to your AUDIO_IMPORT computer in Storage mode, you must first cancel USB communication on your computer as described here. -
Page 136: Exchanging Midi Messages With Your Computer (Midi Mode)
Exchanging MIDI messages with your computer (MIDI mode) Driver installation and settings In order to use the MC-808 as a USB MIDI device from your computer, you must first install the USB MIDI driver. The USB MIDI What is the USB MIDI driver? driver is on the included “MC-808 Editor CD”... -
Page 137: Using Mc-808 Editor
To help you take even greater advantage of its functionality, the MC-808 comes with MC-808 Editor software. MC-808 Editor enables you to use your own computer screen to edit patch, rhythm, and sample parameters that cannot be edited using the MC-808 itself and allows you to modify samples, all while enjoying the use of an efficient, graphical editing environment. -
Page 138: Editor System Requirements
Using MC-808 editor MC-808 editor system requirements System requirements (Windows) • Operating System : Microsoft® Windows® 2000 Professional Microsoft® Windows® XP • CPU/Clock : Pentium®/Celeron® processor 800 MHz or higher • Memory (RAM) : 384 MB or more • Hard Disk : 60 MB or more •... -
Page 139: Appendices
Appendices... -
Page 140: Expanding The Memory
Expanding the memory The MC-808 comes with 4 MB of memory into which audio samples can be loaded. However, in some cases, 4 MB of memory will be insufficient for loading large amounts of data. In such a case, you will have to add separately sold memory (DIMM). Memory can be expanded up to 512 MB. -
Page 141: Removing The Memory
Capacity: Board height: 38 mm or less The MC-808 has been confirmed to work with standard memory that meets the above specifications. However, we Use the screws that you removed in step 2 to fasten the cannot guarantee that all memory of these specifications will cover back in place. -
Page 142: Error Messages
Illegal File! The MC-808 cannot use this file. The MC-808 can use only audio files (WAV/AIFF format). Memory Damaged! The contents of memory may have been damaged. Please perform the Factory Reset operation (p. 25). If this does not resolve the problem, please contact your dealer or the nearest Roland Service Center. -
Page 143: Troubleshooting
Troubleshooting If the MC-808 does not function in the way you expect, first check the following points. If this does not resolve the problem, consult your dealer or a nearby Roland Service Station. * If any sort of message is being displayed on the screen during an operation, refer to “Error messages” (p. 142). - Page 144 1,300,000 notes, but I can’t record that many notes in a pattern. Why? A: On the MC-808, each pattern can record a maximum of approximately 28,000 notes (events). The maximum recording capacity of the sequencer is the total number of events recorded in all patterns.
-
Page 145: Specifications
Specifications MC-808: Sampling groovebox Sound Generator Section Effects Section Maximum Polyphony 128 voices Reverb 1 (4 types) (shared with sampling section) Compressor 1 (1 type) Sampling Frequency 44.1 kHz Multi-effects (MFX) Parts 16 (Main) + 16 (RPS) (MFX1, 2: 47 types) -
Page 146: Power Supply
Specifications Connectors MIX OUTPUT Jacks (L/MONO, R) DIRECT OUTPUT Jacks (L, R) INPUT Jacks (L/MONO/MIC, R) Headphones Jack MIDI Connectors (IN, OUT) USB Connector (Function): MIDI, Mass storage class DC IN Jack Power Supply DC 12 V (AC adaptor) Current Draw 1500 mA Dimensions 431 (W) x 327 (D) x 104 (H) mm... -
Page 147: Index
Index Copy Event ................83 AIFF ............... 100, 133 Microscope ..............83 All Part Mute ..............45 Pattern ............... 71 All Part On ..............45 Song ................. 108 Amp Env Attack ............90, 94 Copy Mode ..............71 Amp Env Decay ............90, 94 Copy Times .............. - Page 148 Index Erase Event ..............81 Error messages ............. 142 Hold Event ................79 Note ................48 Copy ..............71, 83 RPS ................51 Data Thin ..............74 Erase ..............71, 81 Insert ................81 Import ..............100, 134 Move ................82 Info .................
- Page 149 Index Master Key Shift (System) .......... 121 NEXT display ..............42 Master Level (System) ..........121 Note (Microscope) ............79 Master Tune (System) ..........121 Note (Solo Synth) ............59 Mastering effect ............. 64 Note Min, Max Matrix Control ............90, 94 Copy ................
- Page 150 Index Pattern Call ..............49 Rec Mode Pattern mode ..............41 Realtime recording ..........66 Pattern set Rec Velocity Registering ..............49 Realtime recording ..........66 Saving ................ 49 Step recording ............68 Selecting ..............49 TR-REC ..............67 PC Mode ............... 137 Reclock (Pattern) ............
- Page 151 Index RPS ................50–51 Selecting Hold ................51 Arpeggio style ............53 Realtime modify ............52 Chord form ............... 56 Settings ..............51 Mastering setting ............. 64 RPS mixer ............... 52 Part to record ............65 RPS Part ................51 Pattern ...............
- Page 152 Index Source From, End Trigger Level (System) ..........121 Copy ................71 Trim Sw (Sampling) ............ 113 Data Thin ..............74 Trimming Switch (System) ........121 Delete ................. 72 Troubleshooting ............143 Duration ..............73 TR-REC ................67 Erase ................71 Truncate ................
- Page 153 Index Value Data Thin ..............74 Duration ..............73 Shift Clock ..............74 Transpose ..............73 Velocity ..............73 Velocity Pattern ............... 73 Quantize ..............75 Step recording ............69 TR-REC ..............67 Version ................124 View Switch (Microscope) ........... 82 Viewing Measure ..............
- Page 154 For EU Countries...
- Page 155 DECLARATION OF CONFORMITY Compliance Information Statement Model Name : MC-808 Type of Equipment : Sampling Groove Box Responsible Party : Roland Corporation U.S. Address : 5100 S. Eastern Avenue, Los Angeles, CA 90040-2938 (323) 890-3700 Telephone : For the U.K. WARNING:...
- Page 156 Information When you need repair service, call your nearest Roland Service Center or authorized Roland distributor in your country as shown below. AFRICA PHILIPPINES CURACAO URUGUAY NORWAY JORDAN G.A. Yupangco & Co. Inc. Zeelandia Music Center Inc. Todo Musica S.A.
Need help?
Do you have a question about the MC-808 and is the answer not in the manual?
Questions and answers