Table of Contents
Advertisement
Advertisement
Table of Contents

Related Manuals for Grizzly T10010


Summary of Contents for Grizzly T10010
- Page 1 Wet grinder Copyright © November, 2007 by grizzly iNdustrial, iNC. rev. jaNuary, 2012 (st) Warning: no portion of this manual may be reproduced in any shape or form Without the Written approval of grizzly industrial, inc. (For models maNuFaCtured siNCe 3/10) #jb9991 priNted iN ChiNa...
- Page 2 This manual provides critical safety instructions on the proper setup, operation, maintenance, and service of this machine/tool. Save this document, refer to it often, and use it to instruct other operators. Failure to read, understand and follow the instructions in this manual may result in fire or serious personal injury—including amputation, electrocution, or death.
-
Page 3: Table Of Contents
table of contents introduction .......................2 Manual Accuracy ......................2 section 1: safety .......................3 section 2: poWer supply ..................7 section 3: setup ......................9 Unpacking ........................9 Inventory ........................9 Site Considerations ....................10 Wheel Inspection ......................10 Test Run ........................12 section 4: operations ...................13 Grinding Tips ......................13 Positioning the Universal Support ................14 Grinding Jig.......................15 Water Reservoir ......................16... -
Page 4: Introduction
For your convenience, we post all available man- uals and manual updates for free on our website able documentation on our website at at www.grizzly.com. Any updates to your model www.grizzly.com. Any updates to this doc- of machine will be reflected in these documents ument will be reflected on our website as as soon as they are complete. -
Page 5: Section 1: Safety
Safety section 1: safety for your own safety read instruction manual before operating this equipment the purpose of safety symbols is to attract your attention to possible hazard- ous conditions. this manual uses a series of symbols and signal words which are intended to convey the level of importance of the safety messages. - Page 6 only alloW trained and remove adJusting Keys and Wrenches. make a habit properly supervised per- of checking for keys and adjusting sonnel to operate machin- ery. make sure operation instruc- wrenches before turning machinery tions are safe and clearly under- stood.
-
Page 7: Additional Safety Instructions For Grinders
additional safety instructions for grinders 1. eye protection. Grinding causes 6. lung protection. Grinding pro- small particles to become airborne at duces hazardous dust, which may a high rate of speed that could impact cause long-term respiratory problems your eyes, causing severe injury. if breathed. -
Page 8: Machine Data
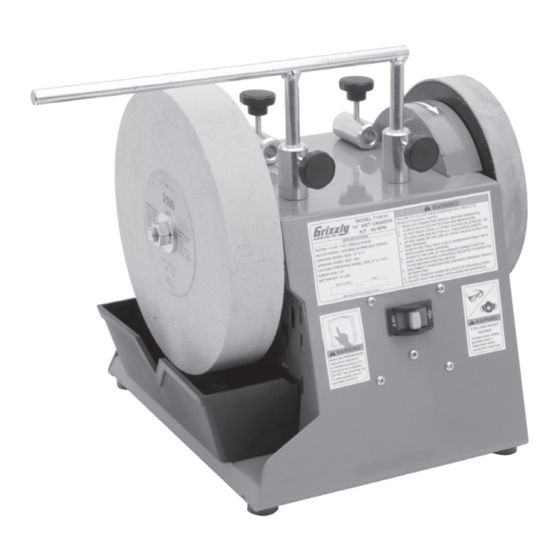
MACHINE DATA SHEET Customer Service #: (570) 546-9663 • To Order Call: (800) 523-4777 • Fax #: (800) 438-5901 MODEL T10010 WET GRINDER Overall Dimensions: Height ....................................13" Width ....................................17" Depth ..................................... 13" Net Weight ..................................41 lbs. Footprint ..................................13" x 10¾" Main Specifications: Arbor Diameter .................................12mm Grinding Wheel Grit ................................ -
Page 9: Section 2: Power Supply
section 2: poWer supply availability circuit requirements Before installing the machine, consider the This machine is prewired to operate on availability and proximity of the required a 110V power supply circuit that has a power supply circuit. If an existing circuit verified ground and meets the following does not meet the requirements for this requirements:... -
Page 10: Extension Cords
grounding & plug requirements Improper connection of the equipment- grounding wire can result in a risk of This machine MUST be grounded. In the electric shock. The wire with green insu- event of certain malfunctions or break- lation (with or without yellow stripes) is downs, grounding reduces the risk of the equipment-grounding wire. -
Page 11: Section 3: Setup
section 3: setup unpacking inventory The Model T10010 was carefully packed model t10010 inventory (figure 2) a. T10010 Wet Grinder ......1 when it left our warehouse. If you discover b. Grinding Jig ........1 any parts are damaged after you have signed for delivery, please immediately c. -
Page 12: Site Considerations
site considerations Wheel inspection Do not assume that a wheel is in sound bench load condition just because it is new—damage Refer to the machine data sheet on can often occur in shipping, with age, page 6 for the weight and size specifica- or with prolonged exposure to moisture. - Page 13 — An undamaged wheel will emit a clear metallic ring or “ping” sound in each of these spots. A damaged wheel will respond with a dull thud that has no clear tone. — If you determine from the ring test that the wheel is damaged, DO NOT use it! TO AVOID DAMAGING THE...
-
Page 14: Test Run
test run 6. Listen and watch for abnormal nois- es or actions. Under normal condi- tions, the grinder will make a humming noise, with only minor vibration. A Once the Model T10010 is positioned, slight wobble from one or both wheels test run the machine to make sure it runs is normal and will not affect grinding properly. -
Page 15: Section 4: Operations
training. -
Page 16: Positioning The Universal Support
positioning the universal support do not make adjustments while the machine is running. disconnect the grinder from power before attempting The Model T10010 Wet Grinder is equipped to make adjustments to the universal with a universal support that serves as support, water reservoir, changing a tool rest and as an attachment point wheels or the angle guide. -
Page 17: Grinding Jig
grinding Jig grinding With Wheel rotation 1. DISCONNECT GRINDER FROM POWER! The grinding jig provided with the wet 2. Position the machine with the ON/OFF grinder is used for securing a variety of switch facing away from you. tools, and can be positioned to grind with and against the wheel rotation. -
Page 18: Water Reservoir
Water reservoir 3. Attach the reservoir to the grinder. — If the grinder is going to be used immediately, position the reservoir The Model T10010 Wet Grinder is designed in the upper grinding position by for wet grinding and should never be used attaching it in the upper slot (see without water. -
Page 19: Angle Guide
to use the angle guide: 1. Locate the eight measuring notches on do not allow the grinding wheel the angle finder (see figure 13). to stay immersed in water for long periods of time without running. angle edge the water can cause the wheel to become waterlogged and unbal- anced and may cause sections of the wheel to break off when the... -
Page 20: Sharpening
sharpening never sharpen against the direction of rotation. the edge of the tool may The leather stropping wheel on the Model dig into the leather wheel, damaging T10010 and the included abrasive strop- the wheel and causing the tool to ping paste can be used to obtain a razor eject from the machine. -
Page 21: Section 5: Accessories
section 5: accessories t10023—accessory Kit #1 includes fix- t10025—sharpening Jig tures for sharpening small knives, large Jig for sharpening 16" planer blades sharp- knives, scissors and axes. ens all planer and jointer blades up to 16" long. figure 15. model t10023 t10024—accessory Kit #2 includes a stone dresser and fixtures for sharpening scrapers, screwdrivers and hollow chis-... - Page 22 h5891, h5892 diamond dressers h5944, h5945, h5946 Wheel dressers Industrial diamond for dressing grinding Exposes new grains for aggressive cut- wheels. 8¼" long round body with knurled ting on all types of grinding wheels. Star grip for maximum control. Includes protec- wheels and discs are hardened steel.
-
Page 23: Section 6: Maintenance
section 6: maintenance grinding Wheels The grinding wheel should be inspected before every use. Use the ring test method noted in Wheel inspection on page 9 to verify the structural integrity. Take care when storing grinding wheels to avoid potential moisture damage, being dropped, or having other items drop on them. -
Page 24: Section 7: Service
section 7: service troubleshooting motor and electrical symptom possible cause solution Motor will not start; 1. Disabling key is at fault. 1. Install/replace disabling key; fuses circuit replace switch. breakers blow 2. Open circuit in motor or loose 2. Inspect/repair all lead con- connections. -
Page 25: Grinder Operations
grinder operations symptom possible cause solution Lines on surface of 1. Impurity on wheel surface. 1. Dress the grinding wheel. 2. Use a holding device to workpiece. 2. Workpiece not being held tight- firmly retain the workpiece. Wheel dulls quickly, 1. -
Page 26: Section 8: Wiring
Technical Support at (570) to a power source. 546-9663. The photos and diagrams included in this section are best viewed in color. You can view these pages in color at www.grizzly.com. model t10010 (mfg. since 3/10) -
Page 27: Wiring Diagram
Wiring diagram figure 21. switch connections. figure 22. motor connections. PADDLE SWITCH Black (viewed from behind) White Neutral Green Ground 110VAC 5-15 Plug Start Capacitor 24MFD 250VAC MOTOR Ground model t10010 (mfg. since 3/10) READ ELECTRICAL SAfETY ON PAGE 24! -
Page 28: Main Breakdown
main breakdown model t10010 (mfg. since 3/10) -
Page 29: Main Parts List
main parts list REF PART # DESCRIPTION PT10010001 ANGLE GUIDE PT10010002 HONING PASTE PT10010003 UNIVERSAL SUPPORT PN16M HEX NUT M12-1.75 LH PT10010005 ARBOR FLAT WASHER 12MM T20683 GRINDING WHEEL 220 GRIT A/O PT10010007 FLANGE BUSHING 15MM ID/17MM OD PT10010008 HORIZONTAL SUPPORT HOLDER PT10010009 VERTICAL SUPPORT HOLDER PT10010010... -
Page 30: Machine Labels Breakdown & Parts List
& parts list REF PART # DESCRIPTION PT10010101 ROTATION DIRECTION ARROW PT10010102 MACHINE ID LABEL PLABEL-57A GLASSES/RESPIRATOR LABEL PLABEL-12C READ MANUAL LABEL PPAINT-01 GRIZZLY GREEN TOUCH-UP PAINT model t10010 (mfg. since 3/10) - Page 31 ____60-69 ____70+ how long have you been a woodworker/metalworker? ____0-2 years ____2-8 years ____8-20 years ____20+ years how many of your machines or tools are grizzly? ____0-2 ____3-5 ____6-9 ____10+ do you think your machine represents a good value? ____yes...
- Page 32 2069 bellingham, Wa 98227-2069 tape along edges--please do not staple...
-
Page 33: Warranty
Warranty grizzly industrial, inc. warrants every product it sells for a period of 1 year to the original purchaser from the date of purchase. this warranty does not apply to defects due directly or indirectly to misuse, abuse, negligence, accidents, repairs or alterations or lack of mainte- nance. - Page 34 Buy Direct and Save with Grizzly – Trusted, Proven and a Great Value! ® ~Since 1983~ Visit Our Website Today For Current Specials! ORDER 24 HOURS A DAY! 1-800-523-4777...
Need help?
Do you have a question about the T10010 and is the answer not in the manual?
Questions and answers