GReddy Intercooler Kit Installation Manual
2009 – on hyndai genesis turbo front mount type 24 ls
Hide thumbs
Also See for Intercooler Kit:
- Installation manual (18 pages) ,
- Instruction manual (9 pages) ,
- Installation manual (7 pages)
Advertisement
Quick Links
GReddy Intercooler Kit
GReddy Intercooler Kit
GReddy Intercooler Kit
GReddy Intercooler Kit
2009
2009
2009
2009 – – – – on HYNDAI GENESIS TURBO
Installation of this kit requires modifications to the front bumper and
Installation of this kit requires modifications to the front bumper and
Installation of this kit requires modifications to the front bumper and
Installation of this kit requires modifications to the front bumper and
removal of the bumper reinforcement. Please check with the owner of
removal of the bumper reinforcement. Please check with the owner of
removal of the bumper reinforcement. Please check with the owner of
removal of the bumper reinforcement. Please check with the owner of
the vehicle before
the vehicle before
the vehicle before installing this kit.
the vehicle before
on HYNDAI GENESIS TURBO
on HYNDAI GENESIS TURBO
on HYNDAI GENESIS TURBO
Front mount Type 24 LS
Front mount Type 24 LS
Front mount Type 24 LS
Front mount Type 24 LS
installing this kit.
installing this kit.
installing this kit.
―1―
Advertisement

Related Manuals for GReddy Intercooler Kit


Summary of Contents for GReddy Intercooler Kit
- Page 1 GReddy Intercooler Kit GReddy Intercooler Kit GReddy Intercooler Kit GReddy Intercooler Kit 2009 2009 2009 2009 – – – – on HYNDAI GENESIS TURBO on HYNDAI GENESIS TURBO on HYNDAI GENESIS TURBO on HYNDAI GENESIS TURBO Front mount Type 24 LS...
- Page 2 2. If installed by an untrained person, it may cause damage to the kit as well as the vehicle. 3. GReddy Performance Products Inc. is not responsible for any damage to the vehicle caused by improper installation. 4. Call your GReddy Authorized dealer or GReddy Performance Products if there are any problems or questions regarding this product.
-
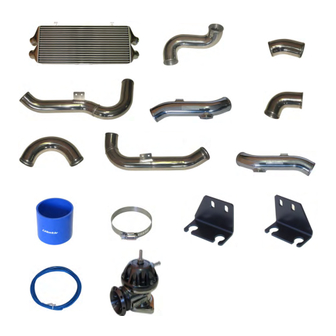
Page 3: Parts List
PARTS LIST PARTS LIST PARTS LIST PARTS LIST Intercooler Type 24 LS Intake Pipe I-1 (50Φ Aluminum) 〃 I-2 (50Φ Aluminum) 〃 I-3 (60Φ Aluminum) 〃 I-4 (70Φ Aluminum) Silicone Hose PR 50Φ × 70mm Straight 〃 60Φ × 70mm Straight 〃... - Page 4 PARTS LIST PARTS LIST PARTS LIST PARTS LIST 6 - 10 11 - 13 16 - 19 ―4―...
- Page 5 2. Removal of Stock Parts 2. Removal of Stock Parts 2. Removal of Stock Parts 2. Removal of Stock Parts Please refer to the factory service manual Please refer to the factory service manual Please refer to the factory service manual Please refer to the factory service manual for the proper removal of stock parts.
-
Page 6: Kit Installation
3. KIT INSTALLATION 3. KIT INSTALLATION 3. KIT INSTALLATION 3. KIT INSTALLATION 3 3 3 3 - - - - 1 1 1 1 Mount the Intercooler Mount the Intercooler Mount the Intercooler Mount the Intercooler Mount the top bracket of the Intercooler Stock Bolt to the horn bracket using the stock bolt. - Page 7 Install the intake pipe I-2 to Intercooler and put a washer between frame and bracket. I-2 bracket Washer M6 bolt Chassis Washer Spring Washer (Parts used #3, 9, 11, 12, 17, 19) Install the Intercooler pipe I-3 and relocate the power steering oil cooler. clamp spacer M6x 20mm bolt...
- Page 8 Install the Intercooler pipe I-4 and reinstall the stock pressure sensor on the I-4. (Parts used #5, 8, 10, 12, & Impact foam 3 3 3 3 - - - - 3 3 3 3 Bumper Modification Bumper Modification Bumper Modification Bumper Modification Remove the impact foam from the bumper.
- Page 9 4 . Starting the Engine 4 . Starting the Engine 4 . Starting the Engine 4 . Starting the Engine (1) Check all the pipe and hose connections. Then reconnect the negative side of the battery. (2) Start the engine. While idling, check for any air leeks. (3) After inspection, reinstall the front bumper, under carriage cover and other stock parts that was removed.
Need help?
Do you have a question about the Intercooler Kit and is the answer not in the manual?
Questions and answers