
Related Manuals for Fujitsu AUT Series


Summary of Contents for Fujitsu AUT Series
-
Page 1: Cassette Type
OPERATING MANUAL AIR CONDITIONER CASSETTE TYPE AUT Series KEEP THIS MANUAL FOR FUTURE REFERENCE FUJITSU GENERAL LIMITED P/N9378589025-02... -
Page 2: Table Of Contents
CONTENTS SAFETY PRECAUTIONS ........1 SELF-DIAGNOSIS ..........9 NAME OF PARTS ........... 2 ADJUSTING THE DIRECTION OF PREPARATORY OPERATION ......... 3 AIR CIRCULATION ..........10 OPERATION ............3 SWING OPERATION ..........10 TIMER FUNCTIONS ..........5 CLEANING AND CARE ........11 ON/OFF TIMER ............ -
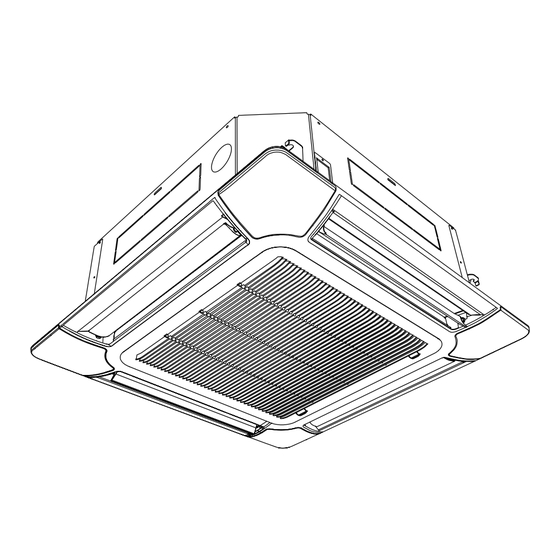
Page 3: Name Of Parts
NAME OF PARTS 1 Air Filter (In Air Intake Grille) 2 Air Flow Direction Flaps 3 Air Intake Grille 4 Remote Controller (Wired) 5 Control Panel (OPTION) 6 Remote Control Signal Receiver 7 MANUAL AUTO Button 8 OPERATION Indicator Lamp (Green) 9 TIMER Indicator Lamp (Orange) 0 FILTER Lamp (Red) A REMOTE CONTROLLER (Wireless) -
Page 4: Preparatory Operation
PREPARATORY OPERATION Set the current day and time Press the DAY button and select the current day. appears around the selected day. Press the timer mode (CLOCK ADJUST) button for 2 seconds or more. The time display on the remote controller will flash. Press the set time buttons to set the current time. - Page 5 To set the operation mode G Operation mode setting Press the master control button to set the operation mode. If DRY is selected, the fan speed will be set to AUTO. AUTO COOL HEAT G Room temperature setting Press the set temperature buttons to set the room temperature. Temperature setting range AUTO ..........
-
Page 6: Timer Functions
OPERATION Child lock function Press the DAY (DAY OFF) button and SET button simulta- neously for 2 seconds or more to activate the child lock function and lock all buttons on the remote controller. Press the buttons again for 2 seconds or more to deacti- vate the child lock function. -
Page 7: Weekly Timer
WEEKLY TIMER Weekly timer setting SU MO TU WE TH FR SA 3 6 9 12 15 18 21 Press the SET button for Press the timer mode button to select the weekly timer. 2 seconds or more. G Day of the week setting SU MO TU WE TH FR SA Press the DAY button to select the day of the week, and then press the SET button to confirm the setting. -
Page 8: Weekly Timer Operation
WEEKLY TIMER WEEKLY timer operation G To start G To cancel SU MO TU WE TH FR SA 3 6 9 12 15 18 21 When the weekly timer is selected, the • Press the DELETE button to cancel 3 6 9 12 15 18 21 timer starts automatically. -
Page 9: Temperature Set Back Timer
TEMPERATURE SET BACK TIMER Temperature SET BACK timer setting SET BACK SU MO TU WE TH FR SA If there is no existing SET BACK tempera- ture setting, “- -” will be displayed for the 3 6 9 12 15 18 21 temperature. -
Page 10: Filter Display Reset
FILTER DISPLAY RESET To Reset Filter Display Press the MAINTENANCE for 2 seconds or more. The filter display will disappear. SELF-DIAGNOSIS When “EE” in Temperature Display is displayed, inspection of the air conditioning system is necessary. Please consult authorized service personnel. Unit number (usually 0) Error code SU MO TU WE TH FR SA... -
Page 11: Adjusting The Direction Of Air Circulation
ADJUSTING THE DIRECTION OF AIR CIRCULATION Instructions relating to heating (*) are applicable only to “HEAT & COOL MODEL” (Reverse Cycle). Start air conditioner operation before performing this procedure. To set the operation mode G Vertical air direction adjustment * Press the START/STOP button to start the air conditioner, and then pro- ceed as follows. -
Page 12: Cleaning And Care
CLEANING AND CARE ● Before cleaning the unit, be sure to stop the unit and turn off the electrical breaker. CAUTION! ● A fan operates at high speed inside the unit, and personal injury could result. ● Be careful not to drop the intake grille. ●... -
Page 13: Troubleshooting
TROUBLESHOOTING Instructions relating to heating (*) are applicable only to “HEAT & COOL MODEL” (Reverse Cycle). In the event of a malfunction (burning smell, etc.), immediately stop operation, turn off the elec- WARNING! trical breaker, and consult authorized service personnel. Merely turning off the unit’s power switch will not completely disconnect the unit from the power source. -
Page 14: Operating Tips
TROUBLESHOOTING Instructions relating to heating (*) are applicable only to “HEAT & COOL MODEL” (Reverse Cycle). Symptom Items to check See Page G Has the circuit breaker been turned off? Doesn’t operate at all: CHECK ONCE G Has there been a power failure? —... - Page 15 OPERATING TIPS Mode operation: AUTO COOLING MODEL G When the room temperature is 2 °C higher than the set G During the Drying mode operation, the FAN setting should temperature, the mode will switch between Cooling and be switched to LOW for a gently cooling effect during Drying.
-
Page 16: Auto Restart
OPERATING TIPS AUTO Restart In Event of Power Interruption G Should the power supply to the air conditioner be inter- G Use of other electrical appliances (electric shaver, etc.) or rupted by a power failure, the air conditioner will restart nearby use of a wireless radio transmitter may cause the automatically in the previously selected mode once the air conditioner to malfunction.
Need help?
Do you have a question about the AUT Series and is the answer not in the manual?
Questions and answers