
Related Manuals for Fantasea FP7100


Summary of Contents for Fantasea FP7100
- Page 1 Fantasea Line FP7100 Housing (Cat. No. 1119) For Nikon Coolpix P7100 Instruction Manual Fantasea FP7100 Housing Instruction Manual 20111213...
-
Page 2: Table Of Contents
EXTERNAL FLASHES ..........................19 ............................21 CCESSORIES ..........................22 OUSING TRAP ................... 22 ONNECTOR FOR IGHTING CCESSORIES LEAK DETECTOR ............................22 FP7100 H ......................22 OUSING CCESSORY YSTEM CARE & MAINTENANCE ........................... 23 FANTASEA PRODUCT CONSUMER LIMITED WARRANTY ............24... -
Page 3: Disclaimer
While every effort has been made in order to ensure that the information included in this instruction manual is accurate and complete, no liability will be accepted for any errors or omissions. Fantasea Line reserves the right to change product specifications and features described herein at any time without prior notice. -
Page 4: Features & Specifications
Features & Specifications Depth rated to 60m/200 feet Made from durable injection molded Polycarbonate Access to all camera controls and functions Shock resistant Double O-ring main seal Special hot-shoe mount for lighting accessories Removable double fiber optic cable connection plate ... -
Page 5: Included In Package
INCLUDED IN PACKAGE 1. FP7100 Housing 6. Screwdriver 2. Removable flash diffuser with secure line 7. Silica gel packs 3. Hand lanyard 8. O-ring remover 4. Silicone grease 9. Spare back door O-ring seal 5. Anti-glare hood for LCD screen 10. -
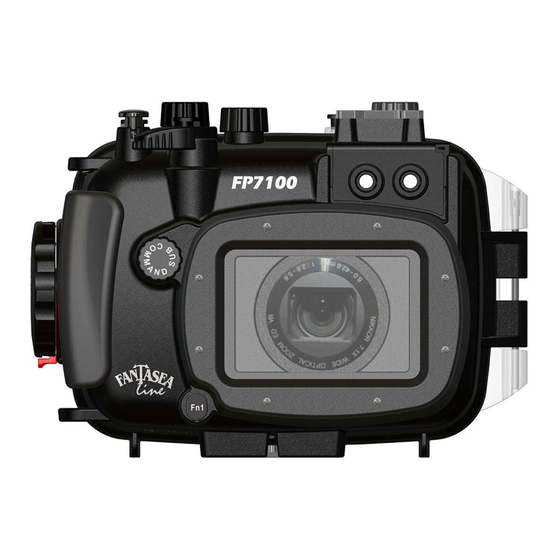
Page 6: Identification Of Housing Parts
IDENTIFICATION OF HOUSING PARTS 1. Please refer to the Nikon Coolpix P7100 camera instruction manual for detailed descriptions and instructions regarding all camera controls and Note functions. 2. It is strongly recommended that you familiarize yourself with all the controls topside before using these controls underwater. Top/Front Side of Housing Corresponding numbered descriptions are found on the following page 8. - Page 7 Numbered descriptions below refer to corresponding numbers on the top/front housing graphic on the previous page: 1. Zoom Control – Turning this control activates the camera zoom button: a. Turn the zoom control clockwise ("W") to zoom out, increasing the area visible in the frame. b.
- Page 8 9. Cold-Shoe Mount for Lighting Accessories- Enables mounting a flash, night dive torch or focus light on top of the housing by using a dedicated connector. For further information regarding such connectors, please visit the Fantasea website – www.fantasea.com 10. Fiber Optic Cable Plate- a.
- Page 9 11. Lens Port- The housing lens port is compatible with a wide variety of accessory filters and lenses. For a selection of lens accessories available, please visit the Fantasea website – www.fantasea.com 12. Tripod Mounting Screw Hole – Enables mounting the housing on a tray, thereby allowing for the addition of various image enhancement accessories to your underwater photo system (such as strobes, lights and more).
- Page 10 Numbered descriptions below refer to corresponding numbers on the back side housing graphic on the previous page: 15. Flash Pop-Up – Pushing this control activates the camera flash pop-up button and pops up the built- in camera flash. Note that once the built-in camera flash has been popped up, it cannot be pushed back down physically through the housing.
-
Page 11: The Nikon Coolpix P7100 Digital Camera
24. OK / Apply Selection - Pushing this control activates the camera OK (confirm selection) button. 25. Menu - Pushing this control activates the camera menu button. 26. Latch Dial Lock- Ensures the secure dial doesn’t accidently open during the dive. 27. -
Page 12: Setting Up The Housing
technology. Fast auto focus ensures images are caught in sharp detail. RAW format is available for greater control and high quality HD movies are simple to record. Nikon Coolpix P7100 Highlights 10.1 MP High Resolution Sensor RAW File Format ... -
Page 13: Preparing The Housing
3. It is recommended to program the camera to the most frequently used underwater photo mode, lighting and other key settings prior to installing the camera in the housing. PREPARING THE HOUSING 1. When using the housing for the first time- a. -
Page 14: Opening The Housing
Image #3 Image #4 OPENING THE HOUSING 1. Lift the small red tab located at the bottom of the latch dial upwards, as indicated by the arrow direction (image #5). There is no need to apply any force. 2. While holding the lock dial up, turn the latch dial counterclockwise until the red latch tab is located at the top of the latch and cannot be turned any further (image #6). -
Page 15: Checking The O-Ring
CHECKING THE O-RING 1. Prior to each closure of the housing, the back door O-ring should be visually inspected. If there is any debris present, including dirt, sand, dust, hair, grease or any other matter, it must be cleaned to ensure a proper watertight seal. 2. -
Page 16: Closing The Housing
3. Lift the housing mode dial so it doesn’t interfere with camera installation (image #9). 4. Hold the camera parallel to the housing and then gently install it inside (image #10). Avoid inserting one side of the camera prior to the other, as this will make the installation difficult and might cause damage to the camera or housing. -
Page 17: Removing The Camera From The Housing
3. Turn the secure dial clockwise till the lock dial clicks. The small red tab should then be pointed towards the bottom of the housing (image #13). Image #12 Image #13 4. Gently try pulling the back door away from the front door. If the housing is properly closed, it should be impossible to open the back door. -
Page 18: Using The Built-In Camera Flash
2. When opening the housing, it is important to hold it so the lens port is facing down. This will prevent the camera from slipping out of the housing while being opened. 3. Open the housing as described in the section “Opening the Housing”, pull up the mode control and carefully remove the camera from the housing. -
Page 19: Optional Accessories
The FP7100 Housing can be used with underwater slave flashes. These external flashes feature a slave sensor which triggers the external flash to fire in sync with the internal camera flash. For the full selection of Fantasea flashes and lighting sets compatible with the FP7100 Housing, please refer to the Fantasea website –... - Page 20 long as there is not much ambient light available. However, if the strobe slave sensor isn’t pointed directly at the internal camera flash, or when photographing during daylight, in clear water and bright conditions, the slave sensor might fail recognizing the output of the internal camera flash. Connecting a fiber optic cable between the internal camera flash and the slave strobe ensures full synchronization in all angles and diving conditions.
-
Page 21: Lens Accessories
EyeGrabber Lens Holders: Attach to Flex or Ball & Joint arms, enabling safe, secure and easily accessible storage for your lens accessories when not in use during the dive. For a selection of lens accessories available, please visit the Fantasea website – www.fantasea.com... -
Page 22: Housing Hand Strap
Follow the instructions included with the Leak Detector in order to install it inside the housing. For Fantasea Leak Detectors available, please visit the Fantasea website – www.fantasea.com FP7100 HOUSING ACCESSORY SYSTEM RedEye &... -
Page 23: Care & Maintenance
CARE & MAINTENANCE The Fantasea FP7100 Housing requires only a minimum amount of care for safe and reliable performance. The following tips will enable you to get the best results: 1. Always rinse your housing in streaming fresh water and if possible soak the housing in a fresh water tub or rinse tank for about 20 minutes after every dive in order to dissolve the salt water crystals from around the controls and openings of the housing. -
Page 24: Fantasea Product Consumer Limited Warranty
ONE (1) YEAR, (two years, where required by law as determined by the origin of the authorized dealer). This warranty is effective from the date of retail purchase from Fantasea or an authorized Fantasea dealer, by the original end-user purchaser (“Warranty Period”). This warranty does not cover any commercial use of the product.
Need help?
Do you have a question about the FP7100 and is the answer not in the manual?
Questions and answers