Troy-Bilt 20210 Operator's Manual
Hide thumbs
Also See for 20210:
- Owner's manual (37 pages) ,
- Operator's manual (36 pages) ,
- Owner's manual (36 pages)
Advertisement
Available languages
Available languages
Quick Links
Download this manual
See also:
Owner's Manual
O
Pressure
Washer
J Lavadora
de Presi6n
Modem / Modemo 0202 m 0
®
l[
WARNmNG
Before
using
this
product,
read
this
manual
and
follow
all
Safety
Rules
and
Operating
Instructions.
Antes de utilizar el producto, lea este manual y siga todas las
P,eglas
de
Seguridad
e Instrucciones
de
Uso.
Questions. _ Pregun[as._ Helpline
- 1-888=611-6708
H-F 8-5 CT
Troy-Bilt®
is a registered
trademark
of MTD
and is used under
license
to
Briggs
& Stratton
Power
Products.
Troy-BiJt®
es una
marca
registrada
de
HTD
Y se usa abaio
licencia
a griggs
& Strat_on
Power
Products.
BRIGGS
& STRATTON
POWER
PRODUCTS
GROUP,
LLC
JEFFERSON,WISCONSIN,
U.S.A.
Printed
in USA
Hanual No. 198666GS
Revision I (I 2/19/2005)
0
Advertisement

Related Manuals for Troy-Bilt 20210


Summary of Contents for Troy-Bilt 20210
- Page 1 Safety Rules Operating Instructions. P,eglas Seguridad e Instrucciones Uso. Questions. _ Pregun[as._ Helpline - 1-888=611-6708 H-F 8-5 CT Troy-Bilt® is a registered trademark of MTD and is used under license Briggs & Stratton Power Products. Troy-BiJt® es una marca...
- Page 2 Safety Rules SAVE THESE iNSTRUCTiONS TABLE OF CONTENTS SAFETY RULES Section H o Safety RuHes ......This is the safety alert symbol, is used Section 2 - Features and ControHs ....alert you to potential persona[ iniury Section 3 o AssembHy ......hazards.
- Page 3 Section 1: Safety RuJes WARNING WARNING WHEN ADDING FUEL Turn pressure washer OFF and let it cool at least 2 minutes before removing gas cap, Fi[[fuel tank outdoors, Operate pressure washer ONLY outdoors, Keep exhaust gas from entering a confined area through DO NOT overfill tank, Allow space for fuel expansion.
- Page 4 Section 1: Safety Rules WARNING WARNING ALWAYS point gun in safe direction and squeeze spray gun tri_er_ to release pressure and avoid kickback each time, NEVER aim spray gun at people, animals or plants, before starting engine. Engage trigger Ioc!< when not in use. DO NOT allow CHILDREN to operate pressure washer:...
- Page 5 Section 1: Safety Rules CAUTION [f you have questions about intended use, ask dealer or , DO NOT tamper with governed speed contact Brigs & Stratton Power Products. , DO NOT operate pressure washer above rated pressure. NEVER operate units with broken or missing parts, or without protective...
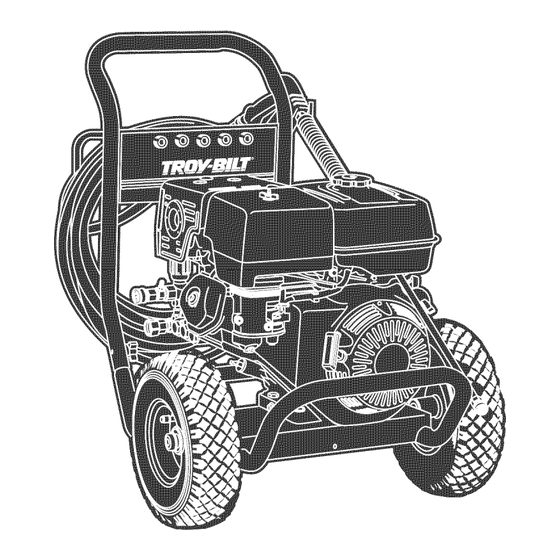
- Page 6 Features and Controls KNOWYOUR PRESSURE WASHER iI- lil.ead t h,. o perator', m,,ooa, ao, .a,ety r°,e. be,ore operat, o,yoor pre..°re w.,.her. Compare the illustrations with your pressure washer to familiarize yourself with the locations of various controls and adjustments. Save this manual for future reference. Throttle Lever Nozzle Extension with...
- Page 7 ASSEMBLY PREPARING PRESSURE WASHER mMPORTANT: Read entire operator's manuaH beforeyou attempt to assembHeor operate your new pressure washen If you have any probHems with the assembHy of your pressure washer or if parts are missing or damage& caHH the Remove Pressure 4asher From pressure washer heHpHine at i -888-6 i i -6708.
- Page 8 Section 3: Assembly Attach Handle Engine Oil and Fuel PHace handHe assembHy onto handHe supports connected ° PHace pressure washer on a HeveH surface. to mann unit. Hake sure holies in handHe aHign with holies on handHe supports (Figure 2). •...
- Page 9 Section 3: Assembly Similariy, attach other end of high pressure hose to high pressure oudet on pump (Figure 5). Puli down on collar of quick connect_ siide onto pump and iet go of collar. Puli on hose to be sure of tight connection. .
- Page 10 Operation HOWTO USE PRESSURE to Start En ine The best way to start your pressure washer for the first time is to follow these instructions step-by-steFThis starting information also applies if you have let the unit sit [f you have any problems operating your pressure washen idle for at least a day.
- Page 11 Section 4: Operation When starting engine, position yourseff as recommended WARNING in Figure i 0 and start engine according to instructions given in engine operator's manuaLAHso see operating instructions tag iocated on the pressure washer. DO NOT touch hot surfaces and avoid hot exhaust gases_ Allow equipment to cool before touching_ Keep at least 5 ft.
- Page 12 Section 4: Operation How to Use the SprayT[ps Cleaning[ Chemical The quick-connect on the nozzle extension allows you to [NPORTANT: Use soaps designed speci_ca[[y switch between five different spray tips.The spray tips vary pressure washers. Household detergents could damage the spray pattern as shown below (Figure...
- Page 13 Section 4: Opecation AppHy detergent to a dry surface, starting at Hower Increase (decrease) spray pressure by turning pressure portion of area to be washed and work upward_ using controH knob cHockwise (countercHockwise) (See long, even, overlapping strokes. DO NOT aHHow "KnowYour Pressure Washer").
- Page 14 SPECmFmCATmONS PRESSURE WASHER MAINTENANCE Outlet Pressure ......3700 psi Fmow Rate ....4.0 gaMMonsper minute (gpm) Detergent Use detergent approved for pressure washers Check Clean Inlet Screen Supply Water ....to Exceed H00°F Examine the screen on the water inlet. Clean it if the screen is dogged...
- Page 15 Section 5: Maintenance Check In-Line Filter Using a garden hose, remove additional debris by back flushing water through nozzle extension (Figure 14). Refer to Figure [ 2 and service the in:Nne filter if it Back flush between 30 to 60 seconds. becomes dogged, as foNows:...
- Page 16 Section 5: Maintenance Pump Maintenance Data tag information is very important if you need help from Changing Pump Oil our Customer Service Department or an authorized service Change oil after first 50 hours of operation and then every dealer. 200 hours or 3 months, whichever occurs first.
- Page 17 Storage PREPAPJNG fJNmT To use PumpSaver, make sure the pressure washer turned off and disconnected from suppHy water. Read and FOP, STORAGE follow aHH instructions and warnings given on the PumpSaver container. Water shouHd not remain in the unit for Hong periods of time.
- Page 18 TROUBLESHOOTmNG Problem Correction Cause spray tip with high Rephce Low pressure spray tip installed. pressure spray tip. VVater inHetis Mocked. Clear inlet. Inadequate water supply. Provide adequate water flow. InHethose is kinHmdor leaking. Straighten inlet hose, patch leak. Pump has foRowing problems: Check and clean inlet hose Clogged inlet hose strainer.
- Page 19 TROYoBILT® OWNERWAR_NTY POLICYEffective Novemberm, 2 004 LiMiTED WARRANTY "TroyoBilt® is a registered trademark of P1TD and is used under license to Brigs & Stratton Power Products. Brigs & Stratton Power Products will repair or rephce, free of charge, any part_ or parts of the eqopment _:* that are defective in material or workmanship or both.Transportation charges on product submitted for repair or replacement...
- Page 20 Reglas de Seguddad CONSERVE ESTAS [NSTRUCCIONES TABLA DE CONTENIDOS REGLAS DE SEGUR[DAD Secd6n U Regias De Seguridad ..... 20-23 [_ste es el sJmbo[o de a[erta de seguridad. Sirve Secci6n 2 Caracteris_icas Y Contrdes ....para advertir a[ usuario de un posible riesgo para Secci6n 3...
- Page 21 Secd6n 1: Re [as de $eguddad ADVERTENCIA CUANDO ANADA COMBUSTIBLE Apague el lavadora de presi6n (posid6n OFF) y d6ielo enfl ia{ al menos pol 2 minuLos antes de lemover h tapa de la gasolina. Opere el lavadora de presi6n SOLAHENTE al aile libre.
- Page 22 5ecd6n 1: Reglas de Seguddad ADVERTENCIA Antes de arrancar e] motor, apunte SIEMPRE con la pistola rociado_a hacia una direcci6n segula y apriete el gadllo para descalgal NUNCA apunte la pistola a la gen_e, animales o plangas. presi6n y evitar el letroceso.
- Page 23 $ecd6n 1: Re Jas de $eguridad PRECAUCI6N NO juegue con paltes que puedan aumental o disminui! h velocidad Si usted tiene alguna pregunta acerca de las finalidades de uso del de rnando, generado!: preg0ntele a su eoncesionario o contaete a Bliggs & NO opere la m_quina lavadora a presidn...
- Page 24 Caracter[sticas y ControIes CONOZCA SU MAQUINA LAVADORA DE PRE$ION i_._J.--/I..Compare las ilustraciones con su m_quina [avadora a presi6n para familiarizarse con Jas ubicadones de los dfferentes controles y ajustes. Guarde este manual para referent[as futuras. El Tanque de[ Gasdina Perilla de[ Cebador Excensi6n para BoquiHas con Palanca de [aV_JvuJa de...
- Page 25 Montaje PREPARANDO EL LAVADOR PRESI6N PARA SO USO mMPORTANTE: Lea totarmente et manual del operario antes que intente ensamblar u operar su I_vador a presi6n_ Si usted tiene un problems aI ensamblar Ia unidad o si hacen f_lta Remueva el Lavador a Presi6n algunas piezas...
- Page 26 Secci6n 3: Montaje Manubrio Conect÷ Agregar Aceit÷ am Motor y Gasomina Coloque el manubrio sobre los soportes del mismo que ya Coloque la lavadora a presi6n sobre una superficie nivelada_ est_n adheridos a la unidad principaLAseg@ese de que Ios orifidos en el manubrio est6n arineados con Ios orifidos los soportes...
- Page 27 Secci6n 3: Montaje De Ia misma manera, conecce el otto extremo de la manguera atta presi6n, a la salida de alta presi6n de ra bomba (Figu_ 20). Nale el collar de la conexi6n r_pida, deslicelo en la bombay sueIce el coIIan NaIe la manguera para asegurarse que esta bien conectada.
- Page 28 Operad6n ¢()HO USAR SU LAVADORA C6mo Dar[e Arranque a su Lavadora Presi6n Para dar[e arranque a su m_quina [avadora a presi6n movida a Si dene problemas operando su m_quina lavadora a presi6n, por motor por primera vez, siga estas instrucciones paso a paso.
- Page 29 Secd6n 4: Operaci6n Cuando arranque el motor; co!6quese en Ia posid6n ADVERTENClA recomendada en Ia Figura 25 y siga las instrucciones manual del usuario del motor: Consulte tambi_n Ia etiqueta de instrucciones situada en la limpiadora a presi6n. NO toque las supelficies calientes 7 evite...
- Page 30 $ecd6n 4: Operaci6n C6mo Usar [as Punta de Rociado Lirnpieza y Ap[icaci6n de[ Qu[rnico La conexi6n r_pida de la extensi6n para boquiilas [e permite usar IMPORTANTE: Ut[[ice quire[cos diseffados dnco pun_as de rocio diferentes, Las puntas de roclo denen especificamente para m_quinas [avadoras...
- Page 31 Secd6n 4: Operad6n & ApIique et detergente sobre la superficie seca, comenzando Aumente (disminuya) [a presi6n de rociado ai darle vuelta a [a la parte inferior de! _rea y dirigi6ndose hacia arriba, utiiizando perilIa en [a direcci6n de Ias maneciIJas deI relo] (en direcci6n movimientos largos, parejos y superpuestos.
- Page 32 ESPEC(F(CAC(ONES Revise [a Manguera de Alta Presi6n Presi6n de Sa[ida ......3700 PSU Las mangueras de alta presi6n pueden desarrollar fugas debido al desgas_e, dobJeces o abuso. Revise [a manguera antes de cada uso. Caudal ..... 4.0 galones por minuto (gpm) Revise si existen cortes, fugas, abrasiones, [evantamiento de [a...
- Page 33 Secd6n 5: Mantenimiento Nantenirniento los Anillos CoJoque el cohdor eierdendo presi6n con e! borrador un I_piz hasta que se asiente por completo en el rondo de la Compre una O-Juego de Nantenimiento deAnilIo, el artieulo abertura.Tenga cuidado de no dobhr el colador_ numera 191922GS,...
- Page 34 Vuelva a porter la varilJa de niveJ de aceite de [a bomba en su El salvador de [a bomba de la marca de[ uso a previene [a lugar. corrosi6n constru7'e 7, he[ado de bomba. Limpie el aceite que se haT,a podido derramar. A[macene [a unidad en un lugar limpio 7' seco.
- Page 35 Diagnosticos de Aver[as DmAGNOSTmCOS DE AVERJAS ProbJema SoJuci6n Causa Esc_ usando la boquilJa de baia presi6n Carnbie Ja boquiJJa a una de Jas_res (negra). boquiJhs de aka presi6n. La en_rada de agua est_ b[oqueada. Limpie la entrada, Sum[nistro de agua inadecuado. Proporcione fluio de agua adeeuado.
- Page 36 POLJTiCA PARA EL PROPiETARIO DE EQUiPOSTROY=BiLT® Efectiva desde em J ro de Noviembre, 2004 GARANTIA LHMITADA "Troy-Bik® es una rnarca registrada de MTD baio licenda de Briggs & Stratton Power Products_ BriF_s & Stratton Power Products reparar_ sustituir_ sin cargo aJguno cualquier componente del eqopo**...
Need help?
Do you have a question about the 20210 and is the answer not in the manual?
Questions and answers