
Related Manuals for Snapper SPXV2270HW


Summary of Contents for Snapper SPXV2270HW
- Page 1 Operator's Manual Model No. Description SPXV2270HW 7800776 NS PX V22 70H W 7800779 Manual No. 7104756 (Rev. '-')
- Page 2 Thank You for purchasing this quality-built Snapper mower. We're pleased that you placed your confidence in the Snapper brand. When operated and maintained according to the instructions in this manual, your Snapper mower will provide many years of dependable service.
-
Page 3: Table Of Contents
Tableof Contents OperatorSafety ................... Safetyinstructions ........................Safety and Operation Decals ....................... Featuresand Controls................AssembJy ................... Operation ..................BeforeStarting .......................... FuelRecommendations ......................StartingtheMower........................Propelling the Mower....................... HandleHeightAdjustment ......................CuttingHeightAdjustment ......................MulchingOperation ........................installingthe Discharge Deflector ..................... installingthe Grass Bag ......................Maintenance R eminder ...................... -
Page 4: Safetyinstructions
If you haveany questions pertaining to your machine which your dealer cannot answer to your satisfaction, contact Customer Service (1-800-317-7833 or www.snapper.com). PREPARATION PROTECTION FOR CHILDREN... - Page 5 Operator Safety SAFE HANDLING OF GASOLINE OPERATION (ContinuedFromPreviousPage) (ContinuedFrom PreviousColumn) 7. Remove gas-powered equipment from the vehicle or 14. DO NOT discharge material against a wail or trailer and refuel it on the ground. If this is not possible, obstruction. Material may ricochet back towards the then refuel equipment using a portable container, rather operator.
-
Page 6: Operatorsafety
If any of these decals are lost or damaged, replacethem immediately. Contact your dealer for replacement decals. Mower Run Part No. 7104745 Mower Stop Part No. 7104746 Mower Start Part No. 7104747 Drive Control Part No. 7104744 SafetyWarnings Part No. 7101394 Keep Hands and FeetAway Part No. 7013010 www.snapper.com... - Page 7 OperatorSafety Explanation of Safety Decals A. WARNING:Avoid Serious injury or Death B. DANGER:Amputation and Thrown Object Hazard. Readthe operator's manual before attempting to To avoid serious injury or death, keep hands and operate the mower. feet away from the mower deck at all times during operation.
-
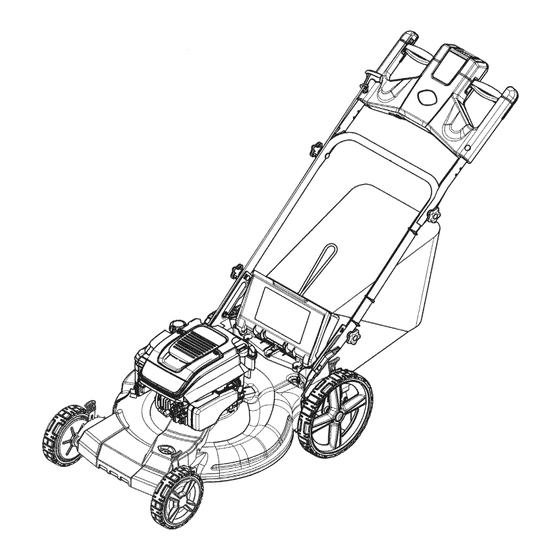
Page 8: Featuresand Controls
Contact your dealer if you have questions. Oil Fill Capand Dipstick Blade Control (2) Fuel Filler Cap Drive Control (2) Mulching Cover Starter Rope Handle Maintenance Reminder Cutting Height Adjust Lever (at each wheel) www.snapper.corn... - Page 9 Assembly Unpack the Mower Cut all four corners of the box from top to bottom. Remove all packing materials from the mower. Locate and identify the items included with the mower: * Mulching plug (A, Figure 1 - installed) * Grass bag (B) * Side discharge deflector (C) * Operator's manual (D) Figure2: Raisingthehand/e assembly...
-
Page 10: Operation
The figures and illustrations in this manual are provided for reference only and may differ from your specific model. Contact your dealer if you have questions. Figure5: 0il andfuel fill iMPORTANTMower is shippedwithout oil in engine. Failure to add oil before starting will result in engine damage. www.snapper.com... -
Page 11: Startingthemower
Operation Starting the Mower The engine on this mower is equipped with a ReadyStart ® system, which features a temperature-controlled automatic choke, it does not have a manual choke or a primer. 1. Squeezethe blade control (A, Figure 6) against the drive control (B). -
Page 12: Cuttingheightadjustment
3. Proceed mowing slowly. Gradually lower the cutting height to obtain the best combination of cutting and mulching performance. Cutting too much grass in one pass, or cutting wet heavy grass may cause clumping or plugging of the mower deck. www.snapper.corn... -
Page 13: Installingthe Grass Bag
Operation nstallingthe GrassBag WARNING DONOT attempt any maintenance,adjustments or service with engine and blade running. STOPengine and blade. Removestarter insert. Disconnect spark plug wire and secure away from spark plug. Engine and components are HOT.Avoid serious burns, allow sufficient time for all components to cool. -
Page 14: Maintenance R Eminder
1. Press the 'Mode' button until the 'Change Oil' screen is displayed. (The icon will flash.) 2. Press and hold the 'Reset' button for more than 3 seconds. NOTEIf not reset, the 'ChangeOil' icon will automatically disappear after 3 operating hours. Figure14:Maintenance r eminder www.snapper.c0rn... -
Page 15: Maintenance Chart
Operation Maintenance Chart WAeNING Emissions Control Maintenance, replacement, or repair of the emissions control DONOT attempt any maintenance,adjustments or service devices and systems may be performed by any non-road with engine and blade running. STOPengine and blade. engine repair establishment or individual. However, to obtain Removethe starter insert. -
Page 16: Changeengineoil
Dispose of used oil properly. 3. Place the mower upright, then fill the engine with engine oil to the 'full' mark on the dipstick. Briggs & Stratton warranty-certified SAE30 lawnmower oil is recommended. Do not overfill. ® Figure15:Drainingtheengineoi/ www.snapper.corn... -
Page 17: Checksafetyinterlocksystem
Maintenance 11.Start the engine and run for 2-3 minutes, to allow the CheckSafety InterlockSystem underside of the mower deck to dry. 1. Start the mower. 2. Releasethe blade control. The engine must stop within 3 seconds. if the engine does not stop, do not use the mower. Bring the mower to an authorized dealer for service. -
Page 18: Drivecontroladjustment
Run the engine until it stops from lack of fuel. The use of a fuel stabilizer in the storage container is recommended to maintain freshness. www.snapper.corn... -
Page 19: Troubleshooting
Troubleshooting PROBLEM PROBABLE CAUSE CORRECTIVE ACTION Engine Will Not Start 1. Fuel tank empty. 1. Fill fuel tank with fresh fuel. 2. Spark plug wire disconnected. 2. Placespark plug wire onto spark plug. Engine Stalls or Loses 1. Blade control is releasedor is not being held 1. -
Page 20: Warranties
For warranty service, find the nearest Authorized Service Dealer using our dealer Iocator at www.BriggsandStratton.com or www.Snapper.com. There is no other express warranty. Implied warranties, including those of merchantability and fitness for a particular purpose, are limited to one year from purchase or to the extent permitted by law. - Page 21 Warranties January 2011 California, U.S. EPA, and Briggs & Stratton Corporation Emissions Control Warranty Statement Your Warranty Rights Obligations Owner's Warranty Responsibilities: The California Air Resources Board, U.S. EPA, and Briggs & Stratton (B&S) pleased to explain the emissions control system warranty on your Model Year As tile engine / equipment owner, you are responsible...
- Page 22 Notes www.snapper.corn...
- Page 23 Operate a walk-behind mower across the face of slopes, never up or down slopes. Operate a riding mower up or down slopes, never across the face of slopes. 10 DEGREES 15 DEGREES On a riding mower to determine if a slope is safe to mow: (1) disengage the blade(s), (2) put the unit in reverse, and (3) try to back straight up the slope, if you can back up the slope, it is generally safe to mow.
- Page 24 Common Service Parts Part Number Specifications Mowsr Mowsr Mower Blade 7103288 Deck Size (in) Drive Belt 7103362 Height of Out (in) 1.25 - 4 Transmission Type Variable Speed/Gear Ground Speed (mph) 0 - 4.2 Blade Torque (ft-lbs) Engine Engine Power (ft-lbs) 7.00 Engine Displacement (cc) Fuel Tank Capacity (qt)
- Page 25 Manual del usuario _8oo_8 spxw_,o.w N.___° de m.__ OdelO_ Descripci6n...
- Page 26 Graciasper haber adquirido este cortac_spedSnapper de alta calidad. Le agradecemosla confianza que Ud. ha depositado en la marca Snapper. Si se manejay se realizael mantenimiento adecuadotal y come se indica en este manual,su cortacespedSnapper le proporcionar_ a_os de funcionamiento liable.
- Page 27 Indite Seguridad del usuario ................Instrucciones de seguridad ......................Etiquetas transparentes de seguridad y funcionamiento ............. Caracteffsticas y rnandos ................ IVlontaje..................... Operaci6n ..................Antesde empezar ........................Recomendaciones sobrecombustible ..................Encendido del corta@sped ....................... PropulsiOn del corta@sped ...................... Ajustede alturadel mango.......................
- Page 28 Si tiene alguna pregunta reiativa a su mD, quina que su distribuidor no pueda responder como usted desea, p6ngase en contacto con ei Departamento de Atenci6n al Cliente (1-800-317-7833 o www.snapper.com). PROTEJA A LOSNINOS...
- Page 29 Seguridad dei usuario iVlANIPULACI(}N S EGURADE LA GASOUNA FUNCIONAIVllENTO (Continuaci6nde la p gina anterior) (Continuaci6nde la columnaprevia) 7. Retire del veh[culo o cami6n el equipamiento que se alimente 14. NO descargue materiales contra paredes u obst6,culos.Los de gasolina y reponga ei carburante sobre el suelo. Si esto no materiaies puede rebotar hacia el usuario.
- Page 30 Funcione del cortac6sped N-°Pieza 7104745 del cortac6sped ................N-°Pieza7104746 2A(_//2. "_ , Arranque del cortac6sped ..N-°Pieza7104747 Control de transmisidn N-°Pieza 7104744 Advertencias de seguridad No` Pieza7101394 Mantenga alejados manos y pies No` P ieza7013010 www.snapper.com...
- Page 31 Seguridad del usuario Explicaci6n del significado de las etiquetasde seguridad A. ADVERTENCIA:Evite la muerte o lesiones graves PELIGRO: R iesgo de amputacionesy de lanzamientode objetos. Para evitar lesiones graves o la muerte, mantenga las Lea el manual del usuario antes de intentarusar el cortac_sped.
- Page 32 Tapa de Ilenado de aceite y varilla indicadora Control de cuchillas (2) Tapa de reileno de combustible Control de transmisi6n (2) Tapa de la desmenuzadora Manilla de la cuerda del motor de arranque Recordatorio de mantenimiento Palancade ajuste de altura de corte (en cada rueda) www.snapper.corn...
- Page 33 IVlontaje Desembalajedei cortac6sped 1. Corte las cuatro esquinas de la caja de arriba a abajo. 2. Quite todo el material de embalaje del cortac6sped. 3. Localice e identifique todos los componentes incluidoscon el cortac6sped: * Tap6n de cubrici6n (A, Figura 1 - instaJado) , Bolsa para hierba (B) , Deflector de descarga lateral (C) , Manual del usuario (D)
- Page 34 _nicamente come referencias y pueden diferir de su concrete modelo. Contacte con su distribuidor si tiene preguntas que formular. Figura5: L/enado de aceitey combustib/e IMPORTANTEEI ¢ortac_spedse envia sin aceite en eJmotor. Si no afiade aceite antes de arrancar eJmotor, eJ motor resuJtar_ dafiado. www.snapper.corn...
- Page 35 Operaci6n Encendido del cortac6sped El motor de este cortac6sped est,, equipado con un sistema ReadyStart®, que incorpora un estrangulador autom_,tico controlado por temperatura. No dispone de un estrangulador manual o un cebador. 1. Apriete el control de la cuchiNa(A, Figura 6) contra el control de transmisi6n (B).
- Page 36 3. Comience a cortar el c6sped lentamente. Baje gradualmente la altura de corte para obtener la mejor combinaci6n de rendimiento de corte y triturado. Si corta demasiada hierba en una pasada,o corta c_sped muy h_medo, la cubierta del cortac6sped puedeatascarse. www.snapper.corn...
- Page 37 Operaci6n nslalaci6nde ia boisade c6sped ADVERTENCIA NO intente realizar ning_n tipo de mantenimiento o ajuste con el motor y la cuchiNaen funcionamiento. DETENGA el motor y la cuchiNa. Quite la Navede acceso. Desconecteel cable de la bujia y mant6ngalo alejado de la bujia. El motor y los componentes est_,nCALIENTES.Para evitar quemaduras graves, espere suficiente tiempo a que todos los componentes se enfrien.
- Page 38 1. Presione el bot6n "Modo" hasta que aparezca la pantafla "Cambiar aceite". (El icono parpadear6,) 2. Presione y mantenga presionado ei bot6n "Restablecer" durante m6,sde 3 segundos. NOTA: S i no se restablece, el icono "Cambiar aceite" desaparecer6, autom6,ticamentedespu6s de 3 horas de funcionamiento. Figura14:Recordatorio d e mantenimiento www.snapper.c0rn...
- Page 39 Operaci6n Tabla de mantenimiento Control de ernisiones ADVERTENCIA Cuaiquier estabiecimiento de reparaci6n de motores que no est_ en NO intente realizar ning_n tipo de mantenimiento o ajuste con el ei camino o cualquier individuo pueden reaiizar el mantenimiento, motor y la cuchilla en funcionamiento. DETENGA el motor y la reemplazo o reparaci6n de los dispositivos y sistemas de control de cuchilla.
- Page 40 3. Coloque recto el cortac6sped y Ileneel motor con aceite para motor basra ia marca que indica 'lleno' de la varilla. Se recomienda usar aceite para cortac6sped SAE30 con certificado de garantia Briggs & Stratton. No Ilene el dep6sito On OXCO$O. ® Fl_Tura 1 5:Drenajede/ace/re de/motor www.snapper.corn...
- Page 41 IVlantenimiento 5. Conecte ei extremo macho de una manguera est_,ndarcon el Revisarel sistemade bloqueode conector del puerto de deslave (A, Figura 16). seguridad 6. Sit_e en posici6n ON el suministro de agua para la manguera. 7. Arranque el motor y deje que funcione hasta que no salga m_,s 1.
- Page 42 Haga funcionar ei motor hasta que se detenga debido a la falta de combustible. Es recomendable usar un estabilizador de combustible en ei contenedor de almacenamiento para mantener ei combustible en buen estado. www.snapper.corn...
- Page 43 Soluci6n de problemas ACCION CORRECTIVA PROBLEMA CAUSAPROBABLE El motor no arranca 1. El tanque de combustible est,, vado. 1. Llene el dep6sito de con combustible reciente. 2. El cable de la bujia est,, desconectado. 2. Conecte el cable de la bujia en la bujia. 1.
- Page 44 Iocalizador de distribuidores www.BriggsandStratton.com o www.Snapper.com. No existe otra garantia expresa. Las garantias implicitas, inclusive aquellas de comerciabilidad y de idoneidad para un prop6sito en particular se limitan a un aSo a partir de la fecha de compra o hasta los limites permitidos por la ley.
- Page 45 Notas...
- Page 46 www.snapper.corn...
- Page 47 €'0 Utilice el cortacesped del tipo "walk behind" a Io ancho de la cara de las pendientes, nunca de arriba a abajo. Utilice el cortacesped monta de arriba a abajo de las pendientes, nunca a Io ancho 10 GRADOS 15 GRADOS de la cara de las pendientes.
- Page 48 N rnero de Especificaciones Cornponentesde rnantenirniento Cortac_sped general pieza Dimensiones de la cubierta (pulg.) Cortac_sped 1,25-4 Altura de corte (pulg.) 7103288 Cuchilla del cortac6sped Veiocidad/pi_6n v ariable Correa de tracci6n 7103362 Tipo de transmisi6n 0 -4,2 Velocidad de suelo (millas por hora) Torsi6n de cuchilla (ft-lbs) Motor 7,00...
Need help?
Do you have a question about the SPXV2270HW and is the answer not in the manual?
Questions and answers