Table of Contents

Related Manuals for MTD 31A-050-706


Summary of Contents for MTD 31A-050-706
- Page 1 Safe Operation Practices • Set-Up • Operation • Maintenance • Service • Troubleshooting • Warranty OPER roR's Electric Snow Thrower m Model 050 MTD LLC, P.O. BOX 361131 CLEVELAND, OHiO 44136-0019 PrintedIn USA FormNo.769-07058A (JuLy 14,2011)
-
Page 2: Serial Number
Choose from the options below: Visit us on the web at www.mtdproducts.com Call a Customer Support Representative at (800) 800-7310 or (330) 220-4683 Write to MTD LLC • EO. Box 361131 • Cleveland, OH • 44136-0019... -
Page 3: Important Safe Operation Practices
ImportantSafeOperation Practices WARNING: This symbol points out important safety instructions which, if not followed, could endanger the personal safety and/or property of yourself and others. Read and follow all instructions in this manual before attempting to operate this machine. Failure to comply with these instructions may result in personal injury. - Page 4 Keep the extension cord away from heat, oil, and sharp anextension cord suitable foroutdoor use. edges to prevent damage. WARNING: Toprevent electric shock u se only with If the extension cord is damaged in any manner while it is plugged in, pull the extension cord from the wall 15.
- Page 5 Usethe right tool. Only use this tool for the purpose Stop the motor and unplug the unit whenever you leave intended. the operating position, before unclogging the auger, and when making any repairs, adjustments, or inspections. Do not overreach. Always keep proper footing and balance.
- Page 6 SafetySymbols This page depicts and describes safety symbols that may appear on this product. Read, understand, and follow all instructions on the machine before attempting to assemble and operate. READ THE OPERATOR'S MANUAL(S) Read, understand, and follow all instructions in the manual(s) before attempting assemble and operate.
-
Page 7: Assembly And Setup
Assembly & Set-Up Contents of Carton One Electric Snow Thrower One Mid Handle One Upper Handle One Electric Snow Thrower One Product Registration Card One Chute Assembly Operator's Manual NOTE:All references to the left and right side of the snow HandleAssembly thrower are from the operator's... - Page 8 3. Ensure that t hecord retainer isonthemid handle's ChuteAssembly crossbar. Refer toFig. 3-2. Remove the four screws securing the front cover to the 4. Place themidand upper handles onto thelower handle. auger housing. Remove the front cover and the chute. See See Fig.
- Page 9 Install the chute in the auger housing with the handle Connecting Extension Cord facing towards the rear of the snow thrower. See Fig. 3-8. NOTE: Do not plug your extension cord into the power source receptacle (outlet) prior to routing it through the cord retainer and connecting...
-
Page 10: Controls And Features
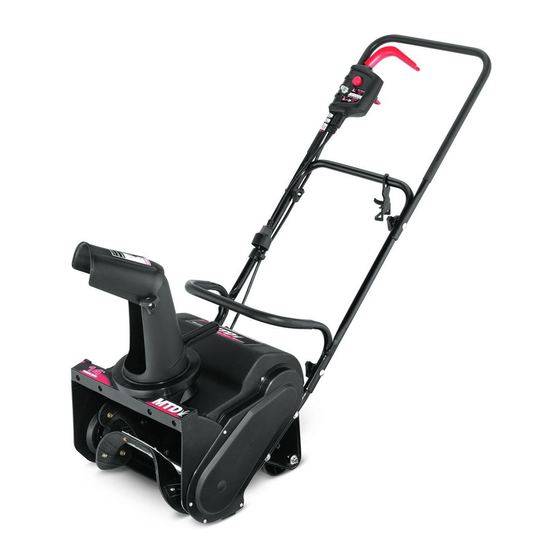
Controls& Features Motor Control Lever Strain Power Chute Discharge Chute Handle Lift Handle Lower Handle Auger Figure 4=1 WARNING. Read, understand, and follow all Auger instructions and warnings on the machine and in When engaged, the auger rotation draws snow into the auger this manual before operating. -
Page 11: Operation
Operation While holding the starter button in, squeeze the motor Starting Motor control lever against the upper handle to start the motor WARNING: Avoid accidental starting. Make sure and engage the auger. See Fig. 5-1. you are in the operating position behind the snow... - Page 12 Position the chute assembly opening by using the chute handle to throw the snow in the desired direction. Fig. 5-3. Figure Clearinga CloggedDischargeChute WARNING! Never use your hands to clear a clogged chute assembly. Shut off motor, disconnect power cord, and remain behind handle until all moving...
-
Page 13: Maintenance And Adjustments
Maintenance& Adjustments Maintenance Resetting CircuitBreaker This snow thrower is equipped with a circuit breaker to prevent Lubrication overheating damage to the motor. Lubricate the pivot points on the motor control lever with a light If the circuit breaker reset button pops out: oil once every season and before the snow thrower is put into... - Page 14 Service ReplacingAugerBelt the key to avoid unintended starting before i_ll WARNING: Unplug the snow thrower and remove Unscrew the six screws securing the belt cover to the auger servicing the snow thrower. housing and remove the belt cover. See Fig. 7-2. Replacing Skid Plate Remove the three screws securing the skid plate to the...
- Page 15 Replacing CoggedBelt Replacing Wheels Unscrew the screws on each side of the wheel shaft. See See your authorized service dealer to have the cogged belt replaced or phone Customer Support as instructed on page 2 for Fig. 7-5. information on ordering a Service Manual.
-
Page 16: Troubleshooting
Troubleshooting Problem Cause Remedy Snow thrower fails to start Key not in place 1. Insert key Cord disconnected from the motor control. 2. Reconnectthe cord keeping the cord restraint close to the motor control. 2. Motor control defective. 3. Replace motor control. 3. -
Page 17: Replacement Parts
Replacement Parts Component Part Number and Description 754-04281A Auger Belt 731-07640 Scraper Blade 735-04273 Rubber Auger 731-07636 Roller Wheel Phone (800) 800-7310 to order replacement parts or a complete Parts Manual (have your full model number and serial number ready). Parts Manual downloads are also available free of charge at www.mtdproducts.com. - Page 19 SECTION 10 = NOTES...
-
Page 20: Limited Warranty
MANUFACTURER'S LiMiTED WARRANTY The limited warranty set forth below is given by MTD LLC with c. Service completed by someone other than an authorized service dealer. respect to new merchandise purchased and used in the United States and/or its territories and possessions, and by MTD Products Limited d.
Need help?
Do you have a question about the 31A-050-706 and is the answer not in the manual?
Questions and answers