Extreme Networks Sentriant AG200 Hardware Installation Manual
Extreme networks sentriant installation guide
Hide thumbs
Also See for Sentriant AG200:
- User manual (422 pages) ,
- Installation manual (80 pages) ,
- Hardware quick start manual (2 pages)
Table of Contents

Related Manuals for Extreme Networks Sentriant AG200


Summary of Contents for Extreme Networks Sentriant AG200
- Page 1 Sentriant AG200 Hardware Installation Guide Extreme Networks, Inc. 3585 Monroe Street Santa Clara, California 95051 (888) 257-3000 (408) 579-2800 http://www.extremenetworks.com Published: June 2008 Part number: 100317-00 Rev. 01...
- Page 2 ServiceWatch, Summit, SummitStack, Triumph, Unified Access Architecture, Unified Access RF Manager, UniStack, the Extreme Networks logo, the Alpine logo, the BlackDiamond logo, the Extreme Turbodrive logo, the Summit logos, the Powered by ExtremeXOS logo, and the Color Purple, among others, are trademarks or registered trademarks of Extreme Networks, Inc.
-
Page 3: Table Of Contents
Contents Preface... 5 About this Guide ...5 Organization of this Guide...5 Conventions...5 Related Publications ...6 Chapter 1: About the Sentriant AG200 Appliance ... 7 Chassis Overview...7 Front Panel Features ...7 Back Panel Features...8 LED Operation ...8 LCD Panel ...9 Chapter 2: Site Preparation and Unpacking ... 11 Site Requirements for the Sentriant AG Appliance...11... - Page 4 Contents Appendix B: Technical Specifications ... 35 Index ... 39 Sentriant AG200 Hardware Installation Guide...
-
Page 5: Preface
This preface provides an overview of this guide, describes guide conventions, and lists other publications that might be useful. About this Guide This guide describes how to install the Sentriant AG200 appliance in an equipment rack. Organization of this Guide This guide includes the following chapters and appendixes: About the Sentriant AG200 Appliance on page 7 ●... -
Page 6: Related Publications
Using the console port on the Sentriant AG appliance at any time ● After the Sentriant AG appliance has been configured, using SSH ● In addition, documentation for Extreme Networks products is available from the Extreme Networks website at the following location: http://www.extremenetworks.com/services/documentation Description This typeface represents information as it appears on the screen, command syntax, or text you enter on a command line. -
Page 7: Chapter 1: About The Sentriant Ag200 Appliance
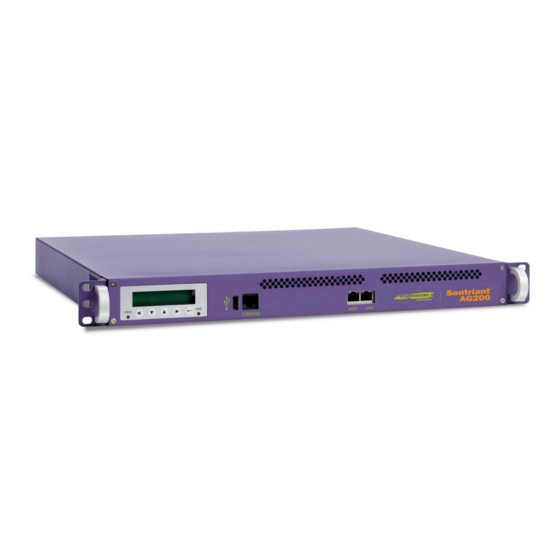
● Chassis Overview The Sentriant AG200 appliance is a compact enclosure that is 1 RU (1.75 inches) high. It fits into a standard 19-inch (48.26 cm) rack. The Sentriant AG appliance provides two 10/100/1000 Ethernet ports, a serial console port, and a USB port. An LCD panel provides access for local system management. -
Page 8: Back Panel Features
About the Sentriant AG200 Appliance Back Panel Features Figure 2 shows the back panel of the Sentriant AG appliance. Figure 2: Back Panel of the Sentriant AG Appliance The back panel of the Sentriant AG appliance has the following features: AC power input connector ●... -
Page 9: Lcd Panel
The LCD panel on the Sentriant AG appliance provides identifying information for the appliance and information about the basic system health. The information on the panel includes: Hostname of the appliance ● IP address of the appliance ● Software version ● Product name ● System uptime ● Sentriant AG200 Hardware Installation Guide... - Page 10 About the Sentriant AG200 Appliance Sentriant AG200 Hardware Installation Guide...
-
Page 11: Chapter 2: Site Preparation And Unpacking
● Site Requirements for the Sentriant AG Appliance The Sentriant AG200 appliance can be rack-mounted in a standard 19-inch rack. Locate the system away from heat sources and in an area that provides unobstructed air flow to the chassis cooling vents. The chassis intake ambient air temperature should not exceed 95 ºF (35 ºC) or drop below 41ºF (5º... -
Page 12: Unpacking The Sentriant Ag Appliance
Eight Phillips screws (two extras) for attaching the rack-mounting brackets to the unit ● AC power cord for use in North America ● DB-9-to-RJ-45 serial cable for connecting the serial console port ● ● Sentriant AG200 Hardware Quick Start Guide Registration card ● Sentriant AG200 Hardware Installation Guide... -
Page 13: Chapter 3: Installing The Sentriant Ag200 Appliance
● Connecting Cables on page 15 ● Overview The Sentriant AG200 appliance fits into a standard 19-inch (48.26 cm) rack. Before you install the Sentriant AG appliance, carefully read the information in Information.” Required Tools and Equipment You need the following items to install the Sentriant AG appliance: Mounting hardware provided with the Sentriant appliance ●... -
Page 14: Installing The Sentriant Ag Appliance In A Rack
Installing the Sentriant AG200 Appliance 3 Repeat these steps to attach the other bracket to the opposite side of the Sentriant AG appliance. Figure 3: Attaching Rack-Mount Brackets SN_003 Installing the Sentriant AG Appliance in a Rack To install the Sentriant AG appliance in a rack: 1 Determine the mounting location for the Sentriant AG appliance. -
Page 15: Connecting Power
Connect the port labeled eth1 to a switch or to a VPN or DHCP server (the Internet or endpoint side). To connect the Console port to a PC or terminal server, use the provided DB-9-to-RJ-45 serial cable. For more details, see “Connecting to the Console Port” on page Sentriant AG200 Hardware Installation Guide... - Page 16 Installing the Sentriant AG200 Appliance Sentriant AG200 Hardware Installation Guide...
-
Page 17: Chapter 4: Startup And Configuration
Startup and Configuration The Sentriant AG200 appliance is shipped with the latest software installed. You must connect to the server using the console port on the front panel to configure the Sentriant AG appliance for your network with the correct IP address, default gateway, DNS server, and other settings. -
Page 18: Performing The Initial Setup
To configure network settings: 1 Highlight Configure Network Settings and select OK. 2 Press [Enter]. The network settings menu is displayed. “Configuring Network “Setting the Time, Date, and Time Zone” on page 22). Settings.” “Setting the Operation Mode Sentriant AG200 Hardware Installation Guide... -
Page 19: Setting The Time, Date, And Time Zone
1 From the main configuration menu, highlight Adjust time, date, timezone, and select OK. 2 Press [Enter]. The main time and date configuration menu is displayed. 3 To set the date and time: a Highlight Change the date and time and press [Enter]. Sentriant AG200 Hardware Installation Guide... - Page 20 Change the time and select OK. 4 Confirm the change and save the changes. 5 Select OK to return to the time/date/timezone menu. 6 To change the time zone: a Highlight Change your timezone and select OK. Press [Enter]. Sentriant AG200 Hardware Installation Guide...
- Page 21 A comma-separated list of NTP server names is displayed. b Change or edit the server names and select OK. Press [Enter]. c Select Yes to accept the list of servers. d Select OK to return to the main menu. Sentriant AG200 Hardware Installation Guide...
-
Page 22: Setting The Operation Mode Of The Server
After you select a server type as the mode of operation, you must configure specific parameters for each type of operation. For instructions on configuring these parameters, refer to Chapter 3, “System Configuration,” in the Sentriant AG Software User’s Guide. Sentriant AG200 Hardware Installation Guide... -
Page 23: Initial Configuration
3 You might be prompted with a security alert because Sentriant AG uses a secure communication connection (SSL) (Figure 5). Click Yes. The Accept license agreement window opens Figure 5: Security Alert Window Figure 6: Accept License Agreement Window Sentriant AG200 Hardware Installation Guide (Figure... - Page 24 Change any of the following as necessary: Host name—Enter a fully qualified domain name (FQDN) (for example, crocus.mycompany.com). ● DNS IP address—Enter one or more DNS resolver IP addresses, separated by commas, ● semicolons, or spaces (for example, 10.0.16.100,10.0.1.1). Sentriant AG200 Hardware Installation Guide...
- Page 25 An internet connection is required to register and activate the license. The license key is registered to the server after the activation is complete and cannot be moved to another machine without first contacting Technical Assistance Center (TAC). Sentriant AG200 Hardware Installation Guide...
-
Page 26: Enabling Lan Bypass
AG appliance is installed in an inline or DHCP inline deployment To enable LAN bypass: 1 Connect a terminal or terminal emulator to the serial console port. 2 While the unit is powering on, press [Delete] or [Tab] to enter the BIOS. Sentriant AG200 Hardware Installation Guide... - Page 27 3 Use the arrow keys to highlight Integrated Peripherals, and press [Enter}. 4 Select Onboard Devices. Sentriant AG200 Hardware Installation Guide...
- Page 28 5 Select Lan 1/2 power on bypass and select Enabled. Select PWR On/Off Lan Bypass Ctrl and select Enabled. 6 Press [Esc] twice to return to the main menu. 7 Select Save and Exit Setup and press [y] Sentriant AG200 Hardware Installation Guide...
-
Page 29: Appendix A: Safety Information
Safety Information WARNING! Read the following safety information thoroughly before installing Extreme Networks products. Failure to follow this safety information can lead to personal injury or damage to the equipment. Only trained service personnel should perform service to Extreme Networks equipment and their components. -
Page 30: Maintenance Safety
EMC regulations. The chassis cover should be removed only by Extreme Networks personnel. There are no customer ● serviceable components in this system. Repairs to the system must be performed by an Extreme Networks factory service technician. -
Page 31: Battery Replacement And Disposal
Replace with the same or equivalent battery type as recommended by the battery manufacturer. ● Dispose of the battery in accordance with the battery manufacturer’s recommendation. ● Sentriant AG200 Hardware Installation Guide... -
Page 32: Hinweise Zur Installation
Sicherheitshinweise WARNUNG! Vor der Installation der Produkte von Extreme Networks sind die nachfolgenden Sicherheitshinweise aufmerksam zu lesen. Die Nichtbeachtung dieser Sicherheitshinweise kann zu Verletzungen oder Schäden an der Ausrüstung führen. Installation, Wartung und Ausbau eines Switch, einer Grundplatte oder einer seiner Komponenten dürfen nur von geschultem und qualifiziertem Servicepersonal durchgeführt werden! Geschulte und... -
Page 33: Allgemeine Sicherheitsmaßnahmen
Die Nichtbeachtung dieser Anweisungen kann zu Schäden an der Ausrüstung oder sogar zu einem Verstoß gegen die erforderlichen Sicherheitsbestimmungen und EMV-Vorschriften führen. Die Abdeckung der Grundplatte darf nur durch Personal von Extreme Networks entfernt werden. ● Das System enthält keine vom Kunden zu wartenden Komponenten. Reparaturen am System sind von einem Extreme Networks Servicetechniker durchzuführen. - Page 34 Austauschen der Lithium-Batterie: Die Batterie kann nicht vom Anwender ausgetauscht werden. Die ● Batterien dürfen nur durch eine identische oder eine gleichwertige, vom Hersteller empfohlene Batterie ersetzt werden. Hierbei ist vorsichtig vorzugehen, da bei einem unsachgemäßen Austausch der Lithium-Batterie Explosionsgefahr besteht. Sentriant AG200 Hardware Installation Guide...
-
Page 35: Technical Specifications
Technical Specifications Table 4 provides technical specifications for the Sentriant AG200 appliance. Table 4: Sentriant AG Appliance Technical Specifications Physical Specifications Chassis dimensions Height: 1.7 inches (4.3 cm) Width: 17 inches (43.2 cm) Depth: 17.3 inches (43.9 cm) Weight 21 lb (9.5 kg) - Page 36 Operating altitude: 0 – 3000 meters (10,000 ft) Operating shock*: 30 m/s (3g), 11 ms Operational random vibration*: 5 – 500 Hz @ 1.5G Acoustic noise: < 5.5 bels A sound power per ISO 7779 < 45.0 dBA declared sound pressure Sentriant AG200 Hardware Installation Guide...
- Page 37 Random vibration*: 5–20 Hz @ 1.0 ASD w/–3 dB/oct. from 20–200 Hz Sinusoidal vibration: 5–62 Hz @ Velocity 5 mm/s, 62–500 Hz @ .2G Drop*: 42.4 * Short-term test condition. Not for extended use under this condition. Sentriant AG200 Hardware Installation Guide (18g), 6ms600 shocks (package < 50 kg)
- Page 38 Technical Specifications Sentriant AG200 Hardware Installation Guide...
-
Page 39: Index
German safety information, 32 green compliance standards, 36 humidity requirements, 11 installation, Sentriant NG appliance, 14 maintenance safety, 30 open rack requirements, 11 Sentriant AG200 Hardware Installation Guide package contents, 12 physical specifications, 35 power connecting, 15 power cord selection, 29... - Page 40 Index Sentriant AG200 Hardware Installation Guide...
Need help?
Do you have a question about the Sentriant AG200 and is the answer not in the manual?
Questions and answers