Table of Contents
Advertisement
Available languages
Available languages
Quick Links
Advertisement
Table of Contents

Related Manuals for Hoover UH40155


Summary of Contents for Hoover UH40155
- Page 1 Owner's Manual Operating and Servicing Instructions llll ll, i www, hoover.com ® Please review this manual before operating your Hoover® product. iiiii I III ©2008 Healthy Gain Investments, Ltd, All rights reserved. #56511C80-R0. 11/08...
- Page 2 Thank you for choosing a HOOVER product. Please enter the complete mode! and serial j!I!i!!N!IL numbers in the spaces provided. Model Serial Number Hint: Attach your sales receipt to this owner's manual. Verification of date of purchase may be required for warranty service of your Serial Number HOOVER product.
-
Page 3: Important Safety Instructions
• Do not use with damaged cord or plug. If appliance is not working as it should, has been dropped, damaged, left outdoors, or dropped into water, take it to a Hoover Sales and Service Center or Authorized Hoover WarrantyService Dealer [Depot). -
Page 4: Assembling Cleaner
1. Assembling cleaner Carton contents STEP ! Using fold down handle Raise upper handle (A) to upright posi- tion until it tocks in place. Press upper handle release button back to fold handle to storaqe position. Cord clip ,,,) To help keep the cord out of the way while cleaning, position c ord into... -
Page 5: How To Use
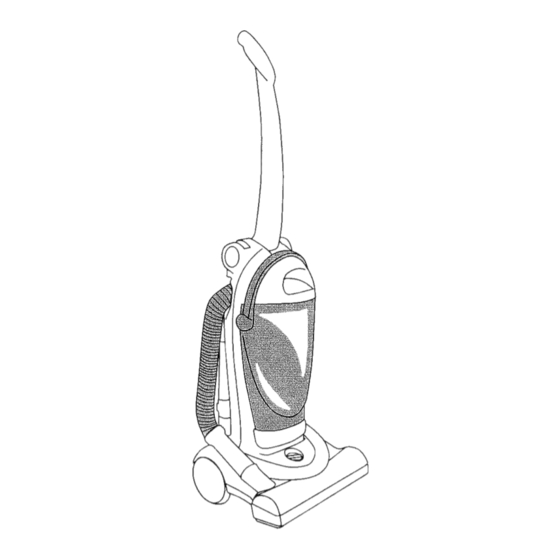
2. How to use Cleaner description Operate cleaner onIy at voltage specified data plate on bottom of cleaner, The assembled cleaner will look like the drawing. FoldAway handle 2. Upper handle release button 3. Dirt cup handle/latch Carrying handle 5. Dirt cup filter chamber Pleated filter (inside filter chamber} 7, Dirt cup 8. -
Page 6: Carpet Height Adjustment
Polarized On-Off Handle positions switch plug To reduce the risk The handle of your of electric shock, cleaner has three po- this appliance sitions; upright when a polarized ptug using cleaning tools; [one blade is wider operating position for than the other). general operation This plug will fit in carpet and floors;... -
Page 7: Cleaning Lightweight Flexible Rugs
Cleaning lightweight flexible rugs Stand on one end of rug and move cleaner toward other end or edge. Before reaching edge, push down on handle. This will lift up the nozzle {front of cleaner) as shown and will prevent rug from clinging to cleaner. -
Page 8: How To Clean Tools
Remove hose Attach wand and tools When using clean- ing tools, cleaner handle should be in the upright position. Also, turn cleaner OFF before disconnecting and connecting the hose {A). The tools are attached to the hose or the Remove hose end wand in the same manner. -
Page 9: Maintenance
3. Maintenance The dirt cup assembly consists of the follow- Familiarize yourself with these home maintenance tasks as proper use and care of inff parts: your cleaner wll] ensure continued cleaning Dirt Cup (A) effectiveness. Filter chamber (B) Pleated filter (C) Dirt Cup Lid {D) Dirt cup carry handle]latch... - Page 10 Filter assembly How to clean filter assembly Press latch [A} Empty filter chain- Holding lid, tap on front of filter bottom of filter chamber and against edge of remove lid. The wastebasket until pleated filter is at- dust particles stop tached to the lid.
-
Page 11: Belt Replacement
Remove hose end To assure effective operation, use only gen- the upright posi- 2-11), {_ig. uine HOOVER belts with your cleaner. When tion, tilt cleaner Remove 2 screws at back until it rests purchasing a new belt, ask for: Flat belt - rear of hood. - Page 12 Lift hood off Remove the 2 screws behind the agitator cover (A). cleaner. Insert agitator Remove agitator With lettering and used belt. Dis- the outside of belt, through belt and card used belt. slide new belt along place belt in belt side of cleaner cav-...
-
Page 13: How To Replace
Continue following the directions in the "Bdt When purchasing a new brushrol], ask for replacement" section to replace belt, new agi- 13" -HOOVER part No. 484141 lO tator, agitator cover and hood. 15" -HOOVER part No, 48414115, Replacement parts and accessory items may be purchased... -
Page 14: Thermal Protector
I, Turn the cleaner OFF and disconnect ings that should be lubricated periodically from the electrical outlet. by a Hoover Factory Service Center or an 2. Check secondary and final filters for Authorized Hoover Warranty Service Dealer dirt accumulation. -
Page 15: Troubleshooting
4. Trouble Shooting If a minor problem occurs, it usually can be solved quite easily when the cause is found by using the check Iist below. PROBLEM POSSIBLECAUSE POSSIBLESOLUTION Cleaner won't run Check fuse or breaker Allow cleaner to cool for 30 minutes [this Thermal protector activated... -
Page 16: Full One Year Warranty
Hoover Sales and Service Center for warranty service, warranted period. This warranty applies when the transportation will be paid one way. -
Page 17: Manual Del Usuario
Manual del usuario Instruccionesde funcionamiento y mantenimiento ,,,,,,,, ,,,,,,i, ,,,,11 www.hoover.corn ® Por favor, lea este manual antes de hacer funcionar su producto Hoover®............iiiiiiiiiii i iiiiiiiiiiii IIIIII I II II ©2008 Healthy Gain Investments, Ltd. Todos los derechos reservados, N °... - Page 18 Reemplazo de la correa del rodillo de cepillos ......Protector t_rmico ............Si necesita ayuda: Visite nuestro sitio web en hoover.com. Siga el enlace del centro de servicio para encontrar centro de servicio m_s cercano o tlame al 1-800-944-9200 para que ]e indiquen...
- Page 19 Centro de ventas y de servido de Hoover o a un Concesionario autorizado de servicio de garantia de Hoover (Depositario), •...
-
Page 20: Ensamblaje De La Aspiradora
1. Ensamblaje de la aspiradora Contenido de la caja PASO I Uso del mango plegable Levante Ia parte superior (]el mango (A) en posici6n ver- tical hasta que quede fija en su lugar. Presione el bot6n de liberaci6n de la parte superior de! mango {B)para plegar el mango a... -
Page 21: Descripci6N De La Aspiradora
2. Funcionamiento Descripci6n de la aspiradora Haga funcionar [a aspiradora para alfombras solamen_een el voltaje espe¢ifieado en la placa de datos. 1. Mango plegable FoldAway 2. Bot6n de liberaci6n de la pa_e superior de| mango 3. Asa]traba del eontenedor para polvo 4. -
Page 22: Trasladode La Aspiradora
Enehufe Interruptor de Posiciones del mango eneender/apagar polarizado PaTa disminuir el Ties- El mango de su go de choque e]_ctrico, aspiradora tiene este aparato tiene un tres posiciones: enchufe po}arizado vertical, para {una patilla es m_s guardafla y usar ancha que Iaotral. los accesorios de Este enchufe podr_, Iimpieza;... -
Page 23: Limpieza De Escaleras
Limpieza de alfombras de rea livianas y flexibles P_resesobre un extremo de ]a _Ifombra y rnueva ]a aspiradora hacia e! otto extremo o borde. Antes de ]legar a] borde, empuje el mango hada abajo. Esto levantar6 la parte deiantera de la aspiradora, eomo se muestra, e impedir_ que la alfombra se pegue a la aspiradom. - Page 24 Conexi6n del tubo y de los Retire ia manguera aeeesorios AI utilizar acceso- rios de lirnpieza, el mango de la aspira- dora debe estar en posiciBn vertical. Adem_s, apague _a aspiradora antes de desconectar y conec- tar la manguera [A). Retire el extremo de Los accesorios est_n conectados...
-
Page 25: Mantenimiento
3. Mantenimiento Familiaricese con estastareas de mantenimiento E1 conjunto del contenedor para polvo est_ en el hogar ya que el uso y cuidado apropiados formado pot las siguientes piezas: de su aspiradora asegurar_n una limpieza Contenedor para po]vo {A) continuamenteefieaz. C_mara dei fiitro (B) Ffltro plegado {C) Tapa (D) - Page 26 Con junto filtro C6mo limpiar el con junto del filtro Vacie la c_mara del Presione Sujete la tapa, filtro. ffolpee la parte infe- traba [A) en Ia rior de] filtro contra parte delantera el borde del cesto la c_mara deI filtro hasta que no caigan y retire la tapa.
-
Page 27: Reemplazode La Luz Delantera
Para asegurar un funcionamiento eficaz, use que et mango se {Fig. 2-11). 0nicamente correas de HOOVER genuinas con apoye en el suelo. Retire los 2 tornillos su aspiradora. A1comprar una nueva correa, Retire los 2 tomillos de la pane posterior solicite: Correa plana - piezan°... - Page 28 Levante yretire Retire los 2tornillos que se encuentran lacubierta de Ia detrfis de la tapa del agitador [A). aspiradora. Retire el agitador Con la inscfipci6n lntroduzca el agi- en la parte exterior y Ia correa usada, tador a tray,s de la Deseche la correa de Ia correa, destice correa y coI6quela...
- Page 29 Qu_ comprar Ai comprar un nuevo rodillo de cepillos, solicite la piezs n° 484141 t0 de 13 pulg. de HOOVER, y la pieza n* 48414115 de 15 pulg. de HOOVER Las piezas de recambio 2/los artlculos accesorios...
-
Page 30: Protector T Rmico
Hoover de garantla de Hoover (DepoOm_s cercanos: Este sistema de rendimiento de limpieza * consultando tas P_ffinas amariltas en la de Hoover estfi disefiado para comparar el seeci6n "Aspiradoras - uso domestico" rendimiento progresivo relativo de los aspi- , consuitando... -
Page 31: Soluci6N De Problemas
4. Soluci6n de problemas Si se produce un problema menor, por 1o general, puede resolverse con bastante faeilidad cuando se identifica la causa a partir de ta ]ista de verifieaci6n que apareee n eontinuaci6n. PROBLEMA CAUSA POSIBLE SOLUCIONPOS}BLE La aspiradora no runeiona La aspiradora/ los aeeesorios no... - Page 32 Estados Unidos, llam¢ al 1-800-944-9200 0 visite par el periodo de un a_o completo a paTtir de la fceha de Hoover en linea en hoover.earn. compra. La presente garantia enbre gratuitamente toda Esta garantia no cubre la recogida, la entrega,...
Need help?
Do you have a question about the UH40155 and is the answer not in the manual?
Questions and answers