Table of Contents
Advertisement
OPERATION MANUAL
Thank you very much for purchasing the ZOOM G2Nu/G2.1Nu (in this manual, we
will call it the G2Nu/G2.1Nu). Please read this manual carefully to learn about all the
functions of the G2Nu/G2.1Nu so that you will be able to use it fully for a long time.
Keep this manual in a convenient place for reference when necessary.
Usage and Safety Precautions . . . . . . . . . . . . . . 2
Terms Used in This Manual . . . . . . . . . . . . . . . . . 3
G2Nu Part Names . . . . . . . . . . . . . . . . . . . . . . . 4
G2.1Nu Part Names . . . . . . . . . . . . . . . . . . . . . . 6
Select a Patch and Play (Play Mode) . . . . . . . . . 8
Using the Tuner . . . . . . . . . . . . . . . . . . . . . . . . . 10
Using the Looper . . . . . . . . . . . . . . . . . . . . . . . . 13
Using Rhythms (Rhythm Mode) . . . . . . . . . . . . 16
Using Direct Mode . . . . . . . . . . . . . . . . . . . . . . . 24
Patch Pre-selection (PRE SELECT) . . . . . . . . . 25
Using a Foot Switch. . . . . . . . . . . . . . . . . . . . . . 26
Using an Expression Pedal . . . . . . . . . . . . . . . . 27
Adjusting the built-in expression pedal . . . . . . . . 28
Using Audio Interface Functions . . . . . . . . . . . . 29
Changing Various Settings (Global Menus) . . . . 30
Open the global menus . . . . . . . . . . . . . . . . . . . . 30
© ZOOM CORPORATION
Copying or reproduction of this document in whole or in part without
permission is prohibited.
Contents
standard pitch. . . . . . . . . . . . . . . . . . . . . . . . . . . . 30
Set the display backlight and contrast . . . . . . . . . 31
Setting the battery type . . . . . . . . . . . . . . . . . . . . 31
Check the current version . . . . . . . . . . . . . . . . . . 31
Upgrading the Firmware Version . . . . . . . . . . . . 32
Effect Types and Parameters . . . . . . . . . . . . . . 33
COMP (compressor) module . . . . . . . . . . . . . . 34
EFX module . . . . . . . . . . . . . . . . . . . . . . . . . . . 35
ZNR (ZOOM noise reduction) module . . . . . . . 37
DRIVE module . . . . . . . . . . . . . . . . . . . . . . . . . 38
(low and middle frequency range) . . . . . . . . . . 40
MODULATION module . . . . . . . . . . . . . . . . . . 41
DELAY module . . . . . . . . . . . . . . . . . . . . . . . . 46
REVERB module . . . . . . . . . . . . . . . . . . . . . . . 47
TOTAL module . . . . . . . . . . . . . . . . . . . . . . . . . 48
Troubleshooting . . . . . . . . . . . . . . . . . . . . . . . . . 49
Specifications . . . . . . . . . . . . . . . . . . . . . . . . . . 50
Rhythm List . . . . . . . . . . . . . . . . . . . . . . . . . . . . 51
Advertisement
Table of Contents

Related Manuals for Zoom G2.1Nu


Summary of Contents for Zoom G2.1Nu
-
Page 1: Table Of Contents
OPERATION MANUAL Thank you very much for purchasing the ZOOM G2Nu/G2.1Nu (in this manual, we will call it the G2Nu/G2.1Nu). Please read this manual carefully to learn about all the functions of the G2Nu/G2.1Nu so that you will be able to use it fully for a long time. -
Page 2: Usage And Safety Precautions
Never open the case or attempt to modify the product in any way since this can result in damage to the unit. Zoom Power considerations Corporation will not take responsibility for any damage to the unit caused by alterations. -
Page 3: Terms Used In This Manual
Remaining battery charge Latch When operating with an AC adapter Press the latch to release or USB bus power, an adapter or it and raise the cover. USB icon appears instead. Cover ZOOM G2Nu/G2.1Nu... -
Page 4: Top And Rear Panel Parts
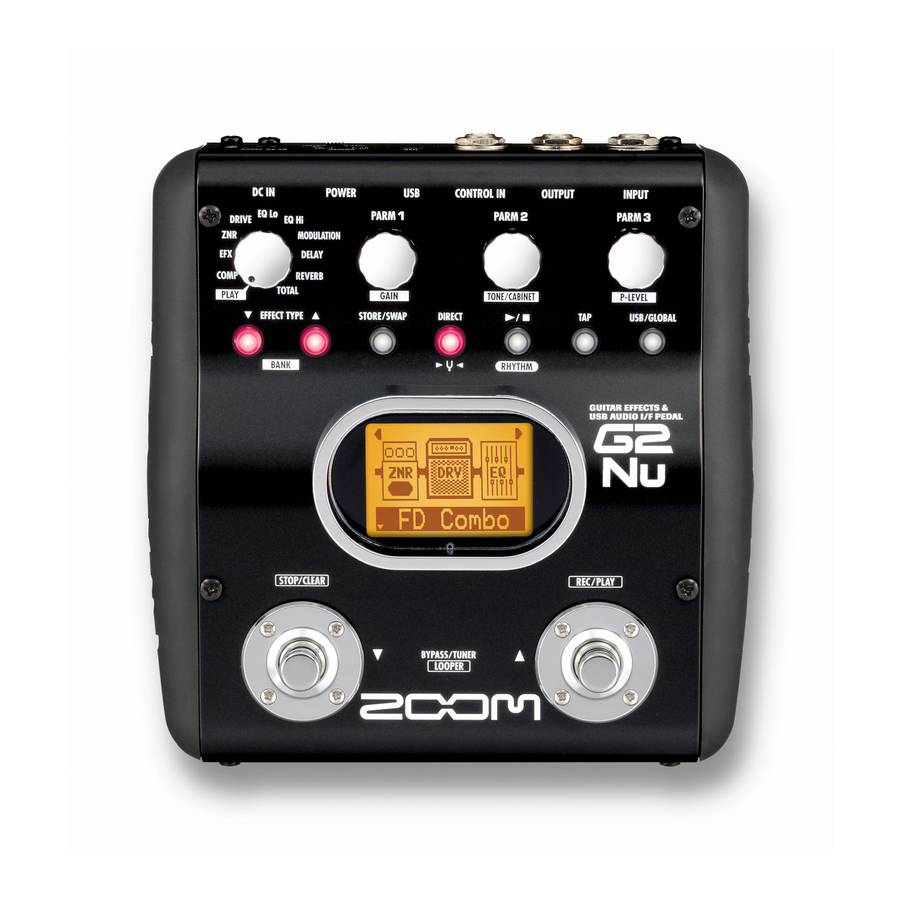
G2Nu Part Names Top Panel Module selector EFFECT TYPE/BANK [▼]/[▲] keys STORE/SWAP key Display Guitar Rear Panel INPUT jack OUTPUT jack Headphones Guitar amplifier FP01/FP02 FS01 ZOOM G2Nu/G2.1Nu... - Page 5 • The unit functions at the minimum necessary level to prevent battery drain and wasteful power POWER switch consumption. • Guitar signal input is ignored. • Any operation causes the unit to return to normal. ZOOM AC adapter (AD-16) DC9V AC adapter jack CONTROL IN jack ZOOM G2Nu/G2.1Nu...
-
Page 6: G2.1Nu Part Names
G2.1Nu Part Names Top Panel Module selector EFFECT TYPE/BANK [▼]/[▲] keys STORE/SWAP key DIRECT key Display [▼]/[▲] foot switches Guitar Rear Panel INPUT jack OUTPUT jack Headphones Guitar amplifier FS01 FP01/FP02 ZOOM G2Nu/G2.1Nu... - Page 7 When in power standby: • The unit functions at the minimum necessary level to prevent battery drain and wasteful power ZOOM AC adapter (AD-16) consumption. • Guitar signal input is ignored. • Any operation causes the unit to return to normal.
-
Page 8: Select A Patch And Play (Play Mode)
Immediately after turning the power ON, play mode is HINT activated regardless of the position of the module selector. DRIVE module Patch volume distortion depth DRIVE module tone • If you do not save changed parameters (→ P22), all changes will be lost HINT when you select a different patch. • When using headphones or a mixer, we recommend that you use the direct mode (→ P24), which simulates the sound of a guitar cabinet. • Adjust the volume for all patches using the master level (→P30). ZOOM G2Nu/G2.1Nu... - Page 9 Press repeatedly to cycle through the banks and patches in order from A0–A9...J0–J9→00–09...90–99→A0. Press the [▼] foot switch to select the previous patch. Using pre-select mode (→P25), you can jump directly to a patch HINT that is far from the current patch. 4. Switch banks Use the bank [▼]/[▲] keys to change to the next or previous bank. You can also connect an external foot switch (FS01) and use HINT it to change banks (→P26). ZOOM G2Nu/G2.1Nu...
-
Page 10: Using The Tuner
When set to bypass/mute, the tuner becomes active. Standard pitch Tuner type Drop tuning adjustment • If you continue to press both [▼]/[▲] foot switches for more than 2 seconds, NOTE the looper becomes active (→P13). • You cannot set the unit to bypass/mute from edit mode (→P18). • When you press both [▼]/[▲] foot switches at the same time, the foot switch that is momentarily pressed first could change the tone in some cases. Please avoid making sound when pressing the switches. ZOOM G2Nu/G2.1Nu... - Page 11 2 or a lower number appears, lower the pitch. After the correct number appears fine tune the string. String number (when the 3rd string is tuned correctly) HINT You can also use the keys above the display to check the pitch. Low (flat) Correct pitch High (sharp) ZOOM G2Nu/G2.1Nu...
- Page 12 Turn Parameter knob 1. The standard pitch of middle A can be set in a range from 435–445 Hz. (Default value: 440 Hz) If you change the standard pitch in tuner mode, the setting is reset to the default NOTE value whenever the power is turned OFF and ON again. If you want this setting to be saved, set it using the global parameters (→ P30). 7. Return to play mode Press either [▼]/[▲] foot switch. ZOOM G2Nu/G2.1Nu...
-
Page 13: Activate Looper
" ♩ ×2." ■ Manual Use the foot switch to start and stop recording. 3. Adjust the tempo Turn Parameter knob 2 to set the tempo. Tempo Tempo can be set in a range from 40–250 BPM (beats per minute). If you selected a note mark in step 2, recording time is calculated according to the tempo. You can also adjust the tempo using the TAP key (→P17). HINT ZOOM G2Nu/G2.1Nu... - Page 14 Recording [▲] foot switch [▲] foot Set time switch [▲] foot switch When using the looper, the unit can also play a rhythm (→P16). However, the HINT parameter knobs only control the looper. 5. Overdub a phrase During loop playback, press the [▲] foot switch. "REC" appears on the display and overdubbing starts. When the end of the recorded phrase is reached, playback returns to the loop beginning and overdubbing continues. ZOOM G2Nu/G2.1Nu...
- Page 15 Turn Parameter knob 3. PHRASE volume The setting range is 0–100. Please note that if you turn Parameter knob 1 or 2 when a phrase has NOTE already been recorded, that phrase will be erased. 7. Erase the phrase Press the [▼] foot switch until "CLEAR" appears on the display to erase the recorded phrase. 8. Return to play mode PRESS both [▼]/[▲] foot switches. ZOOM G2Nu/G2.1Nu...
-
Page 16: Using Rhythms (Rhythm Mode)
Turn Parameter knob 1 (pattern types →P51). Rhythm pattern 3. Adjust the tempo Tempo can be set in a range from 40–250 BPM (beats per minute). Tempo ■ Set the tempo with a number Turn Parameter knob 2 to set the BPM. ZOOM G2Nu/G2.1Nu... - Page 17 HINT You can use a FS01 foot switch (sold separately) to adjust the tempo (→P26). 4. Adjust the rhythm volume Turn Parameter knob 3. Rhythm volume The volume can be set in a range from 0–100. 5. Stop the rhythm Press the rhythm [ ▶ / ■ ] key to stop the rhythm playback and return to ordinary play mode. ZOOM G2Nu/G2.1Nu...
-
Page 18: Creating And Changing Patches (Edit Mode)
The edit screen opens automatically. Effect type The edit screen does not open if the selected module is OFF. HINT Parameter 1 of the Parameter 2 of the Parameter 3 of the current effect type current effect type current effect type • The EQ module is a single module, but it is separated into "EQ Lo" and "EQ Hi" screens for HINT editing. • The TOTAL module is a special module that you can use to set the overall patch volume (patch level) and to edit the patch name, for example. ZOOM G2Nu/G2.1Nu... - Page 19 Press the EFFECT TYPE [▼]/[▲] keys to change the effect type. The parameters shown change according to the effect type. Effect type • The EQ module has only one effect type. HINT • See pages 33–48 for information about the effect types and parameters included in each module. 5. Adjust the parameters Turn parameter knobs 1–3. HINT Parameters related to time and frequency can also be set with Tap tempo (→P17). ZOOM G2Nu/G2.1Nu...
- Page 20 Change the character/symbol Change the type of character/ Move the cursor at the cursor position one symbol at the cursor position character at a time. (uppercase letters, lowercase letters, numbers and symbols). The following characters and symbols can be used. ! # $ % & ' () +, -. ; = @ [] ^ _ ` { } ~ A–Z, a–z, 0–9, (space) ZOOM G2Nu/G2.1Nu...
- Page 21 Turn Parameter knob 1 to the right to change the number to "2." 8. Finish editing Turn the module selector to "PLAY" to return to the play mode. NOTE If you change to another patch, all edits will be lost. Save the patch to keep your edits (→P22). ZOOM G2Nu/G2.1Nu...
-
Page 22: Activate Store Mode
Continue pressing the key until "Swap?" appears on the display. Patch to swap Second patch to swap • Swapping can only be between patches in the user (A–J) banks. HINT • When the unit is shipped from the factory, the user banks contain the same patches as the preset banks. 2. Select the location to save or the other patch to swap Use the [▼]/[▲] foot switches. HINT To switch banks, use the bank [▼]/[▲] keys. Swapping can only be between patches in the user (A–J) banks. NOTE ZOOM G2Nu/G2.1Nu... - Page 23 To use the ALL INITIALIZE function, turn the POWER switch ON while pressing and holding the STORE/SWAP key. To cancel this operation, press the rhythm [ ▶ / ■ ] key instead of pressing the STORE/SWAP key. The following message appears on the display. Executing ALL INITIALIZE erases all the NOTE patches saved in the user banks. Use this function with caution. ZOOM G2Nu/G2.1Nu...
-
Page 24: Using Direct Mode
• Select patches in the same way as in play mode. Press the DIRECT key to turn its light OFF Use Parameter knobs 1–3 to adjust the and return to play mode. parameters. DRIVE module Overall patch distortion depth volume Type of cabinet simulated ZOOM G2Nu/G2.1Nu... -
Page 25: Patch Pre-Selection (Pre Select)
Use the [▼]/[▲] foot switches and bank [▼]/[▲] keys to select the next patch. Patch selection is the same as in ordinary play mode. However, the patch does not change until confirmation is completed in step three. Current patch Next patch to be selected ZOOM G2Nu/G2.1Nu... -
Page 26: Using A Foot Switch
GLOBAL key again to turn its light out. Foot switch function The foot switch function setting affects all HINT patches. Moreover, this setting is saved even when the power is turned OFF. Sound Hold delay source Delay sound Hold Press again Press the foot switch ZOOM G2Nu/G2.1Nu... -
Page 27: Using An Expression Pedal
Use Parameter knob 2 to set the minimum value On the G2.1Nu, you can also use the PEDAL (MIN) and Parameter knob 3 to set the maximum ASSIGN key to set the module controlled. The value (MAX). The range that can be set depends indicator lights next to the selected destination. on the controlled module selected in step 3. Parameter value When MAX > MIN Parameter value ZOOM G2Nu/G2.1Nu... -
Page 28: Adjusting The Built-In Expression Pedal
Turn the power on while pressing the PEDAL ASSIGN key. If "ERROR!" appears on the screen, return to HINT step 2 and repeat the calibration. ZOOM G2Nu/G2.1Nu... -
Page 29: Using Audio Interface Functions
Figure 1. Signal flow during recording software G2Nu/G2.1Nu INPUT Effects OUTPUT Figure 2. Signal flow during playback (direct monitoring ON) G2Nu/G2.1Nu INPUT software Effects OUTPUT Figure 3: Signal flow during playback (direct monitoring OFF) G2Nu/G2.1Nu INPUT software Effects OUTPUT ZOOM G2Nu/G2.1Nu... -
Page 30: Changing Various Settings (Global Menus)
When you are done changing the settings, press the USB/GLOBAL key to turn its light OFF. The recording level setting will be saved even HINT when the power is turned OFF. You can also use the Tap key to adjust the HINT tempo (→P17). ZOOM G2Nu/G2.1Nu... -
Page 31: Set The Display Backlight And Contrast
● ALKALINE Use this setting for alkaline or oxyride (oxy nickel hydroxide) batteries. ● NiMH Use this setting for nickel metal hydride batteries that can be recharged and reused. Battery type Set the battery type that you are using in order to NOTE display the remaining battery charge accurately. ZOOM G2Nu/G2.1Nu... -
Page 32: Upgrading The Firmware Version
Download the latest version upgrade Launch the version upgrade application, application from the ZOOM website and conduct the version upgrade. (http://www.zoom.co.jp/). See the ZOOM website for the upgrade You must connect the unit to a computer to procedures. When you complete the version upgrade the version. upgrade, "Please Restart" appears on the screen. -
Page 33: Effect Types And Parameters
(MUTE). To use these functions, you must connect a foot switch, set the function (→P26) and activate a compatible effect type. Note: Manufacturer names and product names mentioned in the following table are trademarks or registered trademarks of their respective owners. The names are used only to illustrate sonic characteristics and do not indicate any affiliation with ZOOM CORPORATION. ZOOM G2Nu/G2.1Nu... -
Page 34: Comp (Compressor) Module
This compressor provides a more natural sound. PARM1 PARM2 PARM3 THRSH (threshold) 0–50 Ratio 1–10 Level 2–100 Sets the level that activates the Adjusts the compression ratio. Adjusts the level of the signal after compressor. it has passed through the module. ZOOM G2Nu/G2.1Nu... -
Page 35: Efx Module
PARM2 PARM3 UP 0–9, Depth 0–100 Wave DWN 0–9, Rate 0–50 TRI 0–9 Adjust the depth of the Adjusts the rate of the modulation. Sets the modulation waveform to modulation. "UP" (rising sawtooth), "DWN" (falling sawtooth) or "TRI" (triangular). Higher numerical values cause stronger clipping, which emphasizes the effect. ZOOM G2Nu/G2.1Nu... - Page 36 Adjusts the emphasized Adjusts the mix with the Adjusts the level of the signal after frequency. When an expression unaffected sound. it has passed through the module. pedal is not used, the effect is similar to a half open pedal. ZOOM G2Nu/G2.1Nu...
-
Page 37: Znr (Zoom Noise Reduction) Module
ZNR (ZOOM noise reduction) module This module reduces noise when not playing. ZNR (ZOOM noise reduction) ZOOM's unique noise reduction cuts noise during pauses in playing without affecting the tone. NoiseGate This is a noise gate that cuts the sound during playing pauses. -
Page 38: Drive Module
Simulation of the Fuzz Face, Simulation of the Electro- Rat famous for its edgy distortion which has made rock history with Harmonix Big Muff, which is loved sound. its humorous panel design and by famous artists around the world smashing sound. for its fat, sweet fuzz sound. ZOOM G2Nu/G2.1Nu... - Page 39 Effect Types and Parameters MetalWRLD HotBox Z Clean (Metal World) Simulation of the Boss Metal Simulation of the compact ZOOM original unadorned clean Zone, which is characterized by Matchless Hotbox pre-amplifier sound. long sustain and a powerful lower with a built-in tube. midrange. Z Wild...
-
Page 40: Equalizer Module (Low And Middle Frequency Range)
EQUALIZER module (high frequency range) This unit has a six band equalizer. Set the module selector to "EQ Hi" to adjust the three high frequency bands. EQ HIGH Adjusts the high frequency bands PARM1 PARM2 PARM3 3.2kHz ±12 6.4kHz ±12 12kHz ±12 Boosts or cuts the high (3.2 kHz) Boosts or cuts the extremely high Boosts or cuts the harmonics frequency band. (6.4 kHz) frequency band. (12 kHz) frequency band. ZOOM G2Nu/G2.1Nu... -
Page 41: Modulation Module
This is a chorus ensemble that features three-dimensional movement. PARM1 PARM2 PARM3 Depth 0–100 Rate 1–50 0–100 Sets the depth of the modulation. Sets the speed of the modulation. Adjusts the amount of effected sound that is mixed with the original sound. ZOOM G2Nu/G2.1Nu... - Page 42 Vibrato This effect automatically adds vibrato. PARM1 PARM2 PARM3 Depth 0–100 Bal (balance) 0–100 Rate 0–50 Sets the depth of the modulation. Sets the speed of the modulation. Adjusts the balance between original and effect sounds. ZOOM G2Nu/G2.1Nu...
- Page 43 This effect shifts the pitch up or down. PARM1 PARM2 PARM3 Bal (balance) -12–-1, dt, Shift Tone 0–10 0–100 1–12, 24 Adjusts the pitch shift amount in Adjusts the tone. Adjusts the balance between semitones. Selecting "dt" gives a original and effect sounds. detuning effect. ZOOM G2Nu/G2.1Nu...
- Page 44 +1 octave + original 0 cents +2 octaves -700 cents + original +500 cents + original 0 cents -100 cents Doubling Detuned + original ∞ 0 cents -2 octave (0 Hz) + original +1 octave + original ∞ 0 cents ZOOM G2Nu/G2.1Nu...
- Page 45 TapeEcho This effect simulates a tape echo. Changing the "Time" parameter changes the pitch of the echoes. PARM1 PARM2 PARM3 1–1200 mS F.B (feedback) 0–100 0–100 Time Sets the delay time. Adjusts the feedback amount. Adjusts the amount of effected Higher values cause more delay sound that is mixed with the sound repetitions. original sound. ZOOM G2Nu/G2.1Nu...
-
Page 46: Delay Module
The four effect types above have the same parameters. PARM1 PARM2 PARM3 1–5000 mS F.B (feedback) 0–100 0–100 Time Sets the delay time. Adjusts the feedback amount. Adjusts the amount of effected sound that is mixed with the original sound. ZOOM G2Nu/G2.1Nu... -
Page 47: Reverb Module
The 5 effect types above have the same parameters. PARM1 PARM2 PARM3 Decay 1–30 Tone 0–10 0–100 Sets the duration of the Adjusts the tone. Adjusts the amount of effected reverberations. sound that is mixed with the original sound. ZOOM G2Nu/G2.1Nu... -
Page 48: Total Module
MIN (minimum value) MAX (maximum value) Sets the module controlled by the Sets the value sent to the Sets the value sent to the expression pedal. parameter when the pedal is fully parameter when the pedal is fully down. PatchName Changes the patch name (→P20). ZOOM G2Nu/G2.1Nu... -
Page 49: Troubleshooting
• Check the battery setting (→P31). Set the type of ● There is a lot of noise battery being used for a more accurate display of • Check the shielded cables that you are using for the remaining charge. defects. • Use only a genuine ZOOM AC adapter. • Try adjusting the ZNR module settings again. ● Cannot change patches The unit might be in "pre-select mode" (→P25). If it is, turn the power OFF and ON again to restart in the normal mode. -
Page 50: Specifications
Control input: For FP02/FS01 S/N (equivalent input noise): 120 dB Noise floor (residual noise): -100 dBm* Power: AC adapter: DC9V (center minus plug), 500 mA (ZOOM AD-16) Batteries: 6.5 hours of continuous operation using 4 AA alkaline batteries when BACKLIGHT set to LOW USB: Bus power Dimensions: G2Nu: 166 mm (D) ×160 mm (W) ×64 mm (H) G2.1Nu: 169 mm (D) ×260 mm (W) ×67 mm (H) -
Page 51: Rhythm List
Pop3 8Beat2 Dance1 8Beat3 Dance2 8SHFFL Dance3 16Beat1 Dance4 16Beat2 3Per4 16SHFFL 6Per8 Rock 5Per4_1 Hard 5Per4_2 Metal1 Latin Metal2 Ballad1 Thrash Ballad2 Punk Blues1 Blues2 Funk1 Jazz1 Funk2 Jazz2 Hiphop Metro3 R'nR Metro4 Pop1 Metro5 Pop2 Metro ZOOM G2Nu/G2.1Nu... -
Page 52: Declaration Of Conformity
For more detailed information about recycling of this product, please contact your local city office, your household waste disposal service or the shop where you purchased the product. ZOOM CORPORATION 4-4-3 Surugadai, Kanda, Chiyoda-ku, Tokyo 101-0062 Japan http://www.zoom.co.jp G2Nu/G2.1Nu - 5000 - 1... - Page 55 To start Cubase LE 4, double-click the Cubase LE 4 shortcut icon that System". was created on the desktop. After startup, select "ZOOM ASIO To start Cubase LE 4, double-click on the Cubase LE 4 icon that was Driver" as the ASIO driver in the right section of the Device Setup window.
- Page 56 MacOS X Cubase LE 4 installation Connections and preparation Use Cubase LE 4 to record Windows Vista / XP Continued from front From the "Devices" menu of Cubase LE 4, select "VST HINT Check the recorded content. Connections" and select the device containing the When the monitoring button is enabled, the level meter next to the string "Zm In (Out)"...
- Page 57 Start Cubase LE 5. Then access the "Devices" menu, When you insert the DVD-ROM, a screen asking what you want to do In the "Sound" window, verify that "ZOOM G Series Audio" is listed Connect this unit to the computer using a USB cable.
- Page 58 Continued from front Cubase LE 5 installation Connections and preparation Use Cubase LE 5 to record Windows MacOS X From the "Devices" menu of Cubase LE 5, select "VST HINT Check the recorded content. Connections" and select the device containing the When the monitoring button is enabled, the level meter next to the string "USB Audio CODEC In (Out)"...
Need help?
Do you have a question about the G2.1Nu and is the answer not in the manual?
Questions and answers