Venstar T1100FS Owner's Manual
Residential 7-day programmable up to 2-heat & 2-cool
Hide thumbs
Also See for T1100FS:
- Installation instructions manual (15 pages) ,
- Calibration manual (4 pages)
Advertisement
Table of Contents
- 1 Table of Contents
- 2 Front Panel
- 3 Display
- 4 QUICK START Set the Clock and Go
- 5 Selecting the Heat or Cool Mode
- 6 Using the Fan Button
- 7 Basic Operation
- 8 Programming a Daily Schedule
- 9 Advanced Setup
- 10 Advanced Setup Table
- 11 About Advanced Features & Operation
- 12 Warranty
- Download this manual
See also:
Instruction and Installation Manual
Digital
Digital
Thermostat
Thermostat
Control up to 2 Heat & 2 Cool Stages
7-Day Programmable
4 Settings/Day
Auto Changeover
5 minute Built-In
Compressor Protection
Self-Prompting Programming
with Copy Command
Display Either F or C
Use with most Air Conditioning & Heating Systems including: 1 or 2 Stage
Electric Cooling & 2 Stage Gas Heating, Heat Pump, Electric or Hydronic Heat.
OWNER'S
OWNER'S
MANUAL
MANUAL
residential
THERMOSTAT
T1 1 00FS
7-Day
7-Day
PROGRAMMABLE
PROGRAMMABLE
up to
2-heat
up to
2-heat
& 2-cool
& 2-cool
HEAT
COOL
Mounts Flush with the Wall
Back-Lit display
One For All Works with
Virtually All Equipment
Non-Volatile memory
Keypad lockout
Single or Dual setpoint
with Adjustable Deadband
'O' or 'B' Terminal
Optional: Outdoor Sensor
Programmable Fan
Venstar Inc. 08/07
HEAT
PUMP
Advertisement
Table of Contents

Related Manuals for Venstar T1100FS


Summary of Contents for Venstar T1100FS
- Page 1 Display Either F or C Programmable Fan Use with most Air Conditioning & Heating Systems including: 1 or 2 Stage Electric Cooling & 2 Stage Gas Heating, Heat Pump, Electric or Hydronic Heat. OWNER’S OWNER’S MANUAL MANUAL Venstar Inc. 08/07...
-
Page 2: Table Of Contents
SCHEDULE ADVANCED SETUP ABOUT ADVANCED FEATURES & OPERATION WARRANTY CAUTION Follow Installation Instructions carefully. DISCONNECT POWER TO THE HEATER - AIR CONDITIONER BEFORE REMOVING THE OLD THERMOSTAT AND INSTALLING WARNING THE NEW THERMOSTAT. Venstar Inc. 08/07 P/N T1100FS Page 1... -
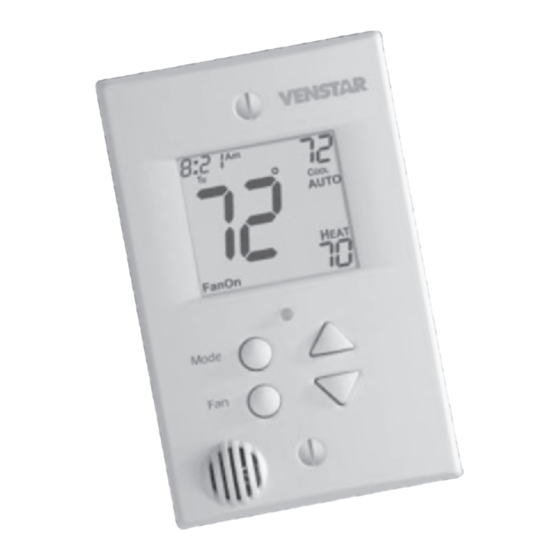
Page 3: Front Panel
Front Panel Liquid Crystal Display with Thermoglow Up/Down Buttons Mode Button Fan Button Heat or Cool Indicator Red = Heat, Green = Cool Temperature Sensor Page 2... -
Page 4: Display
Display I8:88 Night Setup SuMoTuWeThFrSa AUTO Outside Locked ONOFF Program Morning Evening Fan On Service Filter Mode Indicators - Page 6 Selects the operational mode of the equipment. HEAT - Indicates the heating mode. COOL - Indicates the air conditioning mode. AUTO - Indicates the system will automatically changeover between heat and cool modes as the temperature varies. - Page 5 Display I8:88 Night Setup SuMoTuWeThFrSa AUTO Outside Locked ONOFF Program Morning Evening Fan On Service Filter Morning, Day, Evening & Night icons - Pages 8-10 Indicates the day part of the time period program. Setup icon - Pages 12-15 Indicates the thermostat is in the setup mode. Fan On icon - Page 7 Indicates constant, continuous fan operation.
-
Page 6: Quick Start Set The Clock And Go
Quick Start Set the Clock and Go Press the MODE and FAN buttons During Setup & Programming: MODE at the same time for two seconds to enter Setup screens. Pressing the UP or DOWN butt ons will modify th e flashing selection. -
Page 7: Selecting The Heat Or Cool Mode
Selecting the Heat or Cool Mode Select Mode by Pressing the MODE Button I2:00 Heating Only The HEAT setting indicates the temperature the room has to reach before the furnace will Press turn on to heat the room. MODE I2:00 Cooling Only The COOL setting indicates the temperature the room has to... -
Page 8: Basic Operation
Basic Operation Selecting Your Desired Temperature (adjusting the setpoints) AUTO OR PROGRAM MODE Pressing the UP or DOWN buttons in Auto or Program mode will adjust both the heat and cool set temperatures simultaneously. Adjust the desired I2:00 set temperature with the AUTO buttons. -
Page 9: Programming A Daily Schedule
Programming a Daily Schedule Press the MODE button. While holding MODE, press the UP button for two seconds to enter time period programming. MODE Use the Programming Worksheet on the back cover to help with this section. Select the day of week. (Mo - Su) Press MODE... - Page 10 Programming a Daily Schedule 8:00 Adjust the start time for Day. Press MODE 8:00 Adjust the cooling setpoint for Day. (35 - 99 ) Press MODE 8:00 Adjust the heating setpoint for Day. (35 - 99 ) Press MODE 6:00 Adjust the start time for Evening.
- Page 11 Programming a Daily Schedule 6:00 Adjust the heating setpoint for Evening. (35 - 99 ) Evening Press MODE I0:00 Night Adjust the start time for Night. Press I0:00 MODE Night Adjust the cooling setpoint for Night. (35 - 99 ) Press MODE I0:00...
- Page 12 Programming a Daily Schedule The copy command becomes available after programming the entire previous day. Select Yes to copy the previous day’s program to the day displayed. If No is selected: If Yes is selected: Selecting Yes, then pressing MODE will Press copy the previous day’s program.
-
Page 13: Advanced Setup
Advanced Setup Press the MODE button. MODE While holding MODE, NOTE: Each step # is located at press the FAN button for the top right corner of the for 10 seconds to enter display for easy reference. setup screens. I2:00 Setup Adjust the time of day clock. - Page 14 Advanced Setup Select the reversing valve polarity for Heat Pump Setup operation: O = Energize in cooling b = Energize in heating Press (Step 4 only appears if heat pump is on in step 3) MODE Setup Select Electric Heat operation: On = 1st stage electric heat Off = 1st stage gas heat (Step 5 only appears if...
- Page 15 Advanced Setup 0:00 Setup Adjust the programmable fan timer: 0 - 60 minutes 0:00 = off Press Fan On MODE 7:00 Setup Adjust the Programmable Fan start time. (step 10 appears only if step 9 is not 0:00) Press Fan On MODE 9:00 Setup...
- Page 16 Advanced Setup Counts the number of Setup Press hours Cool has been running. Press FAN to reset the Energy Watch Press Cool counter. (0 - 1999 hrs.) MODE Setup Press Reset the counter to 0 to remove the Service Filter icon from the display.
-
Page 17: Advanced Setup Table
Advanced Setup Advanced Setup Table Step # Description Range Factory Default Time of Day 24 hour 12:00 am Day of the Week Mo - Su Heat Pump Off / On Reversing Valve Polarity O / b Electric Heat Off / On Deadband/Temp. -
Page 18: About Advanced Features & Operation
About Advanced Features & Operation CALIBRATION - Under normal circumstances it will not be necessary to adjust the calibration of the temperature. If calibration is required, please contact a trained HVAC technician to correctly perform the following procedure. I2:00 Press the MODE button once. - Page 19 About Advanced Features & Operation Heating Cooling Deadband Deadband Deadband Deadband db 2 db 1 db 1 db 2 (non-adj. 2 ) (adj. 1-6 ) (adj. 1-6 ) (non-adj. 2 ) 1st Stage 2nd Stage 1st Stage Heat Cool 2nd Stage turn on turn on turn on...
- Page 20 About Advanced Features & Operation FACTORY DEFAULTS - If, for any reason, you desire to return all the stored settings back to the factory default settings, follow the instructions below. WARNING: This will reset all Time Period and Advanced Programming to the default settings.
- Page 21 About Advanced Features & Operation KEYPAD LOCKOUT - To prevent unauthorized use of the thermostat, the front panel buttons may be disabled. To disable, or ‘lock’ the keypad, press and hold the MODE button. While holding the MODE button, press the UP and DOWN buttons together.
-
Page 22: Warranty
Warranty One-Year Warranty - This Product is warranted to be free from defects in material and workmanship. If it appears within one year from the date of original installation, whether or not actual use begins on that date, that the product does not meet this warranty, a new or remanufactured part, at the manufacturer’s sole option to replace any defective part, will be provided without charge for the part itself provided the defective part is returned to the distributor through a qualified servicing dealer. - Page 23 Programming Worksheet see Page 8 DAY PERIOD START TIME COOL HEAT Morning Evening Night Morning Copy Mon Evening Night Morning Copy Tue Evening Night Morning Copy Wed Evening Night Morning Copy Thu Evening Night Morning Copy Fri Evening Night Morning Copy Sat Evening Night...
Need help?
Do you have a question about the T1100FS and is the answer not in the manual?
Questions and answers