
Related Manuals for Eton E5


Summary of Contents for Eton E5
- Page 1 AM/FM Stereo/MW.SW.LW Dual Conversion OWNER’S MANUAL www.etoncorp.com re_inventing radio...
-
Page 3: Do You Need Help
OWNER’S MANUAL re_inventing radio DO YOU NEED HELP? Thank you for purchasing the E-5 AM/FM/Shortwave Radio. We want you to thoroughly enjoy the use of this product. To take advantage of its many excellent and unique features, we urge you to carefully read the owner’s manual. -
Page 4: Table Of Contents
• INSTALLING BATTERIES AND BATTERY INFORMATION... • AC ADAPTER INFORMATION... • CHARGING NI-MH BATTERIES IN THE E-5... BASIC RADIO OPERATION... • BEFORE USING THE E5; TURNING THE E5 ON/OFF; USING THE SLEEP TIMER FEATURE... • USING THE LOCK FEATURE... • VOLUME CONTROLS... - Page 5 TABLE OF CONTENTS • SETTING/ACTIVATING/DEACTIVATING THE ALARMS ... WORKING WITH MEMORY... • STORING STATIOINS INTO MEMORY... • LABELING MEMORY PAGES... • ACCESSING WHAT IS STORED IN MEMORY... • CHECKING MEMORY CAPACITY... • CHECKING PAGES AND MEMORIES... • USING THE PAGE COPY/PASTE FUNCTION... •...
-
Page 6: What The E-5 Includes
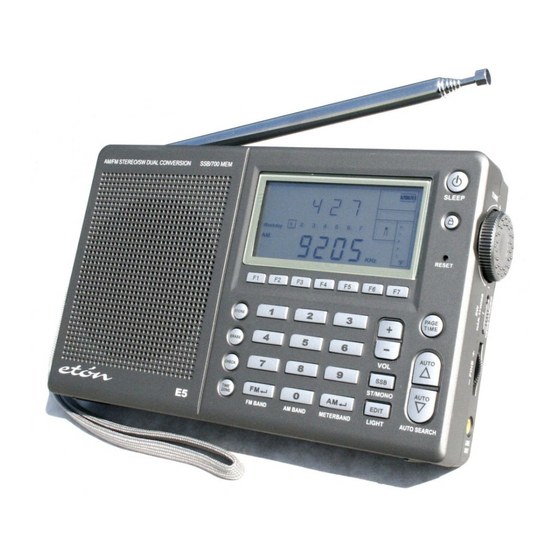
2 WHAT THE E-5 INCLUDES • AC adapter • Stereo earphones • External wire antenna • Carrying pouch • Carrying strap (attached) • Owner’s manual Note: In the instructions below, numbers in parenthesis (), cor- respond to the numbered diagrams. 3 FEATURES •... -
Page 7: Diagrams
3 FEAUTRES continued • Display Light. • Button Lock Feature. • Included: Owner’s Manual, One-Year Warranty, AC Adapter/ Charger and Protective Case. • Internally Recharges Ni-MH Batteries. • Dimensions: 6-5/8”W x 4-1/8”H x 1-1/8”D (167 x 105 x 27 mm). •... - Page 8 3 DIAGRAMS continued RIGHT SIDE Jog Dial Wheel News/Music Narrow/Wide Switch SSB Fine Knob Line Out JOG DIAL WHEEL: Turn the jog dial wheel, combine with other button can adjust time, frequency, volume and memory operations. SLEEP LOCK ALARM INDICATOR INFORMATION AREA AM/FM WEEKDAYS/STATION AREA...
-
Page 9: Getting Started
When the E5 is not being used for a long period of time, remove the batteries to avoid leakage. Damage caused by battery acid leakage is not covered by this product’s war-... -
Page 10: Installing Batteries And Battery Information
4 GETTING STARTED battery leakage warranty program. CAUTION! Never attempt to recharge non-rechargeable batteries! MORE IMPORTANT BATTERY USE INFORMATION • When using batteries for long periods of time, disconnect the AC adapter/charger. • Do not attempt recharging non-rechargeable batteries. Only recharge rechargeable Ni-MH batteries. -
Page 11: Charging Ni-Mh Batteries In The E-5
IMPORTANT AC ADAPTER/CHARGER INFORMATION AND PRECAUTIONS It is normal for the AC adapter/charger to feel warm during use. When the AC adapter/charger is connected, the E5 automatically switches to the AC adapter/charger’s power and installed batteries are not used. Disconnect the AC adapter/charger from the power outlet if it is not being used. - Page 12 • The E5 can be played while charging. • Alarm settings and action are function while charging. • The AC adapter/charger will not charge the batteries unless the E5 is set to charge mode. • For improved life of rechargeable batteries, do not repeatedly charge fully charged batteries.
-
Page 13: Basic Radio Operation
Assure that it is powered with the AC adapter or batteries. Assure that it is unlocked. See lock button instructions below. Place the DX/LOCAL switch (46), on the left side of the E5, to the DX position. TURNING THE E-5 ON AND OFF The E-5 is turned on and off with a quick, short press of the POWER/ SLEEP button (1). -
Page 14: Using The Lock Feature
The E5’s volume is divided into levels, 0-31. When adjust- ing volume, the corresponding level number appears in the display. Volume can be adjusted with the E5 turned on or off. Volume can also be adjusted using the numeric keypad (9). -
Page 15: Using The Dx/Local Switch
5 BASIC RADIO OPERATION continued USING THE DX/LOCAL SWITCH (46) The DX/LOCAL switch is located on the left side of the E5 and is labeled DX/LO. Use DX as the default setting. This gives the E-5 maximum sensitivity to signals. If strong stations seem distorted, then use the local setting (labeled LO). -
Page 16: Setting Up Am And Fm Outside Of North America
SETTING UP AM AND FM OUTSIDE OF NORTH AMERICA NOTE: The E-5 is factory set-up for use in North America. To use the E5 in North America (U.S. or Canada), no changes are needed. In North America, AM stations are spaced by 10 KHz and the AM band extends from 520 kHz to 1710 kHz. -
Page 17: Tuning In Stations
5 BASIC RADIO OPERATION continued 4. Sequentially press the F5 button until the beginning FM frequency of your area appears. 5. Give the PAGE/TIME button (4) a quick, short press. TUNING IN STATIONS Described below are four methods of tuning-in stations: (6), Tuning-Knob (40), Direct Frequency Entry (9) and Auto-Scan (6). -
Page 18: Auto-Scan Tuning
5 BASIC RADIO OPERATION continued 1. Press 8 1 0. 2. Within 3 seconds, press the AM enter button (10). NOTE: Regardless of what type of station is currently tuned (AM, FM or SW), direct frequency entry can be used to enter any type of frequency. -
Page 19: Shortwave With The E5
Below is a band chart showing the E5’s shortwave coverage. E5 SHORTWAVE COVERAGE AND TUNING SUGGESTIONS The E5 has continuous frequency coverage from 150 to 29999 kilohertz (kHz). This includes Longwave (150-519 kHz), Medium Wave (the AM broadcast band (520-1710 kHz) and Shortwave (1711-29999 kHz). - Page 20 SW BAND (meters) 120m USING THE E5’s SSB (Single Side Band) FEATURE (8) SSB enables listening to shortwave signals using the single-side- band mode. This mode is used for a variety of signals including amateur radio and other two-way communications, Morse code, weather-fax transmissions and other encoded signals often referred to as ‘utility’...
-
Page 21: Signal Strength Indicator
FM signals. 6 CLOCK AND ALARM FEATURES NOTE: Turn off the E5 to set clock and alarm functions. Setting clock and alarm features require that you work fast between steps. If you don’t, the set mode will automatically exit. If this occurs, start over. - Page 22 6 CLOCK AND ALARM FEATURES continued 3. Long, 3 second press of TIME ZONE button. ‘Tzone disappears from the display. Time Zone Abbreviation List ANC-Anchorage BEG-Beijing BKK-Bangkok CAI-Cairo CCS-Caracas CHI-Chicago DAC-Dhaka DEL- Delhi DEN-Denver DXB-Dubai GMT-GMT HKG-Hong Kong SETTING THE CLOCK AND WEEKDAY: In the clock set procedure below, while the hour or minute digits flash in steps 2 or 4, press one of the buttons 1-7 to select the day of the week (32).
- Page 23 ZONE button. SETTING THE ALARMS 1 THROUGH 4 (20-23) Alarms can be set with the E5 turned on or off. The E-5 has 4, independently programmable alarm timers (buttons F1-4) to turn it on at a specified time. Additionally, each timer can be programmed for a specific weekday, volume, playtime and memory location.
-
Page 24: Setting/Activating/Deactivating The Alarms
OWNER’S MANUAL 6 CLOCK AND ALARM FEATURES continued 4. Use the tuning knob to set the minutes. 5. Press the PAGE/TIME button. 6. Use the tuning knob to set the wake-up volume. 7. Press the PAGE/TIME button. 8. Use the tuning knob to set the wake-up alarm’s play minutes. 9. -
Page 25: Working With Memory
7 WORKING WITH MEMORY The E5 has 700 memories (also called presets), arranged in 100 pages, with each page holding 7 memories. Buttons F1-7 represent memory locations. STORING STATIONS INTO MEMORY Note that when storing into an already occupied memory position, its contents will be replaced with your new entry. -
Page 26: Accessing What Is Stored In Memory
7 WORKING WITH MEMORY continued 1. Select memory mode with the PAGE/TIME button (4). MEMO appears in the display. 2. Use the buttons to select the desired memory page. 3. Press the EDIT button (7) until ‘_’ appears in the display (about 3 seconds). -
Page 27: Using The Page Copy/Paste Function
7 WORKING WITH MEMORY continued 1. Press and release the PAGE/TIME button (4), causing PAGE to appear in the display. 2. Press or hold down the CHECK button (14) and turn the tuning knob (40) to select the desired page. 3. -
Page 28: Using The Ats Memory Feataure
7 WORKING WITH MEMORY continued 3. While holding down the ERASE button (15), press the F1-7 button that you wish to erase. Note that the box surrounding the memory location disappears. 4. Release the ERASE button. DELETING ALL MEMORY CONTENTS Hold down the EDIT and SSB buttons simultaneously, then press RESET (2). -
Page 29: Using The Light
15 seconds. Always-On Mode: When powered by its AC adapter, the light remains always-on when the E5 is turned on. Manual Light-On/Off Mode: If the light is off, pressing the LIGHT button (7) activates the light for 15 seconds. Pressing it again within 15 seconds turns the light off. -
Page 30: Music/Wide And News/Narrow Switch
12 LINE-OUT SOCKET (43) This socket provides an industry standard, fixed level audio output source for safely routing the E5’s audio to the line-in socket of a stereo system or recording device. Follow your external device’s line-input instructions. The E5’s volume control has no effect on this output. -
Page 31: Rear Folding Stand
15 RESET BUTTON (3) The reset button is located inside the small hole (3) labeled RESET. If the E5 operates erratically, poke a paper clip into the reset hole to reset its microprocessor. Performing a reset does not erase what is stored into the memory locations but does reset the clock to 0:00. -
Page 32: Introduction To Shortwave
OWNER’S MANUAL 16 INTRODUCTION TO SHORTWAVE SW BANDS, SSB AND OTHER SHORTWAVE HELP NEED HELP? CONTACT US. Eton Corporation 1015 Corporation Way Palo Alto, CA 94030 U.S. States: 1-800-872-2228 Canada: 1-800-637-1648 Worldwide: 650-903-3866 www.etoncorp.com Hours of Operation: M-F, 8:30-4, Pacific Time. - Page 33 OWNER’S MANUAL 16 INTRODUCTION TO SHORTWAVE continued is. In North America, the AM band is a frequency range stretching from 530 to 1710 kilohertz; the FM band is 88-108 megahertz. A band is a frequency range in which stations are located. To find AM or FM stations you tune around with the tuning buttons (or the tuning knob on an analog radio) until you find a station you like.
- Page 34 16 INTRODUCTION TO SHORTWAVE continued BAND 120 m 2,300 - 2,495 MHz 90 m 3,20 - 3,40 MHz 75 m 3,90 - 4,05 MHz 60 m 4,750 - 5,1 MHz 49 m 41 m 6,89 - 7,60 MHz 31 m 9,25 - 9,95 MHz 25 m 11,5 - 12,2 MHz...
- Page 35 An external shortwave antenna, especially when mounted outside, can greatly enhance shortwave reception. Some radios are equipped with special antenna sockets. Eton Corporation does not manufac- ture or sell shortwave antennas, however, there are many excellent models available. A web search such as ‘shortwave antennas’ will result in many sources for such products.
- Page 36 16 INTRODUCTION TO SHORTWAVE continued INTRODUCTION TO SINGLE SIDEBAND (SSB) Many higher-end shortwave radios have special circuitry enabling SSB, a highly efficient way of electronically processing transmitted and received signals for two-way communication. Examples of this are amateur radio (hams), maritime and aeronautical communication. Either upper side band (USB) or lower side band (LSB) can be used.
- Page 37 16 INTRODUCTION TO SHORTWAVE continued Aeronautical SW Frequency Ranges (usually USB) 2850-3155 3400-3500 4650-4750 5480-5730 6525-6765 8815-9040 10005-10100 Maritime SW Frequency Ranges (usually USB) 4063-4438 6200-6525 8195-8815 12230-13200 16360-17410 SHORTWAVE SSB WEATHER FREQUENCIES AND WEATHER FAX FREQUENCIES These are best found online by performing a search using your favor- ite Internet search site, searching for ‘shortwave weather frequencies’;...
-
Page 38: Troubleshooting
The RESET button (3) is the small hole on the front right of the E-5. To perform a reset, assure that fresh batteries are in the E5 or power it with its AC adapter. Turn the E5 off and poke a paper clip into the hole. - Page 39 4. Assure that the batteries are not depleted 5. If using an AC adapter, assure that it is plugged into the household outlet (mains socket) and into the E5’s DC socket. Also, assure that the AC adapter is of the correct DC voltage output and polarity and that its plug-tip is of the correct inner and outer diameter.
-
Page 40: Warranty And Service Information
Damage caused by battery acid leakage is not covered under warranty. 18 WARRANTY AND SERVICE INFORMATION You may contact Eton Corporation Service Department for additional information or assistance by calling toll-free Monday through Friday, 8:30am -4:00pm Pacific Standard Time:... -
Page 41: One-Year Limited Warranty
18 WARRANTY AND SERVICE INFORMATION continued The receiver will be serviced under the terms of the Eton Corporation Limited Warranty and returned to you. ONE YEAR LIMITED WARRANTY Etón warrants to the original purchaser this product shall be free from defects in material or workmanship for one year from the date of original purchase. - Page 42 All implied warranties, if any, including warranties of merchantability and fitness for a particular purpose, terminate one (1) year from the date of the original purchase. The foregoing constitutes Eton Corporation entire obligation with respect to this product, and the original purchaser shall have no other remedy and no claim for incidental or consequential damages, losses, or expenses.
- Page 43 re_inventing radio www.etoncorp.com Etón Corporation Corporate Headquarters 1015 Corporation Way Palo Alto, California 94303 USA tel +1 650-903-3866 tel +1 800-872-2228 fax +1 650-903-3867 Etón Europe/Lextronix Germany Rosenstrasse 2 D-10178 Berlin, Germany tel +49 [0]30 243102142 Etón Canada 1 Yonge Street, Suite 1801 Toronto, Ontario M5E 1W7 Canada tel + 1 416-214-6885 v.
Need help?
Do you have a question about the E5 and is the answer not in the manual?
Questions and answers