Table of Contents
Advertisement
Available languages
Available languages
Owner's Manual
JCRAFTSMAN I
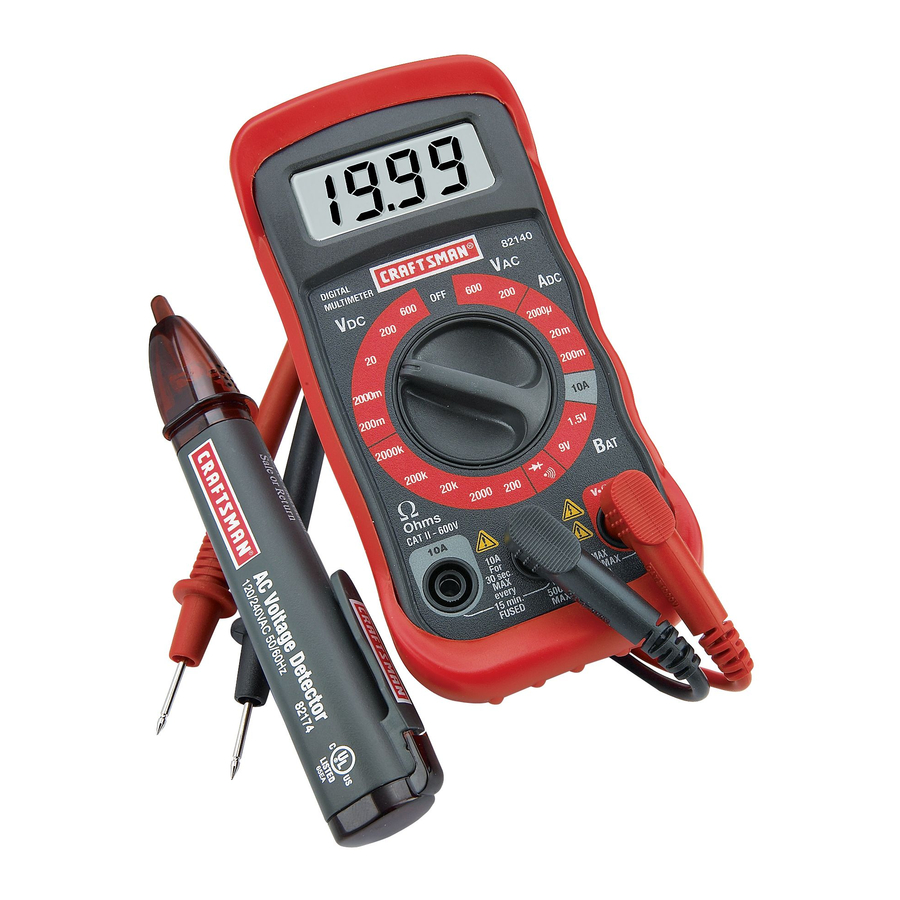
Digital MultiMeter
Model
No. 82140
and
Voltage
Detector
Model
No. 82174
CAUTION:
Read, understand and
follow Safety Rules and Operating
Instructions in this manual before
using this product.
• Safety
• Operation
• Maintenance
• EspaSol
© Sears, Roebuck and Co., Hoffman Estates, IL 60179 U.S.A.
www.craftsman.com
070606
Advertisement
Chapters
Table of Contents

Related Manuals for Craftsman 82140


Summary of Contents for Craftsman 82140
- Page 1 Model No. 82174 • Safety CAUTION: Read, understand and • Operation follow Safety Rules and Operating Instructions in this manual before • Maintenance using this product. • EspaSol © Sears, Roebuck and Co., Hoffman Estates, IL 60179 U.S.A. www.craftsman.com 070606...
-
Page 2: Table Of Contents
II:_ :] ! :[o] |o[o] _/ / :1 _/ _ Page Warranty Safety Instructions Safety Symbols Control and Jacks Symbols and Annunciators Specifications Battery Installation Operating Instructions DC Voltage Measurements AC Voltage Measurements DC Current Measurements Resistance Measurements Continuity Check Diode Test Battery Test Maintenance... -
Page 3: Warranty
Manual Ranging MultiMeter fails togive complete satisfaction within o ne year from the date ofpurchase, RETURN ITTO THE NEAREST SEARS STORE OR OTHER CRAFTSMAN OUTLET THE UNITED STATES, and Sears will r eplace it,free ofcharge. Ifthis CRAFTSMAN Manual Ranging MultiMeter... - Page 4 This meter has been d esigned for s afe use, but m ust beoperated with caution. The rules l isted b elow m ust becarefully followed forsafe o peration. 1. NEVER apply voltage orcurrent tothe meter that e xceeds specified maximum: Input Limits Function...
- Page 5 .-"9'_"_ _I:IIIk'dl,,"]k'd _"+ I:[o] n_ This symbol adjacent to another symbol, terminal or operating device indicates that the operator must refer to an explanation in the Operating Instructions to avoid personal injury or damage to the meter. IwARN'NG This WARNING symbol indicates a potentially hazardous situation, which if not avoided, could result in death or serious injury.
- Page 6 o_o]_IIII_,To] L',]F:I _Ie]LnlT:T_ [_: LCD Display Function switch COM jack 10A jack Positive jack Note: Tilt stand, fuse and battery compartment are on rear of unit. H =O __ k, | __ k, k, •))) Continuity "_ Diode test micro (amps) milli ( volts, amps) kilo (ohms) £_...
-
Page 7: Specifications
Function Resolution Range Accuracy 200mV 0.1mY DC Voltage +(0.5% reading + 2 digits) 2000mV 1 mV (VDC) 0.01V 200V 0.1V 600V 200V 0.1V AC Voltage +(1.2% reading + 10 digits 600V (VAC) (50/60Hz) DC Current 2000#A 1 #A +(1.0% reading + 2 digits) (ADC) 20mA 10pA... - Page 8 Diode Test Test current of 1 mA maximum, open circuit voltage 2.8V DC typical Continuity Check Audible signal will sound if the resistance less than approximately 30£2 Battery Test current 9V (6mA); 1.5V (100mA) >IM_ Input Impedance ACV Bandwidth 45Hz to 450Hz 200mV DCA voltage drop...
- Page 9 i WARNING: To avoid electric shock, disconnect the test leads from any source of voltage before removing the battery door. Disconnect the test leads from the meter. Remove the protective rubber holster (if installed).--_._ Open the battery door by loosening the screw using a Phillips head screwdriver.
-
Page 10: Dc Voltage Measurements
e] ".,l =1 t.,f-I III _JellI__."11 IIt.|l[_l i [e] __ J WARNING: are very dangerous and should be measured with great care. Risk of electrocution. High-voltage circuits, both AC and DC, J 1. ALWAYS turn the function switch to the OFF position when the meter is not in use. -
Page 11: Ac Voltage Measurements
AC VOLTAGE MEASUREMENTS WARNING: Risk of Electrocution. The probe tips may not be long enough to contact the live parts inside some 240V outlets for appliances because the contacts are recessed deep in the outlets. As a result, the reading may show 0 volts when the outlet actually has voltage on it. -
Page 12: Dc Current Measurements
DC CURRENT MEASUREMENTS longer than 30 seconds. Exceeding 30 seconds may cause damage to I CAUTION: Do not make current measurements on the 10A scale for the meter and/or the test leads. Insert the black test lead banana plug into the negative (COM) jack. -
Page 13: Resistance Measurements
RESISTANCE MEASUREMENTS test and discharge all capacitors before taking any resistance ARNING: To avoid electric shock, disconnect power to the unit under measurements. Remove the batteries and unplug the line cords. 1. Set the function switch to the highest £2 position. Insert the black test lead banana plug into the negative (COM) jack Insert the red test lead banana plug into the... -
Page 14: Diode Test
DIODE TEST 1. Insert the black t est l ead banana plug i nto the negative COM jack a nd the red test l ead banana plug i nto the positive diode jack. 2. Turn t he rotary switch tothe _ / o))) position. - Page 15 source ofvoltage before removing the back c over orthe battery orfuse I WARNING: Toavoid e lectric shock, disconnect the test l eads from any doors. I WARNING: Toavoid e lectric shock, donot o perate your meter until the battery and fuse doors are inplace a nd fastened securely.
-
Page 16: Replacing Batteries
REPLACING THE BATTERIES l WARNING: To avoid electric shock, disconnect the test leads from any source of voltage before removing the battery door. 1. When the batteries become exhausted or drop below the operating voltage, "BAT" will appear in the right-hand side of the LCD display. - Page 17 I/ _,{olUJ;] III:(_,,1:[olO]l i I_[_ There may be times when your meter does not operate properly. Here are some common problems that you may have and some easy solutions to them. Meter Does Not Operate: 1. Always read all the instructions in this manual before use. 2.
-
Page 18: Model 82174 Instructions
If this CRAFTSMAN Voltage Detector fails to give complete satisfaction within five years from the date of purchase, RETURN IT TO THE NEAREST SEARS STORE OR OTHER CRAFTSMAN OUTLET IN THE UNITED STATES, and Sears will replace it, free of charge. - Page 19 WARNING: USE EXTREME CAUTION IN THE USE OF THIS DEVICE. Improper use of this device can result in injury or death. Follow all safeguards suggested in this manual in addition to the normal safety precautions used in working with electrical circuits. DO NOT service this device if you are not qualified to do so.
- Page 20 Voltage Sensitivity 100 to 240V AC 50/60Hz Frequency Detection distance <0.2" Over voltage Category III 600V Operating Temperature 32 to 122°F (0 to 50°C) -4 to 140°F (-20 to 60°C) Storage Temperature <85%RH Humidity Altitude <2000 meters (6561 feet) 2 AAA batteries Battery 6x0.75x1 inches / 2oz Dimensions/Weight...
- Page 21 battery cover is in place and fastened securely. I WARNING: To avoid e lectric shock, donot o perate the meter until the WARNING: Risk of Electrocution. High-voltage circuits, both AC and DC, are very dangerous and should be measured with great care. AC VOLTAGE DETECTION WARNING: Risk of Electrocution.
- Page 22 No. 82174 • Seguridad PRECAUCION: Lea, comprenda • Operaci6n siga las Reglas Seguridad e • Mantenimiento Instrucciones de operaci6n en este manual antes de usar el producto. • Espafiol © Sears, Roebuck and Co., Hoffman Estates, IL 60179 U.S.A. www.sears.com/craftsman 070606...
- Page 23 Ir:1:] IIr:l e]:l[o_o]_III1:1 _IIeIq Pagina Garantia Instrucciones de Seguridad Sefiales de Seguridad Control y Conectores Simbolos y Anunciadores Especificaciones Instalaci6n de la Bateria Instrucciones de operaci6n Medici6n de Voltaje CD Medici6n de Voltaje CA Medici6n de corriente CD Medidas de resistencia VerMcaci6n de Continuidad Prueba de Diodo Prueba de Bateria...
-
Page 24: Garantia
COMPLETA POR UN ANO PARA EL MULiMETRO ESCALA MANUAL DE CRAFTSMAN Si este Multimetro de escala manual CRAFTSMAN no le satisface totalmente dentro de un a_o a partir de la fecha de compra, REGR#:SELO A LA TIENDA SEARS O DISTRIBUIDOR... - Page 25 Este medidor ha sido disefiado para uso seguro, sin embargo debe ser operado con precauci6n. Para una operaci6n segura, debera cumplir las reglas enumeradas a continuaci6n. NUNCA aplique al medidor voltaje o corriente que exceda los limites maximos especMcados de alimentaci6n: Limites de entrada Funci6n Entrada maxima...
- Page 26 ;'] : 1_r:11:_"!J]:1."]:[rltJ _11J7:1, Esta seSal adyacente a otra seSal, terminal o dispositivo en operaci6n indica que el operador debera buscar una explicaci6n en las Instrucciones de operaci6n para evitar lesiones a su persona o daSos al medidor. Esta seSal de ADVERTENClA indica que existe L ADVERTENCIA una condici6n potencialmente...
- Page 27 _o] _II/ _,To] III:F:i'lo_o] _I:[O,]l I [O] _,,1 :F: Pantalla LCD Selector de FunciSn Enchufe COM Enchufe 10A Enchufe positivo Nota: El soporte inclinado, y el compartimiento del fusible y bateria se encuentran en la parte posterior de la unidad _ _vA I:[o]Ko_.',]1:111 _IJ][__,IJIo]_,,1 :[_...
-
Page 28: Especificaciones
_".)-..,1 =[e,] I _1 [___[e,] [e] _I_ Funci6n Escala Resoluci6n Precisi6n 200mY 0.1mY Voltaje CD + (0.5% lectura + 2 digitos) 2000mY (V CD) 0.01V 200V 0.1V 600V 200V 0.1V Voltaje CA + (1.2% lectura + 10 digitos 600V (V CA) (50/60Hz) Corriente CD + (1.0% lectura + 2 digitos) - Page 29 _-,.) _ =[e,] I _1 [e,7'__T_e,] [el ZI=[_.".) Prueba de diodo Corriente de prueba de 1 mA m&xima, voltaje de circuito abierto 2.8V DC tipica Verificaci6n de continuidad Se emitira una sepal audible si la resistencia aproximadamente menor a 30_(-2 Prueba de corriente de la bateria...
- Page 30 prueba de cualquier fuente de voltaje antes de quitar la tapa de la J ADVERTENClA: Para evitar choque electrico, desconecte los cables de J bateria. 1. Desconecte los cables de prueba del medidor. Quite la funda protectora de hule. 3. Abra la tapa de la bateria aflojando el tomillo con un destomillador cabeza Phillips.
- Page 31 O" tanto de CA y CD, son muy peligrosos y deberan ser medidos con gran I ADVERTENClA: Riesgo de electrocuci6n. Los circuitos de alta tensi6n, cuidado. 1. SIEMPRE gire el conmutador de funci6n a la posici6n de apagado (OFF) cuando el medidor no este en uso. 2.
-
Page 32: Medici6N De Voltaje Cd
Lapantalla indicara elvalor ypunto decimal correcto. Si s einvierte la polaridad, lapantalla indicara (-)menos antes del v alor. MEDIClON DE VOLTAJE ADVERTENClA: Riesgo deelectrocuci6n. Las puntas delas sondas pueden noser Iosuficientemente largas para h acer contacto con las partes vivas dentro dealgunos contactos 240V p ara e lectrodomesticos debido aque dichos contactos estan m uy a dentro del c ontacto. -
Page 33: Medici6N De Corriente Cd
MEDICION DE CORRIENTE PRECAUCION: no haga mediciones de corriente en la escala de 10 A durante mas de 15 segundos. Si la medici6n se extiende a mas de 15 segundos el multimetro y!o los conductores de prueba podrian sufrir daSos. 1. -
Page 34: Medidas De Resistencia
MEDIDAS DE RESISTENCIA ADVERTENCIA: Para evitar choque electrico, desconecte la tensi6n a la unidad bajo prueba y descargue todos los capacitores antes de tomar cualquier medici6n de resistencia. Retire las baterias y desconecte los cordones de linea. 1. Fije el selector de funci6n a la posici6n £_ mas alta. Inserte el conector banana del cable negro de prueba en el enchufe negativo (COM). -
Page 35: Prueba De Diodo
PRUEBA DE DIODO 1, Inserte el cable negro de prueba en el enchufe negativo COM y el cable rojo de prueba en el enchufe positivo de diodo. Gire el selector rotativo a la posici6n _1- / o))). Toque las puntas de las sondas al diodo bajo prueba. - Page 36 rA V:1_ii :1_1 hVd 1 :1 _i I_l de prueba de cualquier fuente de voltaje antes de quitar la tapa I ADVERTENClA: Para evitar choque electrico, desconecte los cables posterior o la de la bateria o fusibles. menos que la tapa posterior y la tapa de la bateria y fusibles esten I ADVERTENClA: Para evitar choque electrico, no opere el medidor a colocadas...
-
Page 37: Reemplazo De Baterias
REEMPLAZO DE LAS BATERiAS prueba de cualquier fuente de voltaje antes de quitar la tapa de la DVERTENCIA: Para evitar choque electrico, desconecte los cables de bateria. 1. Cuando las baterias se agoten o caigan bajo el voltaje de operaci6n, aparecera "BAT"... -
Page 38: Reemplazo De Los Fusibles
REEMPLAZO DE LOS FUSIBLES de prueba de cualquier fuente de voltaje antes de quitar la tapa de I ADVERTENCIA: Para evitar choque electrico, desconecte los cables fusibles. 1. Desconecte los cables de prueba del medidor y cualquier articulo bajo prueba. Quite la funda protectora de hule. - Page 39 _o] Rt[oKo] _I J]:1 :,1 _ ,{o] : ] 1:1;_ r:_: Habra ocasiones en que su medidor no funcione correctamente. seguida encontrara algunos problemas comunes que puede Ilegar a tenet y algunas soluciones faciles. El medidor no funciona: 1. Siempre lea todas las instrucciones de este manual antes de usar. 2.
- Page 40 GAP,ANTiA COMPLETA POP, CINCO ANOS en el detector de voltaje CRAFTSMAN. Si este detector de voltaje CRAFTSMAN no le satisface totalmente dentro de cinco afios a partir de la fecha de compra, P,EGP,ESE A LA TIENDA SEARS U OTP,O VENDEDOP, DE...
- Page 41 ESTEI ADVERTENCIA: EXTREME PRECAUCIONES USAR DISPOSITIVO. El uso inadecuado este dispositivo puede resultar en I lesiones o la muerte. Siga las salvaguardas sugeridas este manual, adem_ls las precauciones normales usadas al trabajar circuitos electricos. NO de servicio a este dispositivo si usted no est_l capacitado para hacerlo.
- Page 42 =[...",] ".,I = [o,,) I_1 [o,T±[o,,) [o] _I =[.._ 100 a 240V CA Sensibilidad de Voltaje Frecuencia 50/60Hz Distancia de detecci6n <0.2" Sobre voltaje Categoria III 600V Temperatura de operaci6n 0 a 50°C (32 a 122°F) -20 a 60°C (-4 a 140°F) Temperatura de almacenamiento Humedad...
- Page 43 que la tapa de la bateria esta colocada y asegurada. ADVERTENClA: Para evitar choque electrico, no opere el medidor hasta O" CA y CD, son muy peligrosos y deberan ser medidos con gran ADVERTENClA: Riesgo de electrocuci6n. Los circuitos de alto voltaje, cuidado.
Need help?
Do you have a question about the 82140 and is the answer not in the manual?
Questions and answers