Singer 7442 Instruction Manual
Hide thumbs
Also See for 7442:
- Instruction manual (71 pages) ,
- Service manual (40 pages) ,
- Instruction manual (71 pages)
Table of Contents
Advertisement
Advertisement
Table of Contents

Related Manuals for Singer 7442


Summary of Contents for Singer 7442
- Page 1 ® 7442...
- Page 2 Do not modify the plug in any wa_ This appliance complies with EEC Directive 89/336/EEC covering the electromagnetic compatibility. ® SINGER is a Registered Trademark of KSIN Luxembourg III S.ar.L. @ 2005, Singer Sewing Co. All Rights Reserved.
- Page 3 Avec cette machine a coudre, utilisez le modele YC-485EC de Yamamoto Electric. Cet appareil est conforme _ la directive CEE 89/336 EEC concernant les normes 61ectromagn6tiques. SINGER _ est une marque d6posee de KSIN Luxembourg Ill S.ar.L (_) 2005, Singer Sewing Co. Tous droits r6serves.
- Page 4 Yamamoto Electric con esta m_quina de coser. Este instrumento se conforma con directivo de CEE 89/336/EEC cubriendo supresi6n contra interferencia de radio. SINGER ° es una marca registrada de KSIN Luxembourg Ill S.ar.L. @ 2005, Singer Sewing Co. Todos los derechos reservados.
- Page 5 TABLE OF CONTENTS 1. KNOWING YOUR SEWING MACHINE Stretch stitches Machine identification ..........Straight stretch stitch, Ric-rac stitch, Honeycomb stitch, Accessories Overedge stitch, Feather stitch, Pin stitch, Blanket stitch, Ladder stitch, Star stitch, Slant pin stitch, Setting up your machine Slant overedge stitch, Greek key stitch, Entredeux stitch, Spool pins Double overlock stitch, Criss-cross...
- Page 6 TABLE DES MATIERES 1. VOTRE MACHINE A COUDRE Points extensibles Point droit extensible, Point ric rac, Point nid d'abeille, Description de la machine 6 - 7 Accessoires 8 - 9 Point surjet extensible, Point plume, Point epingle, Point languette, Point d'echelle, Point epingle oblique, Preparation de la machine ........
-
Page 7: Table Of Contents
INDICE DE CONTENIDOS Puntadas elasticas 1. PRINCIPALES PARTES DE LA MAQUINA Puntada recta triple, Puntada ric rac, Puntada panal, Identificacion de la maquina ........Accesorios Puntada sobre-borde, Puntada pluma, Puntada de broche, Puntada de ribete, Puntada en escalera, Preparacion de la maquina Porta carretes 12 - Puntada alfiler inclinado,... -
Page 8: Knowing Your Sewing Machine
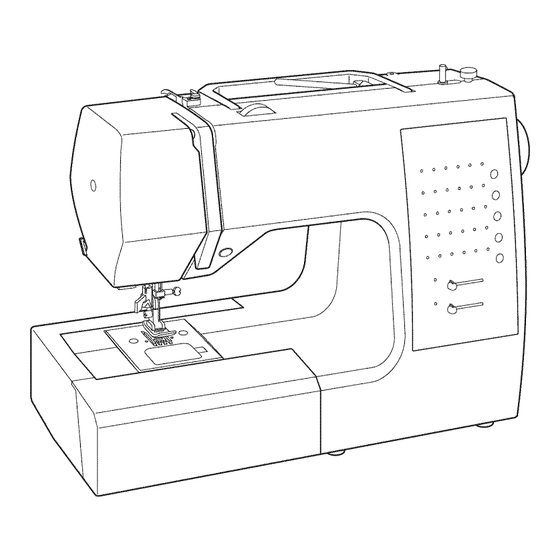
1. KNOWING YOUR SEWING MACHINE MACHINE IDENTIFICATION 1. Thread guide 2. Thread take-up 3. Thread tension control 4. Face cover 5. Thread cutter 6. Extension table (Accessory box) 7. Bobbin winder shaft 8. Bobbin winder stop 9. Reverse stitch switch 10. -
Page 9: Principales Partes De La Maquina
1. VOTRE MACHINE A COUDRE 1. PRINCIPALES PARTES DE LA MAQUINA DESCRIPTION DE LA MACHINE IDENTIFICATION DE LA MAQUINA 1. Guide-ill 1. Guia hilo 2. Releveur de fil 2. Tria- hilos 3. Control tension hilo 3. Reglage tension du fil superieur 4. - Page 10 ACCESSORIES FOR SEWING MACHINE 1. Needles 2. Bobbins (4 total - 1 in machine) 3. Auxiliary spool pin 4. Spool pin felt discs (2) 5. Spool pin cap (mini) 6. Spool pin cap (small) 7. Spool pin cap (large) 8. Buttonhole opener/Brush/Seam Ripper 9.
-
Page 11: Accesorios
ACCESORIOS ACCESSOIRES POUR LA MACHINE A COURE PARA MAQUINA DE COSER 1. Aiguilles 1. Agujas 2. Canettes (total 4 - 1 dans la machine) 2. Canillas (4 total - 1 en maquina) 3. Porte-bobine auxiliaire vertical 3. Pasador de carrete auxiliar 4. - Page 12 SETTING UP YOUR MACHINE Be sure to wipe off any surplus oil from needle Set power/light switch at plate area before using your machine the first "OFF" time. Mettez I'interrupteur moteur/ lumiere sur "OFF". POWER LINE CORD/FOOT CONTROL Poner el Interruptor de corfiente/ luz de velocidad en "OFF"...
-
Page 13: Preparacion De La Maquina
PRI PARATION DE LA MACHINE PREPARACION DE LA MAQUINA Installez votre machine sur une surface bien plane. Asegurarse de limpiar cualquier aceite sobrante del area de la Votre machine & coudre a et6 huilee a fond par l'usine. plancha de aguja, antes de usar, por primera vez, la maquina. II est donc indispensable, avant de commencer a l'utiliser,... - Page 14 SPOOL PINS Spool HORIZONTAL SPOOL PIN for normal thread spool Carrete Bobine "_'_ Spool pin felt discs __-: Place thread spool on the pin and secure with a spool cap to ensure smooth flow of thread. If the thread spool has a thread Rondelle feutre Disco del pasador c retaining slit, it should be placed to the right.
-
Page 15: Porta Carretes
PORTE-BOBINE PORTA CARRETES PASADOR DE CARRETE HORIZONTAL PORTE-BOBINE HORIZONTAL pour la bobine normale para carrete de hilo normal Placez la bobine sur la broche et fixez-y un couvre-fil pour Coloque el carrete de hilo en el pasador y aseg6relo con la assurer un debit de fil bien regulier. - Page 16 WINDING THE BOBBIN 1. Place a spool of thread on the spool pin, and secure it with the spool pin cap. Pull the thread out from the spool and place it through thread guides as shown in illustration. ® 2. Put end of thread through the hole in bobbin as shown. ®...
-
Page 17: Devanado De La Canilla
PREPARATION DE LA CANETTE DEVANADO DE LA CANILLA 1. Mettez une bobine de fil en place sur un porte-bobine 1. Coloque el carrete de hilo en el pasador de carrete fixez-la bien a I'aide du couvre-fil. Tirez le fil hors de la bobine asegOrelo con la tapa de pasador de carrete. - Page 18 THREADING THE BOBBIN THREAD 1. Raise the needle to its highest position by rotating the hand wheel toward you. ® 2. Remove the bobbin cover plate by pushing the release button to the right. Bobbin cover will pop up sufficiently to allow you to remove the cover.
-
Page 19: Enhebrado Del Hilo De La Canilla
ENFILAGE DU FIL DE CANETTE ENHEBRADO DEL HILO DE LA CANILLA 1. Relevez I'aiguille position haute en tournant 1. Eleve la aguja hasta su posicion mas alta girando el volantd. manuellement le volant vers vous. 2. Retirez la plaque de canette en poussant le bouton 2. - Page 20 THREADING THE TOP THREAD Raise the presser foot lifter. Always be sure to raise the presser foot lifter before threading the top thread. (If the presser foot lifter is not raised, correct thread tension cannot be obtained.) B. Turn the hand wheel toward you until the needle is in its highest position and the thread take-up is visible.
-
Page 21: Enhebrado Del Hilo Superior
ENFILAGE DU FIL SUPI'=RIEUR ENHEBRADO DEL HILO SUPERIOR Elevez le pied presseur. Veillez a toujours elever le releveur A Levante el prensatelas. Siempre asegL_rese de levantar el de pied presseur avant d'enfiler le fil superieur. (Si le releveur prensatelas antes de bobinar el hilo superior. - Page 22 USING AUTOMATIC NEEDLE THREADER Raise the needle to its highest position by rotating the hand wheel towards you. 1. Hook thread to thread guide as illustrated. 2. Pull down lever holding the end of thread. 3. Turn the lever as far as it will go. 4.
-
Page 23: Empleo Del Enhebrador Aguja
UTILISATION DE L'ENFILEUR DE CHAS EMPLEO DEL ENHEBRADOR AGUJA D'AIGUILLE Levantar la aguja a la posicion mas elevada girando el volante de la maquina hacia uated. Amener I'aiguille en position haute en toumant le volant vers VOUS. 1. Enhebrar el hilo en el guia+ hilo como indica la ilustraci6n. 1. - Page 24 PiCKiNG UP BOBBIN THREAD 1. Raise the presser foot lifter. 2. Holding needle thread loosely with your left hand, turn hand wheel toward you with your right hand first lowering the needle and continuing until the needle comes to its highest position. NOTE: A quick way to pick up the bobbin thread is, with straight stitch selected, touch...
-
Page 25: Recogida Del Hilo De La Canilla
RAPPEL DU FIL INFERIEUR RECOGIDA DEL HILO DE LA CANILLA 1. Relever le pied presseur. 1. Alzar la palanca del pie prensatelas. 2. Tenir le fil de I'aiguille et tourner le volant vers vous en faisant 2. Manteniendo flojo el hilo de la aguja con la mano izquierda, remonter I'aiguille a sa position la plus haute. - Page 26 Size Tricot Polyester 11/80,14/90, Nylon 16/100 Do not use on stretch fabrics. * For best sewing results, always use a Singer Branded Needle. A!ways disconnec I the machine from power Supply bY removing the plug from the wall,out!et, Changing the needle 1.
-
Page 27: Tabla De Hilo, Agujay Material
Punto doble Tama_o 11/80, * Pour obtenir les meilleurs resultats de couture, utilisez Jersey 14/90, 16/100 Tricot toujours une aiguille de marque Singer. No usar sobre el material estirado. • Para los mejores resultados de costura, use siempre agujas marca Singer. - Page 28 ADJUSTING TOP THREAD TENSION Under side C6te de dessous 90% of your sewing will be accomplished with the word "AUTO" Reverso exposed on the tension control dial on top of the machine. Well balanced Correct Bien equilibrada STRAIGHT STITCHING Top side ..
-
Page 29: Ajuste De La Tension Del Hilo Superior
AJUSTE DE LA TENSION DEL HILO REGLAGE DE LA TENSION DU FIL SUPERIEUR SUPERIOR COSTURA RECTA POINT DROIT El buen aspecto de la costura generalmente esta determinado L'aspectde votre pointdroit depend surtout du bon equilibre por la tension equilibrada de ambos hilos superior e inferior. entre latension supefieure et la tensioninf@rieure. - Page 30 LEDindicator Temoin adiode Indicador L ED ill ill i° Pattern selection buttons Touches deselectiondemotif Botones d eselecci6n depatr6n LEDindicator Stitchlengthcontrol* iHm_ Temoin adiode -- Longueur depoint* IndicadorLED Control I ongitudpuntada * Stitchwidth/needle p osition control * Commande de largeurdepoint!position d'aiguille * Controldeanchode puntada/posici6n deaguja* *NOTE: The provided scales and numbers on the length and width controls are for reference only and do not represent actual sewing parameters...
- Page 31 FONCTIONS DU PANNEAU FUNCIONES DEL PANEL DE CONTROL COMMANDE patr6n Botones de selecci6n Touches de s61ection motifs Conecte el interruptor principal y el indicador LED encima del patr6n de costura recta se encender& En ese momento podra Mettez I'interrupteur d'alimentation sous tension pour allumer coser la Puntada recta.
- Page 32 REVERSE OPERATION SWITCH Dual purpose reverse stitchltacking switch Reverse stitch switch Interrupteur couture arriere Interruptor de puntadas hacia atras * Reverse stitch function for straight and zigzag stitches Reverse sewing is carried out while the reverse stitch switch is pushed. The machine will continue to sew in reverse as long as the reverse switch button is pressed.
-
Page 33: Interruptor De Funcionamiento
TOUCHE DE FONCTIONNEMENT INTERRUPTOR DE FUNCIONAMIENTO Interrupteur de couture arri_relfaufilage Interruptor de costura hacia atras/remate * Fonction couture artiste pour les points droits et zigzags Funci6n de costura hacia atr_s para costuras rectas La couture arriere avance Iorsque I'interrupteur couture zigzag arriere reste appuye. -
Page 34: Empezera Coser
2. COMMENCEZ A COUDRE 2. STARTING TO SEW 2. EMPEZER A COSER TABLEAU DE REFF:RENCE QUICK REFERENCE CUADRO DE REFERENCIA TABLE OF STITCH RAPIDE DES LONGUEURS RAPIDA DE LARGO Y LENGTH AND WIDTH ET LARGEURS DE POINTS ANCHO DE PUNTADA LENGTH WIDTH STITCH... - Page 35 LENGTH WIDTH SYMBOL STITCH LONGUEUR(mm) LARGEUR (mm) LARGO ANCHO POINT SYMBOLE AU TO MAN UAL AUTO MAN UAL AU TO MAN UE L AUTO MANUEL PUNTADA SIMBOLO AU TO MAN UAL AUTO MAN U AL STAR 3.5~7.0 POINT EN ETOILE 1.5~3.0 BRILLO ESTELAR VINE...
- Page 36 STRAIGHT STiTCHiNG Straight stitch is most frequently used for every aspect sewing. Let's learn how to sew following the steps below. 1. SETTINGS Presser foot - General Purpose Foot Thread tension control - AUTO NOTE: Based upon the weight of the fabric, slight "fine tuning" of the tension may be desired.
-
Page 37: Puntada Recta
POINT DROIT PUNTADA RECTA Ceci est le point le plus utilise pour toute genre de couture. Punto recto se usa mas frecuentemente para coser cualquier Apprenez a vous servir correctement de votre machine, cosa. Aprenda el uso correcto de su maquina. suivant les etapes ci-dessous. - Page 38 INSERTING ZIPPERS AND PIPING Use zipper foot to sew to the right or left of the zipper or close to the cord. Needle to left of foot Needle to right of foot Aiguille a gauche du Aiguille a droite du pied pied presseur presseur Aguja a la izquierda del...
-
Page 39: Insercion De Cremalleras Y Vivo
PLACER FERMETURE INSERCION DE CREMALLERAS Y VlVO GLISSIERE OU UN BIAIS (GALONNER) Utilizar el prensatelas de cremalleras que permite ceser a la derecha e la izquierda de la cremallera o cerca del cordon vive. Utilisez le pied fermeture glissiere, au moyen duquel vous pouvez piquet aussi bien a gauche qu' a droite, ou aussi au plus pres du cordonnet. - Page 40 ZIGZAG STiTCHiNG Under side C6te de SETTINGS :Presser foot - General Purpose Foot Reverse :Thread tension control - AUTO The top thread may appear on the bottom depending on the thread, fabric, type of stitch and sewing speed, but the bobbin thread must never appear on the top of the fabric.
-
Page 41: Puntadazig-Zag
POINTZIGZAG PUNTADAZIG-ZAG REGLAGES :Pied presseur - Pied universel AJUSTES :Pie prensatelas - Pie universal :Control tension hilo - AUTO :Reglage tension du fil superieur - AUTO Le fil superieur peut paraTtre sur I'envers, en fonction du ill, du El hilo superior puede aparecer en la parte inferior, segQn el tissu et de la vitesse de couture, mais le fil de la canette ne doit... - Page 42 BLINDHEM STITCH The blindhem stitch is primarily used for hemming curtains, trousers, skirts, etc. Medium to heavyweight fabric Settings : Presser foot - Blind stitch foot Material de peso medic a 3esado : Thread Tension Control: AUTO Tissus moyens et Iourds - Regular blind stitch for normal firm fabrics - Elastic blind stitch for soft, stretchable fabrics under side...
-
Page 43: Puntada Invisible
POINT INVISIBLE PUNTADA INVISIBLE REGLAGES :Pied presseur - Pied point invisible AJUSTFS :Pie prensatelas - Prensatelas de puntada invisible :Reglage tension du fil superieur - AUTO :Control tension hilo - AUTO pour Point invisible les tissus tisses - Puntada invisible regular para las telas normales - Point invisible pour les tissus extensibles untada invisible super elastico para las telas suves, elastico... - Page 44 MULTI-STITCH ZIGZAG SETTINGS :Presser foot - General Purpose Foot :Thread tension control - AUTO This is a strong stitch because as its name implies, it makes three short stitches where the normal zig-zag makes only one. For this reason it is highly recommended for overcasting types of fabrics.
-
Page 45: Zig-Zag De Tres Puntadas
ZIGZAG MULTI-POINT :;ii ZIG-ZAG DE TRES PUNTADAS :;ii REGLAGES :Pied presseur - Pied universel AJUSTES :Pie prensatelas - Pie universal :Control tension hilo - AUTO :Reglage tension du fil superieur - AUTO Pour reparer des dechirures droites ou en angle placez le tissu Esta es una puntada fuerte, ya que como su nombre implica, avec le debut de I'accroc sous la partie centrale du pied. - Page 46 STRETCH STITCHES SETTINGS :Presser foot - General Purpose Foot or Satin Stitch Foot :Thread tension control - AUTO Stretch stitches are mainly for use on knit, or stretchable fabrics, but can also be used on ordinary woven materials. STRAIGHT STRETCH STITCH ,,,'"...
-
Page 47: Puntadas Elasticas
POINTS EXTENSIBLE PUNTADAS ELASTICAS REGLAGES :Pied presseur - Pied universel ou pour point AJUSTES :Pie prensatelas - Pie universal o para coser bourdon en saten :Control tension hilo - AUTO :Reglage tension du fil superieur - AUTO Les points extensible sont gen6ralement utilises pour les tissus Las puntadas elasticas se utilizan principalmente en generos de elastiques,... - Page 48 FEATHER STITCH The pleasing appearance of this stitch enables it to be used for top stitching, or attaching lace or inset panels when making lingerie or girdles. It is also ideal for quilting applications and faggoting. PIN STITCH The Pin stitch is a traditional stitch pattern used for picot like edges and for applique work.
- Page 49 POINT PLUME PUNTADA PLUMA L'aspect agreable de ce point lui permet de servir de couture El aspecto agradable de esta puntada permite su uso como visible a plat, ou pour assembler les dentelles, ou pour adomo o la aplicacion de encaje o paneles intemos en lenceria I'insertion de pieces de type lingerie.
- Page 50 SLANT PIN STITCH Excellent for hemstitching table and bed covers with an elegant touch. Picot-like stitch can also be made on sheer materials. Sew along the raw edge of fabric and trim close to the outside of the stitching. SLANT OVEREDGE STITCH 1,t,: Seams and overcasts...
- Page 51 POINT EPINGLE OBLIQUE PUNTADA ALFILER INCLINADO Tres pratique pour fake les ourlets de table et couvre-Iit avec Es excelente para dobladillar manteles y sobrecamas dando une touche el6gante. Le point ressemblant a un point picot un toque de elegancia. La puntada tipo picot tambien puede (ourlet cocotte) peut 6tre effectue sur les tissus fragiles.
- Page 52 Useful for decorative stitching on borders and for use in heirloom sewing. The Entredeux stitch is most often sewn with a Wing Needle (Singer Style 2040) to create holes in the stitch pattern. DOUBLE OVERLOCK STITCH The Double overleck stitch has three main uses. It is perfect for attaching...
- Page 53 "Entre dos" es mas cousu a I'aide d'une aiguille aile (Style Singer 2040) pour creer comQnmente usada con una aguja "de ala" (Singer estilo 2040) des trous dans le motif du point. para crear agujeros en el patron de costura.
- Page 54 DECORATIVE DESIGNS SETTINGS :Presser foot - Satin stitch foot :Thread tension control - AUTO * Always test sew on a cut-off strip of the fabric being sewn to check the pattern to be used. * Before starting to sew, check that there is enough thread wound onto the bobbin to make sure that the thread will not run out during sewing.
-
Page 55: Disesos De Bordados Decorativos
MOTIFS D#CORATIFS DISENOS DE BORDADOS DECORATIVOS REGLAGES :Pied presseur - Pied pour point bourdon AJUSTI=S :Pie prensatelas - Pie para coser en saten :Control tension hilo - AUTO :Reglage tension du fil superieur - AUTO * Effectuez une couture d'essai sur une bande decoup6e du Puede realizar una costura de prueba... -
Page 56: Continuous Patterns
CONTINUOUS PATTERNS SETTINGS :Presser foot - General purpose foot or Satin Stitch Foot :Thread tension control - AUTO These are the optimum patterns for sewing continuous patterns. Use whichever patterns suit your preference. SEWING ON A BUTTON SETTINGS :Presser foot - General purpose foot :Darning plate Position your fabric and button under the presser foot. -
Page 57: Patrones Continuos
MOTIFS CONTINUEL PATRONES CONTINUOS REGLAGES :Pied presseur - Pied universel ou pour point AJUSTFS :Pie prensatelas - Pie universal o para coser bourdon en saten :Reglage tension du fil superieur - AUTO :Control tension hilo - AUTO Ces motifs conviennent parfaitement a la couture des motifs Estos son los patrones... -
Page 58: Sewing A Buttonhole
SEWING A BUTTONHOLE Tab B USING BUTTONHOLE FOOT Tab A Languette LengL_eta B Languette A Your machine offers you two difference widths of bartack Leng0eta A buttonholes sewn by a system that measures the size of the button and calculates the size buttonhole required. All of this is done in one easy step. -
Page 59: Confeccion De Ojales
CONFECTION DES BOUTONNII RES CONFECClON DE OJALES UTILISATION DU PIED BOUTONNI#RE USO DEL PIE DE OJALADORA Votre machine vous offre deux differentes largeurs de brides Su maquina de coser le ofrece dos anchos de ojales cosidos de boutonnieres cousues au moyen d'un systeme qui mesure pot un sistema que mide el tamafio del boton y calcula... - Page 60 5. Carefully mark the position of buttonhole on your garment. 6. Place the fabric under the foot. Pull out the bobbin thread underneath the fabric to a length of about 4 inches to the rear. 7. Align the buttonhole mark on the fabric with the mark on the buttonhole foot, and then lower the buttonhole foot.
- Page 61 5. Marquez soigneusement la position de la boutonniere sur le 5. Marque cuidadosamente la posicion del ojal en la vestimenta. vetement. 6. Coloque el material debajo del pie. Tire del hilo de la bobina 6. Placez le tissu sous le pied. Tirez le fil de la bobine sous le debajo del material a un largo de aproximadamente 10 cm hacia atras.
- Page 62 CORDED BUTTONHOLES Spur Hook filler cord (crochet thread or buttonhole twist) over the spur Saliente and pull both ends of the cord forward under the foot and tie off the cord as shown in the illustration. Sew buttonhole so that zigzag stitches cover the cord. When completed, release the cord from foot and snip off extra length.
- Page 63 BOUTONNIERES GANSEES OJALES CON CORDON (RENFORCEES) Enganchar el cordon de relleno al saliente de la guia y estirar ambos extremos del cordon hacia adelante, por debajo de la Accrocher le cordonnet (ill de passe ou fil de soie) sur la tige du guia.
- Page 64 Put one drop of sewing machine oil on the hook race as indicated by the arrows. (A, B) NOTE: Singer Brand Sewing Machine Oil is suggested. DO NOT use "all purpose" oil as it is not suited for sewing machine lubrication.
-
Page 65: Cuide Su Maquina
"universelle", elle ne convient pas _ la lubrification Singer. NO use aceite "para todo uso" debido a que no es el machines _ coudre. m_s adecuado para la lubricaci6n de su m&quina de coser. -
Page 66: Other Information
Doing so will result in broken needles possible damage to your machine. Use of a Singer Brand 3mm (Style 2025) Twin Needle is strongly recommended THREADING THE TWIN NEEDLE 1. Place a spool on each spool pin. Thread the two threads one. -
Page 67: Informacion Otra
L'utilisation d'une aiguille double de 3 mm de la marque Singer (Style 2025) est fortement recommandee. Se recomienda usar una aguja doble (estilo 2025) de 3 mm marca Singer. - Page 68 5. PERFORMANCE CHECKLIST GENERAL PROBLEMS Machine does not sew. * Power switch is turned off.- Turn on the switch. Machine jams/knocks. * Thread is caught in hook.- Clean hook (see page 62 - 63). * Needle is damaged.- Replace needle (see page 24 - 25). Fabric does not move.
-
Page 69: Cuadro De Verificacion De
5. VERIFICATION DES PETITS 5. CUADRO DE VERJFICACION PROBLEMES DE COUTURE RENDIIVllENTO PROBLEMES GENERAUX PROBLEMAS GENERALES La machine ne coud pas: Machine does not sew. *L'interrupteur est hors fonction. L'activ6 * El interruptor de energia no esta conectado. - Ponerio en la La machine est coincer: posici6n LOW o HIGH. - Page 71 ENGLISH / FRAN(_AIS / ESPAt_OL (_) Part No, 77186 3/05...
Need help?
Do you have a question about the 7442 and is the answer not in the manual?
Questions and answers
How to remedy my top thread from crossing the bobbin twice, vs once?