Table of Contents
Advertisement
Available languages
Available languages
Having TROUBLE with operation?
Please reset your unit
Refer to page of How to reset your unit
Vous avez des PROBLÈMES de fonctionnement?
Réinitialisez votre appareil
Référez-vous à la page intitulée Comment réinitialiser votre appareil
Dear Customer,
This apparatus is in conformance with the valid
European directives and standards regarding
electromagnetic compatibility and electrical safety.
European representative of Victor Company of
Japan, Limited is:
JVC Technical Services Europe GmbH
Postfach 10 05 04
61145 Friedberg
Germany
EN, FR
© 2010 Victor Company of Japan, Limited
Cher(e) client(e),
Cet appareil est conforme aux directives et normes
européennes en vigueur concernant la compatibilité
électromagnétique et à la sécurité électrique.
Représentant européen de la société Victor
Company of Japan, Limited:
JVC Technical Services Europe GmbH
Postfach 10 05 04
61145 Friedberg
Allemagne
0110DTSMDTJEIN
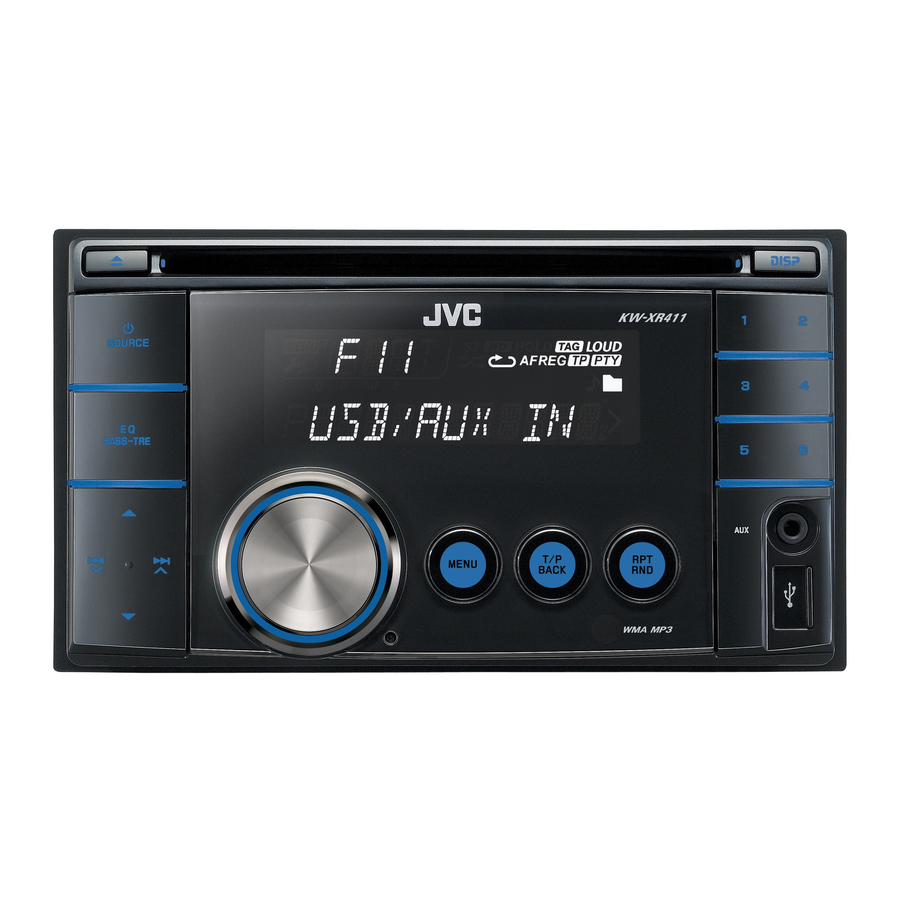
KW-XR411
CD RECEIVER / RÉCEPTEUR CD
For canceling the display demonstration, see page 4. / Pour annuler la démonstration des
affichages, référez-vous à la page 4.
For installation and connections, refer to the separate manual. / Pour l'installation et les
raccordements, se référer au manuel séparé.
INSTRUCTIONS
MANUEL D'INSTRUCTIONS
ENGLISH
FRANÇAIS
GET0657-003A
[E/EU]
Advertisement
Table of Contents

Related Manuals for JVC KW-XR411


Summary of Contents for JVC KW-XR411
- Page 1 électromagnétique et à la sécurité électrique. European representative of Victor Company of Représentant européen de la société Victor Japan, Limited is: Company of Japan, Limited: JVC Technical Services Europe GmbH JVC Technical Services Europe GmbH Postfach 10 05 04 Postfach 10 05 04 61145 Friedberg...
- Page 2 Thank you for purchasing a JVC product. Please read all instructions carefully before operation, to ensure your complete understanding and to obtain the best possible performance from the unit. IMPORTANT FOR LASER PRODUCTS 1. CLASS 1 LASER PRODUCT 2. CAUTION: Do not open the top cover. There are no user serviceable parts inside the unit; leave all servicing to qualified service personnel.
-
Page 3: Table Of Contents
How to read this manual CONTENTS The following icons/symbols are used to How to read this manual indicate: How to reset your unit Press and hold the button(s) How to forcibly eject a disc [Hold] until the desired operation Canceling the display begins. -
Page 4: Canceling The Display Demonstration
Canceling the display demonstration Turn on the power. Select <DEMO OFF>. [Hold] (Initial setting) Finish the procedure. Setting the clock Turn on the power. Adjust the minute. [Hold] (Initial setting) Select <CLOCK>. Select <24H/12H>. Select <CLOCK SET>. Select <24 HOUR> or <12 HOUR>. -
Page 5: Basic Operations
Basic operations Display window Loading slot Selects preset station. Ejects the disc Control dial USB (Universal Serial Bus) input Remote sensor terminal You can control this unit with an optionally purchased remote control, RM-RK50 ( 12). Auxiliary input jack When you press or hold the following button(s)... Button General operation •... -
Page 6: Listening To The Radio
Button General operation • Enters playback mode menu directly ( • Returns to the previous menu. • Activates/deactivates TA Standby Reception. • Enters PTY Searching mode if pressed and held. Power off : Checks the current clock time. Power on : Changes the display information. Listening to the radio Ÿ... -
Page 7: Selecting A Preset Station
Manual presetting (FM/AM) The following features are available You can preset up to 18 stations for FM and 6 only for FM Radio Data System stations. stations for AM. Searching for your favourite Ex.: Storing FM station of 92.50 MHz into preset FM Radio Data System number “04.”... - Page 8 Standby receptions Tracing the same programme— Network-Tracking Reception TA Standby Reception When driving in an area where FM reception is TA Standby Reception allows the unit to switch not sufficient enough, this unit automatically temporarily to Traffic Announcement (TA) from tunes in to another FM Radio Data System any source other than AM.
-
Page 9: Listening To A Disc
Listening to a disc Ÿ All tracks will be played repeatedly until you change the ] Turn on the power. source or eject the disc. Stopping playback and ejecting Caution on volume setting: Discs produce very little noise compared the disc with other sources. -
Page 10: Listening To The Usb Device
Changing the display information Disc title/Album name/performer (folder name)* = Track title (file name)* = Current track number with the elapsed playing time = Current track number with the clock time = (back to the beginning) * If the current disc is an audio CD (except for CD Text), “NO NAME” appears. If an MP3/WMA file does not have Tag information or <TAG DISPLAY>... -
Page 11: Listening To The Other External Components
Cautions: • Avoid using the USB device if it might hinder your safety driving. • Do not pull out and attach the USB device repeatedly while “READING” is shown on the display. • Do not start the car engine if a USB device is connected. •... -
Page 12: Using The Remote Controller
Using the remote controller This unit can be remotely controlled as instructed here (with an optionally purchased remote controller). We recommend that you use remote controller RM-RK50 with your unit. Installing the lithium coin battery (CR2025) 1 • Turns the power on if pressed briefly. When the power is on, pressing the button also mutes the sound or pauses. -
Page 13: Selecting A Preset Sound Mode
Selecting a preset sound mode You can select a preset sound mode suitable Storing your own sound mode for the music genre. You can store your own adjustments in memory. FLAT = NATURAL = DYNAMIC = VOCAL [Hold] BOOST = BASS BOOST = USER = (back to the beginning) While listening, you can adjust the tone level of ] <PRO EQ>... -
Page 14: Menu Operations
Menu operations Repeat step 2 if necessary. • To return to the previous [Hold] menu, press T/P BACK. • To exit from the menu, press DISP or MENU. Category Menu item Selectable setting, [ Initial: Underlined DEMO • DEMO ON : Display demonstration will be activated Display automatically if no operation is done for about... - Page 15 Category Menu item Selectable setting, [ Initial: Underlined SSM * • SSM 01 – 06 : For settings, Strong-station • SSM 07 – 12 Sequential • SSM 13 – 18 Memory AF-REG * • AF ON : When the currently received signals become Alternative weak, the unit switches to another station (the frequency/...
- Page 16 Category Menu item Selectable setting, [ Initial: Underlined FADER * R06 – F06 : Adjust the front and rear speaker output [ 00 ] balance. BALANCE * L06 – R06 : Adjust the left and right speaker output [ 00 ] balance.
-
Page 17: More About This Unit
Category Menu item Selectable setting, [ Initial: Underlined TEL MUTING • MUTING 1/ : Select either one which mutes the sounds Telephone MUTING 2 while using a mobile phone. muting • MUTING OFF : Cancels. AMP GAIN * • LOW POWER : VOLUME 00 –... - Page 18 • Some CD-Rs or CD-RWs may not play back on Disc/USB operations this unit because of their disc characteristics, Caution for DualDisc playback or for the following reasons: • The Non-DVD side of a “DualDisc” does not – Discs are dirty or scratched. comply with the “Compact Disc Digital Audio”...
- Page 19 • The maximum number of characters for Playing MP3/WMA tracks from a USB file/folder names vary depending on the device disc format used (includes 4 extension • While playing from a USB device, the playback characters—<.mp3> or <.wma>). order may differ from other players. –...
-
Page 20: Troubleshooting
( If “PROTECT” does not disappear, consult your JVC IN-CAR ENTERTAINMENT dealer or a company supplying kits. The unit does not work at all. - Page 21 Symptom Remedy/Cause Disc cannot be played back. Insert the disc correctly. • CD-R/CD-RW cannot be played • Insert a finalized CD-R/CD-RW. back. • Finalize the CD-R/CD-RW with the component • Tracks on the CD-R/CD-RW which you used for recording. cannot be skipped. Disc can neither be played back •...
- Page 22 Symptom Remedy/Cause “NO FILE” appears on the Selected folder is an empty folder *. Select another display. folder that contains MP3/WMA tracks. “NOT SUPPORT” appears on the Skip to the next track encoded in an appropriate format display and track skips. or to the next non-copy-protected WMA track.
-
Page 23: Maintenance
Maintenance Moisture condensation Do not use the following discs: Moisture may condense on the lens inside the Single CD (8 cm disc) Warped disc unit in the following cases: • After starting the heater in the car. • If it becomes very humid inside the car. Should this occur, the unit may malfunction. -
Page 24: Specifications
Specifications Maximum Power Output: Front/Rear: 50 W per channel Continuous Power Output (RMS): Front/Rear: 20 W per channel into 4 Ω, 40 Hz to 20 000 Hz at no more than 1% total harmonic distortion. Load Impedance: 4 Ω (4 Ω to 8 Ω allowance) Tone Control Range: Bass: ±12 dB (60 Hz, 80 Hz, 100 Hz, 200 Hz) - Page 25 1.8 kg (excluding accessories) Design and specifications are subject to change without notice. JVC bears no responsibility for any loss of data in the USB mass storage class device while using this System. Microsoft and Windows Media are either registered trademarks or trademarks of Microsoft Corporation in the United States and/or other countries.
- Page 26 Merci pour avoir acheté un produit JVC. Veuillez lire attentivement toutes les instructions avant d’utiliser l’appareil afin de bien comprendre son fonctionnement et d’obtenir les meilleures performances possibles. IMPORTANT POUR PRODUITS LASER 1. PRODUIT LASER CLASSE 1 2. ATTENTION: N’ouvrez pas le couvercle supérieur. Il n’y a aucune pièce réparable par l’utilisateur à...
-
Page 27: Comment Lire Ce Manuel
Comment lire ce manuel TABLE DES Les icônes/symboles suivants sont utilisés MATIERES pour indiquer: Maintenez pressées ces Comment lire ce manuel touches jusqu’à ce que Comment réinitialiser votre appareil [Maintenez l’opération souhaitée pressée] Comment forcer l’éjection d’un démarre. disque Annulation des démonstrations des Tournez la molette de affichages commande. - Page 28 Annulation des démonstrations des affichages Mise sous tension de l’appareil. Choisissez <DEMO OFF>. (Réglage initial) [Maintenez pressée] Terminez la procédure. Réglage de l’horloge Mise sous tension de l’appareil. Ajustez les minutes. (Réglage initial) [Maintenez pressée] Choisissez <CLOCK>. Choisissez <24H/12H>. Choisissez <CLOCK SET>. Choisissez <24 HOUR>...
- Page 29 Opérations de base Fente d’insertion Choisit une station préréglée. Éjection d’un disque Fenêtre d’affichage Molette de commande Prise d’entrée USB (bus série Capteur de télécommande universel) Vous pouvez commander cet autoradio avec la télécommande vendue en option, RM-RK50 ( 12). Prise d’entrée auxiliaire Quand vous appuyez ou maintenez pressées les touches suivantes...
-
Page 30: Coute De La Radio
Touche Opérations générales • Permet d’accéder directement au menu des modes de lecture ( • Retourne au menu précédent. • Mise en/hors service de l’attente de réception TA. • Maintenez cette touche pressée pour entrer en mode de recherche PTY. Mise hors tension : Vérifiez l’heure actuelle. - Page 31 Préglage manuel (FM/AM) Les fonctionnalités suivantes sont Vous pouvez prérégler un maximum de 18 accessibles uniquement pour les stations pour FM et de 6 stations pour AM. stations FM Radio Data System. Ex.: Mémorisation de la station FM de fréquence 92,50 MHz sur le numéro de préréglage “04”.
- Page 32 Attente de réception Poursuite du même programme— Attente de réception TA Poursuite de réception en réseau L’attente de réception TA permet à l’appareil de commuter temporairement sur des Lorsque vous conduisez dans une région où la informations routières (TA) à partir de n’importe réception FM n’est pas suffisamment forte, cet quelle source autre que AM.
- Page 33 Écoute d’un disque Ÿ Toutes les plages sont reproduites répétitivement ] Mise sous tension jusqu’à ce que vous de l’appareil. changiez la source ou éjectiez le disque. Arrête de la lecture et éjection du Précautions sur le réglage du volume: Les disques produisent très peut de bruit par disque rapport aux autres sources.
- Page 34 Changement des informations sur l’affichage Le titre du disque/Nom de l’album/interprète (nom du dossier)* = Titre de la plage (nom de fichier)* = Numéro de la plage actuelle avec la durée de lecture écoulée = Numéro de la plage actuelle avec l’horloge = (retour au début) * Si le disque actuel est un CD audio (sauf pour les CD Text), “NO NAME”...
- Page 35 Attention: • Éviter d’utiliser le périphérique USB s’il peut gêner une conduite une conduite en toute sécurité. • Ne déconnectez puis ne reconnectez pas le périphérique USB répétitivement pendant que “READING” apparaît sur l’affichage. • Ne démarrez pas le moteur de la voiture si un périphérique USB est connecté. •...
- Page 36 Utilisation de la télécommande Cet autoradio peut être commandé à partir d’une télécommande de la façon indiquée ici (avec une télécommande vendue en option). Nous vous recommandons d’utiliser la télécommande RM-RK50 avec votre autoradio. Mise en place de la pile-bouton au lithium (CR2025) 1 •...
- Page 37 Sélection d’un mode sonore préréglé Vous pouvez sélectionner un mode sonore Mémorisation de votre propre préréglé adapté à votre genre de musique. mode sonore Vous pouvez mémoriser vos propres ajustements en mémoire. FLAT = NATURAL = DYNAMIC = VOCAL BOOST = BASS BOOST = USER = (retour [Maintenez pressée] au début)
- Page 38 Utilisation des menus Répéter l’étape 2 si nécessaire. [Maintenez • Pour revenir au menu pressée] précédent, appuyez sur T/P BACK. • Pour quitter le menu, appuyez sur DISP ou MENU. Catégorie Article de Réglages pouvant être choisis, [ Réglage initial: Souligné menu DEMO •...
- Page 39 Catégorie Article de Réglages pouvant être choisis, [ Réglage initial: Souligné menu SSM * • SSM 01 – 06 : Pour les réglages, Mémorisation • SSM 07 – 12 automatique • SSM 13 – 18 séquentielle des stations puissantes AF-REG * •...
- Page 40 Catégorie Article de Réglages pouvant être choisis, [ Réglage initial: Souligné menu FADER * R06 – F06 : Ajustez la balance de sortie avant-arrière des [ 00 ] enceintes. BALANCE * L06 – R06 : Ajustez la balance de sortie gauche-droite [ 00 ] des enceintes.
- Page 41 Catégorie Article de Réglages pouvant être choisis, [ Réglage initial: Souligné menu TEL MUTING • MUTING 1/ : Choisissez le mode qui permet de réduire le son lors Sourdine MUTING 2 de l’utilisation d’un téléphone portable. téléphonique • MUTING OFF : Annulation.
- Page 42 • Certains CD-R ou CD-RW ne peuvent pas être Opérations des disques/USB reproduits sur cet appareil à cause de leurs Précautions pour la lecture de disques à caractéristiques ou des raisons suivantes: double face – Les disques sont sales ou rayés. •...
- Page 43 • Le nombre maximum de caractères pour Lecteur de plages MP3/WMA à partir les noms de fichier/dossier varie en fonction d’un périphérique USB du format du disque utilisé (et inclus les • Lors de la lecture à partir d’un périphérique 4 caractères de l’extension—<.mp3>...
- Page 44 ( Si “PROTECT” ne disparaît, consultez votre revendeur d’autoradio JVC ou la société qui fabrique les kits. Cet autoradio ne fonctionne pas Réinitialisez l’appareil. ( du tout. Cochez le réglage <SRC SELECT> = <AUX IN>.
- Page 45 Symptôme Remède/Cause Le disque ne peut pas être Insérez le disque correctement. reproduit. • Le CD-R/CD-RW ne peut pas être • Insérez un CD-R/CD-RW finalisé. reproduit. • Finalisez le CD-R/CD-RW avec l’appareil que vous • Les plages sur les le CD-R/CD-RW avez utilisé...
- Page 46 Symptôme Remède/Cause “NO FILE” apparaît sur Le dossier choisi est un dossier vide *. Choisissez un autre l’affichage. dossier contenant des plages MP3/WMA. “NOT SUPPORT” apparaît sur Saute à la plage codée suivante dans le format approprié l’affichage et la plage est sautée. ou à...
- Page 47 Entretien Condensation d’humidité N’utilisez pas les disques suivants: De la condensation peut se produire sur la CD Single (disque de Disque gondolé lentille à l’intérieur de l’appareil dans les cas 8 cm) suivants: • Après le démarrage du chauffage dans la voiture.
- Page 48 Spécifications Puissance de sortie maximum: Avant/ 50 W par canal Arrière: Puissance de sortie en mode Avant/ 20 W par canal pour 4 Ω, 40 Hz à continu (RMS): Arrière: 20 000 Hz avec moins de 1% de distorsion harmonique totale. Impédance de charge: 4 Ω...
- Page 49 1,8 kg (sans les accessoires) La conception et les spécifications sont sujettes à changement sans notification. JVC ne peut être tenu responsable pour toute perte des données dans le périphérique USB à mémoire de grande capacité lors de l’utilisation de cette chaîne.
Need help?
Do you have a question about the KW-XR411 and is the answer not in the manual?
Questions and answers