Table of Contents
Advertisement
Available languages
Available languages
Owner's Manual
360 ° Level System
...f_.t...g LAsERTRA¢'"
2-Beam Level, Plumb and Square
Model No.
320.48249
CAUTION:
Read, understand
and follow
all Safety Rules and Operating
Instructions
in this manual before using this product.
, SAFETY
° OPERATION
° MAINTENANCE
Sears, Roebuck and Co., Hoffman Estates, IL 60179 U.S.A.
Advertisement
Table of Contents

Related Manuals for Craftsman 320.48249


Summary of Contents for Craftsman 320.48249
- Page 1 Owner's Manual 360 ° Level System ...f_.t...g LAsERTRA¢'" 2-Beam Level, Plumb and Square Model No. 320.48249 , SAFETY CAUTION: Read, understand and follow ° OPERATION all Safety Rules and Operating Instructions ° MAINTENANCE in this manual before using this product. Sears, Roebuck and Co., Hoffman Estates, IL 60179 U.S.A.
- Page 2 Trouble Shooting ........... Page Notes ............. Pages 13-14 Service Numbers ........... Back Cover FULL ONE YEAR WARRANTY ON CRAFTSMAN 360 ° LEVEL SYSTEM featuring LASERTRAC If this CRAFTSMAN Level System fails to give complete satisfaction within one year from the date of purchase,...
- Page 3 ii1,1 u ll,: ....::::1,i..-: ..¸.::... WARNmNG: BE SURE to read and understand all instructions in this manual before using this Level System_ Failure to follow all instructions result in hazardous laser radiation exposure, electric shock, and/or bodily injury° ....iiiiii ,i,,11,1, iii i,...
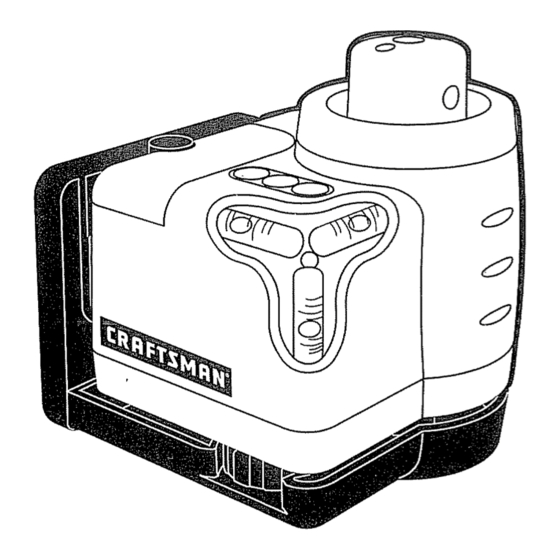
- Page 4 KNOW YOUR LEVEL SYSTEM (See Fig. 1 & Fig. 2) This Craftsman Level System is a highly versatile tool. It can be hand-held, wall-mounted or leveled on a horizontal surface or tripod stand (sold separately). It projects a pulse laser'dot'...
- Page 5 TO INSTALL BATTERIES (See Fig. 3) This Pulse Level uses two "D" battede& (sold separately) 1. Rotate the screw on the battery Fig. 3 cover counterclockwise as shown in Fig. 3 until the cover is loosened completely, 2, Install two new batteries, Be sure the polarity (+/-) is correcfl 3.
- Page 6 "Y" wheel: Usedwhen leveling(calibrating)the Level System;adjuststhe bubbles of the Y vial (in horizontalposition)and Z vial (invertical position)(Fig.2), Using the Glasses Included This LevelSystem includesa pair of standardsafetyglassesthat are madeof a laser-lightenhancingmaterial.The primarypurposeof these glasses is to improve the user'svisibilityof the tool's laserline. WARNING:These glassesWILL NOTprotectthe eyesfrom damagethat could resultfrom lookingdirectlyintothe laser projection, ADJUSTING...
- Page 7 ADJUSTING THE HORIZONTAL LASER BEAM SCAN 1, Place the Level System on a horizontal surface or on a tripod stand (sold separately) in horizontal position (Fig,7)o 2, Level the tool, (See page 6) 3.,Press the "ON/OFF" soft touch control button to turn power ON, 4_ Press the soft touch scan button (button 2) one time for "fast"...
- Page 8 USINGTHE LEVEL SYSTEM This level can be easily used in several ways, tt can be hand, held for point marking and simple alignment, placed against a plumb wall or on a level structure (and re-leveled) or mounted on a tripod (sold separately) to project a pulsing dot 'chalk line' as a horizontal level line or vertical plumb line, Be...
- Page 9 WORKING WITH OBSTRUCTIONS AND USER INTERFERENCE Figure 12 illustrates the nature of the laser "line" projected from the Level System° It is actually a "dot" of laser light that is projected as a pulse° This is important because obstructions and user interference that takes place in front of the device WILL NOT affect the laser line projected on either side of...
- Page 10 WHEN USING AS A HAND-HELD LEVEL The Leve! System can be hand-held for use as a straight line reference tool. As a hand-held device the Level System can be used for quick reference and alignment across any two points of reference such as lining up cut-outs and fixtures on drywall or checking wallpaper and paint trim.
- Page 11 The LevelSystemhas been designed to be a low-maintenancetoot, However, in order to maintain its performance,you must ALWAYSfollow these simple directions_ ALWAYS handle the tool with care_ Treat it as the fine opticat device it is, and as you would treat a camera or binoculars° 2.
- Page 12 PROBLEM CAUSE SOLUTION ul_l,,,,,,,,i ii, i i i ,ll,i/ Tone is heard Batteries Replace with fresh batteries. from Levet are weak, System Laser dot!line Working condition is Use laser enhancing glasses. is hard to too bright. see. The toot is too far from Get the toot closer to the target, the target, lU Ullll...
- Page 13 NOTES...
- Page 14 NOTES...
- Page 15 Manua_ del Propietado $istema ivelaci6n de 360° ...oo. L asetTtac . Nivel de 2 Rayos Ldser, de PIomada y Escuadra iViodelo No. 320.48249 ATENCION: Antes de usar este producto, lea, comprenda y siga todas ° SEGURIDAD las reglas de seguridad y las instrucciones o FUNCIONAlVlIENTO de funcionamiento incluidas...
- Page 16 DE UN AI_JO DEL SISTEMA DE NIVEL DE 360 ° con LaserTrac MR CRAFTSMAN Si este sistema de nivelaci6n CRAFTSMAN no le otorga completa satisfacci6n dentro de un aSo desde fa fecha de compra, DEVUI_LVALO AL ALMACE_N SEARS MAS CERCANO EN ESTADOS UNIDOS y Sears Io reemplazarA gratuitamente.
- Page 17 Z_ ADVERTENClA: ASEGORESE de leer y comprender todas las instrucciones indicadas en este manual antes de usar este sistema de nivelaci6n. Si no se siguen todas las instrucciones indicadas a continuaci6n, puede resultar en exposic;6n peligrosa a radiaci6n I_ser, choque el_ctrico y/o lesl6n personal, Z_ ATENClON: El uso de controles o ajustes o la ejecuci6n de procedimientos no especificados en este manual puede resultar en exposici6n peligrosa...
- Page 18 CONOZCA SU SISTErvIA DE NIVELACION (Ver Fig. 1 y Fig. 2) Este sistema de nivelaci6n Craftsman es una herramienta muy versdtil. Puede usarse sosteni_ndolo en ta mano, montado en la pared, colocado sobre una superficie horizontal o instalado en un trfpode (vendido por separado)o Proyecta un punto de pulso 1,4_ser que forma una ifnea horizontal o vertical.
- Page 19 INSTALACI6N DE LAS BATERIAS (Ver Figura 3) Este nivel de pulsos I&ser usa dos batedas "D". (vendidas por separado) Fig. 3 1oGire a la izquierda el tornillo situado en la tapa de las batedas como se muestra en la Fig. 3 hasta que fa tapa se suelte completamente°...
- Page 20 Rueda"Y":Se usa paraajustar(calibrar)el sistemade nivelaci6n;ajustalas burbujasde ta ampollaY (en posici6nhorizontal)y de la ampoltaZ (en posici6n vertical) (Fig.2). Uso de los Lentes Provistos Coneste nivelse incluyeun par de lentesprotectoresest__ndares fabricadosde un materialque intensificala luz laser.El prop6sitoprimordialde estos lenteses mejorarla visibilidaddef usuariode la linea laserde la herramienta. ADVERTENClA:EstoslentesNO protegerAnlos ojoscontradafios que podrfan resultaral rnirardirectamentela proyecci6ndel laser.
- Page 21 AJUSTE DEL ESCANEO HORIZONTAL DEL RAYO LASER 1oColoque el sistema de nivelaci6n en una superficie horizontal o en un trfpode (vendido pot separado) posici6n horizontal (Fig.. 7)° 2oCalibre la herramienta. (Ver p_.gina 6) 3. Oprima el bot6n de control "ON/OFF" (Encendido/Apagado) para encender el sistema.
- Page 22 USO DEL SISTEMA DE NIVELACION Este nivel puede ser fAcilmente usado de varias maneras. Puede ser sostenido en la mano para marcaci6n de puntos y alineamiento sencillo, puede ser colocado contra un muro a plomo o en una estructura nivelada (y renivelada) o puede instalarse en un tfipode (vendido por separado) para proyectar una 'lfnea de puntos' de pulso laser como una linea de nivel horizontal o plomada vertical.
- Page 23 TRABAJO CON OBSTRUCCIONES E INTERFERENClA DEL USUARIO La Figura 12 ilustra la naturaleza de la "lfnea" laser proyectada desde el sistema de nivelaci6n, Es en realidad un "punto" de luz laser que se proyecta como un pulso. Esto es importante porque las obstrucciones e interferencias del usuario que ocurran...
- Page 24 USO COiVIO UN NIVEL DE MANO El sistema de nivelaci6n puede ser sostenido en la mano para su uso como una herramienta de referencia de Ifnea derecha° Como un dispositivo de mano, el sistema de nivelaci6n puede set usado para referencia y alineamiento rApido a tray,s de dos puntos de referencia, tal como el alineamiento de aberturas y de accesorios en drywall o verificaci6n...
- Page 25 Este nivel ha sido dise_ado como una herramientade bajo mantenimientoo Sin embargo, para mantener su rendimiento,es necesario seguir SlEMPRE estas sencillas instrucciones. 1. SlEMPRE manipule con cuidado la herramienta.Tr_tela igual como tratarfa cualquier otro dispositivo6ptico, tal como una c_mara fotogr_fica o gemelos binoculares.
- Page 26 PROBLEiViA CAUSA SOLUClON i,_1,_,11, ii, ii, ill, ill Se escucha un Las bater[as Coloque baterias nuevas tono desde el sistema est_n d_biles de nivelaci6n II',t nnln "UlUI'I'"Ilul I n,l' i u,,u,ll,l,,i n i'ul,,"n El ambiente de Use lentes de intensificaci6n trabajo es demasiado de Igtsero brillante.
- Page 27 NOTAS...
- Page 28 Your Home For repair in your home of all major brand appliances, lawn and garden equipment, or heating and cooling systems, no matter who made it, no matter who sold it! For the replacement parts, accessories owner's manuals that you need to do°it-yourself, For Sears professional installation of home appliances...
Need help?
Do you have a question about the 320.48249 and is the answer not in the manual?
Questions and answers