Table of Contents
Advertisement
Available languages
Available languages
Advertisement
Table of Contents

Subscribe to Our Youtube Channel
Related Manuals for Craftsman 135.17243


Summary of Contents for Craftsman 135.17243
- Page 1 Owner's Manual SCROLLING SABRE SAW Model No. 135.17243 Caution: Safety Before using this product, Operation read this manual and follow Maintenance all its Safety Rules and Parts Operating Instructions. EspaSol, R 18 Sears, Roebuck and Co., Hoffman Estates, IL 60179...
- Page 2 NEAREST SEARS STORE IN THE UNITED STATES, and Sears will replace it, free of charge. If this CRAFTSMAN Scrolling Sabre Saw is used for commercial or rental purposes, this warranty applies for only 90 days from the date of purchase.
- Page 3 Read and understand all instructions. Failure to follow all instructions listed below, may result in electric shock, fire and/or serious personal injury. SAVE THESE INSTRUCTIONS Work Area When operating a power tool outside, use an outdoor extension cord marked "W-A" Keep your work area clean and well lit.
- Page 4 Do not force tool. Use the correct tool for caused by poorly maintained tools. Develop your application. The correct tool will do the a periodic maintenance schedule for your tool, job better and safer at the rate for which it is designed.
- Page 5 Always wear safety goggles or eye _Some dust created by protection when using this tool. Use a power sanding, sawing, dust mask or respirator for applications grinding, drilling, and other construction activities contains chemicals known to which generate dust. cause cancer, birth defects or other Secure material before cutting.
- Page 6 Symbols IMPORTANT: Some of the following symbols may be used on your tool. Please study them and learn their meaning. Proper interpretation of these symbols will allow you to operate the tool better and safer. Symbol Name Designation/Explanation Volts Voltage (potential) Current Amperes Hertz...
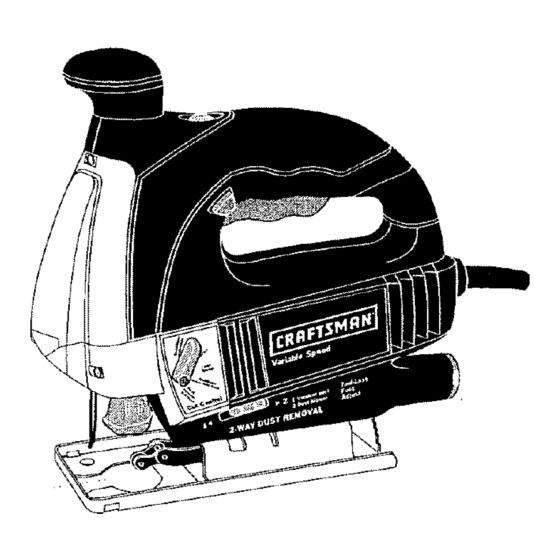
- Page 7 F_i_I Disconnect the plug from the power source before making any assembly, adjustments or changing accessories. Such preventive safety measures reduce the risk of starting the tool accidentally, Scrolling Sabre Saw with Laser-Trac SCROLLING KNOB CONTROL WHEEL LASER LIGHT/WORKLIGHT "LOCK-ON" /_f--_-.
- Page 8 i6!9X0<427 9-G4 9/23/04 9 ;04 _i,__ P When inserting the saw blade, the back of Attaching the Blade the blade must rest in the groove of the To prevent personal injury, guide roller (Fig, 3). always disconnect plug from power source before assembling parts, making 2.
- Page 9 SM !6i9X00427 9-04 9/23/04 9:04 AM USING THE LASER LINE GUIDE The 4 position control wheel allows you to control the function of the lights. Below, lists Onty turn on the laser light on when the tool is the function of each setting (Fig.
- Page 10 DUST EXTRACTION Your sabre saw is equipped with a dust port for dust and chip extraction, To use this feature, remove blade storage compartment and move dust blower switch to the "OFF" position "O" (Fig, 6). Attach vacuum hose (optional accessory) to the ON=o( 1 3)1...
- Page 11 SCROLL MODELS Note: It may be necessary to turn scrolling Scrolling saws permit 360 ° rotation of the saw knob slightly back and forth to be sure the blade without turning the saw, so intricate plunger is locked in the desired position. designs may be cut with minimum effort.
- Page 12 then position the straightedge parallel and at the same distance as between the blade and the side edge of the foot or first mark the side edge of the foot and then clamp the straightedge on the mark and parallel to the cut line Fig.
- Page 13 METAL CUTTING sandwiched between two pieces of wood or When cutting metal clamp material down. Be tightly clamped on a single piece of wood extra certain that you move the saw along (wood on top of the metal). Draw the cut lines slowly.
- Page 14 CIRCLE CUTTING 1. Before attaching the rip fence, draw a circle and drive a finishing nail in the center of circle. 2. Drill or plunge cut near the circles edge, turn saw off and disconnect the plug from power source (Fig. 17). 3.
- Page 15 Service should be replaced at an Authorized Service Center. Bearings which become noisy (due to reventive maintenance heavy load or very abrasive material cutting) performed by unauth- should be replaced at once to avoid orized personnel may result in misplacing overheating or motor failure.
- Page 16 CRAFTSMANSCROLLING SABRESAW MODEL NUMBER135.17243 .810 65" SIERRADE VAIVE:N PARA HACER CONTORNOS CRAFTSMAN NUMERODE MODELO135.17243...
- Page 17 PART PART PART NAME PART NAME 2610916229 2610913995 Housing 2610913978 Field 2610913992 Lever 2610913979 Armature 2610917358 Locking Tang 2610924106 Switch 2610924134 Board Assembly 2610916910 Cord 2610916536 Lock Botton 2610967219 2610390329 Bushing Spring 2610917489 2610912487 Guard Ball Bearing 2610018632 Retaining Ring 2610916094 Lever 2610320548...
- Page 18 DEVUELVALA AL ALMACEN SEARS MAS CERCANO EN LOS ESTADOS UNIDOS y Sears la reemplazara_gratuitamente. Si esta Sierra de Vaiven para hacer Contornos CRAFTSMAN se usa para propSsitos comerciales o de a[quiler, esta garantfa es valida durante 90 dfas desde [a fecha de compra.
- Page 19 Lea y entiendatodas las instrocciones. E l incumplimiento de todas las instrucciones indicadasa continuaoi6n puede dar lugar a sacudidaselectricas,incendios y/o ]esienes personales graves. CONSERVE ESTASINSTRUCCIONES Area de trahajo No abuse del eord6n. Nunca use el eord6n para gevar las herramientas ni para sacar el enchufe de un Mantenga e l _readetrabajo limpiay hieniluminada.
- Page 20 sitnacidnque puedaafectar el funcionarniento de las Utilizaci6n y cuidado de las herramientas herramientas.Si la herrarnlentaesl(i daflada, haga Utilice abrazaderasn otrornodo pr;icticode lijar y que realicenun serviciode ajustesy reparacionesa soportarla pieza de trabajoa una plataformaestable. la herrarnientaantes de nsarla. Muchosaccidentes LasujecJ(Jn de la piezade trabajo con la mane o centre son causados per herramientasmantenidas el cuerpo resulta inestable y puedeocasionar p_rdida de control...
- Page 21 Antes decnmenzar e t cnrte,encienda la Use s61nIns accesnrinsvendidnspnr Sears para su herramienta y dejeque lahnjaalcance tndasu modeln. Los accesoriosque puedenser adecuadns velncidad.Laherramienta p uedechirriaro vibrarsi para una I_erramienta,puedenser peligrosos si se utilizan en otra herramienta. lavelocidad de lahnjaesdemasiado lentaal cnmienzo delcortey posiblemente puede Ciertn pnlvogeneradnpnr el experimentar retrocese.
- Page 22 tMPORTANTE: Es posible que algunos de los sfmbolos siguientes se usen en su herramienta. Por favor, estedielos y aprenda su significado, La interpretaei6n adeeuada de estos simbolos Is permitira utilizar la herramienta meier y con m;_sseguridad. Simbo!o Nombre Designaci6nlexpiicaci6 n Vnlt Tensi6n (potencial) Ampere...
- Page 23 DESCRIPCI6N FUNCIONAL Y ESPECIFICACIONES esconecte el enchufe de la luente de energia anles de realizar cualquier ensamblaje o ajuste, o cambiar accesorios. Estasmedidas de segufidad preventivas reducen el riesgo de arrancar ia herramienta accidentalmente. Sierra de vaiv_n para hacer contornos con Laser-Trac ll[_il POM0DEOESPLAZAMIENTO CONTINUO...
- Page 24 AI introducir la hoja de sierra, la parte posterior de la Colocaci6n de la hoja hoja debe descansar en la ranura del rodilio de gufa Para prevenir lesiones (Fig. 3). personales, desconecte siempre el enchufe de la fuente de eoergia antes de montar 2.
- Page 25 La rueda de control de 4 posiciones permite al operador herramienta este sobre lapieza de trabajo. controlar la funci6n de los luces. A continuaci6n se 1, Marque primers lalinea de code en la piezade indica la funci6n de cada posisi6n (Fig, 1). trabajo (con el lads bueno hacia abajo)+ Posici6n 1: Apaga todas las luces.
- Page 26 EXTRACCION DEPOLVO La sierrade vaiv_n est_ equipadacon un orificio para polvo a fin de extraerel polvo y lasvirutas. Parautilizar este dispositivo, quite ei eompartimiento paraguardar hojasy muevael interruptor del soplador PARAPOLVO de polvo hasta la posici6n de apagado"0" (Fig, 6). INTERRUPTOR Coloqueuna manguerade aspiraci6n(accesorio opcionai) en el orificio para polvo y conecteel otro lado...
- Page 27 MODELOS DE DESPLAZAMIENTO CONTINUO Nota: Puede que sea necesariogirar el paine de Las sierras de desplazamientocontinue permiten una desplazamientocontinue ligeramente haciaarras y rotaciCnde 360° de la hoja de sierraa fin de que los hacia adelantepara asegurarsede que el 6mbolo est;_ dise_os complicados se puedancortar con un esfuerzo fijo en laposicion deseada.
- Page 28 lateral de la base o marqueprimero el horde lateral de la base y luego fiie con abrazaderasla reglarecta sobre esa marca y paralelamentea la lineade corte (Fig. 12). En los modelos con el dispositivo de desplazamiento continuo, se recomienda bloquear el pomo de desplazamiento continuo.
- Page 29 CORTEDEMETAL tuedemente con abrazaderas a una sola piezade madera AI cortar metal,fJjeei materialcen abrazaderas. (la maderasobre el metal).Trace las lineas o el dise5o AsegOrese muy bien de que haceavanzarla sierra de code sobre ]a piezasuperior de madera. lenlamenle. Utiliee velocidades m_s bajas. No tuerza, AI cortar aluminio extrudado o hierro angular, fije la doble, ni luerce la hoja.
- Page 30 CORTE CIRCULAR 1[ef il'J 1. Antesde coIocar eltope-gu[a para cor_aral hiIo, trace un drculo y claveun clavofino en el centrodet circuIo. 2. Per[ore un corte o realicelo mediante descenso vedical cerca del borde de] circulo, apague la sierra y deaconecfe el enchufe de la fuente de energia (Fig.
- Page 31 Servicio Centro de servicio autofizade.Losrodamientos que se vuelven ruidosos (debidoa la pesadacargao al corte de El manlenimiento preventive materiales muy abrasivos) debenser sustituidos realizado per personal no inmediatamentepara evitar el sobreealentamientoo el autorizadopude dar lugar a la colocaci6n incorrecta falle del motor. de cables y componentesinternes que podria constituir un peligro serio, Recomendamos que todo Limpieza...
- Page 32 Get it fixed, at your home or ours! Your Home For repair in your home of all major brand appliances, lawn and garden equipment, or heating and cooling systems, no matter who made it, no matter who sold it! For the replacement parts, accessories owner's manuals that you need to do-it-yourself.
Need help?
Do you have a question about the 135.17243 and is the answer not in the manual?
Questions and answers