Table of Contents
Advertisement
Quick Links
Advertisement
Table of Contents

Related Manuals for Craftsman 919.670070


Summary of Contents for Craftsman 919.670070
- Page 1 I CRnFTSMAN I 120/240 VOLT ® 7000 WATT iMPORTANT: o SAFETY GUmDELmNES Read Safety Guidemines o ASSEMBLY and All mnstructions Carefully o OPERATmON o MNNTENANCE o TROUBLESHOOTmNG o F_EPAmR PARTS Sold Sears Canada, Uric,, Toronto, Ont, M5B2B8 MGP-670070 Rev 0 12/40/99...
- Page 2 Sears will repair, free of charge, any defect in material and workmanship. If your Craftsman engine is used for commercial or renta! purposes, this warranty applies only for 90 days form the date of purchase.
- Page 3 This manuaH contains information that is important for you to know and understand. This information reHates to protecting YOUR SAFETY and PREVENTING EQUIPMENT PROBLEMS. To heHpyou recognize this information, we use the symboHs to the right. Hease read the manuaH and pay attention to these sections. CAUTION indicates a potentially hazardous situation DANGER indicates an imminently hazardous situation which, if not avoided, _...
- Page 4 READ AND UNDERSTAND ALL WARNINGS BEFORE ATTEMPTBNG TO OPERATE GENERATOR° RBSK OF ELECTROCUTBON AND FBRE .(¢ont'd} WHAT COULD HAPPEN HOW TD PREVENT iT HAZARD Operation of generator in rain, wet, Water is an excellent conductor of ebc- Operate generator in a clean, dry, icy, or flooded conditions.
- Page 5 READ AND UNDERSTAND ALL WARNINGS BEFORE ATTEMPTBNG TO OPERATE GENERATOR° RiSK OF FiRE WHAT COULD HAPPEN HOW TO PREVENT iT HAZARD Turn engine off and allow it to cool Gasoline and gasoline vapors Attempting to fill the fuel tank while before adding fuel to the tank.
- Page 6 READ AND UNDERSTAND ALL WARNNNG$ BEFORE Risk of in'u.Lu_r_z and Pro eper_vtDa_ao_lLe When Trans_q Generater HAZARD WHAT COULD HAPPEN HOW TO PREVENT iT If generator is equipped with a fuel Fire, hhaiation, Damage to Vehicle Fuei or oii can bak or spill and couid Surfaces shut-off valve, turn the valve to the resuit in fire or breathing hazard,...
- Page 7 READ AND UNDERSTAND ALL WARNINGS BEFORE ATTEMPTBNG TO OPERATE GENERATOR° RiSK OF UNSAFE OPERATION HOW TO PR_:V_:NT iT HAZARD WHAT COULD HAPPEN Review and understand all of AH sources of energy include the Operation of generator in carebss manner. potential for injury. Unsafe operation the operating instructions or maintenance of your generator warnings in this manual.
- Page 8 REAO ANO UNDERSTAND ALL WARNINGS BEFORE ATTEMPTBNG TO OPERATE GENERATOR° RiSK OF HOT SURFACES HAZARD WHAT COULD HAPPEN HOW TO PREVENT Contact with hot engine and Contact with hot surfaces, such as During operation, touch only the generator components. engines exhaust components, could control surfaces of the generator.
- Page 9 CARTON CONTENTS 1 ° Parts t = Owner"s Manua! "t L14=30P o TwisBeck Plug To be installed and/or used in accordance with appropriate HocaH eHectricaHcodes t o Generater and reguHafions. Refer to enclosed instructions for Parts and Parts Box for Wheel Kit Assembly 1 = Cotter Pin 1 = A×le End Cap 1 = Flat Washer...
- Page 10 Read owner's manual. Do not attempt to operate equipment until you have read Owner's Manual for Safety, Assembly, Operation, Maintenance, Storage Instructions. Handle Assembly TOOLS NEEDED FOR ASSEMBLY secured te top frame 1 - Box Cutter or Knife 2 - 1/2" Wrenches 1 - Pair Wire Pliers Hammer 1 - 1/2"...
- Page 11 INSTALLATmON OF BATTERY Attach one end of the negative (black) cable to the negative (-) terminal on the battery. Recommended Battery for Electric Start: 12V - 45 A H. or 210 CCA (Cold Cranking Amps) Attach the other end of the negative (black) cable to the frame as shown.
- Page 12 Place the fiat washer (7) against the wheel bushing and slide the cotter pin (4) through the drilled hole The Craftsman Wheel Kit was designed to greatly of the axle (2). Bend the cotter pin (4) to secure in improve the portability of your generator.
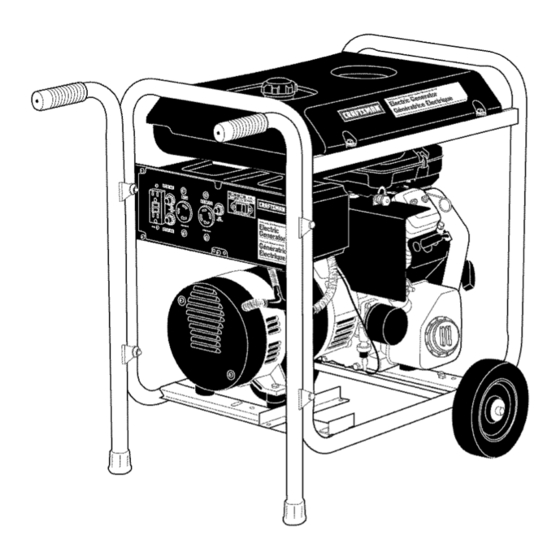
- Page 13 KNOW YOUR GENERATOR Read this Owner's Manual and Safety Rules before operation of your Generator. Compare this illustra- tion with your generator to famiHiarize yourseHf with the location of various controHs and adjustments. Save the manuaH for future rderences. FUEL TANK CIRCUIT FUEL CAP BREAKERS...
- Page 14 NOTE: Some inductive appHiances and tooHs will Hist on the motor name pilate, the starting and running Your generator is equipped with: voHtage and amperage requirements. Use the following one 120 voHtGFCI dupHex receptacle protected by formuHa to convert voltage and amperage to wattage: a 15 amp circuit breaker (Volts X Amp = Watts} one 120 voHt3-prong twisflock...
- Page 15 Full extension cord that is hot to the touch is oveHoaded, Repair or replace damaged extension cords Connecting Generator To Main E(ectrica( Supp(y Potential hazards exist when a ebctrba] generator is Replace dipstick firmly. connected to the main ebctrba( supply coming into the house, It is at that point that the generator could NOTE: When adding oil to the engine crankcase, use...
- Page 16 For recoil start: To Start Your Generator Hace OFF/RUN/START switch in the RUN posi- tion. Never run engine indoors in enclosed, poor ventilated areas. Engine exhaust contains carbon monoxide, ordoriesa and deadly gas. iMPORTANT: Make sure the battery is property serviced, fully charged, and assembbd before starting.
- Page 17 CONNECTmNG ELECTRmCAL LOADS Voltage sensitive equipment should be the last equipment connected to the generator. Plug Let engk_e run and warm up for five minutes after voltage sensitive appliances such at TV's, VCR's, starting with no ebctrbai ioad. microwaves, ovens, computers, and cordless Connect...
- Page 18 GENERAL RECOMMENDATmONS The warranty of the generator does not cover items that have been subjected to operator abuse or negli- gence+ To receive full value from the warranty, opera- tor must maintain the generator as instructed in this manual+ Plug Some adjustments wiii need to be made periodically to maintain your generator+...
- Page 19 Addfreshoil SeeAdd EngineOil intheOpera= Clean Cooling System tier section of thismanual Debris may cHog the engine's air cooHing system_ Startandrunengine at idHe t o checkforHeaks. Remove bHower housing and dean area shown to prevent overheating and engine damage. Stopengine.Re-check oiH HeveH, addoiH if re- quired.
- Page 20 4000 feet Authorized Craftsman Service Center for repair and ad- performance may be affected. If so consuit with your nearest Craftsman Service Center regarding high aititude set changes. GOVERNOR Your engine governor maintains the constant operating speed of your generator.
- Page 21 PROBLEM CA USE Engine wifl not start Low on fuei or oil 1, Add fuel or oii, Ignition switch in "Off" position. 2, Turn to "ON" position Fauityspark piug, Replace spark plug, Choke in wrong position. 4, Adjust choke accordingly, Fuei shut-off vaive in dosed 5, Open fuel shut-off valve, position.
- Page 22 Briggs& Stratton Corporation (B&S), the California Air Resources Board (CARD) and the United States Environmental Protection Agency (U.S. EPA) Emission Control System Warranty Statement (Owner's Defect Warranty Rights and Obligations} EMISSION CONTROL WARRANTY COVERAGE IS APPLICABLE TO CERTIFIED MODEL YEAR 1997 LATER ENGINES...
- Page 23 TORQUE 20=25 IN=LBS TORQUE 20=30 IN=LBS AFTER SETTING ENGINE SPEED TORQUE 25=30 IN=LBS TORQUE 120=144 IN=LBS TORQUE TORQUE 120=144 IN=LBS 20=25 IN=LBS DESCRIPTION PART NUMBER FUEL TANK SCREWS 91895680 FUEL TANK GS-0795 FUEL CAP GS-0443 HEAT SHIELD GS-0271 FRAME ASSEMBLY GS-0913 END COVER GS-0077...
- Page 24 CRAFTSMAN 7000 GENERATOR 9t 9°670070 GENERATOR ASSEMBLY 21" TORQUE 60=70 IN=LBS INSERT IN SQUARE HOLES 17 /16 TORQUE 120=144 IN=LBS DESCRIPTmON PART NUMBER ENGINE (model # 294447-1042-E1) SCREW 5/16-18 x 3/4 SS-12-CD GROUND STRAP GS-0118 LOCK WASHER SSN-1619-ZN LOCK NUT...
- Page 25 CRAFTS_,_AN 7000 GENERATOR 0t0o670070 GENERATOR HEAD ASSEMBLY ORENT WITH VENTS DOWNWARD SHOWN TORQUEUNTILTHREADSRUNOUT TORQUE 204-264 IN-LBS 12 TORQUE 60-70 I N-LBS TORQUE 30-40 IN-LBS SHOWN REFERENCE ONLY 8 TORQUE 120-144 IN-LBS INSERT INTO O-RING GROOVE, PART OF 10 SCALE CAPACITOR WIRING DESCRIPTION PART NUMBER...
- Page 26 CRAFTSMAN 7000 GENERATOR 9t 9°670070 PANEL ASSEMBLY TORQUE OF 10 BN=LBS. DESCRmPTION PART NUMBER PANEL ASSEMBLY GS-0928 PANEL COVER GS-0017-1 SCREW 10 - 9 X .50 SSF-3156 SCREW #6-32 X .5 TORX SSF-583 SSF-584 NUT, SPEED #6 - 32 120V DUPLEX GFCI RECEPTACLE...
- Page 27 CRAFTSMAN 70GG GENERATOR 9t9,670070 WHEEL KEY NO, DESCRiPTiON PART NO, GS-0583 WHEEL (2 USED) AXLE GS=0586 GS-0213 AXLE SPACER(2 USED) COTTER PiN SSN=622 WHEEL BRACKET(2 USED) GS-0217=1 AXLE END CAP SSF=591 FLAT WASHER, 3/40D X 11/16 ID SSN=623 SS-12-CD 5/16-18 X 1-3/4...
- Page 28 CRAFTSMAN 7000 GENERATOR 9t0=670070 WmRING DIAGRAM OOOG DOOO REAR ViEW CONTROL PANEL HOUSING (MALE) OOOG REAR VI EW TO ENGINE STARTER SOLENOID TO ENGINE MAGNETO REAR VIEW HOUSING (FEMALE) 15A 120V GFCl 30 G 3OA C/B 120/240V, DESCRIPTION COLOR PART NUMBER...
- Page 29 CRAFTSMAN 7000 GENERATOR 9t9,670070 WiRE ASSEMBLY NOTE: TAPE CONDUIT WITH 3/4 " WiDE SLACK ELECTRICAL TAPE IN AREAS SHOWN, TO PRODUCE A SECURE TEE JOINT. TAPE CODUIT WiTH 3/4 " WiDE SLACK ELECTRICAL TAPE. LEADS TO ENGINE 23+_25 IN. LONG 22 _25 IN LONG ,''"...
- Page 30 CRAFTSMAN 7000 GENERATOR 919.070070 Briggs & Stratton Model No. 294447=1257=E1 614_ _7_8 "k REQUIRES SPECIAL TOOL TO iNSTALL. SEE REPAIR iNSTRUCTiON MANUAL 1029_ 33 , 276A GRAPROIL fi GRAPHOIL 1022_ 1022_ 36 40_)@ REQUIRES SPECIAL TOOLS TO iNSTALL. SEE REPAIR iNSTRUCTION MANUAL.
- Page 31 CRAFTSMAN 7000 GENERATOR 919.670070 Briggs & Stratton Model No. 294447+1257+E1 Part No, _No, Description 692163 Crankshaft 807619 Piston Assembly (Standard) NOTE 807807 Piston Assembly (.010 Oversize) 807809 Piston Assembly (+020 Oversize) 807811 Piston Assembly (+030 Oversize) 807620 Ring Set (Standard)
- Page 32 CRAFTSMAN 7000 GENERATOR 919.670070 Briggs & Stratton Model No. 294447-1257-E1 520 507_ 373@ 1!19 _ 1054__ Part Part No, Description _No, Description 805025 Screw (Control Bracket) 691509 Spring Cap Be!I Crank AItemator 690923 393295 805762 691177 Screw (Bell Crank) Mounting Bracket...
- Page 33 CRAFTSMAN 7000 G ENERATOR 919.670070 Briggs & Stratton Model No. 294447-1257-E1 81g_) 1028 62_j/ 6oiA 524_ 1139 @_" 1971_ 833_ _No, Part No, Description Description _No, Part No, 691561 Air Cleaner Base Air Filter Retainer 805631 805655 Air Cleaner Gasket...
- Page 34 CRAFTSMAN 7000 GENERATOR 919.070070 Briggs & Stratton Model No. 294447-1257-E1 308A_ 638- _t_ 322 529 _) 732 _ 732A _ Part No, Description _No, Part No, Description 691528 808766 Flywheel (Steel Ring Gear) Pawl Spring 690744 Grommet 691568 Rewind Starter Housing...
- Page 35 CRAFTSMAN 7000 GENERATOR 919.670070 Briggs & Stratton Model No. 294447-1257-E1 797A 305A 1124 1036 EM{SSIONS LABEL _305 K_No, Part No, Description _No, Part No, Description 797A 693167 808055 Blower Housing Nut (Brush Retainer) 692539 808777 Screw (Blower Housing) Drive Cap...
- Page 36 CRAFTSMAN 7000 GENERATOR 919.670070 Briggs & Stratton Model No. 294447=1257=E1 358 ENGINE GASKET 1095 VALVE GASKET 1022 _No= Pa_ No= Description _No= Part No= Description 805101 690721 OiI Seal (Magneto Side) Choke Shaft Bushing 806085 276A 805420 Cylinder Head Gasket...
- Page 37 37-- ENG lvlGP 670070...
- Page 38 MGP 670070 38-- ENG...
- Page 39 39-- ENG lvlGP 670070...
- Page 40 Dear Customer, In manufacturing this product, many steps have been taken to provide you with the highest quality. Unfortunately, errors or omissions occasionally occur. In the event that you find a missing or defec- tive part, please contact your nearest Sears store. SERVICEAND REPAIRPARTS CALL1o800o665o4455 * Keep this number...
Need help?
Do you have a question about the 919.670070 and is the answer not in the manual?
Questions and answers