Table of Contents
Advertisement
Available languages
Available languages
Operator's
Manual
Snow Thrower
3.8 Horsepower
4-Cycle
Engine
21-inch
Single Stage
Auger Propelled
Model536.885201
CAUTION: Before using this product,
read this manual and follow all of its
Safety Rules and Operating Instructions.
CRRFTSMRN °
Manual del usario
Quitanieves
de 21 pulgadas
3.8 caballos
de fuerza
(hp)
Monoetapico
Propulsado
por barrena
Modelo 536.885201
PRECAUCION:
Antes de usar este producto,
lea este manual y siga todas las reglas de
seguridad e instrucciones de operaci6n.
Sears, Roebuck
and Co., Hoffman
Estates,
IL 60179 U.S.A.
F-011060M
www.sears.com/craftsman
Advertisement
Table of Contents

Related Manuals for Craftsman 536.885201


Summary of Contents for Craftsman 536.885201
- Page 1 (hp) Monoetapico Propulsado por barrena Modelo 536.885201 PRECAUCION: Antes de usar este producto, lea este manual y siga todas las reglas de seguridad e instrucciones de operaci6n. Sears, Roebuck and Co., Hoffman Estates, IL 60179 U.S.A. F-011060M www.sears.com/craftsman...
- Page 2 BACK COVER LIMITED ONE-YEAR WARRANTY ON CRAFTSMAN SNOW THROWER For one years from the date of purchase, when this Craftsman Snow thrower is maintained, lubricated, and tuned up according to the operating and maintenance instructions in the owner's manual, Sears will repair, free of charge, any defect in material or workmanship.
- Page 3 IT MEANS-- ATTENTION!!! BECOME ALERT!!! YOUR SAFETY IS INVOLVED. OOK FOR THIS SYMBOL TO POINT OUT IMPORTANT SAFETY PRECAUTIONS. Disengage all cIu[ches before starting the engine (motor). Do not operate the equipment without wearing adequate winter outer garments. Engine Exhaust, some of its con- Wear footwear that will improve footing on stituents, and certain vehicle com- slippery surfaces.
- Page 4 3. Do not p ut h ands or feet n ear orunder ro- 14.Donot o verload the machine capacity tating p arts. Keep c lear o fthe discharge attempting toclear snow a ttoo fast a rate. opening atall t imes. 15.Never operate the machine athigh t rans-...
- Page 5 IMPORTANT: Many of the following symbols are located on your unit or on literature sup- plied with the product. Before you operate the unit, learn and understand the purpose for each symbol. Control And Operating Symbols Slow Fast Electric Start Engine Start Engine Run Engine Off...
- Page 6 Safety Warning Symbols DANGER DANGER WARNING Thrown Objects. Thrown Objects. Keep Bystanders Away. Keep Bystanders Away. IMPORTANT DANGER DANGER Read Owner's Manual Avoid Injury From Stop The Engine Before Operating Rotating Auger. Keep Before Unclogging This Machine. Hands, Feet And Discharge Chute! Clothing Away.
- Page 7 DO NOT back over Auger Drive Lever _. cables. Auger Drive Cable Remove the packing material from handle assembly. Chute Crank Deflector Figure 1 Knob REMOVE FROM CARTON Figure 2 1. Locate and remove container of Craftsman 5W30 oil. F-011060M...
- Page 8 _" CHECKLIST While learning how to use your snow Before you operate your new snow thrower, pay extra attention to the fol- thrower, to ensure that you receive the lowing important items: best performance and satisfaction from this quality product, please review the Engine oil is at proper level.
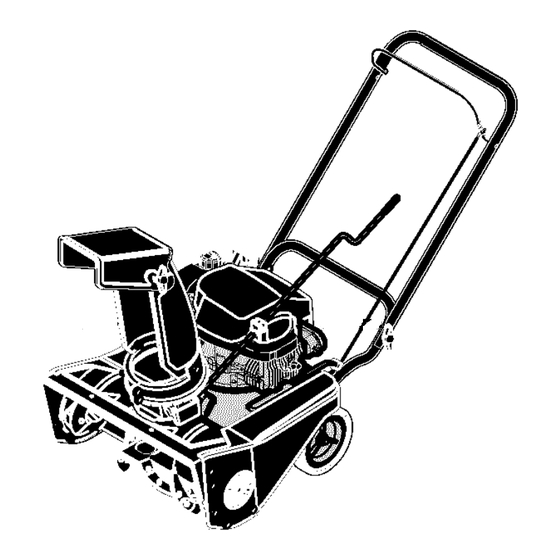
- Page 9 KNOW YOUR SNOW THROWER READ THIS OWNER'S MANUAL AND SAFETY RULES BEFORE OPERATING YOUR SNOW THROWER. Compare the illustrations with your SNOW THROWER to familiarize yourself with the location of various controls and adjustments. Save this manual for future reference. Drive Lever Recoil Starter...
- Page 10 HOW TO THROW SNOW The operation of any snow thrower can result in foreign objects being thrown 1. Engage the auger drive lever. into the eyes, which can result in se- 2. To stop throwing snow, release the vere eye damage. Always wear safety auger drive lever.
- Page 11 FILL OIL: tial synthetic 0W30 motor oil for easier starting. NOTE: Engine may already contain some residual oil. Check frequently NOTE: S.A.E. 5W30 motor oil may be when filling the crankcase. DO NOT used to make starting easier in areas overfill.
- Page 12 COLD START mable. Always use caution ARNING: Gasoline is flam- 1. Move the ignition lever to the on when handling or storing position. gasoline. 2. Make sure the auger drive lever is Do not fill fuel tank while snow in the disengaged (RELEASED) thrower is running, when it is hot, or position.
- Page 13 WARM START Also move throttle control, choke control, and starter handle several If restarting a warm engine after a short times. shutdown, leave choke at "OFF" and do not push the primer button. If the en- gine fails to start, follow the Cold Start instructions.
- Page 14 crushed rock driveways. Move t he depth,slow your pace to allow the handle d own toslightly r aise theau- discharge chute to dispose of the ger. snow as rapidly as the auger re- 9. The forward s peed o fthesnow ceives the snow.
- Page 15 CUSTOMER RESPONSIBILITIES SERVICE R ECORDS Fillindates asyou Before Every Every Every complete r egular Each Each Before SERVICE service. Often Hours Hours Hours Season Storage DATES Check Engine Oil Level • Change Engine Oil Tighten A_I Screws and Nuts Check Spark Plug Lubricate Chute Control ..
-
Page 16: Removing Top Cover And Belt Cover
HOW TO REMOVE THE TOP COVER There are no adjustments under the top Top Cover cover. If removal is required, follow the steps below. 1. Remove screws A that attach the rod support clamp the the top cov- er, Pivot crank assembly rod up and lay on unit. - Page 17 ENGINE Carefully remove the oil fill cap/dip- LUBRICATION stick. Oil will begin to flow into the Check the crankcase oil level before oil drain pan. starting the engine and after each five After all the oil has drained from the (5) hours of continuous use.
- Page 18 dental starting when making WARNING: To prevent acci- any adjustments or repairs, always disconnect the spark plug wire and place it where it cannot make contact with the spark plug. HOW TO ADJUST THE AUGER DRIVE CABLE The auger drive cable was adjusted at 6.
- Page 19 HOW TO ADJUST THE AUGER BRAKE The auger brake is adjusted at the fac- Auger Drive Lever Adjuster tory to assure safe operation of the snowthrower. If the auger brake needs an adjustment, follow the steps below: 1. To access the auger brake, tilt the front of the unit up.
- Page 20 HOW TO REMOVE THE AUGER DRIVE BELT The auger drive belt is made of special construction and must be replaced with an original equipment belt available from the nearest Sears Store. If the auger drive belt is damaged, the Idler Arm snowthrower will not discharge snow and will not move forward.
- Page 21 HOW TO REMOVE THE AUGER 8. Slide the auger out of the right side of the auger housing (See 1. Remove the belt cover. See "How Figure 22). To Remove The Belt Cover" in the 9. Slide the auger out of the bearing maintenance section.
- Page 22 Sears Store. needs adjusting, contact your nearest Craftsman Store, which has the proper equipment and experience to make any IMPORTANT: Never tamper with the necessary adjustments. engine governor, which is factory set for...
- Page 23 If you do not remove the gasoline, tank, fumes may reach an open use fuel stabilizer supplied with unit flame, spark or pilot light from a fur- or purchase Craftsman Fuel Stabi- nace, water heater, clothes dryer, lizer No. 3550. Add fuel stabilizer to cigarette, etc.
- Page 24 TROUBLE CAUSE CORRECTION Difficult starting Defective spark plug. Replace spark plug. Water or dirt in fuel system. Use carburetor bowl drain to flush and refill with fresh fuel. Engine rune erratic Blocked fuel line, empty gas Clean fuel line; check fuel tank, or stale gasoline, supply;...
- Page 25 SEARS, ROEBUCK Federal and California Emission Control Systems Limited Warranty Small Off-Road Engines CALIFORNIA & US EPA EMISSION quired maintenance listed in your Owner's CONTROL WARRANTY STATEMENT Manual, but Sears, Roebuck and Co. will not deny warranty solely due to the lack of receipts The U.
- Page 26 ershall pay any charges formaking service Sears, Roebuck and Co. according to Subsec- calls and/or fortransporting theproducts tion 4 below. Any such part repaired or re- and from the place w here the inspection and/ placed under the ECS Warranty shall be orwarranty work i sperformed.
- Page 27 use shall not r educe Sears, Roebuck and Co. EMISSION-RELATED PARTS ECS Warranty obligations. INCLUDE THE FOLLOWING: 9.Unapproved add-on ormodified parts m ay 1. Carburetor Assembly and its Internal Com- not b eused t omodify orrepair aSears, Roe- ponents buck a nd C o. engine. Such u se voids this ECS a) Fuel filter Warranty and shall besufficient grounds for...
- Page 28 QUITANIEVES DE CRAFTSMAN Por un argoa partJr de la fecha de compra, siempre que a este quitanJeves Craftsman se ]e de mantenimiento, lubricacJ6n y aftnamJento de acuerdo con las instrucciones de operaci6n ymante- nimiento presentadas en el manual del propietario, Sears reparar& sin cargo alguno, cua]quJer defecto en eI material y mano de obra.
- Page 29 Preste atenci6n a este simbolo, le indica precaucion_s de seguridad importan- tes. Este simbolo significa--iiiATENCION!H iiiESTE ALERTA!!! SE TRATA DE SU SEGURIDAD. Tenga mucho cuidado para evitar resba- Iones o cafdas, especialmente cuando es- te retrocediendo. Las emanaciones de escape producidas por este motor PREPARACK) N contienen quimicos reconocidos...
- Page 30 mente tomacorrientes que hayan sido Cuando limpie, repare o inspeccione la instalados deacuerdo con los reglamen- unidad, asegSrese de que la barrena/im- tos deinspecci6n locales. pulsor y todas las partes m6viles se en- cuentren detenidas y que todos los 6. Jamas intente efectuar ningt_n ajuste controles esten desenganchados.
- Page 31 siempre que tiene b uena estabilidad, Siva a almacenar el quitanieves por un sujete con firmeza elmango delaunidad. periodo prolongado, siempre consulte las Camine; nunca oorra. instrucciones del manual del operador donde encontrara detalles importantes. 20.Noexcedasualcance. Piseconseguridad ymantengase bien e quilibrado entodo Mantenga o reemplace las etiquetas de momento.
- Page 32 B']]_I_t]_t]. _] IMPORTANTE: Los siguientes simbolos est_n ubicados en la unidad o en las hojas informativas que vienen con el producto. Antes de operar la unidad entienda y aprenda el objetivo de cada slm- bolo. Simbolos de control y operacion Despacio R_pido Arranque electrico...
- Page 33 Simbolos de control y operacion Mezcla de combustible Combustible Aceite y aceite Descarga hacia Descarga hacia Descarga hacia la Descarga hacia la ABAJO ARRIBA IZQUIERDA DERECHA i' o] Transferencia de peso Transferencia de peso Llave de encendido Levante el mango Presione el pedal Insertar para marcha, para enganchar...
- Page 34 Remueva et material de empaque del Deflector de Manivela mango superior e inferior. descarga de a Mango superior Figura 1 Perilla C6MO SACAR EL QUlTANIEVES LA CAJA _*.41 Localice y retire la botella de aceite de Figura 2 motor Craftsman 5W30. F-011060M...
- Page 35 I ::1 _[.:.__,'q _vj I :] IV_,IJ_l _" LISTA DE REVISION Antes de operar su nuevo quitanieves, y pa- AI mismo tiempo que aprende a usar su qui- ra asegurar que obtenga el mejor rendimien- tanieves, preste mucha atenci6n a ios deta- to y la mayor satisfacci6n de este producto lies siguientes:...
- Page 36 CONOZCA SU QUITANIEVES LEA ESTE MANUAL DE INSTRUCCIONES Y LAS REGLAS DE SEGURI- DAD ANTES DE OPERAR SU QUITANIEVES. Compare las ilustraciones con su QUITANIEVES para familiarizarse con la ubicaci6n de los diversos controles y ajustes. Guarde este manual p8ra referenoia futura. Palanc8 de propulsi6n de I8 barren8 -- Manij8 de...
- Page 37 La operaci6n decualquier quitanieves puede Para detener la descarga de nieve, suet- provocar que objetos extraSos seaR l anza- te la palanca de propulsion de la ba- dos con fuerza hacia s us ojos, Iocual podria rrena. resultar enlesiones graves. Use siempre gafas deseguridad oprotectores para l os...
- Page 38 ANTES DE HACER ARRANCAR motor parcialmente sintetico 0W30, para un EL MOTOR arranque mas facil. ACEITE DE MOTOR: NOTA: Puede usar aceite de motor del tipo S.A.E. 5W30, para un arranque mas facil, NOTA: Puede que el motor ya tenga algSn ouando la temperatura est_ constantemerlte residuo de aceite.
- Page 39 ANTES DEARRANCAREL NOTA: Para evitar problemas del motor, el MOTOR sistema de combustible debe vaciarse antes de almacenar la unidad por 30 dias o mas. Antes de darle servicio a la unidad o de Arranque el motor y dejelo en marcha hasta hacer arrancar el motor, familiaricese que las lineas de combustible y el carbura-...
- Page 40 firmemente la manija de arranque a Para 8yudar 8 evitar que se congele el reaccibn. 8rrancador a reacci6n y los controles del motor, proceda de 18 manera siguiente des- Jale rApidamente Ia manija pues de cad8 trabsjo de remoci6n de nieve, t, Con el motor en march8, jale la cuerda de 8rranque energica y continuadamente extendiendo...
- Page 41 barrena" enIasecci6n deServicio 11. Limpie el quitanieves despu6s de cada Ajustes. USO, 2. El l anzamiento denieve m As e fectivo se 12. Quite el hielo, la nieve y los residuos de Iogra cuando lanieve s equita i nmedia- todo el quitanieves, EnjuAguelo con tamente despu6s delanevada.
- Page 42 RESPONSABILIDADES DEL PROPIETARIO REGISTROSDE SERVICIO Antes Anote las fechas en Antes Cada Cada Cada Cada FECHA que se hacemanteni- de ca- A me- esta- gear- mientoregular da uso nudo horas horas horas ei6n darlo SERVICIO Reviser el nivet de acei- ' te del motor "...
- Page 43 C6MO QUITARLA CUBIERTA SUPERIOR Cubierta No hay controles de ajuste debajo de la superior cubierta superior. Si es necesario quitar- la, siga los pasos a continuaci6n: 1. Quite los tornillos A que sujetan abrazadera de soporte de la varilla a la eubierte superior. Haga girar la varilla de la manivela hacia arri- bay dejela sobre la unidad.
- Page 44 LUBRICACION DEL MOTOR Saque con cuidado la tapa/varilla de ni- vel de aceite. El aceite empezarA a caer en el reeipiente pare el aceite. Revise el nivel de aceite en el carter deI ci- Despu6s que todo el aceite del motor gt3efial ) antes de hacer arrancar el motor y haya salido, coloque el quitanieves en la...
- Page 45 nir el arranque accidental ADVERTENCIA: Para preve- del motor, siempre desco- necte el cable de la bujia y manten- galo alejado de esta, mientras reali- za ajustes o reparaciones a la uni- dad. COMO AJUSTAR EL CABLE DE PROPULSION DE LA BARRENA El cable de propulsi6n de la barrena fue Apriete la tuerca que sujeta el reaorte de tensibn del cable.
- Page 46 COMO AJUSTAR EL FRENO DE LA BARRENA El freno de la barrena es ajustado en la fa- Palanca de propul- si6n de la barrena Tuerca de brica para asegurar la operaci6n segura del ajuste quitanieves. Si el freno de la barrena necesi- tara ajuste, siga los pasos a continuaci6n: Para alcanzar el freno de la barrena, in- cline la parte delantera de la unidad ha-...
- Page 47 COMO SACAR LA CORREA DE PROPULSION DE LA BARRENA La correa de propulsi6n de la barrena esta construida especialmente para la unidad y debe set reemplazada con una correa origi- nal para la unidad, disponible en su tienda Sears mAs cercana. Si la correa de propulsi6n de la barrena es- tuviera daSada, el quitanieves no descargarA...
- Page 48 Para sacar la correa de propulsibn de Correa de pro- la barrena de Ia polea del propulsor, pulsi6n de la barrena mueva el brazo guia a la posici6n de en- ganche. Esto le dara un espacio libre entre la polea del propulsor y el brazo de freno para sacar la correa de pro- Polea del pulsion de la barrena (vea la...
- Page 49 C()MO SACAR LA BARRENA Deslice la barrena hacia afuera por el lado derecho del alojamiento (yea Ia Retire la cubierta de la correa. Consulte Figura 22). "C6mo quitar la cubierta de la correa" en Deslice la barrena fuera del soporte de Ia secci6n de mantenimiento.
- Page 50 Para operar la unidad en alturas superiores cesita set ajustada, oomuniquese con su a los 7.000 pies, consulte con el personal de centro de servicio Craftsman mas cercano. su tienda Sears mas cercano. Alli encontrarA el equipo y la experiencia IMPORTANTE:...
- Page 51 Craftsman No. 3550. ASada es- de ropa, cigarrillo, etc. tabilizador de combustible a la cantidad NOTA: Para evitar dar_o al motor (si el quita-...
- Page 52 II f_,1 :] mL, II _] :11 m[o[o__,1 ml V L,_o,] [o] _h'dl :t :1 -.J_,1 :r±_ [o] _I _] _±\vj _ :t r±_ PROBLEMA CAUSA CORRECCION Dificultad para Buj_a defectuesa. Reernplace la bujia defectuesa. arrancar Agua o suciedad en et sistema Use el escurridor de la taza del de combustible, carburador para enjuagar;...
- Page 53 SEARS, ROEBUCK Garantia limitada de cumplimiento con el Sistema Federal de control de emisiones y con el sistema de control de emisiones del Estado de California Motores pequehos no aptos para carretera (off-road) CONTROL DE EMISIONES SISTEMA PARA EL CONTROL DE CALIFORNIA Y DE LA AGENCIA DE EMISIONES DEL FABRICANTE...
- Page 54 Sears, Roebuck and Co. o a Sears, Roebuck A. CAMPO DE APLICAOION: Esta garantia and Co. al 1-800-473-7247 (llamada gratuita de berA aplicarse a los motores peq ue5os para en E.U.A.). vehiculos off-road modelo 1995 y modelos de aSos posteriores en California (para otros es- NOTA IMPORTANTE tados, motores modelo 1997 y modelos de aSos posteriores).
- Page 55 Garantia SCE d eberA garantizarse per elresto aprobada per S ears, Roebuck and Co. p ara del P eriodo delamisma. utilizarse eneldesempeflo decualquier man- tenimiento o cambio delaGarantia SCE, la 3.Cualquier parte g arantizada yreIacionada cual se proporcionarA sin cargo alguno para e l con emisiones que seespecifique para c am-...
- Page 56 For repair of major brand appliances in your own home.,. no matter who made it, no matter who sold it! iiiiiiiiiii 1-800-4-MY-HOME SM Any,_me day night (,-800469-4663! iiiiiiiiiii www.sears.com iiiiiiiiiii TO bring in products such as vacuums, lawn equipment and electronics for repair, call for the location of your nearest Sears Parts &...
- Page 57 CRAFTSMAN 21" 3.8HP SNOW THROWER 536.885201 DRIVE COMPONENTS F-O11060M...
- Page 58 CRAFTSMAN 21" 3.8HP SNOW THROWER 536.885201 DRIVE COMPONENTS Key No. Part No. Description 762248 Cover, Top 26x292 Screw 762273 Bracket, Crank Rod 26x293 Screw 762266 Box, Heater 762357 Primerbulb, Red 271172 1259 Hose 762249 Deflector, Carburetor 26x291 Screw 762358 Handle, Starter ..
- Page 59 CRAFTSMAN 21" 3.8HP SNOW THROWER 536.885201 AUGER COMPONENTS F-O11060M...
- Page 60 CRAFTSMAN 21" 3.8HP SNOW THROWER 536.885201 AUGER COMPONENTS Key No. Part No. Description 762246-848 Frame, Motor Box 302635 710079 Bolt 580251 Retainer, Bearing 43846 Bearing 302628 Bolt 338965 Pulley, Auger 710274 Screw 762277 Cover, Left Belt 762266 Housing, Auger 312300...
- Page 61 CRAFTSMAN 21" 3.8HP SNOW THROWER 536.885201 HANDLE & DISCHARGE COMPONENTS F-O11060M...
- Page 62 CRAFTSMAN 21" 3.8HP SNOW THROWER 536.885201 HANDLE & DISCHARGE COMPONENTS Key No. Part No. Description 762252-853 Handle, Upper 762259 Cable, Auger Drive 337584 Bolt 57171 Knob 71037 311936 Washer 762250-853 Handle, Lower 762251-853 Lever, Auger Drive 70984 Screw 340715 Bolt...
- Page 63 CRAFTSMAN 21" 3.8HP SNOW THROWER 536.885201 DECALS NOTILLUSTRATED Part No. Description 761150 DECAL, AUGER CONTROL 70141 DECAL, DANGER AUGER -FOOT 48x304 DECAL, BELT INSTR. MINI 48x301 DECAL, 3.8HP/21" 48x302 DECAL, CONTROL PANEL 70142 DECAL, DANGER CHUTE HANDER F-O11060M...
- Page 64 CRAFTSMAN 143.023800 REPAIR PARTS _172 F-O11060M...
- Page 65 REPAIR PARTS CRAFTSMAN 143.023800 PART PART DESCRIPTION DESCRIPTION RPM High 3450 to 3750 37032 Camshaft (NCR) 37280 Cylinder (Incl. 2,20 & t 50) 29914 Oil Pump Ass'y. 26727 Dowel Pin 35261 Mounting Flange Gasket 33734 Breather Element 34311E Mounting Flange (Incl.
- Page 66 CRAFTSMAN 143.023800 REPAIR PARTS 36784 VaNe Cover 35000A Starter Cup 30200 Screw, 10-24 x 9/16" 650926 Screw, 8-32 x 21/64" 29752 Nut & Lock Washer 34357 Fuel Line 30593 Retainer Clip 26460 Fuel Line Clamp 6201 Screw, 1/4-28 x 7/8"...
- Page 67 CRAFTSMAN 143.023800 REPAIR PARTS F-O11060M...
- Page 68 REPAIR PARTS CRAFTSMAN 143,023800 PART DESCRIPTION 640228 Carburetor (Incl. 184 of Engine Parts List) 631615 Throttle Shaft & Lever Assembly 631767 Throttle Return Spring 640070 Throttle Shutter 650506 Shutter Screw 632797 Choke Shaft & Lever Assembly 631890 Choke Shutter 630735...
- Page 69 REPAIR PARTS CRAFTSMAN 143.023800 PART DESCRIPTION 599743 Rewind Starter 599740 Retainer 590616 Starter Dog 590617 Dog Spring 590645A Pulley & Rewind Spring Ass'y 590643 Starter Housing Ass'y 590535 Starter Rope (Length 98" x 9/64" dia.) 590701 Starter Handle 590760 Spring Clip...
Need help?
Do you have a question about the 536.885201 and is the answer not in the manual?
Questions and answers