Table of Contents
Advertisement
Available languages
Available languages
I CRRFTSMRN 1
Operator's Manual
Snow Thrower
3.8 Horsepower
4-Cycle
Engine
21-inch
Single Stage
Auger Propelled
Model536.885203
CAUTION: Before using this product,
read this manual and follow all of its
Safety Rules and Operating Instructions.
Manual del usario
Quitanieves
de 21 pulgadas
3.8 caballos
de fuerza (hp)
Monoet&pico
Propulsado
por barrena
Modelo 536.885203
PRECAUCI6N:
Antes de usar este producto,
lea este manual y siga todas las reglas de
seguridad e instrucciones de operaci6n.
Sears, Roebuck
and Co,
Hoffman
Estates,
IL 60179 U.S.A.
F-031049C
www.sears.com/craftsman
Advertisement
Table of Contents

Subscribe to Our Youtube Channel
Related Manuals for Craftsman 536.885203


Summary of Contents for Craftsman 536.885203
- Page 1 (hp) Monoet&pico Propulsado por barrena Modelo 536.885203 PRECAUCI6N: Antes de usar este producto, lea este manual y siga todas las reglas de seguridad e instrucciones de operaci6n. Sears, Roebuck and Co, Hoffman Estates, IL 60179 U.S.A. F-031049C www.sears.com/craftsman...
- Page 2 SERVICE AND ADJUSTMENT BACK COVER LIMITED ONE-YEAR WARRANTY ON CRAFTSMAN SNOW THROWER For one year from the date of purchase, when this Craftsman Snow thrower is maintained, lubricated, and tuned up according to the operating and maintenance instructions in the owner's manual, Sears will repair, free of charge, any defect in material or workmanship.
- Page 3 IT MEANS-- ATTENTIONI!! BECOME ALERTI!! YOUR SAFETY IS INVOLVED. OOK FOR THIS SYMBOL TO POINT OUT IMPORTANT SAFETY PRECAUTIONS. Disengage all clutches before starting the engine (motor). DO not operate the snow thrower without wearing adequate winter outer garments. Engine Exhaust, some of its con- Wear footwear that will improve footing on stituents, and certain vehicle com- slippery surfaces.
- Page 4 3. Do not p ut h ands orfeet n ear orunder ro- 14. Do nct overlead the snow thrower capecity tating p arts. Keep c lear o fthe discharge by attempting to clear snow at too fast a opening atall t imes. rate.
- Page 5 IMPORTANT:Many of the following symbols are located on your snow thrower or on litera- ture suppliedwith the product. Beforeyou operate the snow thrower, learn and understand the purpose for each symbol. Control And Operating Symbols Slow Fast Electric Start Engine Start Engine Run I-I N Choke Off...
- Page 6 _'.]_l_[o_ Safety Warning Symbols DANGER DANGER WARNING Thrown Objects. Thrown Objects. Keep Bystanders Away. Keep Bystanders Away. IMPORTANT DANGER DANGER Read Owner's Manual Avoid Injury From Stop The Engine Before Operating Rotating Auger. Keep Before Unclogging This Machine. Hands, Feet And Discharge Chute! Clothing Away.
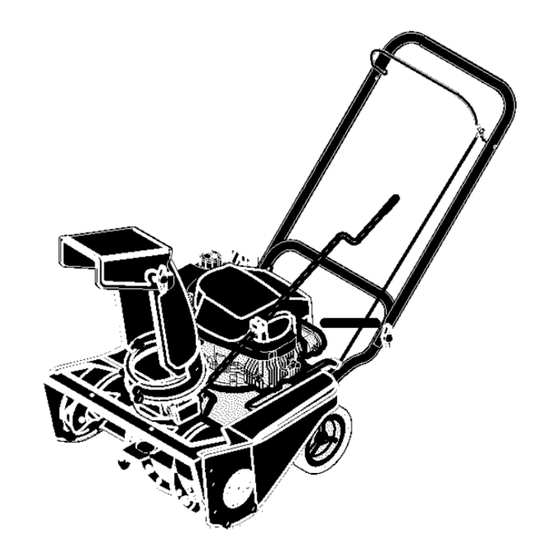
- Page 7 Auger Remove the packing material from Drive Cable handle assembly. Remove the lower insert from the axle. Chute Crank Deflector Upper Handle Figure 1 Knob REMOVE FROM CARTON 1. Locate and remove container of Figure 2 Craftsman 5W30 oil. Fu031049C...
- Page 8 _[.'.],.'.] = iLv_ I =]i_"4 _" CHECKLIST While learning how to use your snow Before you operate your new snow thrower, pay extra attention to the fol- thrower, to ensure that you receive the lowing important items: best performance and satisfaction from this quality product, please review the _"...
- Page 9 [o] -.1:1 ;__,_n i [o_ KNOW YOUR SNOW THROWER READ THIS OWNER'S MANUAL AND SAFETY RULES BEFORE OPERATING YOUR SNOW THROWER. Compare the illustrations with your SNOW THROWER to familiarize yourself with the location of various controls and adjustments. Save this manual for future reference.
- Page 10 any snow thrower can result Manual before operating ARNING: The operation of ARNING: Read Owner's machine. Never direct dis- in foreign objects being thrown into the eyes, which can re- charge toward bystanders. Stop the engine before unclogging discharge sult in severe eye damage. Always wear safety glasses or eye shields chute or auger housing and before...
- Page 11 Use the fuel stabilizer supplied with NOTE: To avoid engine problems, the the unit or purchase Craftsman Fuel fuel system must be emptied before Stabilizer No. 3550. Make sure that storage for 30 days or longer. Start the...
- Page 12 [o] -.1:1 ;__*_n i [o_ gasoline that may be stale from long make certain that you have read the fol- periods of storage in the container. lowing information. mable. Always use caution How To Start A Cold Engine ARNING: Gasoline is flam- when handling or storing 1.
- Page 13 times. How To Start A Warm Engine If restarting a warm engine after a short shutdown, leave choke at "OFF" and do gine indoors or in enclosed, not push the primer button. If the en- ARNING: Never run en- poorly ventilated areas. En- gine fails to start, follow the Cold Start instructions.
- Page 14 [o] -.1:1 ;__*_n i [o_ less likely to blow into unwanted DRY AND AVERAGE SNOW areas. 1. Snow up to eight inches deep can be removed rapidly and easily by 7. For safety and to prevent damage walking at a moderate rate. For to the snow thrower, keep the area snow or drifts of a greater depth, to be cleared free of stones, toys...
- Page 15 ILv_ !'_.! I_IIi :1_!'_.! _[l_l CUSTOMER RESPONSIBILITIES SERVICE R ECORDS Fillindates asyou Before Every Every Every complete r egular Each Each Before SERVICE service. Often Hours Hours Hours Season Storage DATES Change Engine Oit Not ..........Check Spark Plug Drain Fuel Check Adjustment of Auger Control Cabte GENERAL RECOMMENDATIONS...
- Page 16 ADJUST AUGER CONTROLCABLE The auger control cable was adjusted 6. Tighten the nut that holds the cable tension spring. at the factory. If the auger will not en- gage or disengage correctly, adjust the auger control cable as follows: 1. Loosen the nut that holds the cable tension spring (See Figure 9).
- Page 17 ENGINE 3. Carefully remove the oil fill cap/dip- LUBRICATION stick. Oil will begin to flow into the Check the crankcase oil level before oil drain pan. starting the engine and after each five 4. After all the oil has drained from the (5) hours of continuous use.
- Page 18 HOW TO REMOVE THE TOP COVER There are no adjustments under the top Top Cover cover. If removal is required, follow the steps below. 1. Remove screws A that attach the rod support clamp the the top cov- er. Pivot crank assembly rod up and lay on unit.
- Page 19 HOW TO ADJUST THE AUGER BRAKE Auger The auger brake is adjusted at the fac- Drive Lever Adjuster tory to assure safe operation of the snowthrower. If the auger brake needs an adjustment, follow the steps below: 1. To access the auger brake, tilt the front of the unit up.
- Page 20 HOW TO REMOVE THE AUGER DRIVE BELT The auger drive belt is made of special construction and must be replaced with an original equipment belt available from Sears. Idler Arm If the auger drive belt is damaged, the snowthrower will not discharge snow and will not move forward.
- Page 21 HOW TO REMOVE THE AUGER 8. Slide the auger out of the right side of the auger housing (See 1. Remove the belt cover. See "How Figure 22). To Remove The Belt Cover". 9. Slide the auger out of the bearing on the left side of the auger hous- 2.
- Page 22 TO ADJUST THE CARBURETOR The carburetor is not adjustable. En- gine performance should not be af- fected at altitudes up to 7,000 feet. operation at higher elevations, contact your nearest Sears Service Center. IMPORTANT: Never tamper with the engine governor, which is factory set for proper engine speed.
- Page 23 If you do not remove the gasoline, tank, fumes may reach an open use fuel stabilizer supplied with unit flame, spark or pilot light from a fur- or purchase Craftsman Fuel Stabi- nace, water heater, clothes dryer, lizer No. 3550. Add fuel stabilizer to cigarette, etc.
- Page 24 TROUBLE CAUSE CORRECTION Difficult starting Defectivesparkplug, Replace spark plug, Drain and clean the fuel tank. Water or dirt in fuel system. Refill with fresh fuel. Engine runs erratically Blocked fuel line, empty gas Clean fuel line; check fuel tank, or stale gasoline, supply;...
- Page 25 SEARS, ROEBUCK Federal and California Emission Control Systems Limited Warranty Small Off-Road Engines CALIFORNIA & US EPA EMISSION quired maintenance listed in your Owner's Manual, but Sears, Roebuck and Co. will not CONTROL WARRANTY STATEMENT deny warranty solely due to the lack of receipts The U.
- Page 26 ershall pay any charges formaking service Sears, Roebuck and Co. according to Subsec- calls a nd/or fortransporting theproducts to tion 4 below. Any such part repaired or re- and from the place w here the inspection and/ placed under the ECS Warranty shall orwarranty work i sperformed.
- Page 27 use shall not r educe Sears. Roebuck end Co. EMISSION-RELATED PARTS ECS Warranty obligations. INCLUDE THE FOLLOWING: 9,Unapproved add-on ormodified parts m ay 1. Carburetor Assembly and its Internal Com- not b eused t omodify orrepair aSears, Roe- ponents buck a nd Co. engine, Such u se voids this ECS a) Fuel filter Warranty and shall besufficient grounds for...
- Page 28 CRAFTSMAN 21" 3.8HP SNOW THROWER 536.885203 DRIVE COMPONENTS F-031049C...
- Page 29 CRAFTSMAN 21" 3.8HP SNOW THROWER 536.885203 DRIVE COMPONENTS Key No. Part No. Description 762248 Cover, Top 26x292 Screw 762273 Bracket, Crank Rod 26x293 Screw 762366 Box, Heater 762357 Primerbulb, Red 271172 1259 Hose 762249 Deflector, Carburetor 26x291 Screw 762358 Handle, Starter 143.043800...
- Page 30 CRAFTSMAN 21" 3.8HP SNOW THROWER 536.885203 AUGER COMPONENTS F-031049C...
- Page 31 CRAFTSMAN 21" 3.8HP SNOW THROWER 536.885203 AUGER COMPONENTS Key No. Part No. Description 762245E549 Frame, Motor Box 302635 580251 Retainer, Bearing 43846 Bearing 302628 Bolt 338965 Pulley, Auger 26x263 Screw 762277 Cover, Left Belt 762266 Assembly, Auger Housing 312300 71067...
- Page 32 CRAFTSMAN 21" 3.8HP SNOW THROWER 536.885203 HANDLE & DISCHARGE COMPONENTS F-031049C...
- Page 33 CRAFTSMAN 21" 3.8HP SNOW THROWER 536.885203 HANDLE & DISCHARGE COMPONENTS Key No. Part No. Description 762252E701 Handle, Upper 762259 Cable, Auger Drive 337584 Bolt 57171 Knob 71037 311936 Was her 762250E701 Handle, Lower 762251E701 Lover, Auger Drive 70984 Screw 340715...
- Page 34 CRAFTSMAN 143.043800 REPAIR PARTS 185 1 F-0310490...
- Page 35 CRAFTSMAN 143.043800 REPAIR PARTS PART PART DESCRIPTION DESCRIPTION RPM High 3450 to 3750 37608 Mounting Flange (Incl. 72 thru 83, 306, 37791 Cylinder (Incl. 2,20 & 150) 309A, 311A) 26727 Dowel Pin 37614 Oil Drain Plug 33734 Breather Element 27897...
- Page 36 CRAFTSMAN 143.043800 REPAIR PARTS 30200 Screw, 10-24 x 9/16" 35000A Starter Cup 29752 Nut & Lock Washer 650926 Screw, 8-32 x 21/64" 30593 Retainer Clip 29774 Fuel Line 6201 Screw, 1/4-28 x 7/8" 26460 Fuel Line Clamp 26756 Carburetor To Intake Pipe 35586A Fuel Tank (Incl.
- Page 37 CRAFTSMAN 143.043800 REPAIR PARTS <6 -3 PART DESCRIPTION 590743 Rewind Starter 590740 Retainer 590616 Starter Dog 590617 Dog Spring 590645A Pulley & Rewind Spring Ass'y 590643A Starter Housing Ass'y 590535 Starter Rope (Length 98" x 9/64" dia,) 590701 Starter Handle...
- Page 38 CRAFTSMAN 143.043800 REPAIR PARTS - 25 F-031049C...
- Page 39 CRAFTSMAN 143.043800 REPAIR PARTS PART DESCRIPTION 640228 Carburetor (Incl. 184 of Engine Parts List) 631615 Throttle Shaft & Lever Assembly 631767 Throttle Return Spring 640070 Throttle Shutter 650506 Shutter Screw 632797 Choke Shaft & Lever Assembly 631890 Choke Shutter 630735...
- Page 40 GARANTiA LIMITADA DE UN AI_IOPARA LA MAQUINA QUITANIEVES DE CRAFTSMAN Per un aSo a partir de la fecha de compra, siempre que a este quitanieves Craftsman se le de rnantenirniento, _ubricaci6ny afinamiento de acuerdo con las instrucciones de operaci6n y mante- nimiento presentadas en el manual del propietario, Sears reparar&...
- Page 41 Preste atencibn a este slmbolo le indica,precaucionCs de seguridad importan- tes. Este s mbolo significa--iiiATENClON!!! iiiESTE ALERTA!!! SE TRATA DE SU SEGURIDAD. ren el quitanieves sin la instrucci6n apropieda, Mantenga el Area libre de personas, es- Las emanaciones de escape pecialmente nitros pequeSos y mescotas.
- Page 42 tensi6n con certificaci6n CSA!UL Use controles est6n desenganchados. Desco- selamente tomacorrientes que hayan si- necte el cable de la bujia y maot6ngalo deinstalades deacuerde con los regla- alejado de la bujla pare evitar un arran- mentos deinspecci6n locales. que accidental. 6.
- Page 43 21. No trate de usar el quitanieves pare lim- Mantenga o reemplace las etiquetas de piar techos. seguridad e instrucciones, seg5n sea ne- cesario, MANTENIMIENTO Mantenga el quitanieves en marcha unos ALMACENAMIENTO cuantos minutos despu_s de despejar le Revise los pernos con frecuencia pare nieve, para evitar que se congele la be- asegurar que est_n bien apretados y que...
- Page 44 _,']]_]_o_o_ IMPORTANTE: Los siguientes simbolos est_n ubicados en su quitanieves o en las hojas in- formativas que vienen con el producto. Antes de operar el quitanieves entienda y aprenda el objetivo de cada slmbolo. Simbolos de control y operacibn Despacio Rapido Arranque el_ctrico Arranque de motor...
- Page 45 Simbolos de control y operacibn Mezcla de combustible Combustible Aceite y aceite Descarga hacia Descarga hacia Descarga hacia la Descarga hacia la ABAJO ARRIBA IZQUIERDA DERECHA E=o] Transferencia de peso Transferencia de peso Llave de encendido Levante el mango Presione el pedal Insertar para marcha, para enganchar para desenganchar...
- Page 46 Deflector de Manivele mango superior e inferior. Desmonte el descarga de a inserto inferior del eje. Mango superior Figure 1 Perilla C(_MO SACAR EL QurrANIEVES LA CAJA Lecalice y retire la botella de aceite de motor Craftsman 5W30. Figure 2 F-031049C...
- Page 47 I ::1_ _ .__,! Lv_ I :] IF_,?IL:I LISTA DE REVISION Antes de operar su nuevo qeitenieves, y pa- AI mismo tiempo que aprende a usar su qui- re asegurar que obtenga el mejor rendimien- tanieves, preste mucha atenci6n a los deta- to y la mayor satisfacci6n de este producto lies siguientes:...
- Page 48 CONOZCA SU QUITANIEVES LEA ESTE MANUAL DE INSTRUCCIONES Y LAS REGLAS DE SEGURI- DAD ANTES DE OPERAR SU QUITANIEVES, Compare las ilcatraciones con su QUITANIEVES pare femiliarizarse con la ubicaci6n de lesdiversos controles y ajustes, Guarde este manuel pare referencia future, Palanca de propulsi6n de la barrene -- Manija de...
- Page 49 del propietario antes de operar de cualquier quitanieves puede ADVERTENCIA: Lea el manual DVERTENClA: La operacibn la maquina. Nunca dirija la des- provocar que objetos extra_os carga hacia los transeuntes. Pare el mo- sean lanzados con fuerza hacia sus tor antes de deaobstruir el tubo de des- ojos, Io cual podrla resultar en lesiones carga o el alojamiento...
- Page 50 ANTES DE HACER ARRANCAR NOTA: Puede user aceite de motor del tipo EL MOTOR S.A.E. 5W30, pare un arranque mAs f&cil, cuando la temperature est& constentemente ACEITE DE MOTOR: en -6,7 ° C (20°F) o menos. NOTA: Puede que el motor ya tenge algo Tepa!varilla de nivel de aceite.
- Page 51 Estabilizador de Combustible No, 3550 nan correctamente. de Craftsman, AsegQrese de que el reck piente que contiene la gasoline a utilizer, C()MO PARAR EL MOTOR est_ limpio y sin 5xido u otros residuos.
- Page 52 motor, proceda de la manera siguiente des- Jale rapidameote la manija pu_s de cada trabajo de remoci6n de nieve. 1. Con el motor en march& jale la cuerda de arranque en_rgica y oontinuadamente extendiendo todo el brazo, unas tres o cuatro veces.
- Page 53 hoje,s decaucho no pe,ran, consulte <'CA- se derretirA la nieve y el hielo acumula- dos en el motor. me ajuste,r el ce,ble de propulsiAn de la barrena" en le,secciAn de Servicio y 11. Limpie el quitanieves despuAs de cada Ajustes. use.
- Page 54 hV_ r__! _ii ;I _I hV_ll;I _ i I[O] RESPONSABIMDADES DEL PROPIETARIO REGISTROSDE SERVIClO Antes Anote las fechasen Antes Cada Cada Cada Cada FECHA que se hacemanteni- de ca- A me- esta" guar- mienteregular da uso nudo horas horas horas cibn darle SERVICIO...
- Page 55 hV_ r__! _ii_ I hV_ll_ i I[e] AJUSTAR EL CABLE DE CONTROL DE LA BARRENA El cable de prapulsiSn de la barrena fue ajustado en [e fabrica. Si la barrena no en- gancha o desengancha correctamente, ajus- te el cable de propulsi6n de le barrena, de la menera siguiente: 1.
- Page 56 hVi I_'!1ii ;111hVlll;ll i I[I] LUBRICACI6N DEL MOTOR Saque con cuidado la tapa/varilla de ni- vel de eceite. El aceite empezar& a caer en el recipiente para el aceite. Revise el nivel de aceite en el carter del ci- Despu_s que tode el eceite del motor g_ehal ) antes de hacer arrancar el motor y haya salido, pate el quitanieves en la despe6s de cada cinco (5) horas de use...
- Page 57 C(_MOQUITARLA CUBIERTA SUPERIOR Cubierta No hay controles de ajuste debajo de la superior cubierta superior. Si es necesario quitar- la, siga los pasos a continuaci6n: 1. Quite los tornillos A que sujetan la abrazadera de soporte de la varilla a la cubierta superior. Haga girar la varilla de la manivela hacia arri- bay d@jela sobre la unidad.
- Page 58 C_MO AJUSTAR EL FRENO DE LA BARRENA El freno de la barrena es ajustado en la f&- Palanca de propul- si6n de la barrena Tuerca de brica pare asegurar ]a operaci6n segura de] ajuste quitanieves. Si el freno de la barrena necesi- tara ajuste, siga los pesos a continuaci6n: Pare alcenzar el freno de la barrena, in- Braze del...
- Page 59 C6MO SACAR LA CORREA DE PROPULSI6N DE LA BARRENA Le correa de propulsi6n de la barrene esta construida especialmente pera le unided y debe set reemplazada con une corree origi- nal pare la unidad, disponible en su tiende Seers m&s cercane. Si le corree de propulsi6n de le berrena es- tuviera daheda, el quitenieves no descergar&...
- Page 60 Pare sacar la correa de propulsibn de Correa de pro- la barrena de la polea del propulsor, puisi6n de ]a berrene mueva el braze guia e la posici6n de en- ganche. Esto le dare un espacio libre entre le polea del propulsor y el braze de freno pare sacar la correa de pro- Polea del pulsibn de la barrena (vee la...
- Page 61 C_MOSACARLABARRENA Deslice la barrena fuera del soporte de cojinetes en el lade izquierdo del aloja- Retire la cub{erta de la correa. Consulte miento. "C6mo quitar la cub{erta de la correa", 10. Pare instalar le barrena, realice los pe- Saquela correa de propulsi6n de la be- sos anteriores en orden inverse.
- Page 62 AJUSTE DEL CARBURADOR El carburador no es ejustab[e. El rendimiento de la unidad no debe verse afectado en altitudes de hesta 7.000 pies. Pare operar la unidad en alturas superiores a los 7.000 pies, consulte con el personal de su tienda centro de servicio Sears m&s cer- ceno, IMPORTANTE: Nunca trete de modificar...
- Page 63 Craftsman No. 3550. AAada es- NOTA: Pare evitar daSo sl motor (si el quita- tabilizador de combustible ala centidad nieves no se usa pot mas 30 dlas) siga los...
- Page 64 IIf_*!:] Ir*_lm] : 11 I[o[o__*l ! VA_*ToKo] _Ih'dl:t :1-.U_*! :tr_*T_ [ o]_I m] _ \vl _ :t r_l PflOBLEMA CAUSA COflflECClON Dificultad para Bujia defectuosa, Reemplaee la bujia defectuesa. arrancar Agua o suciedad en el sistema Vacie y limpie el tanque de de combustible, combustible;...
- Page 65 SEARS, ROEBUCK Garantia limitada de cumplimiento con el Sistema Federal de control de emisiones y con el sistema de control de emisiones del Estado de California Motores pequeflos no aptos para carretera (off-road) CONTROL DE EMISIONES DE SISTEMA PARA EL CONTROL DE CALIFORNIA Y DE LA AGENCIA DE EMISIONES DEL FABRICANTE...
- Page 66 Sears, Roebuck and Co. o a Sears, Roebuck A. CAMPO DE APLICACION: Esta garantia and Co. al 1-800-473-7247 (llamada gratuita debera aplicarse a los motores peque5os pare en E.U.A.). vehiculos off-road modelo 1995 y modelos de ar_os posteriores en California (para otros es- NOTA IMPORTANTE tados, motores modelo 1997 y modelos de...
- Page 67 Garantfa SCE debera garantizarse pot elresto aprobada por Sears, Roebuck and Co. para del P eriodo delamisma. utilizarse en el desempeSo de cualquier man- tenimiento o cambio de la Garantfa SCE, la 3.Cualquier parte g arantizada yrelacionada coal se proporcionarA sin cargo alguno para el con emisiones que seespecifique para c am-...
- Page 68 Your Home For repair - in your home - of all major brand appliances, lawn and garden equipment, or heating and cooling systems, no matter who made it, no matter who sold it! For the replacement parts, accessories and owner's manuals that you need to do-it-yourself. For Sears professional installation of home appliances and items like garage door openers and water heaters.
Need help?
Do you have a question about the 536.885203 and is the answer not in the manual?
Questions and answers