Advertisement
Available languages
Available languages
Quick Links
BRiGGS
& STRATTON
Before using this product,
read this manual and follow all
I_!_J_ WARNING
Safety Rules and Operating
Instructions.
ADVERTENCIA
Antes de utilizar el producto,
lea este manual y siga todas [as
Reglas de Segur[dad
e Instrucc[ones
de Uso.
BP, IGGS
& STRATTON
POWER
PRODUCTS
GROUP,
LLC
JEFFERSON,WiSCONSiN,
U.S.A.
Manual
No, [99399GS
Revision
- (04/05/2006)
Advertisement

Related Manuals for Briggs & Stratton 30320


Summary of Contents for Briggs & Stratton 30320
- Page 1 BRiGGS & STRATTON ADVERTENCIA I_!_J_ WARNING Before using this product, read this manual and follow all Antes de utilizar el producto, lea este manual y siga todas [as Safety Rules and Operating Instructions. Reglas de Segur[dad e Instrucc[ones de Uso. BP, IGGS &...
-
Page 2: Symbols And Meanings
SAVE THESE INSTRUCTIONS TABLE OF CONTENTS SAFETY RULES Safety Rules ........Features and Controls ......This isthe safety alert symbol. Itisused to alert you to potential personal iniury hazards. Assembly ........Obey all safety messages that follow this Operation ........8-II symbol to avoid possible iniury or death. - Page 3 WARNING WARNING Operate generator ONLY outdoors. WHEN ADDING OR DRAINING FUEL Turn generator OFF and let it coo[ at [east 2 minutes before Keep exhaust gas from entering a confined area through windows, doors, ventilation intakes or other openings. removing fuel cap. Loosen cap slowly to relieve pressure in tan[<.
- Page 4 CAUTION WARNING DO NOT tamper with governed speed. Generator supplies correct rated frequency and voltage when running at governed WHEN ADJUSTING OR MAKING REPAIRSTO¥OUR spee& GENERATOR DO NOT modify generator in am/way. Disconnect the spar[< plug wire from the spar[< plug and place the wire where it cannot contact spark plug.
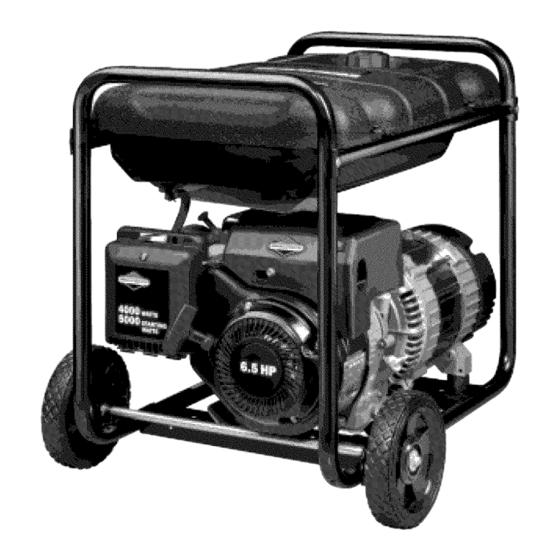
- Page 5 KNOWYOUR GENERATOR Read this operator's manua[ and safety fumes before operating your generator. Compare the illustrations with your generator to famiIhrize yourself with the locations of various controls adjustments. Save this manual for future reference° Spark Arrester Muffler Fue[ Valve Fuel Tank On/Off Switch...
- Page 6 o 9/16" wrench ASSENBL¥ o Pliers Your generator requires some assembly and is ready for o Safety glasses use after it has been properly serviced with the Refer to Figure ( and install the wheel kit as follows: recommended oil and fuel. Tip generator so that engine end is up.
- Page 7 I0. Return generator to normal operating position (resting Type of Fuel onwheels a ndsupport leg). Always use clean, fresh, UNLEADED gasoline with a I I. Attach handle using a long (M8 x 45mm) cap screw minimum of 87 octane/87 AKI (91 RON). DO NOT and lock washer.Tighten with a 9/16"...
- Page 8 USING THE GENERATOR Generator Location Generator Clearance System 6; round WANNmNG The generator has a system ground that connects the generator frame components to the ground terminals on the AC output receptacles.The system ground is connected Keep at least 5 ft. (152 cm) clearance on all sides of generator to the AC neutral wire (see '°Equipment Description", including overhead°...
- Page 9 OPERATING WARNmNG Starting Engine Disconnect all electrical loads from generator. When starting engine, pull cord slowly until resistance is felt following start instructions: and then pull rapidly to avoid kid<bad<. Make sure unit is on a level surface. NEVER start or stop engine with electrical devices plugged in and turned on, Turn white fuel valve to"On"...
-
Page 10: Stopping The Engine
Connecting Electrical Loads Let engine stabilize and warm up for a few minutes after starting. o Plug in and turn on the desired J2OVokAC, single phase, 60 Hz electrical loads. o DO NOT connect 240Voff loads to the J20Vok duplex than generator or receptacle can supply. - Page 11 DON'T OVERLOAD Plug in and turn on the next load. Again, permit the generator to stabilize. Repeat steps 4 and 5 for each additional load. NEVER add more loads than the generator capacity.Take special care to consider surge loads in generator capacity, C adty as described...
-
Page 12: Specifications
ENGINE TECHNICAL PRODUCT INFORMATION SPECIFICATIONS This is a single cylinder, overhead vaIve(OHV), air cooled Generator Specifications engine. [t is a low emissions engine. Starting _attage ......5,000 Watts In the State of California, Model Series J20000 engines are _attage ......4,000 _atts certified by the Ca[ffornh Air Resources Board to meet emissions standards for 125 hours. -
Page 13: Maintenance
GENERAL environment where it will not be exposed to excessive dust, dirt, moisture or any corrosive vapors. Cooling air R :COMMENDAT[ONS slots in the generator must not become dogged with snow, [eaves, or any other foreign material ReguJar maintenance will improve the performance Check the cleanliness of the generator frequently and dean... -
Page 14: Air Cleaner
25 psi) to blow Use low pressure air (not to exceed NOTE: Synthetic oil meeting ILSAC GF-2,API certification away dirt. Inspect cooling air slots and openings on the mark and API service symbol with "SJiCF ENERGY generator.These openings must be kept clean and CONSERVING"... -
Page 15: Servicing Spark Plug
To service the air deaner, follow these steps: Clean area around oil drain plug.The oil drain plug is located at base of engine, opposite carburetor. Loosen screw and tilt cover down (Figure 10). Remove oil drain plug and drain oil completely into a Ii_, suitable container. -
Page 16: Cooling System
C[ean Cooling System WARNmNG Over time debris may accumulate in cylinder cooling fins and cannot be observed without partial engine disassembly. For this reason, we recommend you have a authorized service dealer clean the cooling system (Figure 13) per recommended intervals (see "Maintenance Schedule"... - Page 17 Run engine outdoors for several minutes to be sure treated fuel has replaced untreated fuel in carburetor. The generator should be started at least once every seven If fuel preserver is not used, then always remove all fuel from tank and run engine until it stops from lack of fuel.
-
Page 18: Troubleshooting
TROUBLESHOOTING ProbRem Correction Cause Reset circuit breaker. One of the circuit breakers is open. Fault in generator. Contact authorized service facility. Engine is running, Poor connection or defective cord set. Check and repair. AC output is available. Connected device is bad. Connect another device that is in... - Page 19 NOTES...
- Page 20 Briggs & Stratton Corporation (B&S), the CaHforniaAir Resources Board (CARB) and the United States Environmenta[ Protection Agency (U°S° EPA) Emissions Contro[ System Warranty Statement (Owner's Defect Warranty Rights and Obmigations) California_ United States and Canada Emissions Controm Fuel Metering System Defects Warranty Statement...
- Page 21 Emissions Durabimity Period and Air Emissions Compliance Period [ndex [nformation On Your Engine Engine Emissions Compliance Label Emissions Label After July l, 2000 certain Brigs & Stratton engines will be certified to meet the United States Environmental Protection Engines that are certified to meet the California Air Resources...
- Page 22 NOTES...
- Page 23 Effective February 1, 2006 replaces all undated Warranties and all Warranties dated before February 1, 2006 LmMmTED WARRANTY Briggs & Stratton Power Products Group, LLC will repair or replace, free of charge, any part(s) of the portable generator that is defective in material or workmanship or both.
- Page 24 CONSERVE ESTAS [NSTRUCC[ONES TABLA DE CONTENmDOS REGLAS DE SEGURIDAD Reg[as De Seguddad ........ 24-26 Este es el simbo[o de a[erta de seguridad, Sirve Conozca Su Generador ........ para advertir a[ usuario de un posible riesgo para Montaje .......... 28-29 su integridad fisica.
- Page 25 ADVERTENCmA ADVERTENCmA Opere el generador SOLAHENTE a[ aire libre. CUANDO ANADA COMBUSTIBLE O VACiE EL DEP6SITO Asegu]rese de que los gases de escape no puedan entrar por ventanas, puertas, tomas de aire de vendHad6n u otras aberturas en un espado •...
- Page 26 ADVERTENCmA PRECAUCmON NO cambie ninguna veHocidad decerminada. EH generador suminiscra una frecuencia y un voHcaiecaHificado cuando funciona a una veHocidad determinada. CUANDO A]USTE O FiAGA REPARACmONES A SU GENERADOR NO modifique aHgenerador en ninguna forma. Siempre desconecte eHaHambrede Habuiia y coH6queHo donde no PRECAUCmON pueda encrar en concacco con Habuiia.
- Page 27 CONOZCA $U GENERADOR Lea este manua[ deJ operario y [as reglas de seguridad antes de operar su generadoro Compare [as i[ustradones con su Generador para famiharizarse con [as ubicadones de los diferentes contro[es 7 ajustes. Conserve este manual para referendas futuras.
- Page 28 " A[icates " Gafas de seguridad Su generador requiere dedertos p roce@mientos demontaie Consu[te [a Figura [4 e insta[e e[ iuego de ruedas solo estar_ hsto para set udhzado despues de haber[e conforme a [as [nstrucc[ones s[gu[entes: suministrado servido con e[ combustible y aceite recomendados.
- Page 29 [0. Vuelva aco[ocar elgenerador en[aposid6n normal de Tipo de gasolina fundonamiento (apoyado en[as ruedas y[apata deapoyo). Utilice siempre gaso[ina sin p[omo [impia y nueva con un I I. File elasa con uno torni[[o d ecabeza largos (H8 x 45ram) m_ximo de 87 octanos/87AKI (91 RON).
- Page 30 OEL GENERADOR Ubicaci6n de[ Generador Espacio Libre Airededor Generador Tierra de[ Sistema ADVENTENCmA E[ generador dispone de una conexi6n a qerra del sistema que conecta los componentes de[ basddor a bs terminales de derra de bs enchufes hembra de salida de CA. La qerra de[ sistema est_ conectada a[ came de CA neutro que, a su vez, est_...
- Page 31 OPERANDO EL GENE DOR ADVERTENCmA Endenda e[ Motor Desconecte todas hs cargas el6ctricas de[ generadon Use hs siguientes instrucdones para encender: Aseg_rese de que [a unidad est_ en una superfide plana. Cuando arranque el motor, tire [entamente de[ cable hasta sentir SitQe [a v_lvula de combustible blanca en [a posid6n "On"...
- Page 32 RECEPTACULOS Cone×ion De Cargas EUectricas Deje que e[ motor se estabi[ice y se cahente por unos minutos despu_s de[ arranque. Conecte y endenda [as cargas electricas de [ 20Vo[tios monof_sicas de 60 Hz gue desse. NO conecte cargas de 240Vo[tios a tomacorrientes NUNCA intente...
- Page 33 SOBRECARGUE GENE DOR Conecte y encienda [a pr6xima carga. De nuevo, permita que e[ generador se estabi[ice. Capacidad Repita los pasos 4 y 5 para cada carga adiciona[ que usted tenga. Usted debe asegurarse que su generador puede proveer sufidente vataje calificado (cuando este fundonando) y de carga NUNCA...
- Page 34 mNFORMACm6N T :CNmCA SOBRE ESPECmFmCACmONES Dr:L EL MOTOR El motor es de uno dlindros, de v_Nuhs en cabeza (OHV), Especificaciones de[ Generador refrigerado pot aire y de baja emisi6n. En e[ Estado de California, los motores de h serie [ 20000 han Vata]e .......
- Page 35 RECOMENDACmONE$ EPJ ,LES Revise frecuentemente [a [impieza de[ generador y [[mpie[o cuando este con po[vo, sucio, con aceite, humedad, o cuando otras E[ mantenimiento peri6dico mejorarS, el ren@miento y prolongarS. substancias extra,as sean visib[es en su superficie exterion [a vida 6ti[ del generadonAcuda a un distribuidor autorizado para...
- Page 36 Puede usar aire a ba[a presi6n (que no exceda los 25 psi) para NOTA: Todo aceite sint6dco que cump[a [as especificaciones e[iminar [a sudedado Inspecdone [as ranuras para aire de ILSAC GF-2, con marca de cerdficaci6n API y con simbolo enfriamiento y [a apertura de[ generador,...
- Page 37 Para revisar el filtro de aire, siga estos pasos: Limpie [a zona de alrededor de[ tap6n de vaciado de aceite, situado en [a base de[ motor, a[ otto [ado de[ carburadol_ Afloje el torniHo e incline [a tapa hacia abajo (Figura 23). Quite e[ tap6n de [[enado de aceite...
- Page 38 Sistema de Refrigeraci6n de Aire ADVERTENCmA Con el tiempo+ se pueden acumuhr residuos en [as aletas de refrigeraci6n del cilindro y pasar inadvertidos mientras no se desmonte parcialmente el motor. Recomendamos que encargue h limpieza del sistema de refrigeraci6n (Figura 26) a un distribuidor de servicio siguiendo los intervalos recomendados (consulte...
- Page 39 ALMACENAMiENTO Ponga en funcionamiento e[ motor en un _rea descubierta varios minutos para asegurarse de que [a gaso[ina tratada E[ generador deberS_ ser encen@do a[ menos una vez cada s[ete remp[azado [a gaso[ina no tratada de[ carburador. d[as Y deber_ dejar[o fundonar a[ menos durante 30 m[nutos.
- Page 40 DIAGNO$ITICO$ DE AVERiA$ Accion Prob[emo Ca.usa Reposidone el interrupton E[ interruptor autom_tico de circuito estk abierto, E[ motor est_ funcionando Revise y repare. Conexi6n ma[ o defectuosa de[ [uego de cables. pero no ex[ste sa[ida de AC disponsib[e. E[ dispositivo conectado est_ daSado.
- Page 42 Briggs & Stratton Corporation (B&S), el Ca[iforniaAir Resources Board (CARB, Consejo de recursos de aire de California) y [a United States Environmental Protection Agency (U.S. EPA,Agencia estadounidense de protecci6n de[ medioambiente) Garantia de[ sistema de control de emisiones (Garantia contra defectos_ derechos y ob[igaciones...
- Page 43 |nformad6n sobre e[ peHodo de durabiUidad PerJodo de cump[[m[ento de [a normat[va de [as ÷misiones y e[ _ndice de aire en [a em[s[ones en [a et[queta de cump[[m[ento de em[s[ones de[ motor etiqueta de emisiones de[ motor Los motores con cerdficad6n de cump[imiento de [a normativa sobre...
- Page 44 Fecha deentrada en vigor:l de Febrero de 2006, Sustituye a todas las garantias sin fecha y a las de fecha anterior at 1 Febrero de 2006 GARANTiA LmMmTADA Briggs & Stratton Power Products Group, LLC reparara o sustituira sin cargo alguno cualquier componente del generador portatil que presente defectos de materiales y/o mano de obra.
Need help?
Do you have a question about the 30320 and is the answer not in the manual?
Questions and answers