Table of Contents
Advertisement
Installer: Leave this manual with the appliance. Consumer: Retain this manual for future reference.
UNVENTED NATURAL GAS FIRED ROOM HEATER
Blue Flame Heaters
Model #
MHBF6NG
MHBF10NG/HSBF10NG/TSBF10NG
MHBF20NGT/HSBF20NGT/TSBF20NGT
MHBF30NGT/HSBF30NGT/TSBF30NGT
MHBF30NGT/
HSBF30NGT/
TSBF30NGT
MHIR30NGT/
HSIR30NGT/
TSIR30NGT
WARNING: If the information in this manual is not followed exactly, a fire or explosion may result causing
property damage, personal injury, or loss of life.
- Do not store or use gasoline or other flammable vapors and liquids in the vicinity of this or any other appliance.
- WHAT TO DO IF YOU SMELL GAS
• Shut off gas supply
• Do not try to light any appliance
• Do not touch an electrical switch; do not use any phone in your building.
• Immediately call your gas supplier from a neighbor's phone. Follow the gas supplier's instructions.
• If you cannot reach your gas supplier, call the fire department.
- Installation and service must be performed by a qualified installer, service agency, or the gas supplier.
WARNING: This is an unvented gas-fired heater. It uses air (oxygen) from the room in which it is installed. Pro-
visions for adequate combustion and ventilation air must be provided. Refer to Fresh Air for Combustion and
Ventilation section on page 3 of this manual.
WARNING: Improper installation, adjustment, alteration, service or maintenance can cause injury or property
damage. Refer to this manual for correct installation and operational procedures. For assistance or additional
information consult a qualified installer, service agency, or gas supplier.
ENERCO GROUP, INC., 4560 W. 160
INSTALLATION INSTrucTIONS
ANd OwNer'S MANuAL
reAd INSTrucTIONS cAreFuLLY: Read and follow all instructions. Place instruc-
tions in a safe place for future reference. Do not allow anyone who has not read
these instructions to assemble, light, adjust or operate the heater.
Burn Rate
6,000 Btu/hr
10,000 Btu/hr
20,000 Btu/hr
30,000 Btu/hr
MHBF20NGT/
HSBF20NGT/
TSBF20NGT
MHIR20NGT/
HSIR20NGT/
TSIR20NGT
Unvented Natural Gas Fired Room Heater
TH
ST., CLEVELAND, OHIO 44135 · 216-916-3000
Plaque Heaters
Model #
MHIR10NG/HSIR10NG/TSIR10NG
MHIR20NGT/HSIR20NGT/TSIR20NGT
MHIR30NGT/HSIR30NGT/TSIR30NGT
1
Installation Instructions and Owner's Manual
Serial numbers on back cover.
Burn Rate
10,000 Btu/hr
20,000 Btu/hr
30,000 Btu/hr
MHBF6NG/
MHBF10NG/
HSBF10NG/
TSBF10NG
MHIR10NG/
HSIR10NG/
TSIR10NG
70574
Rev.G 03/09
Advertisement
Table of Contents

Related Manuals for Enerco UNVENTED NATURAL GAS FIRED ROOM HEATER HSBF10NG


Summary of Contents for Enerco UNVENTED NATURAL GAS FIRED ROOM HEATER HSBF10NG
-
Page 1: Installation Instructions
Refer to this manual for correct installation and operational procedures. For assistance or additional information consult a qualified installer, service agency, or gas supplier. Unvented Natural Gas Fired Room Heater ENERCO GROUP, INC., 4560 W. 160 INSTALLATION INSTrucTIONS ANd OwNer’S MANuAL reAd INSTrucTIONS cAreFuLLY: Read and follow all instructions. - Page 2 This appliance may be installed in an aftermarket* permanently manufactured (mobile) home, where not prohibited by local codes. This appliance is only for use with the type of gas indicated on the rating plate. This appliance is not convertible for use with any other gas. *Aftermarket completion of sale, not for the purpose of resale, from the manufacturer.
-
Page 3: Local Codes
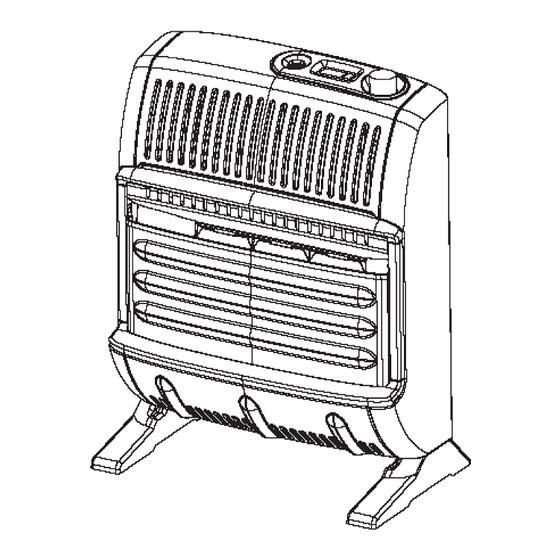
odor is detected. Make certain you read and under- stand all warnings. Keep this manual for reference. It is your guide to safe and proper operation of this heater. Product Features Ignitor Button Room Temperature Thermometer LED Blower Switch Burners Grill Front Panel Figure 1... -
Page 4: Determining The Type Of Heater Location Space
5.3 or applicable local codes. 3. Add the Btu/hr of all the fuel-burning appliances in the space such as, Vent–free heater, Gas water heater, Gas furnace, Vented gas heater, Gas fire- place logs, and Other gas appliances* *Do not include direct-vent gas appliances. Direct- vent draws combustion air from the outdoors and vents to the outdoors. -
Page 5: Installation
VENTILATION AIR OUTLET AIR OUTLET INLET VENTILATION CRAWL SPACE Figure 3. Ventilation from Outdoors If necessary provide extra fresh air by using ventila- tion grills or ducts. Connect these items directly to the outdoors or spaces open to the outdoors. These include attics* and crawl spaces. -
Page 6: Fastening Heater To Wall
6” Min from adjoining walls Left Side Floor 2” min. to top surface of carpet, tile or other combustible material Figure 4 FASTENING HEATER TO WALL Mounting Bracket The mounting bracket in located on the back panel of heater (see figure 5). It has been taped there for ship- ping. -
Page 7: Floor Mounting Away From Wall
1. Drill holes at marked locations using 5/16” drill bit. For solid walls (concrete or masonry), drill at least 1” deep. 2. Fold wall anchor as shown in figure 8 below. Figure 8. 3. Insert wall anchor (wings first) into hole. Tap anchor flush to wall. -
Page 8: Checking Gas Connections
WARNING: This appliance requires a 3/8” NPT (National Pipe Thread) inlet connection to the pressure regulator. Use of floor mounting feet will require you to use a 3/8 NPT street elbow to make gas connection. CAUTION: Never connect heater to private (non-utili- ty) gas well. -
Page 9: Electrical Wiring Diagram
Pressure Testing Heater Gas Connections: 1. Make sure that the heater supply piping sys- tem is connected and has been leak tested as described above. 2. Make sure control knob of heater is in OFF position. 3. Open equipment shutoff valve (see figure 13). 4. -
Page 10: Lighting Instructions
C. Use only your hand to push in or turn the gas control knob. Never use tools. If knob will not push in or turn by hand, don’t try to repair it; call a qualified service technician or gas supplier. Force or attempted repair may result in a fire or explosion. -
Page 11: For Your Safety Read Before Lighting
WARNING: When running heater, set control knob at “LO” or “HI” locked positions. Poor combustion and higher levels of carbon monoxide may result if heater is operated with control knob positioned between locked positions. IMPORTANT: Release downward pressure while turn- ing control knob. -
Page 12: Thermostat Control Operation
• If pilot does not stay lit, refer to Troubleshoot- ing, pages 14 & 15. Also, contact a qualified service person of gas supplier for repairs. • If control knob does not pop up when released, contact a qualified service person or gas sup- plier for repairs. -
Page 13: Cleaning And Maintenance
Figure 24b CLEANING AND MAINTENANCE WARNING: Turn off heater and let cool before servicing. CAUTION: You must keep control areas, burner and circulation air passageways of heater clean. Inspect these areas of heater before use. Have the heater inspected yearly by a qualified service person. -
Page 14: Troubleshooting
TROUBLESHOOTING NOTE: All troubleshooting items are listed in order of operation and likely occurrence. WARNING: Only a qualified service person should service and repair heater. CAUTION: Never use a wire needle, or similar object to clean ODS/pilot. This can damage ODS/pilot unit. Make sure grille guard is in place before running heater. - Page 15 TROUBLESHOOTING CON’T OBSERVED SYMPTOM 1. Burner orifice is clogged or damaged Burner backfiring during opera- tion 2. Burner damaged 3. Gas regulator defective 1. Plaque damaged Burner plaque(s) does not glow 2. Control knob set between locked posi- [Infrared Only] tions.
-
Page 16: Specifications
SPECIFICATIONS BTU (Available) Type of Gas Ignition Pressure Regulator Setting Inlet Gas Pressure (Maximum) Inlet Gas Pressure (Minimum) Electrical Rating /Blower Burners / Orifice nozzles Thermostatic Control Clearances: inches (mm) Sides Floor (min. to top of carpet) Fabric / flammable objects BTU (Available) Type of Gas Ignition... - Page 17 Thermostat models BF20NGT BF30NGT IR20NGT IR30NGT 16-1 16-2 Unvented Natural Gas Fired Room Heater 22-1 16-1 33-1 22-3 22-1 33-1 27-1 28-1 22-2 Installation Instructions and Owner’s Manual 16-2 27-2 28-2 22-2 22-3...
- Page 18 For all models, Equipment shutoff valve with 1/8” NPT tap. IR20NGT, IR30NGT, BF20NGT, BF30NGT, BF20NGT, BF30NGT • PARTS LIST This list contains replacement parts used in your heater. When ordering parts, follow the instructions listed under Replacement Parts on page 20 of this manual. ITEM PART NO.
- Page 19 ITEM PART NO. IR20NGT BF20NGT – – 70677 – 70677 – 70678 – 70678 – 70701 70701 70702 70702 70597 70597 70590 70590 70680 70680 70679 70679 70689 – 70690 – – – 70691 – 70695 70695 70697 70697 70698 –...
- Page 20 IR10NG, BF6NG and BF10NG • This list contains replacement parts used in your heater. When ordering parts, follow the instructions listed under Replacement Parts on page 20 of this manual. ITEM PART NO. IR10NG BF6NG 70300 70300 70301 70301 70302 70302 70303 70303...
- Page 21 NON-Thermostat models IR10NG BF6NG BF10NG Unvented Natural Gas Fired Room Heater 22-1 22-3 16-1 16-2 22-1 16-2 22-3 Installation Instructions and Owner’s Manual 29-1 27-2 4 16-1...
-
Page 22: Replacement Parts
Purchase these heater accessories from your local dealer. If they can not supply these accessories, con- tact your nearest Parts Central or call Enerco Group, Inc.’s 800# for information. You can also write to the address listed on the front page of this manual. - Page 23 NOTES Unvented Natural Gas Fired Room Heater Installation Instructions and Owner’s Manual...
-
Page 24: Warranty Information
We make no other warranty, expressed or implied. Enerco Group, Inc. warrants this product to be free from defects in materials and components for two (2) years from the date of first purchase, provided that the product has been properly installed, operated and maintained in accor- dance with all applicable instructions.
Need help?
Do you have a question about the UNVENTED NATURAL GAS FIRED ROOM HEATER HSBF10NG and is the answer not in the manual?
Questions and answers