Table of Contents
Advertisement
Available languages
Available languages
Quick Links
INSTALLATION INSTRUCTIONS
PART # GA6050
PART # GA6052
PART # GA6053
Remove the contents of the fireplace hood kit.
Check for any missing or damaged parts. If any
parts are missing or damaged, promptly inform
the dealer where you bought this kit.
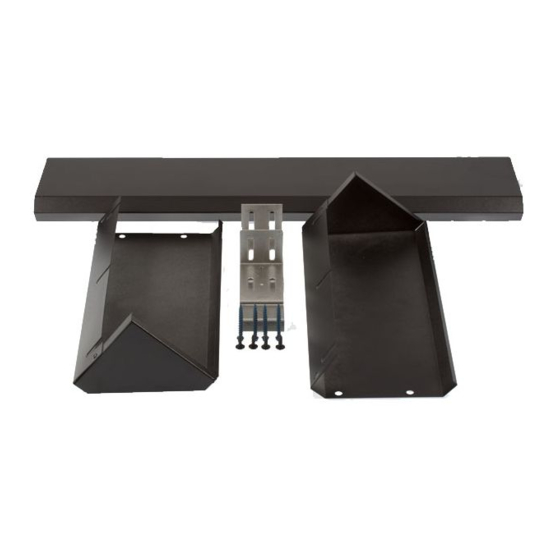
Fireplace Hood Kit Contents:
• 1-Fireplace Hood (consists of center-hood sec-
tion and two adjustable outer-hood sections)
• 4-Sheet Metal Screws
• 4-Masonry Screws
• 2-Mounting Brackets
NOTICE: Read this entire instruction sheet before
installing the fireplace hood.
SIZING THE FIREPLACE HOOD
TO THE FIREPLACE OPENING OR
GLASS DOOR FRAME
The fireplace hood is adjustable from 28 to 48
inches. You must open hood wide enough to
cover the entire fireplace opening. You can open
hood wider if desired. For best appearance, make
sure center section of hood is centered with the
fireplace opening.
Follow the instructions below to properly size the
fireplace hood.
1. Measure width of fireplace opening or glass
door frame (see Measurement "A", Figure 1).
Use work space below to figure proper size for
fireplace hood.
Measurement "A"
Subtract 24 inches
(width of hood center section) ___________
Subtotal = _______________
Divided by 2
Measurement "B" = _______________
Measurement "B" is the distance from the
outside edges of center-hood section to outside
edges of adjustable outer-hood sections (see
Figure 2). When adjustable outer sections are
extended to this measurement, hood will be
correct size. The overall width of the hood will
equal the width of the fireplace opening. If you
have glass doors and would like the hood to
hang beyond the edge of the door frame, add
1/2 inch to measurement "B". Make sure that
hood provides room for opening doors.
FIREPLACE HOOD
FLAT BLACK ENAMEL
POLISHED PLATED BRASS
ANTIQUE PLATED BRASS
_______________
_______________
2. If hood is brass, remove all protective film
from brass.
3. Place center-hood section face down on a
smooth, soft surface.
4. Measure in from outside ends of adjustable
outer-hood sections. Place a piece of tape on
bent-under flange of adjustable outer-hood
sections to mark the distance of Measurement
"B" (see Figure 3).
Measurement "A"
Fireplace Opening
Measurement "A"
Glass Door Frame
Figure 1 - Measurement "A"
Center-Hood
Section
Figure 2 - Measurement "B"
Measurement "B"
Tape
Figure 3 - Mark for Measurement "B"
Measurement "B"
Adjustable Outer-Hood
Sections
Adjustable Outer-
Hood Section
Advertisement
Table of Contents

Related Manuals for Desa GA6050


Summary of Contents for Desa GA6050
-
Page 1: Installation Instructions
FIREPLACE HOOD INSTALLATION INSTRUCTIONS PART # GA6050 FLAT BLACK ENAMEL PART # GA6052 POLISHED PLATED BRASS PART # GA6053 ANTIQUE PLATED BRASS Remove the contents of the fireplace hood kit. 2. If hood is brass, remove all protective film Check for any missing or damaged parts. If any from brass. - Page 2 5. Slide the adjustable outer-hood sections into the center section. Stop when edge of center-hood section is even with tape (see Figure 4). 6. Place pieces of tape across adjustable outer- Bottom of hood sections and center-hood section to hold Mounting in place.
- Page 3 3. Remove mounting brackets and drill a 5/32 Fireplace inch diameter hole into fireplace lintel at each marked location. 4. Use the masonry screws provided to fasten brackets to lintel (see Figure 9, page 2). Fireplace 5. Slide hood over mounting brackets (see Cross Figure 10).
- Page 4 4. Remove mounting brackets and drill a 1/8 inch Manufactured Fireplace diameter hole into fireplace housing at each marked location. 5. Use the sheet metal screws provided to fasten brackets to fireplace housing (see Figure 12, page 3). Approximate Screw 6.
- Page 5 INSTRUCTIVO PARA LA INSTALACIÓN DE LA CUBIERTA DE CHIMENEA PARTE # GA6050 PLANA COLOR NEGRO ESMALTADO PARTE # GA6052 CHAPA DE LATÓN BRILLANTE PARTE # GA6053 CHAPA DE LATÓN ANTIGUO Saque el contenido del paquete de cubierta de La longitud total de la cubierta será igual al chimenea.
- Page 6 5. Deslice las secciones laterales ajustables 2. Apriete las abrazaderas del dintel de la puerta por dentro de la sección central. Detenga las de vidrio. Así, los soportes de montaje se secciones cuando el borde de la sección se fijarán en su sitio. alinee con la cinta (consulte la figura 4).
- Page 7 Chimenea Corte transversal de la chimenea Montaje de la cubierta de latón en la superficie de la chimenea Chimenea Figura 10 - Ubicación de la cubierta en Cubierta de latón una chimenea de mampostería para chimenea INSTALACIÓN DE LA CUBIERTA EN UNA CHIMENEA MANUFACTURADA Corte transversal...
- Page 8 3. Marque la ubicación de los tornillos a través Chimenea manufacturada de las ranuras de los soportes de montaje. 4. Quite los soportes de montaje y perfore un orificio de 3 mm (1/8 de pulgada) en cada marca a través de la cavidad de la chimenea. 5.
Need help?
Do you have a question about the GA6050 and is the answer not in the manual?
Questions and answers