Table of Contents
Advertisement
OWNER'S
MANUAL
DVD PLAYER with VIDEO CASSETTE RECORDER
EWD2202
INSTRUCCIONES EN ESPAÑOL INCLUIDAS.
EMERSON AND THE G-CLEF LOGO ARE REGISTERED
TRADEMARKS OF EMERSON RADIO CORP., PARSIPPANY,
NEW JERSEY, U.S.A.
If you need additional assistance for set-up or operating
after reading owner's manual, please call
TOLL FREE : 1 - 800 - 256-2487
Please read before using this equipment.
Advertisement
Table of Contents

Related Manuals for Emerson EWD2202


Summary of Contents for Emerson EWD2202
- Page 1 MANUAL DVD PLAYER with VIDEO CASSETTE RECORDER EWD2202 INSTRUCCIONES EN ESPAÑOL INCLUIDAS. EMERSON AND THE G-CLEF LOGO ARE REGISTERED TRADEMARKS OF EMERSON RADIO CORP., PARSIPPANY, NEW JERSEY, U.S.A. If you need additional assistance for set-up or operating after reading owner’s manual, please call TOLL FREE : 1 - 800 - 256-2487 Please read before using this equipment.
-
Page 2: Laser Safety
WARNING : TO REDUCE THE RISK OF FIRE OR ELECTRIC SHOCK, DO NOT EXPOSE THIS APPLIANCE TO RAIN OR MOISTURE. CAUTION RISK OF ELECTRIC SHOCK DO NOT OPEN CAUTION : TO REDUCE THE RISK OF ELECTRIC SHOCK, DO NOT REMOVE COVER (OR BACK). NO USER SER- VICEABLE PARTS INSIDE. -
Page 3: Important Safeguards
IMPORTANT SAFEGUARDS 1. Read Instructions - All the safety and operating instruc- tions should be read before the appliance is operated. 2. Retain Instructions- The safety and operating instructions should be retained for future reference. 3. Heed Warnings - All warnings on the appliance and in the operating instructions should be adhered to. -
Page 4: About Copyright
A NOTE ABOUT RECYCLING This product’s packaging materials are recyclable and can be reused. Please dispose of all materials in accordance with your local recycling regulations. Batteries should never be thrown away or incinerated but disposed of in accordance with your local regulations concerning chemical wastes. -
Page 5: Table Of Contents
LASER SAFETY ........2 IMPORTANT SAFEGUARDS ......3 ABOUT COPYRIGHT . -
Page 6: Features
Mode ¡ Dolby Digital sound This player can handle Dolby Digital surround sound with 5.1 channels when connected to a Dolby Digital decoder. ¡ Still/fast/slow/step playback Various playback modes are available including still pic- tures, fast forward/reverse, slow motion and step frames. ¡... -
Page 7: Precautions
Mode Hardware specifications ¡ Auto Head Cleaner ¡ 4 Head HiFi Stereo ¡ Bilingual on-screen menu display selectable in English, French, or Spanish ¡ 181 channel capability PLL frequency synthesiz- er tuner with direct station call (A cable converter box may be necessary to view scram- bled cable channels.) Automatic functions ¡... -
Page 8: About The Discs
PLAYABLE DISCS The following discs can be played back on this DVD/VCR. Disc Type Logo Contents Disc Size 12 cm Sound Video Pictures 8 cm 12 cm Audio Sound 8 cm (singles) This player conforms to the NTSC color system. You can- not play discs recorded in other color systems such as PAL or SECAM. -
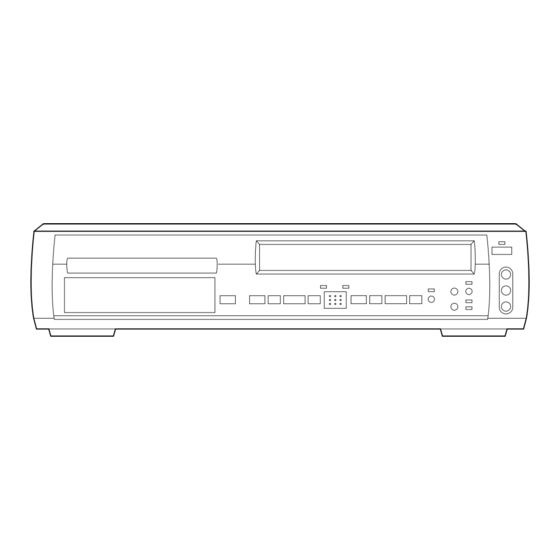
Page 9: Operating Controls And Functions
OPERATING CONTROLS AND FUNCTIONS FRONT PANEL REMOTE CONTROL SPEED AUDIO POWER SKIP/CH. VCR/TV +100 SLOW DISPLAY PAUSE PLAY STOP RECORD MENU ENTER SETUP TITLE RETURN SEARCH CLEAR/ MODE ZOOM MODE C.RESET SUBTITLE ANGLE REPEAT 1. Disc loading tray 2. DVD OUTPUT Light (Green) [page 13] This light appears when the DVD/VCR is in DVD mode. - Page 10 example: setting clock or timer program). Press to add or delete channel numbers during channel preset. 19. STOP/EJECT Button (VCR) [page 21] EJECT Button Press to remove the tape from the VCR. STOP Button Press to stop the tape motion. Press to enter digits when setting program (For example:setting clock or timer program).
-
Page 11: Rear View
48. ENTER Button Press to accept a setting. 49. g Button DVD mode Press to fast forward the Disc. Press the Pause but- ton, then press the FWD button to begin slow motion playback. Press the FWD button repeated- ly to change the forward speed of slow motion. VCR mode Press to rapidly advance the tape, or view the pic- ture rapidly in forward during playback (Forward... -
Page 12: Display
and to the component Video In jacks of a televi- sion. COAXIAL Jack Connect an optional coaxial digital audio cable here and to the Coaxial Digital Audio In jack of a decoder or audio receiver. S-VIDEO OUT Jack Connect an optional S-Video cable here and to the S-Video In jack of a television. -
Page 13: Vcr/Dvd Switching
Since this product comprises VCR and DVD players, it is necessary to switch one from the other. SWITCHING TO VCR MODE Press the VCR button on the remote control. (Verify that the VCR OUTPUT Light is lit.) Press the OUTPUT button on the front panel, and then press the VCR Button on the remote control. -
Page 14: Hookups
DVD/VCR TO TV CONNECTION 1. Disconnect the AC power cord of the TV from the AC outlet. 2. Disconnect the antenna or cable from the TV. 3. Connect the antenna or cable to the ANT-IN jack of the DVD/VCR. 4. Connect the DVD/VCR to the TV using the coaxial cable. -
Page 15: Deck
FOR TVs WITH COMPONENT VIDEO IN JACKS Use a component video cable (commercially available) in place of the yellow video cable to enjoy higher qual- ity pictures. The component video connection only supplies video (picture) in the DVD mode of the DVD/VCR. Therefore, in order to use the VCR features or view TV channels at the DVD/VCR, you still need to either connect the RF coax- ial cable between the ANT-OUT jack of the DVD/VCR and the TV’s Antenna In jack, or connect the yellow video cable as described earlier (Fig. -
Page 16: Connecting To A Dolby Digital Decoder Or Dts Decoder
CONNECTING TO A DOLBY DIGITAL DECODER OR DTS DECODER If using this DVD/VCR to play a DVD disc in 5.1 channel Dolby Digital surround, or DTS surround formats, the DVD/VCR outputs a Dolby Digital, or DTS data stream from its COAXIAL DIGITAL AUDIO OUT jack. By hooking the DVD/VCR up to a Dolby Digital or DTS decoder, you can enjoy a more convincing, realistic ambience with powerful and high-quality surround sound of a professional standard such as can be heard in movie theaters. -
Page 17: Setup
AUTOMATIC CHANNEL SET UP The DVD/VCR can automatically program the tuner to scan only the channels which are available in your area. ¡ Channel memory programming is NOT needed when the DVD/VCR is connected to a cable box or a satellite box as in "DVD/VCR TO TV CONNEC- TION"... -
Page 18: To Change The On-Screen Language
TO ADD/DELETE CHANNELS When scanning, some channels may be skipped due to a weak signal. In such cases, you can add the channels to the DVD/VCR memory manually. Press the MENU button until the main menu appears. (If you have already set the clock, you only have to press it once. -
Page 19: Playback Function
NORMAL PLAYBACK Insert a prerecorded tape. The DVD/VCR will turn on, and the VCR/TV Light and the CST IN Light comes ¡ If the safety tab has been removed, the DVD/VCR will start playback automatically. Turn on the TV and set the TV to channel 3 or 4. ¡... -
Page 22: Special Features
COPYING A VIDEO TAPE You can make copies of video tapes made by friends or relatives for your enjoyment. Warning: Unauthorized recordings of copyrighted video tapes may be an infringement of copyright laws. Connect the recording DVD/VCR (this unit), the play- ing VCR (another source) and your TV using the fol- lowing diagram. -
Page 23: Auto Rewind
AUTO REWIND When a tape reaches the end during recording, play- back, or fast-forward, the tape will automatically rewind to the beginning. After rewinding finishes, the DVD/VCR will eject the tape and switch itself off. ¡ The DVD/VCR will not rewind the tape automati- cally during timer recording or One Touch Recording. -
Page 24: Using The Title Menu
USING THE TITLE MENU With a DVD containing a title menu, you can select the desired titles from the menu. Press the TITLE button. ¡ The title menu will appear. ¡ With some discs, a title menu may appear automati- cally. -
Page 25: Fast Forward/Reverse
FAST FORWARD/REVERSE Press the FWD or the REV during playback. ¡ For DVDs, pressing the FWD g or REV h but- ton cycles the playback speed in four steps. In the case of DVDs, the sound will mute. ¡ For audio CDs, the playback speed is fixed at 16. Button Press the PLAY button to return to normal playback speed. -
Page 26: Starting From A Desired Time Count
By using only the Number buttons. TITLE SEARCH: Directly enter the desired title number with the Number buttons with playback stopped. CHAPTER SEARCH: Directly enter the desired chapter number with the Number buttons when the disc is being played or paused. ¡... -
Page 27: Repeat
REPEAT Press the REPEAT button during playback. For DVDs ¡ A single title or chapter can be played back repeat- edly. ¡ Pressing the REPEAT button cycles the display on the screen as follows. REPEAT [OFF] REPEAT [CHAPTER] REPEAT [TITLE] For audio CDs ¡... -
Page 28: Program (Audio Cd)
PROGRAM (Audio CD) Press the MODE button in stop mode. ¡ The program screen will appear. Press the Number buttons to enter the desired track numbers. ¡ 50 programs can be displayed at once on the screen. Press “ ” to go to the next page. Press the PLAY button. -
Page 29: Playing An Mp3 Disc
PLAYING AN MP3 DISC Insert an MP3 file recorded on disc. ¡ The MP3 menu screen is displayed. ¡ Folders are referred to as “Albums” and files are referred to as “Tracks”. ¡ “+” appears at the beginning of the album name. ¡... -
Page 30: Playing A Desired Track From An Mp3 Disc
PLAYING A DESIRED TRACK FROM AN MP3 DISC Press the SEARCH MODE button during play- back. ¡ The SEARCH menu is displayed. ¡ The track currently being played or in RESUME ON will be highlighted. In the case of RESUME OFF, the first track of the disc will be highlighted. -
Page 31: Settings
CHANGING THE AUDIO LANGUAGE OR SOUND MODE The DVD/VCR has a function which allows you to select the desired audio language and sound mode. For DVDs Press the AUDIO button during playback. ¡ The current audio status will appear at the top. Press the AUDIO button repeatedly until you see the language of your choice. -
Page 32: Changing The Subtitle Language
CHANGING THE SUBTITLE LANGUAGE The DVD/VCR has a function which allows you to select the desired language for subtitles. Press the SUBTITLE button during playback, and then press the SUBTITLE button to select the desired subtitle language. ¡ The subtitle language can be changed if the subtitles are recorded in multiple languages on the DVD being played. -
Page 33: Changing The On-Screen Display
CHANGING THE ON-SCREEN DISPLAY You can check the information regarding the disc by pressing the DISPLAY button on the remote control. For DVDs Press the DISPLAY button during playback. CH 7/49 0:01:46 -0:03:27 CH (Chapter): Current chapter number / the total number of chapters. -
Page 34: Changing The Setup Items
CHANGING THE SETUP ITEMS LANGUAGE SETTINGS Press the SETUP button in STOP mode. ¡ The setup screen is displayed. SET-UP 1.LANGUAGE 2.DISPLAY 3.AUDIO 4.PARENTAL SELECT: EXIT: SETUP Press the buttons to select Language, and then press the ENTER button. SET-UP 1.LANGUAGE 2.DISPLAY 3.AUDIO... -
Page 35: Display Settings
DISPLAY SETTINGS Press the SETUP button in STOP mode. ¡ The setup screen will appear. SET-UP 1.LANGUAGE 2.DISPLAY 3.AUDIO 4.PARENTAL SELECT: SET: EXIT: SETUP CANCEL: Press the buttons to select DISPLAY and then press the ENTER button. SET-UP 1.LANGUAGE 2.DISPLAY 3.AUDIO 4.PARENTAL SELECT:... -
Page 36: Audio Settings
AUDIO SETTINGS Press the SETUP button in STOP mode. ¡ The setup screen will appear. Press the buttons to select Audio and then press the ENTER button. Press the buttons to select an item, and then press the ENTER button. DRC (Default: OFF) On: DRC (Dynamic Range Control) -
Page 37: Parental Lock
PARENTAL LOCK Press the SETUP button in STOP mode. ¡ The setup screen will appear. SET-UP 1.LANGUAGE 2.DISPLAY 3.AUDIO 4.PARENTAL SELECT: EXIT: Press the buttons to select PARENTAL, and then press the ENTER button. SET-UP 1.LANGUAGE 2.DISPLAY 3.AUDIO 4.PARENTAL SELECT: EXIT: SETUP Press the Number buttons to enter a 4-digit... -
Page 38: Language Code List
Language Afar Abkhazian Afrikaans Amharic Arabic Assamese Aymara Azerbaijani Bashkir Byelorussian Bulgarian Bihari Bislama Bengali; Bangla Tibetan Breton Catalan Corsican Czech Welsh Danish [DAN] German [GER] Bhutani Greek [GRE] English [ENG] Esperanto Spanish [SPA] Estonian Basque Persian Finnish [FIN] Fiji Faroese French [FRE] Frisian... -
Page 39: Troubleshooting Guide
TROUBLESHOOTING GUIDE If the DVD/VCR does not perform properly when operated as instructed in this Owner's Manual, check the player consulting the following checklist. PROBLEM No power. The player does not respond to. • Check if the power plug is connected to an AC outlet. the remote control. -
Page 40: Handling Precautions
HANDLING PRECAUTIONS SERVICING Should your DVD/VCR become inoperative, do not try to correct the problem by yourself. There are no user- serviceable parts inside. Turn off, unplug the power cord, and please call our help line at 1-800-256-2487 to locate an Authorized Service Center. CABINET CLEANING ¡... -
Page 41: Specifications
Product type: DVD player with Video Cassette Recorder Discs: DVD video Audio CD Video Cassette tape Converter output: VHF Channel 3 or 4. Power source: 120 V AC +/- 10%, 60 Hz +/- 0.5% Power consumption: 25 W (standby: 7.2 W) Operating temperature: 5°C to 40°C... -
Page 42: Panel Delantero
CONTROLES DEL FUNCIONAMIENTO Y SUS FUNCIONES PANEL DELANTERO PANEL REMOTO POWER SPEED AUDIO SKIP/CH. VCR/TV +100 SLOW DISPLAY PAUSE PLAY STOP RECORD MENU ENTER SETUP TITLE RETURN SEARCH CLEAR/ MODE ZOOM MODE C.RESET SUBTITLE ANGLE REPEAT 1. Bandeja de carga del disco 2. - Page 43 Presione detener el movimiento de la cinta. Presione para entrar dígitos cuando ajuste progra- ma. (Por ejemplo: ajuste reloj o programa con tem- porizador). Presione para seleccionar los modos de ajuste del menú en pantalla. 20. Botón OUTPUT Presione para seleccionar el modo DVD o el modo VCR. Usted puede cambiar el modo de salida ya presionando el Botón OUTPUT en el panel delantero o ya presionan- do el Botón DVD o VCR en el control remote.
- Page 44 ción. (Búsqueda en Avance). Cuando ajuste pro- grama. (Por ejemplo: ajuste reloj o programa con temporizador), presione para determinar su selec- ción y proceder al siguiente paso que usted desea entrar. Presione para determinar los modos de ajuste del menú en pantalla. Presione para añadir o cancelar números de canal durante preajuste de canal.
-
Page 45: Cambio De Vcr/Dvd
Como este producto se utiliza del reproductor VCR y DVD, es necesario cambiar uno del otro. CAMBIO AL MODO VCR Presione el Botón VCR en el control remote. (Verifique que la Luz VCR OUTPUT está enendida.) Presione el Botón OUTPUT en el panel delantero y, luego, presione el Botón VCR en el control remote. -
Page 46: Conexiones
DVD/VCR A CONEXIÓN DE TV 1. Desconecte el cordón de alimentación AC del toma de corriente AC. 2. Desconecte la antena o cable del TV. 3. Conecte la antena o cable a la toma ANT.IN del DVD/VCR. 4. Conecte el DVD/VCR al TV utilizando el cable coaxi- 5. -
Page 47: Preparación De Reloj
PREPARACIÓN DE RELOJ Ajuste el reloj con precisión para grabación con tempo- rizador automática adecuada. Le sugerimos que usted utilice un TV o estación de radio como su fuente de tiempos. Presione [MENU] dos veces para llamar el menú principal. (Si usted ha ajustado ya el reloj, usted sólo tiene que presionarlo una vez). -
Page 48: Limited Warranty
FUNAI CORP. will repair this Emerson product, free of charge in the USA in the event of defect in materials or workmanship as follows: DURATION: PARTS: FUNAI CORP. will provide parts to replace defective parts without charge for one (1) year from the date of original retail purchase.
Need help?
Do you have a question about the EWD2202 and is the answer not in the manual?
Questions and answers