Table of Contents
Advertisement
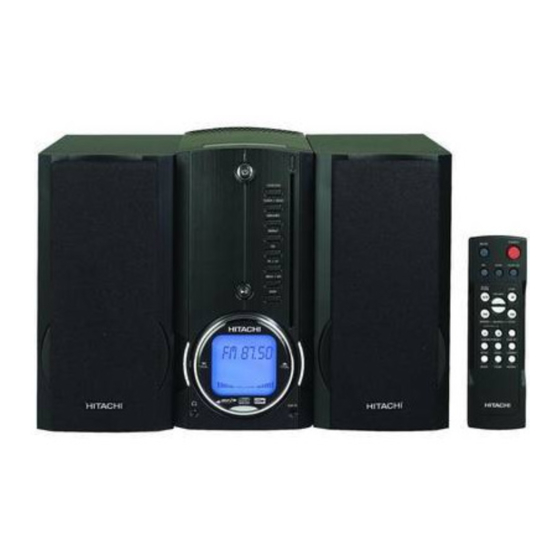
MP3/USB SLOT-IN CD MICRO SYSTEM
MP3/USB SLOT-IN CD
MICRO-CHAINE COMPATIBLE MP3 AVEC PORT USB
MICRO SYSTEM
MP3/USB SLOT-IN CD MICRO SYSTEEM
MICRO-HIFISYSTEM MIT USB SLOT EINGANG
MICRO HI-FI COMPATIBILE CON MP3 CON PORTA USB E SLOT-IN PER CD
CD MIKROSYSTÉM S MP3/USB
MP3/USB CD MIKRO SYSTÉM SE ŠTERBINOVÝM VKLÁDÁNÍM
AXM89MP3 / AXM89MP3UK
OPERATING INSTRUCTIONS
MANUEL D'UTILISATION
HANDLEIDING
ISTRUZIONI OPERATIVE
BETRIEBSANLEITUNG
POKYNY K OBSLUZE
NÁVOD K OBSLUZE
Before operating please read these instructions thoroughly.
Avant de faire fonctionner l'appareil, Iisez bien toutes les instructions de ce manuel.
Deze intructies aandachtig doorlezen alvorens het toestel te gebuiken.
Leggere attentamente le istruzioni prima di usare l'apparecchio.
Lesen Sie bitte vor Inbetriebsnahme diese Gebrauchsanweisung aufmerksam durch.
Pred pou
ž
it
í
m si pros
Pred pou
ž
it
í
m si d
í
m peclive prostudujte tyto pokyny.
ô
kladone precitajte tieto pokyny.
Advertisement
Table of Contents

Related Manuals for Hitachi AXM89MP3UK


Summary of Contents for Hitachi AXM89MP3UK
- Page 1 MP3/USB SLOT-IN CD MICRO SYSTEM MP3/USB SLOT-IN CD MICRO-CHAINE COMPATIBLE MP3 AVEC PORT USB MICRO SYSTEM MP3/USB SLOT-IN CD MICRO SYSTEEM MICRO-HIFISYSTEM MIT USB SLOT EINGANG MICRO HI-FI COMPATIBILE CON MP3 CON PORTA USB E SLOT-IN PER CD CD MIKROSYSTÉM S MP3/USB MP3/USB CD MIKRO SYSTÉM SE ŠTERBINOVÝM VKLÁDÁNÍM AXM89MP3 / AXM89MP3UK OPERATING INSTRUCTIONS...
-
Page 2: Some Dos And Don'ts On The Safe Use Of Equipment
SOME DOS AND DON'TS ON THE SAFE USE OF EQUIPMENT This equipment has been designed and manufactured to meet international safety standards but, like any electrical equipment, care must be taken if you are to obtain the best results and safety is to be assured. DO read the operating instructions before you attempt to use the equipment. - Page 3 IMPORTANT (FOR UK ONLY) The mains lead on this equipment may be supplied with a moulded plug incorporating a fuse, the value of which is indicated on the pin face of the plug. Should the fuse need to be replaced,an ASTA or BSI approved BS1362 fuse must be used of the same rating.
-
Page 4: Laser Safety
Warning: to prevent fire or shock hazard, don’t expose this appliance to rain or moisture. These markings are located on the bottom, side or back of the unit. Caution: to prevent the risk of electric shock, do not remove cover (or back), no user-service- able parts inside, refer servicing to qualified service personnel. -
Page 5: Safety Instruction
SAFETY INSTRUCTION 1. READ INSTRUCTIONS - All the safety and operating instructions should be read before the appliance is operated. 2. RETAIN INSTRUCTIONS - The safety and operating instruction should be retained for future reference. 3. HEED WARNINGS - All warnings on the appliance and in the operating instruc tions should be adhered to. - Page 6 that is recommended by the manufacturer. An appliance and cart combination should be moved with care. Quick stops, excessive force, and uneven surfaces may cause the appliance and cart combination to overturn. 16. WALL OR CEILING MOUNTING - If the appliance is mounted to a wall or ceiling it should be mounted only as recommended by the manufacturer.
-
Page 7: Handling Compact Discs
HANDLING COMPACT DISCS This unit has been designed to play compact discs bearing the iden- tification logo shown at the left. No other discs can be played. 1. Open a disc case by holding the bottom left and right sides with the right hand, and then lighting the top cover with the left hand. -
Page 9: Control And Indicators
CONTROL AND INDICATORS 1. STANDBY led indicator 2. CD Eject key 3. POWER key • Press to turn the power ON/Standby. 4. CD Compartment 5. FUNCTION key • To select the TUNER, CD, CARD-USB or AUX mode. 6. TUNER/BAND key •... -
Page 10: Installation
INSTALLATION 1. Unpack all parts and remove protective material. 2. Insert the batteries (2xUM-4/SIZE "AAA") into the remote control transmitter as shown in the battery compartment. 3. Do not connect the unit to the mains before checking the main voltage and before all other connections have been made. -
Page 11: Standby On/Off
OPERATION STANDBY ON/OFF When you first plug the unit into the mains, the unit will go into standby mode. The display will show the time. 1. You can press POWER to switch on the unit. 2. The standby function of the unit remains on until the unit is switched on. 3. - Page 12 OPERATION/COMPACT DISC/MP3 Press FUNCTION key to select the MP3-CD/CD function. INSERTING THE MP3-CD/CD DISC Press OPEN/CLOSE to open the CD door. Insert a MP3-CD/CD in the tray. Press OPEN/CLOSE again to close the CD door. • The MP3-CD/CD-player starts and scans the contents list of the MP3-CD/CD. FOR CD After a few seconds, the total playing time and number of tracks appear on the display.
-
Page 13: Programming Tracks
If any other file names start with letter “A”, press and hold REW /DN FF/UP , the “ ” will stop flashing, then press REW/DN or FF/UP again, the display will show the other song, eg: A-APPLE, A-ANGEL etc. Press PLAY/PAUSE key to start playing this track with your selected letter. - Page 14 REPEAT PLAY (For CD) If at any time you wish to listen to a disc or program over and over again, the repeat function will allow you to do so. Press REPEAT once. “REPEAT ” will be displayed on the LCD. Press REPEAT twice, “REPEAT ALL”...
- Page 15 OPERATION/TIMER Before setting the timer, make sure the clock is correctly set. TIMER ON SETTING Select TUNER or CD mode and select the desired sound source. For TUNER If you select BAND, press REW/DN or FF/UP to select a preset station. The display will show the selected preset station and frequency.
-
Page 16: Specifications
OPERATION/MUTE (FOR REMOTE ONLY) Press MUTE to terminate the sound output. Press again to cancel this mode. GENERAL Set not reacting when any function button is pressed. The normal function of the product may be disturbed by external interference, just reset the product (recon- nect of power source may be required) to resume normal operation.
Need help?
Do you have a question about the AXM89MP3UK and is the answer not in the manual?
Questions and answers