Table of Contents
Advertisement
Advertisement
Table of Contents

Subscribe to Our Youtube Channel
Related Manuals for Hitachi AX-M717


Summary of Contents for Hitachi AX-M717
- Page 1 Instruction Manuals AX-M717 HI-FI MICRO SYSTEM...
- Page 2 SOME DOS AND DON'TS ON THE SAFE USE OF EQUIPMENT This equipment has been designed and manufactured to meet international safety standards but, like any electrical equipment, care must be taken if you are to obtain the best results and safety is to be assured. ************** DO read the operating instructions before you attempt to use the equipment.
- Page 3 IMPORTANT The mains lead on this equipment may be supplied with a moulded plug incorporating a fuse, the value of which is indicated on the pin face of the plug. Should the fuse need to be replaced, an ASTA or BSI approved BS 1362 fuse must be used of the same rating. If the fuse cover is detachable never use the plug with the cover omitted.
- Page 4 WARNING • The apparatus shall not be exposed to dripping or splashing and that no objects filled with liquids, such as vases, shall be placed on the apparatus. • To be completely disconnect the power input, the mains plug of apparatus shall be disconnected from the mains.
-
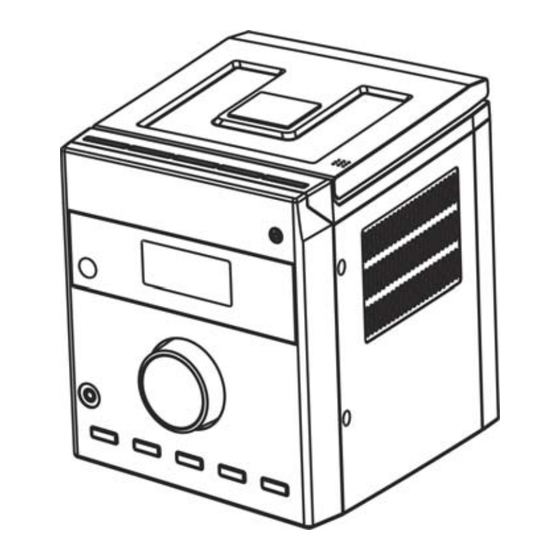
Page 5: Package Contents
Package contents • Main unit • 2 x Speakers • Remote control • User manual Features Front view 1. Standby/On button 2. Display 3. Volume control 4. Remote sensor 5. Headphone socket 6. Mode/Band button 7. Clock/Display button 8. Source button 9. -
Page 6: Top View
Top view 1. CD door 2. Skip Back/Tune - button 3. Skip Forward/Tune + button 4. Play/Pause/Preset + button 5. Stop/Preset - button 6. Program button Rear view Aux In L/R sockets Audio Out L/R sockets FM antenna wire L / R speaker terminals Note: The marking plate is located on the bottom of the unit. -
Page 7: Remote Control
Remote control 1. Mute button 2. CD button 3. Mode button (CD playback) 4. Band button (FM/MW) 5. Volume + button 6. Skip Back /Reverse/Tune - button 7. Volume - button 8. Numeric keypad 9. Program button 10. Preset - button 11. -
Page 8: Making The Connections
Making the connections Connect external hi-fi units (e.g., MP3 player) to these sockets using standard phono cables (not Grounded included) AC outlet Right Speaker Left Speaker Connect the red speaker wires to the red (+) terminals and the black speaker wires to the black (-) terminals. - Page 9 • Using your micro system Press the Standby button to turn on the unit. To choose the desired source, press the Source button on main unit to cycle through the option or press the CD, Tuner or Aux buttons on the remote control. Turn the volume control or press the Volume +/- button to adjust the volume level.
-
Page 10: Listening To The Radio
Using repeat and random playback To repeat tracks or play tracks in random order, press the Mode button to cycle through the options: 1 (repeat current track) -> All (repeat all tracks) -> Intro (play the first 10 seconds of each track) -> Random -> off (normal play). -
Page 11: Setting The Clock
Storing station presets The radio can store up to 10 preset stations. To store a station: 1. Tune the radio to the desired station. 2. Press the Program button. "Preset" flashes on the display. 3. Press the Preset+/- buttons to select the desired preset number. - Page 12 Setting the Timer You can set up the system to turn on at a chosen time. To set the timer: 1. In standby mode, press and hold the Timer button until the hour starts flashing. 2. Press the buttons to set the hour, then press the Timer button.
-
Page 13: Specifications
Main unit: 145 (W) x 167.5 (H) x 208 (D) mm Speaker box: 135(W) x 167.5 (H) x 147 (D) mm for each Weight: 4Kg We continually strive to improve our products; specifications may change without prior notice. Hitachi Europe Ltd. -
Page 14: Troubleshooting Guide
Troubleshooting guide Should you experience difficulties in the use of this player please refer to the following chart. Troubleshooting Guide Problem Points to Check • Disc may be inserted upside down • Disc not mounted correctly on spindle • Dirty or defective disc •...
Need help?
Do you have a question about the AX-M717 and is the answer not in the manual?
Questions and answers