
Related Manuals for Hitachi KC320


Summary of Contents for Hitachi KC320
- Page 1 Instruction Manual KC320 Design DAB & FM RDS Clock Radio With iPod Docking iPod is a trademark of Apple Inc., registered in the U.S. and other countries.
-
Page 2: Safety Precautions
Safety Precautions To achieve the utmost in enjoyment and performance, and in order to become familiar with its features, please read this manual carefully before attempting to operate the unit, this will assure you years of faithful, trouble free performance and listening pleasure. Important Notes This safety and operating instruction should be retained for future reference. -
Page 3: Safety Information
Safety Information Some Do’s And Don’ts On the Safe Use Of Equipment This equipment has been designed and manufactured to meet international safety standards but, like any electrical equipment, care must be taken if you are to obtain the best results and safety is to be assured. DO read the operating instructions before you attempt to use the equipment. -
Page 4: Table Of Contents
Table of Contents Safety Precautions ........................2 Safety Information........................3 Table of Contents ........................4 Package Content ......................... 5 Controls Overview ........................6 Getting Started..........................8 DAB Mode ........................... 8 1. Autoscan ..........................8 2. Add new stations......................... 9 3. Autoselect..........................9 4. -
Page 5: Package Content
Package Content AC/DC Adapter Part Number: KSS12_065_1800B Instruction manual Part Number: HS_ezCLOCK_08070-0-00 DAB/FM Radio iPod dock adaptors Part Number:3,8,9,10,11,13,14 (For Part number details, please refer to the item list on the last page.) -
Page 6: Controls Overview
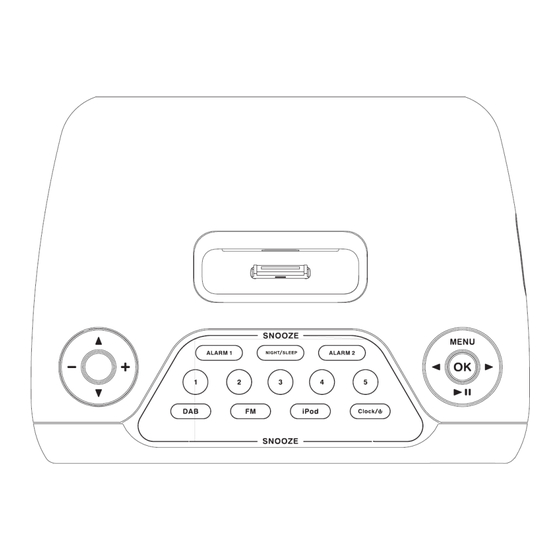
Controls Overview RADIO TOP VIEW RADIO FRONT VIEW LCD DISPLAY WINDOW Signal strength Indicator Alarm 1 icon Stereo Indicator Time status Alarm 2 icon AM & PM Indicator First Row Display Second Row Display Right direction icon Left direction icon RIGHT SIDE VIEW... - Page 7 iPod Dock Designed for connecting to your iPod Scroll up/down Press to upward or downward in the menu setup button Volume Press to Increase or decrease the volume during audio up/Down button playback DAB function Touch to enter DAB mode touch pad FM function Touch to enter FM mode...
-
Page 8: Getting Started
Getting Started Connect the unit to the power outlet, it will automatically enter the clock mode. DAB Mode Touch to enter the DAB mode. Scanning for DAB Radio Stations 1. For initial use in DAB mode, your radio will now scan for DAB stations in your area and store them in memory. -
Page 9: Add New Stations
2. Add new stations Press , and then press to select Add new stations. 2. Your radio will scan the DAB channels with a progressive slide bar displayed on the LCD. Any new stations available will be added to the station list. 3. -
Page 10: Changing The Dab Station Information
Changing the DAB Station Information It is possible to change the information that is displayed on the second line of the display when listening to a DAB station. There are five types of information available as listed below with examples on the right. To change the information displayed press the button repeatedly, the display will cycle through the follow display modes. -
Page 11: Dab Menu Controls
DAB Menu Controls... -
Page 12: Setting Dab/Fm Station Presets
Setting DAB/FM Station Presets Your radio can store 5 DAB station presets and 5 FM station presets, this will enable you to get direct access to your favourite stations. To store the current station: 1. Touch and hold one of preset touch pad until Preset # stored displayed on the LCD. -
Page 13: Fm Mode
FM Mode How to tune in FM Radio Stations To listen to FM radio stations switch your radio on and touch to enter the FM Mode. 1. Stereo detection (changing Auto type)-Auto/Off 1. Press button, and then press to select Stereo detection. -
Page 14: Seek (Searching Fm Radio Stations Automatically)
0.05MHz per step manually until the desired frequency is reached, then your radio will immediately tune to that station. Seek (searching FM Radio Stations Automatically) 1. In tuning mode, press to select Seek. 2. Press to automatically scan up or down the frequency band. -
Page 15: Changing The Fm Station Information
Changing the FM Station Information To change the information displayed press the button repeatedly, the display will cycle through the follow display modes. Radio text: This is scrolling text information supplied by the FM station. It may comprise information on music titles or details of the program and is provided by the broadcaster. -
Page 16: Fm Menu Controls
FM Menu Controls... -
Page 17: Ipod Mode
iPod Mode Docking and playing your iPod This unit can play music files stored on your iPod through the stereo speakers Docking your iPod Dock Adapters Insert the Dock Adapter that fits your iPod model, then plug in your iPod. The adapter number is marked at the back or side of each dock adapter. -
Page 18: Clock Mode
Clock Mode 1. Touch to enter into CLOCK mode; 1. Clock settings Clock format (a) Press button, press to select Clock settings. Note: In clock menu, you may press browse<Clock settings>, <Brightness> and <System>. (b) In Clock settings, press to select Clock format. (c) Press to select 12 or 24 hour basis display and then press... -
Page 19: System
(b) Press to select 100%/50%/OFF and then press to confirm. Night mode (a) In Brightness, press and then to select to Night mode. Note: This setting is activated when ‘Night mode’ is set to ‘On’. (b) Press to select 25%/50%/OFF and then press to confirm. -
Page 20: Setting Alarm
Setting Alarm Notes: a. Clock must be set before setting alarms. b. Alarm can be set only in the Clock mode. Setting Alarm 1 1. Touch and hold for 3 seconds, Alarm 1 will be shown and Off is flashing. 2. -
Page 21: Snooze Function
8. Press to set snooze period which ranges from 1-30 minutes, and press to confirm. Alarm 1 setting is now finished, and the Alarm 1 icon will appear on the LCD display. 9. To check the setting status of Alarm 1, touch Note: Procedure of setting Alarm 2 will be exactly the same as setting Alarm 1, except using Snooze Function... -
Page 22: Night Mode
Night Mode Night mode is designed to help user stay at an environment avoiding light disturbance from radio, you may select ON to active it, or select OFF to disable it. 1. Touch to enter CLOCK mode, otherwise, it will enter ‘sleep setting’. -
Page 23: Specification
Specification General: Design DAB & FM RDS Clock Radio With iPod Docking 2W rms X 2 Audio Output: Frequency Ranges: DAB Band III (174 - 240 MHz) FM (87.5 - 108 MHz) Input Connectors: DC power socket Output Connectors: 3.5mm stereo jack headphone socket (32 ohm) LCD Display: High resolution display Power Supply:...
Need help?
Do you have a question about the KC320 and is the answer not in the manual?
Questions and answers