Table of Contents
Advertisement
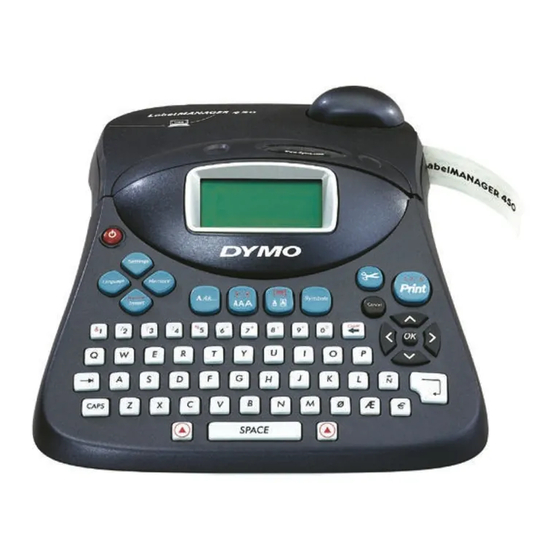
USB Connector
AC Power Connector
Power
Settings
Memory
Language
Preview/Insert
Tab
CAPS
Figure 1 LabelMANAGER 450 Electronic Labelmaker
Settings
Language
Memory
Preview
Insert
,
!
?
–
+
1
2
3
4
5
6
A
Z
E
R
T
Q
S
D
F
CAPS
W
X
C
V
Shift
Symbols
,
=
Clear
%
&
/
0
7
8
9
,
O
Y
U
I
K
G
H
J
B
N
.
@
SPAC E
Shift
Space Bar
Shift
LCD Display
1,2...n
Cancel
.
P
L
M
*
Tape Exit
Font Style/Size
Font/Fixed Length
Box/Align
Symbols
Cutter
Print
Cancel
Navigation
Arrows & OK
Backspace/
Clear
Return/Enter
Currency
Advertisement
Table of Contents

Related Manuals for Dymo LabelMANAGER 450


Summary of Contents for Dymo LabelMANAGER 450
- Page 1 LCD Display USB Connector AC Power Connector Tape Exit Font Style/Size Font/Fixed Length Box/Align Symbols Power Cutter Settings Settings Print Memory 1,2...n Language Memory Language Cancel Preview Symbols Insert Preview/Insert Cancel Navigation Clear – & Arrows & OK Backspace/ Clear CAPS CAPS Return/Enter...
-
Page 2: About Your New Labelmaker
You can choose to print your labels in many different sizes and styles. The labelmaker uses DYMO D1 tape cassettes in widths of 1/4” (6 mm), 3/8” (9 mm), 1/2” (12 mm), 3/4” (19 mm), or 1” (24 mm). Tape cassettes are also available in a wide range of materials. - Page 3 To insert the tape cassette 1. Press and release the tape cassette cover to open the tape compartment. See Figure 3. CLICK! Figure 5 4. Press firmly until cassette clicks into place. Make Figure 3 sure the tape and ribbon are positioned The first time you use the labelmaker, correctly.
-
Page 4: Printing Your First Label
Setting the Current Date To set the units of measure 1. Press The default date format depends upon the Settings 2. Use the arrow keys to select Set Units and language selection for the labelmaker. You can press change the default date format by following the instructions in Changing the Date Format on 3. -
Page 5: Shift Key
CAPS mode on. When CAPS mode is off, all letters printer or you can print labels from your computer entered appear in lower case. using DYMO Label Software. Your labelmaker connects to your computer using the USB Shift Key connection located on the top of the labelmaker. -
Page 6: Formatting Your Label
Normal Bold Italic Figure 8 Outline Refer to the LabelMANAGER 450 Quick Start Card Shadow for installation instructions and the DYMO Label Software User Guide for information about designing and printing labels. Strike-through Formatting Your Label Vertical Mirror You can choose from a number of formatting Italic + Bold options to enhance the appearance of your labels. -
Page 7: Creating Multi-Line Labels
Creating Multi-Line Labels Underline DYMO The number of lines you can print on a label Square Box DYMO depends on the width of the label you are using: Pointed Box • Maximum of five lines on 3/4" (19 mm) and 1”... -
Page 8: Using Tabs
Using Tabs Adding Symbols The labelmaker supports the extended symbol set You can add tabs to a label to align text on multi- as shown in Figure 10: line labels. Tabs are left justified and the default spacing is 2.0” (50 mm). To change the tab spacing 1. -
Page 9: Adding Date And Time
Adding the Date to Your Label To add a symbol 1. Press . The first row of symbols shown in The date can be added as fixed text (the date Symbols the table appears in the display. remains the same) or as variable text that is 2. -
Page 10: Printing Options
3. Select Fixed Time or Autom. Updated and To serialize your labels press 1. Enter the text for your label. When Autom. Updated is selected, a time 2. Press and then select Set # Copies. Settings icon is inserted on your label. When Fixed Time is 3. -
Page 11: Previewing Your Label
Previewing Your Label The barcode prints horizontally along the label with the text in small print underneath the barcode. You You can preview the text or format of your label can optionally add text before and after the prior to printing. A two-line label is previewed as a barcode. -
Page 12: Adjusting The Print Contrast
Adjusting the Print Contrast Storing Formats You can adjust the print contrast to fine tune the In addition to label text, you can store up to ten print quality of your label. specific label formats you use frequently. This feature stores only the formatting information not To set the contrast the label text. - Page 13 Clean your labelmaker from time to time to keep it working properly. Clean the cutter blade each time you replace the label cassette. To clean the cutter blade 1. Press to turn off the power. 2. Press together. The message, Cut Test, appears on the display.
-
Page 14: Troubleshooting
• Adjust the fixed-length label setting appropriately, or length. • Select a narrower font size. If you still need assistance, contact DYMO Customer Support for your country. Refer to Contacting Customer Support on the inside back cover to locate the contact number for your country. -
Page 15: Documentation Feedback
We also welcome your suggestions about additional topics you would like to see covered in the documentation. Send email messages to: documentation@dymo.com Please keep in mind that this email address is only for documentation feedback. If you have a technical question, please contact Customer Support.
Need help?
Do you have a question about the LabelMANAGER 450 and is the answer not in the manual?
Questions and answers
when i insert a new cassette and switch on it all seems ok but when I try and print, the tape just keeps rolling out without stopping and without printing