Table of Contents
Advertisement
Advertisement
Table of Contents

Related Manuals for Baumatic BRC4BDY


Summary of Contents for Baumatic BRC4BDY
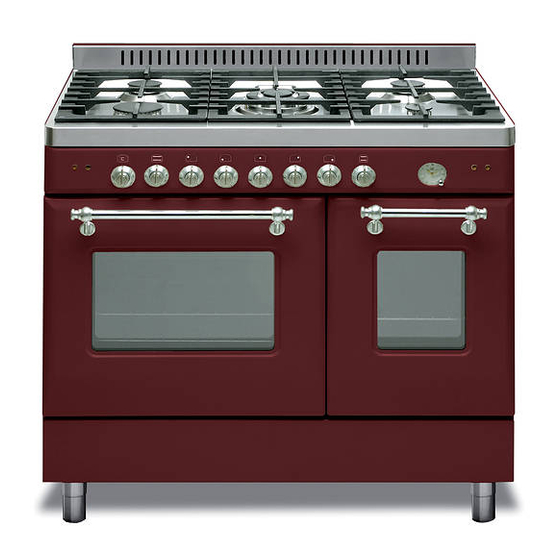
- Page 1 BRC4BDY/BRC4GBL/ BRC4IV 90cm Twin cavity rustic style range cooker...
- Page 2 User Manual for your Baumatic BRC4BDY/BRC4GBL/BRC4IV 90cm Twin cavity rustic style range cooker NOTE : This User Instruction Manual contains important information, including safety & installation points, which will enable you to get the most out of your appliance. Please keep it in a safe place so that it is easily available for future reference;...
-
Page 3: Table Of Contents
Contents Environmental note Important safety information 5 – 9 Specifications 9 – 11 Control panel Thermostat control knob (main oven) Oven function selector knob (main oven) Oven function and thermostat control knob (secondary oven) Analogue clock with cut off timer Setting the analogue clock and using the cut off timer 12 - 13 Setting the time... -
Page 4: Environmental Note
Environmental note o The packaging materials that Baumatic uses are environmentally friendly and can be recycled. o Please discard all packaging material with due regard for the environment. -
Page 5: Important Safety Information
Important safety information Your safety is of the utmost importance to Baumatic. Please make sure that you read this instruction booklet before attempting to install or use the appliance. If yo are unsure of any of the information contained in t ooklet, please contact the Baumatic Advice Line. - Page 6 This appliance complies with all current European safety legislation. Baumatic do wish to emphasise that this compl iance does not remove the fact that the appliance surfaces will become hot during use and retain heat after operation.
- Page 7 o Do not place heavy objects on the oven door or lean on the oven door when it is open, as this can cause damage to the oven door hinges. Nobody should be allowed to sit or stand on any part of the cooker.
- Page 8 Please see the specific section of this booklet that refers to installation. o Baumatic Ltd. declines any responsibility for injury or damage, to person or property, as a result of improper use or installation of this appliance.
-
Page 9: Specifications
o The above directives comply with 93/68/EEC regarding CE marking. o The manufacturer declares that the oven is built using certified materials and requires the appliance to be installed in accordance with the standards currently in force. This appliance must be used by a trained person for domestic purposes only. Specifications Product dimensions: Height:... - Page 10 o 8 function multifunction main oven o Main oven capacity: 61 litres o 5 function static secondary oven o Secondary oven capacity: 35 litres o Oven energy efficiency class: o Storage compartment capacity: 35 litres o Analogue clock with cut off timer o Cooling fan o Thermostatically controlled grill o Double glazed removable doors...
-
Page 11: Control Panel
For future reference please record the following information which can be found on the rating plate and the date of purchase which can be found on your sales invoice. The rating plate for your oven can be located by opening the door of the storage compartment. Model Number ………………………………. -
Page 12: Setting The Analogue Clock And Using The Cut Off Timer
Setting the analogue clock and using the cut off timer Setting the time o Press the control knob in and turn it clockwise, until the correct time of day is set on the clock face. o Release the control knob. Selecting manual operation mode o IMPORTANT: You must set your appliance to run in manual operation mode, before you can use your oven. -
Page 13: Selecting A Cooking Function And Temperature
o To cancel the audible signal, turn the analogue clock control knob clockwise to the symbol. o Before you can use your appliance in manual operation again, you must turn the analogue clock control knob clockwise to the symbol again. o Important: If you do not turn the thermostat control knob and oven function selector knob to 0. -
Page 14: Selecting A Main Oven Function
o After both cavities have cooled, they should then be cleaned with warm soapy water, using either a sponge or soft cloth. No abrasive cleaners should be used. o Outer parts of the oven should be cleaned with warm soapy water, using either a sponge or soft cloth. -
Page 15: Thermostat Control Knob (Main Oven)
HALF GRILL: This method of cooking utilises the inner part only of the top element, which directs heat downwards onto the food. This function is suitable for grilling small portions of bacon, toast and meat etc. The thermostat control knob must be turned to its maximum setting. -
Page 16: Selecting An Oven Function And Temperature (Secondary Oven)
Selecting an oven function and temperature (secondary oven) If you turn the control knob clockwise, it will automatically select a conventional oven function and you can regulate the temperature between 50 - 250°C. To use one of the other functions, you should turn the dial past the max. -
Page 17: The Cooling Fan
o To achieve this, turn the main oven thermostat control knob to the off position. The main oven will stop heating, but the cooling fan will continue to run. o When the main oven is sufficiently cool, you should turn the main oven function selector knob to the off position. -
Page 18: Using And Assembling The Rotisserie
Using and assembling the rotisserie o Place the food on the spit (L), making sure that it is placed centrally between the two forks (F). Otherwise excess strain will be placed on the motor (R). o Place one end of the spit (L) onto support (G) and put the opposite end into the hole of the motor (P). -
Page 19: Cooking Guidelines
Cooking guidelines o Please refer to the information given on food packaging for guidance on cooking temperatures and times. Once familiar with the performance of your appliance, temperatures and times can be varied to suit personal preference. o If you are using the fan oven function, then you should follow the information given on the food packaging for this particular mode of cooking. -
Page 20: Warnings
Warnings o Keep the oven door closed when using any of the grill or oven functions in the main oven. o When using the grill function in the secondary oven, the heat deflector MUST be fitted and the door left open. For the remaining functions of the secondary oven, the oven door must be kept closed. -
Page 21: Using The Hob Top
Using the hob top The following symbols will appear on the control panel, next to each control knob: Black circle: gas off Large flame: maximum setting Small flame: minimum setting o The minimum setting is at the end of the anti-clockwise rotation of the control knob. -
Page 22: Energy Saving Tips
Energy saving tips o The diameter of the bottom of the pan should correspond to that of the burner. o The burner flame must never extend beyond the diametre of the pan. o Use flat bottomed pans only o When possible, keep a lid on the pan whilst cooking. o Cook vegetables with as little water as possible, to reduce cooking times. -
Page 23: Cleaning The Hob Burners
Any damage that is caused to the appliance by a cleaning product will not be fixed by Baumatic free of charge, even if the appliance is within the guarantee period. Cleaning the hob burners The hob burners should be cleaned once a week or more frequently if they get soiled. -
Page 24: Maintaining Cast Iron Pan Stands
o IMPORTANT: Make sure that you reassemble the burners in the original way. Maintaining cast iron pan stands o IMPORTANT: Make sure that the hob surface and pan stands have cooled before you attempt to touch them. o Wipe the pan stands over with a soft, damp cloth that has been put into warm soapy water. -
Page 25: Removing The Oven Door For Cleaning
Removing the oven door for cleaning o Open the oven door fully. o The hinges (A) are provided with two movable hooks (B). o Rotate the hooks into the slot (C). o You should grip the sides of the door at the centre and then incline it slightly towards the oven cavity and then by pulling it gently away from the oven cavity. -
Page 26: Installation
Installation The installation must be carried out by a suitably qualified person, in accordance with the current version of the following. o UK Regulations and Safety Standards or their European Norm Replacements. o Building Regulations (issued by the Department of the Environment). - Page 27 (including the burners). o Baumatic do not recommend that the cooker is positioned below wall cupboards, as the heat and steam from the appliance and what is being cooked, may damage the cupboard and its contents.
-
Page 28: Gas Connection
Conversion for use on LPG and other gases must only be undertaken by a qualified person. For information on the use of other gases, please contact the Baumatic Advice Line. o The cooker must be installed by a qualified person, in... -
Page 29: Gas Safety (Installation And Use) Regulations
o If there are any other fuel burning appliances in the same room the current edition of BS 5440: Part 2: should be consulted to determine air vent requirements. o Ensure that the room containing the cooker is well ventilated, keep natural ventilation holes or install a mechanical ventilation device (mechanical cooker hood). -
Page 30: Gas Connection
Gas connection ALL INSTALLATION AND SERVICE WORK MUST BE CARRIED OUT BY A CORGI REGISTERED ENGINEER. o Prior to installation, ensure that the gas supply conditions (nature of the gas and gas pressure) and the adjustment conditions are compatible. The adjustment conditions for this appliance are stated on the rating plate which can be found on the back cover. -
Page 31: Gas Adjustment (Conversion To Lpg)
Gas adjustment (Conversion to LPG) All work must be carried out by a CORGI registered engineer. IMPORTANT: Always isolate the cooker from the electricity supply before changing the injectors and/or adjusting the minimum flow of the burners. o Remove the pan-stands, burners and flame spreaders (A). -
Page 32: Minimum Flow Adjustment For Hob Gas Taps
IMPORTANT: After changing the injectors YOU MUST follow the minimum flow adjustment section below. Minimum flow adjustment for hob gas taps. All work must be carried out by a CORGI registered engineer. o Light the burner and set the knob at the minimum position. -
Page 33: Fitting A Stability Chain
Fitting a stability chain IMPORTANT: It is a legal requirement for your CORGI registered installer to fit a stability chain. The stability hook should be securely fixed to the fabric of the building, in an adjacent position to the safety chain at the rear of the appliance. The chain should be kept as short as is practical. -
Page 34: Electrical Connection
Electrical connection This appliance must be installed by a qualified person in accordance with the latest edition of the I.E.E. Regulations and in compliance with Baumatic’s instructions. Before connecting the appliance, make sure that the supply voltage marked on the rating plate corresponds with your mains supply voltage. -
Page 35: Replacing The Mains Supply Cable
o The cable can be looped if necessary, but make sure that is not kinked or trapped when the cooker is in position. Replacing the mains supply cable If the mains supply cable is damaged, then it must be replaced by an appropriate replacement. -
Page 36: My Appliance Isn't Working Correctly
My appliance isn’t working correctly o The oven isn’t coming on. * Check that the oven is in manual operation mode. * Check that you have selected a cooking function and a cooking temperature. o There appears to be no power to the oven and grill. * Check that the appliance has been connected to the electrical mains supply correctly. - Page 37 Or any installation other than the one specified by Baumatic Ltd. has been completed. Please refer to the conditions of guarantee that appear on the...
-
Page 38: Contact Details
Czech Republic United Kingdom Baumatic CR spol s.r.o. Baumatic Ltd., Amperova 495 Baumatic Buildings, 46215, Librec 6 Bennet Road, Czech Republic Reading, Berkshire RG2 0QX +420 800 185 263 United Kingdom www.baumatic.cz Sales Telephone (0118) 933 6900 Slovak Republic Sales Fax Baumatic Slovakia, s.r.o.
Need help?
Do you have a question about the BRC4BDY and is the answer not in the manual?
Questions and answers