Table of Contents
Advertisement
Advertisement
Table of Contents

Related Manuals for DigiDesign Mbox 2 Pro


Summary of Contents for DigiDesign Mbox 2 Pro
-
Page 1: Getting Started
Getting Started ® Mbox 2 Pro Version 7.4... - Page 2 Radio and Television Interference This equipment has been tested and found to comply with the This guide is copyrighted ©2007 by Digidesign, a division of limits for a Class B digital device, pursuant to Part 15 of the Avid Technology, Inc. (hereafter “Digidesign”), with all rights FCC Rules.
- Page 3 UL & CUL mark on its compliant equipment. Warning Any modifications to the unit, unless expressly approved by Digidesign, could void the user's authority to operate the equipment. Canadian Compliance Statement: This Class B digital apparatus complies with Canadian ICES- 003.
- Page 4 Important Safety Instructions 1) Read these instructions. 2) Keep these instructions. 3) Heed all warnings. 4) Follow all instructions. 5) Do not use this apparatus near water. 6) Clean only with dry cloth. 7) Do not block any ventilation openings. Install in accordance with the manufacturer’s instructions.
-
Page 5: Table Of Contents
About www.digidesign.com ........ - Page 6 MIDI Patch Name Support..........62 viii Mbox 2 Pro Getting Started...
- Page 7 Before You Call Digidesign Technical Support ........
- Page 8 Mbox 2 Pro Getting Started...
-
Page 9: Chapter 1. Installation Quickstart
chapter 1 Installation QuickStart Windows Installation Mac Installation Overview Overview (Mac OS X Systems Only) (Windows Systems Only) Installation of Pro Tools LE for Mbox 2 Pro on a Mac includes the following steps: Installing Pro Tools LE™ for Mbox® 2 Pro on a Windows computer includes the following “Connecting Mbox 2 Pro to the Computer”... - Page 10 Mbox 2 Pro Getting Started...
-
Page 11: Chapter 2. Welcome To Mbox 2 Pro
Pro Tools system. line outputs • Firewire connector cable (six-pin 1394) • Two additional channels of unbalanced • Power supply outputs on a single 1/4-inch TRS connector • Digidesign Registration Information Card Chapter 2: Welcome to Mbox 2 Pro... -
Page 12: Pro Tools Le Capabilities
Pro Tools LE uses your computer’s CPU to mix and process audio tracks (host process- ing). Computers with faster clock speeds yield higher track counts and more plug-in processing. Mbox 2 Pro Getting Started... -
Page 13: System Requirements
Hard Drive Requirements System Requirements For optimal audio recording and playback, all Mbox 2 Pro can be used with a Digidesign-qual- Pro Tools systems require one or more Digide- ified Windows or Mac computer. sign-qualified drives. A DVD drive is required to use the Pro Tools In- For a list of Digidesign-qualified hard drives, staller disc. -
Page 14: About The Pro Tools Guides
RTAS and AudioSuite plug-ins included with Pro Tools. Important Notices include information that could affect your data or the performance of • Digidesign Plug-ins Guide explains how to use your system. optional Digidesign plug-ins. • Pro Tools Shortcuts lists keyboard and Right- click shortcuts for Pro Tools. -
Page 15: About Www.digidesign.com
Development Partners and their plug-ins, applications, and hardware. News and Events Get the latest news from Digidesign; sign up for a Pro Tools demo. To learn more about these and other resources available from Digidesign, visit the Digidesign website (www.digidesign.com). - Page 16 Mbox 2 Pro Getting Started...
-
Page 17: Chapter 3. Installing Pro Tools On Windows
chapter 3 Installing Pro Tools on Windows This chapter contains information for Windows Connecting Mbox 2 Pro and systems only. If you are installing Pro Tools on a Installing Pro Tools LE Mac computer, see Chapter 4, “Installing Pro Tools on Mac.” To install Pro Tools LE and Mbox 2 Pro: Before installing this version of Pro Tools, Start Windows, logging in with Administrator... - Page 18 (www.digidesign.com). To install QuickTime: Visit www.apple.com and go to the Quick- Time page. Download the QuickTime installer applica- tion to your computer. Double-click the QuickTime installer applica- tion and follow the on-screen installation in- structions. Mbox 2 Pro Getting Started...
-
Page 19: Launching Pro Tools Le
The Mbox 2 Pro ASIO Driver and DirectSound Set the Screen saver to None. Window System Audio Driver let you use your Digidesign Mbox 2 Pro hardware interface with Click Apply. third-party applications that support the ASIO Driver or DirectSound Driver standard. -
Page 20: Uninstalling Pro Tools Le
Filtered Dream.ptf file (located Standalone Windows Audio Drivers in the Filtered Dream Demo Session folder). Digidesign Windows Audio Drivers can be in- stalled on Windows systems that do not have Uninstalling Pro Tools LE Pro Tools software installed. Use the standalone... -
Page 21: Chapter 4. Installing Pro Tools On Mac
chapter 4 Installing Pro Tools on Mac This chapter contains information for Mac sys- Installing Pro Tools LE tems only. If you are installing Pro Tools on a Windows computer, see Chapter 3, “Installing After the Apple System software settings are con- Pro Tools on Windows.”... -
Page 22: Connecting Mbox 2 Pro To The Computer
Connect the small end of the included MIDI I/O Driver The MIDI I/O Driver is required Firewire cable to the FireWire port on if you are using the Digidesign MIDI I/O inter- Mbox 2 Pro. face. With your computer on, connect the other... -
Page 23: Additional Software On The Pro Tools Installer Disc
The demo session for Pro Tool LE is named “Fil- ers (for playing other audio applications tered Dreams.” through your Digidesign hardware) and a Pro Tools demo session. Before installing the demo session to your audio drive, make sure the drive is config- Check your Pro Tools Installer disc for addi- ured as described in “Formatting an Audio... -
Page 24: Uninstalling Pro Tools
Avid products. install. Clean Uninstall Removes all Pro Tools files, in- When installation is complete, click Close. cluding system files, Digidesign plug-ins, and MIDI patch names. The demo session can be opened by double- clicking the Filtered Dream.ptf file (located Click Uninstall. -
Page 25: Chapter 5. Configuring Your Pro Tools System
chapter 5 Configuring Your Pro Tools System After you have connected your system and in- Shut down your Pro Tools system in this order: stalled Pro Tools software, you are ready to start Quit Pro Tools and any other running applica- up and configure your Pro Tools system. -
Page 26: Configuring Pro Tools Le
To change the Hardware Buffer Size: Choose Setup > Playback Engine. From the H/W Buffer Size pop-up menu, select the audio buffer size, in samples. Click OK. Playback Engine dialog for Mbox 2 Pro (Structure plug- in installed) Mbox 2 Pro Getting Started... - Page 27 RTAS Processors To set the number of RTAS Processors: Choose Setup > Playback Engine. The RTAS Processors setting determines the number of processors in your computer allo- From the RTAS Processors pop-up menu, select cated for RTAS (Real-Time AudioSuite) plug-in the number of available processors you want to processing.
- Page 28 Click OK. avoid interrupting playback and recording when working with instrument plug-ins. Be sure to disable RTAS error suppression when you need to ensure the highest possible audio qual- ity, such as for a final mix. Mbox 2 Pro Getting Started...
- Page 29 DAE Playback Buffer Size If Pro Tools needs more system memory for the DAE Playback Buffer, it will prompt you to re- The DAE Playback Buffer Size determines the start your computer. amount of memory DAE allocates for disk buff- ers.
- Page 30 • Plug-in Streaming Buffer Size settings higher tion. than 250 msec (Level 2) improve the audio qual- Click OK. ity of sample playback, but they also decrease the amount of memory available for other sys- tem tasks, such as RTAS processing. Mbox 2 Pro Getting Started...
- Page 31 Pro Tools Hardware Settings Internal Use this setting if you are recording an- alog signals directly into Mbox 2 Pro. When set In the Hardware Settings dialog, Pro Tools lets to internal, Mbox 2 Pro provides four channels you set the default sample rate and clock source of input (analog only).
-
Page 32: Optimizing A Windows System For Pro Tools
AMS (Mac OS X Only)” for details. puter can do other Pro Tools tasks. In most cases the DMA option will already be set correctly, as Windows XP detects and activates DMA mode by default. Mbox 2 Pro Getting Started... - Page 33 To enable DMA for any IDE hard drives To configure Windows Power Management (Windows XP): (Windows XP): Choose Start > Control Panel. Choose Start > Control Panel. Double-click System. Double-click Power Options. Click the Hardware tab. Click the Power Schemes tab. Under Device Manager, choose Device Man- From the Power Schemes pop-up menu, select ager.
- Page 34 (other than a FireWire card that you might use Click OK to close the Performance Options to connect an external drive to your system). window. Click OK to close the System Properties win- dow. Restart the computer for the changes to take effect. Mbox 2 Pro Getting Started...
-
Page 35: Optimizing A Mac System For Pro Tools
Under the General tab, choose Selective not yet been qualified for Pro Tools. For de- Startup. tails on qualified versions of Mac OS, visit the Digidesign website Deselect Load Startup Items and click OK. (www.digidesign.com). Click Restart to restart the computer. - Page 36 In the Spotlight window, click the Privacy tab. Select the volume in the left column of the To prevent indexing of a drive, drag its icon Disk Utility window. from the desktop into the list. Click Enable Journaling in the toolbar. Mbox 2 Pro Getting Started...
-
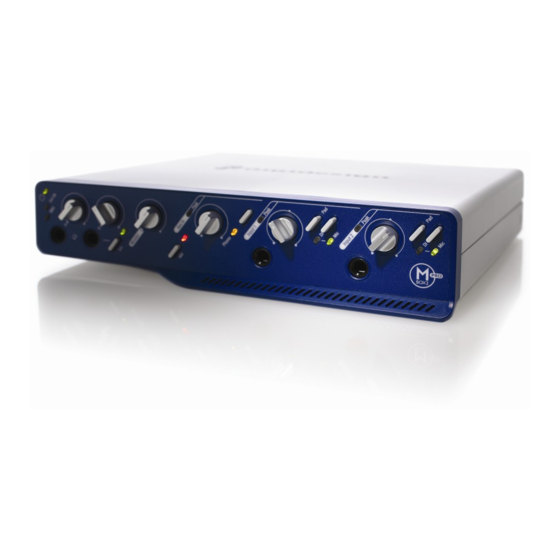
Page 37: Chapter 6. Hardware Overview
chapter 6 Hardware Overview Mbox 2 Pro Front Panel Features The Mbox 2 Pro front panel has the following features: Input 2 Aux In (3–4) Input 1 Power Monitor Source Source Source Gain Gain Level Peak Headphones level selector selector selector (A, B) Peak... - Page 38 Monitor Level manufacturer. The Monitor knob adjusts the output level of the Mon Out ports. In Pro Tools, this will be the signal routed to Analog outputs 1–2. Mbox 2 Pro Getting Started...
- Page 39 Gain Controls Peak LEDs These knobs adjust the input gain levels of their Input 1, 2 and the Aux Input have Peak LEDs corresponding input (Input 1, Input 2, or that also function as signal meters. They light Aux In). green at –60 dBFS, yellow at –6 dBFS, and red at 0 dBFS (peak).
-
Page 40: Mbox 2 Pro Back Panel Features
This port supplies power to Mbox 2 Pro using Purchase this cable (model #CS625) through the included power supply. Though external your authorized Digidesign dealer or online power is not always required, you should use ex- through the DigiStore (www.digidesign.com). - Page 41 Word Clock S/PDIF Digital I/O The Word Clock In and Out ports let you con- The S/PDIF in and out ports are unbalanced two- nect BNC cables to synchronize Pro Tools to in- conductor phono (RCA) connectors that utilize coming 1x Word clock, and synchronize other a full 24-bit, two-channel digital data stream.
- Page 42 Source 1 and Source 2 are lo- cated such that they are directly in line with their associated input controls on the front panel. This lets you locate input jacks more eas- ily when viewing from the front of the unit. Mbox 2 Pro Getting Started...
-
Page 43: Chapter 7. Making Studio Connections
chapter 7 Making Studio Connections To hear audio recorded into a Pro Tools session, By default, Headphone B output mirrors the you will need to connect headphones or an ex- Pro Tools channel 1–2 output being heard in the ternal sound system (such as powered monitors Headphone A output. -
Page 44: Connecting A Sound System
Using a 1/4-inch TRS stereo cable, connect the Line Output (5–6) output on the back panel to the inputs of your external device. See the Pro Tools Reference Guide for infor- mation on signal routing, sends and bussing. Mbox 2 Pro Getting Started... -
Page 45: Connecting Audio Inputs
Connecting a Digital Deck Mic/Line In Each Mic/Line In section on the back panel pro- If you have a CD, DVD, DAT or other device that vides combination jacks that accept XLR or TRS accepts S/PDIF connections, connect it to the connectors for Inputs 1 and 2. -
Page 46: Connecting A Microphone
XLR connectors. If you are not sure about the phantom power require- ments for your microphone, refer to your micro- phone’s documentation or contact the manu- 1/4-inch connector facturer. XLR and 1/4-inch connectors Mbox 2 Pro Getting Started... - Page 47 Using a Mic that Has an XLR Connector To use a microphone that has an XLR connector: Plug your microphone cable into one of the Mic/Line inputs on the back of Mbox 2 Pro. 48V (Phantom Power) Input 1 Phantom Power switch Mic input On the front of the Mbox 2 Pro, turn the Monitor control to the desired level.
-
Page 48: Connecting Instruments To The Mbox 2 Pro
On the front of the Mbox 2 Pro, turn the Monitor control to the desired level. If the incoming signal is too loud, press the Pad switch to engage the –20 dB pad. Mbox 2 Pro Getting Started... - Page 49 Connecting Electric Guitar or Bass On the front of the Mbox 2 Pro, set the Source to Mic by pressing the Mic/DI switch until the Mic LED is lit. To use a guitar with Mbox 2 Pro: On the front of the Mbox 2 Pro, plug your gui- On the front of the Mbox 2 Pro, turn the tar cable into one of the DI inputs.
- Page 50 Enabling S/PDIF Input in the Hardware Setup dialog Pro Tools LE to enable the S/PDIF ports for digi- Once enabled in the Hardware Setup dialog, the tal input. S/PDIF inputs become active and will pass audio to Mbox 2 Pro. Mbox 2 Pro Getting Started...
-
Page 51: Midi Connections
Setting the Clock Source to S/PDIF is the only To connect MIDI devices to Mbox 2 Pro: way to utilize S/PDIF input. Doing so lets you Connect the MIDI OUT of your MIDI device record or monitor up to six discrete input chan- or controller to the MIDI IN port on the back of nels (the four analog input channels, plus the Mbox 2 Pro. -
Page 52: Word Clock
Mbox 2 Pro Word Clock Launch Pro Tools. In and Out connectors to the appropriate ports on the other Word clock-capable devices in your Choose Hardware > Setup. studio. Click the Clock Source pop-up menu and choose Internal. Mbox 2 Pro Getting Started... -
Page 53: Using A Footswitch
Pro Tools LE as Word Clock Slave Using a Footswitch In order to slave Pro Tools to an external Word The footswitch connector on Mbox 2 Pro lets clock source, you must configure Word clock as you use a footswitch pedal to control either the Pro Tools Clock source, as follows: playback start/stop or recording punch in/out. - Page 54 Mbox 2 Pro Getting Started...
-
Page 55: Chapter 8. Common Tasks With Pro Tools Le
chapter 8 Common Tasks with Pro Tools LE This chapter is designed to give new users spe- Recording a Pro Tools Session cific methods for accomplishing common tasks with your Pro Tools system. Before you record with Pro Tools LE, you first create a Pro Tools session, then prepare an audio For the most complete information on using track for recording. - Page 56 From the pop-up menu, select the interface in- put you want to record. For example, select Analog 1 if your audio source is plugged into an Input 1 connector on the Mbox 2 Pro. Record enabling a track in the Mix window Mbox 2 Pro Getting Started...
-
Page 57: Importing Audio From A Cd
Choose Track > Input Only Monitoring. This al- Importing Audio from a CD lows you to monitor the input of tracks that are record enabled. To import audio from a compact disc: Choose Window > Transport to display the Put the source CD into your computer’s Transport window. -
Page 58: Creating An Audio Cd From A Pro Tools Session
In the Bounce Options dialog, choose “master” audio file. After the new audio file has Analog 1–2 as the Bounce Source. been bounced to disk, you can burn it to a CD. Choose WAV (BWF) for the File Type. Mbox 2 Pro Getting Started... - Page 59 Choose Stereo Interleaved for the Format. Click Save. Choose 16 for the Resolution and 44100 for Pro Tools begins bouncing to disk. Pro Tools the Sample Rate. bounces are done in real time, so you hear audio playback of your mix during the bounce process If you are changing the sample rate of the (though you cannot adjust it).
-
Page 60: Recording Midi In A Pro Tools Session
Pro Tools system must be config- ured for MIDI. See Appendix A, “Configuring MIDI Input selector in an Instrument track MIDI Studio Setup (Windows Only)” or Appendix B, “Configuring AMS (Mac OS X Only).” Mbox 2 Pro Getting Started... - Page 61 Do one of the following, depending on the If your connected MIDI device does not ap- type of instrument you are using: pear, check that you have configured your • If you are using an instrument plug-in, computer and its MIDI settings. For more click an Insert selector and insert the plug- information, refer to Appendix A, “Config- in on the Instrument track.
- Page 62 Edit window. Click Record in the Transport window. Return to Zero Fast Forward Play Go to End Rewind Online Stop Record Transport window Click Play in the Transport window or press the Spacebar to begin recording. Mbox 2 Pro Getting Started...
-
Page 63: Appendix A. Configuring Midi Studio Setup (Windows Only)
appendix a Configuring MIDI Studio Setup (Windows Only) MIDI Studio Setup Window MIDI Studio Setup The MIDI Studio Setup window is organized MIDI Studio Setup (MSS) lets you configure the into three sections. Interface controls are at the MIDI controllers and sound modules that are top of the window. - Page 64 Send Channels and Receive Channels options (These determine which channels send and receive MIDI.) Instrument Name The Instrument Name field shows the user-de- finable instrument name for the currently se- lected instrument. MIDI Studio Setup Properties section Mbox 2 Pro Getting Started...
-
Page 65: Midi Patch Name Support
MIDI interface input ports. Inputs will sorted by manufacturer, in Program Files\ include Mbox 2 Pro and any additional MIDI in- Common Files\Digidesign\MIDI Patch Names\ terfaces enabled on your system. The MIDI in- Digidesign. terface port that is set and displayed here is the... - Page 66 Patch Select dialog ware to create your own custom patch names. In the Open dialog, navigate to Program Files\Common Files\Digidesign\MIDI Patch Names\Digidesign\<name of manufacturer>, and select the MIDI Patch Name file (.midnam) for the MIDI device. Mbox 2 Pro Getting Started...
-
Page 67: Appendix B. Configuring Ams (Mac Os X Only)
appendix b Configuring AMS (Mac OS X Only) Click MIDI Devices. AMS scans your system Audio MIDI Setup for connected MIDI interfaces. If your MIDI in- terface is properly connected, it appears in the Pro Tools recognizes the ports on your MIDI in- window with each of its ports numbered. - Page 68 Repeat steps 3–6 for each MIDI device in your TextEdit). MIDI setup. To configure an external MIDI device: Select the external device icon and click Show Info (or double-click the new device icon). External Device Icon Mbox 2 Pro Getting Started...
- Page 69 Click the More Properties arrow to expand the Click the device image. The window expands dialog, then enable the appropriate MIDI chan- to show images for various MIDI devices (such nels (1–16) for the Transmits and Receives op- as keyboards, modules, interfaces, and mixers). tions.
-
Page 70: Midi Patch Name Support
MIDI patch name files (.midnam) can be edited in any text editor, or you can use third-party patch librarian and editor soft- ware to create your own custom patch names. Patch Select button, Mix window Mbox 2 Pro Getting Started... -
Page 71: Appendix C. Hard Drive Configuration And Maintenance
Supported Drive Formats and Drive Types For complete information on track count and the supported number and configuration of Drive Formats SCSI drives, visit the Digidesign website (www.digidesign.com). Windows Windows XP systems should use drives formatted as NTFS only. FireWire Hard Drives... -
Page 72: Formatting An Audio Drive
• Choose a file system. For optimum perfor- For complete information on track count with mance, audio drives should be formatted as internal drives, refer to the Digidesign website NTFS. (www.digidesign.com). • Select “Perform a quick format.”... -
Page 73: Partitioning Drives
Formatting Mac Audio Drives Partitioning Drives (Mac Only) Partitioning creates a logical volume or volumes For optimum performance, audio drives should on a physical drive, almost as if you were creat- be formatted as Mac OS Extended (Journaled). ing virtual hard drives. Partitions can then be formatted with the appropriate file system To format an audio drive: (NTFS for Windows, HFS+ for Mac). -
Page 74: Defragmenting An Audio Drive
Increased fragmentation increases the chance of disk errors, which can interfere with playback of audio, and result in performance errors. On Windows, to avoid fragmentation, for- mat drives with higher cluster sizes (such as 32K). Mbox 2 Pro Getting Started Guide... -
Page 75: Using Mac Drives On Windows Systems
Defragmenting Windows Audio Drives Using Mac Drives on Windows Systems To defragment an audio drive (Windows Vista): Choose Start > Control Panel. Pro Tools for Windows lets you record and play back sessions directly from a Mac-formatted Click System and Maintenance. (HFS+) drive connected to a Windows system. -
Page 76: Hard Disk Storage Space
7 GB 7.8 GB 10.5 GB 11.6 GB 32 mono tracks, 5 minutes 800 MB 883 MB 1.2 GB 1.3 GB 32 mono tracks, 60 minutes 9.4 GB 10.4 GB 14 GB 15.4 GB Mbox 2 Pro Getting Started Guide... -
Page 77: Appendix D. Troubleshooting
appendix d Troubleshooting Backing Up Your System Backing Up Your Work Configuration It is highly recommended that you back up your After configuring your system and Pro Tools, work on a regular basis, and especially before you should save an image of your system drive making changes to your system configuration. -
Page 78: Common Issues
Pro Tools. Power Saver Features Some automatic power saver features, such as those that spin down the system hard drive, can affect Pro Tools perfor- mance. These features should be turned off. Mbox 2 Pro Getting Started... -
Page 79: Before You Call Digidesign Technical Support
Gather Important Information Before You Call Digidesign Digidesign wants to help you resolve problems Technical Support as quickly and efficiently as possible. If you have the following information handy when you Register Your System contact Technical Support, it will make the diag- nosis of your problem easier. - Page 80 Note any DAE errors or other error codes you en- counter. Additonally, note the ability to repro- duce the problem under different conditions, for example, with another session, or after changing settings (such as the Hardware Buffer Size). Mbox 2 Pro Getting Started...
-
Page 81: Index
index ASIO driver (Windows) 11 Energy Saver (Mac), turning off 28 audio drivers Ext Clock LED 29 ASIO driver (Windows) 11 CoreAudio driver (Mac) 15 Audio MIDI Setup (AMS) (Macintosh) 59 FireWire authorizing Pro Tools LE cable types 32 Mac 14 FireWire requirements 63 Windows 11 footswitch 33, 45... - Page 82 (Windows) 9 setup (Macintosh) 59 processor performance (Mac) 28 setup (Windows) 55 Processor Scheduling performance (Windows) 26 MIDI Input Selector 52 MIDI Studio Setup (MSS) (Windows) 55 QuickTime installing (Windows) 10 network connections 70 Mbox 2 Pro Getting Started...
- Page 83 registration information 5 technical support product registration required 71 removing Pro Tools Windows 12, 16 TRS 37 RTAS Processors setting 19 uninstalling Pro Tools Windows 12, 16 S/PDIF 33 Sample Rate 23 screen saver, disabling (Windows Vista) 11 screen savers 70 SCSI requirements 63 Software Update (Mac), turning off 27 sources...
- Page 84 DIGIDESIGN TECHNICAL SUPPORT (USA) PRODUCT INFORMATION (USA) INTERNATIONAL OFFICES Visit the Digidesign website 2001 Junipero Serra Boulevard Tel: 650.731.6100 Tel: 800.333.2137 for contact information Daly City, CA 94014-3886 USA Fax: 650.731.6384 Tel: 650.731.6300 Fax: 650.731.6399...
Need help?
Do you have a question about the Mbox 2 Pro and is the answer not in the manual?
Questions and answers