Table of Contents
Advertisement
Quick Links
Advertisement
Table of Contents

Related Manuals for AEG Competence B9879-4


Summary of Contents for AEG Competence B9879-4
- Page 1 COMPETENCE B9879-4 Built-In Electric Oven User information...
-
Page 2: Dear Customer
Dear Customer, Please read these user instructions carefully and keep them to refer to later. Please pass the user instructions on to any future owner of the appli- ance. The following symbols are used in the text: Safety instructions Warning! Notes that concern your personal safety. Important! Notes that show how to avoid damage to the appliance. -
Page 3: Table Of Contents
The electronic oven controls........ - Page 4 Cleaning the Oven Shelf Runner ........
-
Page 5: Safety Instructions
• Warning: Risk of burns! The interior of the oven becomes hot dur- ing use. • Using ingredients containing alcohol in the oven may create an alco- hol-air mixture that is easily ignited. -
Page 6: How To Avoid Damage To The Appliance
How to avoid damage to the appliance • Do not line the oven with aluminium foil and do not place baking trays, pots, etc. on the oven floor, as the heat that builds up will dam- age the oven enamel. -
Page 7: Disposal
Disposal Packaging material The packaging materials are environmentally friendly and can be recy- cled. The plastic components are identified by markings, e.g. >PE<, >PS<, etc. Please dispose of the packaging materials in the appropriate container at your local waste disposal facilities. Old appliance The symbol on the product or on its packaging indicates that this... -
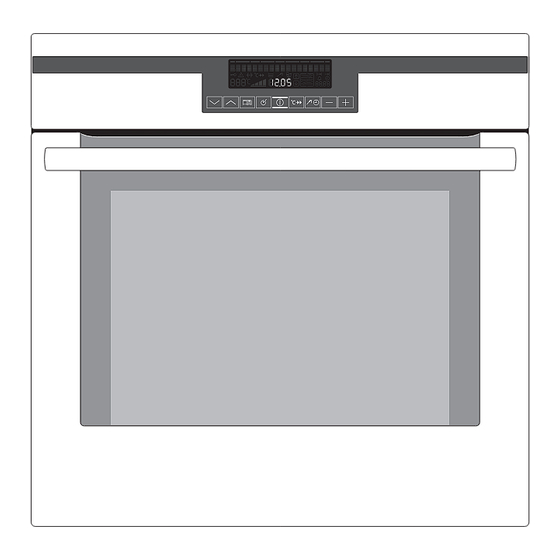
Page 8: Description Of The Appliance
Description of the Appliance General Overview Door handle Oven displays and buttons Full glass door... -
Page 9: The Electronic Oven Controls
In the menu status bar the current position within a menu is shown by a flashing bar. When the menu status bar can no longer be seen in the display, the oven begins to heat or the time set begins to count down. Symbol status bar Symbol... -
Page 10: Buttons
Buttons wm¸¹º»¼-+ Button To select oven functions. To move down and up in the menu. ¸ To open the Options menu. To close the Options menu (press and hold button). ¹ Confirm, change to the sub-menu. º To switch appliance on or off. -
Page 11: Oven Features
For baking or for collecting fat Baking Shelf For moist cakes, roasts or for use as a baking tray or a pan to collect fat. Top heat and heating elements Oven shelf runners, removable Oven lighting Meat probe socket Oven lighting Fan heating element... -
Page 12: Oven Shelf Runner
Pizza stone For cooking the perfect pizza base and crusty bread Meat probe For determining exactly how far joints of meat are cooked Oven Shelf Runner Triple shelf runner for ovens 2 side rails with 3 telescopic runners. -
Page 13: Before Using For The First Time
Before using for the first time Setting the language 1. When the appliance has been connected to the elec- trical supply, SPRACHE EINS- TELLEN - LANGUAGE MENU is shown in the display. 2. Using the arrow buttons select the desired lan- guage. -
Page 14: Setting The Clock
For the metal surfaces, use commercially available cleaning agents. 1. Open the oven door. The oven light is lit. 2. Remove all oven accessories, and clean them with warm water and a scouring agent. 3. Wash the oven in the same way, and wipe dry. -
Page 15: Operating The Oven
The display only offers setting options that are possible with the cur- rent function after each operational step. The Oven Functions menu • When you switch the appliance on, you find yourself in the Oven Functions menu. • Select the desired oven function using the arrow buttons In the menu status bar, the currrent position within the menu is shown. -
Page 16: The Options Menu
You use this to go back to the higher menu. You can cancel a setting procedure by pressing and holding down the OPTION button. You will then find yourself back in the Oven functions menu. –—OVEN FUNCTIONS button. ý ý ý... -
Page 17: Use Of The Oven Functions
For grilling flat food items ar- ranged in the middle of the grill and for toasting. For baking on up to three oven levels at the same time. Set the oven temperatures 20-40 °C lower than when using Con- ventional. -
Page 18: Meat Programmes
VEAL LAMB JOINT GAME BONED POULTRY Usage, Tables, Tips and Recipes You will find practical information on the various oven functions, pro- grammes and automatic recipes in the accompanying booklet. Application Chicken, duck, goose Roast pork, shoulder of pork Roast beef, pot roast... -
Page 19: Switching The Oven On And Off
Switching the Oven On and Off Selecting an oven function 1. Switch appliance on using the ON/OFF 2. Using the arrow buttons select the desired oven function. A suggested temperature ap- pears in the temperature dis- play. The oven starts to heat up. -
Page 20: Pre-Heating With The Rapid Heat Up Function
Cooling fan The fan switches on automatically in order to keep the appliance’s sur- faces cool. When the oven is switched off, the fan continues to run to cool the appliance down, then switches itself off automatically. Pre-heating with the RAPID HEAT UP function After an oven function has been selected, with the additional function RAPID HEAT UP the pre-heating time can be shortened. -
Page 21: Heat Indicator
When the oven function has been switched on the four bars that slowly light up one after the other indicate how far the oven has heated up. Rapid heat up indicator When the RAPID HEAT UP function has been switched... -
Page 22: Inserting Combination Shelf, Baking Tray And Roasting Tray
All insertable components have a small curved indentation on their left and right edges. This indentation serves as an anti-tip device and must always point towards the back of the oven. Inserting combination shelf: Insert combination shelf so that the two guide bars point downwards. -
Page 23: Attaching/Removing The Grill Pan Handle
Attaching/Removing the Grill Pan Handle The handle is particularly useful for removing the grill pan and tray more easily from the hot oven. Attaching the handle Insert the handle at an angle from above into the recess in the side of... -
Page 24: Meat Probe
Setting meat probe core temperature To switch the oven off when the temperature at the centre of a roast reaches a core temperature set by you. There are two temperatures to consider: –... -
Page 25: Oven Functions
The core temperature is displayed from 30°C. 3. Set oven function and, if necessary, oven temperature. As soon as the pre-set core temperature is reached, a signal sounds. 4. To switch off the signal, press any button. -
Page 26: Automatic Programmes
Automatic programmes In addition to the oven functions for individually setting baking and roasting, you have the option of working with various automatic pro- grammes: 1. Meat programmes with weight input (OVEN FUNCTIONS menu) 2. Meat programmes with meat probe (OVEN FUNCTIONS menu) 3. -
Page 27: Meat Programmes With Meat Probe
When all meat programmes are completed, an audible signal sounds. Meat programmes with meat probe When the meat probe is plugged in, the OVEN FUNCTIONS menu offers additional meat programmes with meat probe. These programmes offer optimum settings for each type of meat. -
Page 28: Options
Options RECIPE MENU in overview ¸ RECIPE MENU ¹ BAKING RECIPES ¹ LEMON SPONGE CAKE SWEDISH CAKE SPONGE CAKE CHEESE CAKE FRUIT CAKE STREUSEL PLAIT YEAST PLAIT WHITE BREAD BACK ROASTING RECIPES ¹ PIZZA POTATO GRATIN ONION TARTE QUICHE LORRAINE LASAGNE CANNELLONI MEAT CASSEROLE... - Page 29 ROASTING RECIPES menu. 5. Use the arrow buttons to select the desired reci- If the selection is not altered for a few seconds, the oven takes this setting and begins to heat up. _____ button RECIPE MENU ý...
- Page 30 A suggested temperature ap- pears in the display. If the selection is not altered for a few second, the oven takes this setting and begins to heat up. _______ ONION TARTE ý ý ý 280û c wm¸¹º»¼-+...
- Page 31 With the recipes POWDER CAKE and FROZEN PIZZA using the buttons, the suggested temperture can be increased or decreased by 10°C. In the category OTHER RECIPES you will find the following menu options: POWDER CAKE FROZEN PIZZA DRYING HERBS PRESERVING You will find further instructions on these functions in the booklet “Tables, Tips and Recipes”.
-
Page 32: Memory Menu
10 for recipes with pre-set meat probe core temperatures. Saving settings for “Personal Recipes” To save settings for a known recipe 1. Select oven function and temperature. 2. If necessary, use the SELECTION tion DURATION tions” section). -
Page 33: Overwriting A Memory Position
2. Using the arrow button select saved recipe. You can call up the first three saved “Personal Recipes” directly in the Oven Functions menu. Other “Personal Recipes” can be called up in the MEMORY MENU under the menu option START MEMORY. -
Page 34: Settings Menu
SETTINGS MENU Independent of the current use of the oven, you can change various base settings. These remain permanently set, until they are changed again. RAPID HEAT UP MENU – RAPID HEAT UP ON – RAPID HEAT UP OFF RESIDUAL HEAT MENU –... - Page 35 7. Press the OK button. In the display SAVED appears for a few seconds. Afterwards, you will find yourself back in the Oven Functions menu. button, open the Options menu. select the menu option SETTINGS go to the setting that you want to...
-
Page 36: Clock Functions
When the DURATION oven switches the heating elements off, when 90% of the time set or calculated has elapsed. The residual heat present is used to continue the cooking process until the time set has elapsed (3 to 20 mins.). - Page 37 Countdown time (max. 99 minutes). After about 5 seconds the display shows the time re- maining. OVEN FUNCTIONS and the symbol are shown in the display. When the time has elapsed, an audible signal sounds for 2 minutes.
- Page 38 DURATION 1. Select oven function and temperature. 2. Press the SELECTION ton repeatedly until DURA- TION the symbol for displayed. 3. Using the set the desired cooking time. After about 5 seconds the remaining cooking time is displayed. The symbol...
- Page 39 1. Select the oven function and temperature. 2. Press the SELECTION ton repeatedly until END and the symbol are displayed. 3. Using the button, set the desired switch-off time. After about 5 seconds the switch-off time is displayed. The symbol...
- Page 40 2 minutes and the oven switches itself off, for example: at 14:05. and END combined and END can be used simultaneously, if the oven is ý ý ý 200û c þ wm¸¹º»¼-+ function, ý ý ý 200û c þ...
-
Page 41: Additional Functions
Switching off the CHILD LOCK • Touch SELECTION LOCK goes out in the display. The CHILD LOCK is now deactivated and the oven is again ready for use. CHILD LOCK ý ý ý 280û c þ wm¸¹º»¼P - P + buttons simultaneously until CHILD button. -
Page 42: Button Lock
BUTTON LOCK To ensure that all oven functions set are not accidentally altered. Switching on BUTTON LOCK 1. If necessary, switch on the appliance using the ON/OFF 2. Select the oven function. 3. Press the SELECTION buttons simultaneously until BUTTON LOCK appears in the display. -
Page 43: Cleaning And Care
1. The oven light switches on automatically when the oven door is opened. 2. After every use, wipe the oven with a solution of water and washing-up liquid and allow to dry. In the event of stubborn dirt, clean using PYROLUXE. -
Page 44: Cleaning Function For Oven Cleaner Spray
Cleaning function for oven cleaner spray With the cleaning function for oven cleaner spray you can pre-heat the oven to the optimum effective temperature for oven cleaner sprays. Important: Only use oven cleaner sprays that require the oven to be heated. -
Page 45: Performing Pyroluxe Cleaning
(After this point the oven would al- ready have cooled down too much). The time the oven cleaner spray needs to be left to work depends on the manufacturer’s instructions. The acoustic signal can be deactivated by pressing any button. - Page 46 – PYROLUXE HEAVY for a high degree of soiling (3:15). The respective DURATION Pyrolytic cleaning then starts. The oven light does not work. When a pre-set temperature is reached, the door is locked. The lock symbol is active until the door is unlocked again.
-
Page 47: Shelf Support Rails
Shelf Support Rails The shelf support rails on the left and right hand sides of the oven can be removed for cleaning the side walls. Removing the shelf support rails First pull the front of the rail away from the oven wall (1) and then un- hook at the back (2). -
Page 48: Oven Shelf Runner
Oven Shelf Runner The shelf support rails on the left and right hand sides of the oven can be removed for cleaning the side walls. Removing the shelf support rails First pull the front of the rail away from the oven wall and then un- hook at the back. -
Page 49: Cleaning The Oven Shelf Runner
Cleaning the Oven Shelf Runner Clean oven shelf runners with hot water and washing up liquid. Important: The oven shelf runners cannot be cleaned in the dish- washer. Important: On no account grease telescopic runners. Information regarding use in pyrolytic appliances: The oven shelf runners must be removed before pyrolytic cleaning is carried out. -
Page 50: Oven Lighting
– Switch off the oven! – Disconnect from the electricity supply. Place a cloth on the oven floor to protect the oven light and glass cov- Replacing the oven light bulb/ cleaning the glass cover 1. Remove the glass cover by turning it anti-clockwise and then clean it. -
Page 51: Oven Door
1. Open the oven door completely. 2. Completely fold back the clamp- ing levers on both door hinges. 3. Grip the oven door with both hands and close it about 3/4 going past the point of resistance. 4. Pull the door away from the oven (Caution: the door is heavy!) 5. -
Page 52: Oven Door Glass
Oven Door Glass The oven door is fitted with four glass panels mounted one behind the other. The inner panels can be removed for cleaning. Caution: The following steps are to be performed only when the oven door has been removed. If the glass is removed while the door is at- tached, the lighter weight may cause it to spring up and cause injury. - Page 53 Replacing the centre glass panels 1. Insert the centre panels at an angle from above into the section of the door in which the handle is located, á one after the other ( 2. Lower the centre panels down and push them towards the lower edge of the door as far under the retain- ing frame as they will go (...
-
Page 54: What To Do If
If you are unable to remedy the problem by following the above suggestions, please contact your local Service Force Centre. Possible cause The oven is not switched on The clock is not set The required settings have not been set The oven’s safety cut-out has... - Page 55 Advice on cookers with metal fronts: Because of the cooler surface at the front of the cooker, opening the oven door during (or just after) baking or roasting may cause the glass to steam up.
-
Page 56: Electrical Connection
Connection Cooker Control Circuit It is necessary that you install a double pole switch between the oven and the electricity supply (mains), with a minimum gap of 3mm between the switch contacts and of a type suitable for the required load in compliance with the current regulations. -
Page 57: Installation Instructions
Installation Instructions Attention: The new appliance may only be installed and connected by a registered expert. Please comply with this. If you do not, any damage resulting is not cov- ered by the warranty. Safety information for the installer • The electrical installation is to be set up so that the appliance can be isolated from the mains with a minimum 3mm all-pole contact sepa- ration. -
Page 61: Warranty Conditions
Warranty conditions Great Britain Standard guarantee conditions We, AEG, undertake that if within 12 months of the date of the purchase this AEG appliance or any part thereof is proved to be defective by reason only of faulty workmanship or materials, we will, at our discretion repair or replace the same FREE OF CHARGE for labour, materials or carriage on condition that: •... -
Page 62: Index
Oven light bulb..... 50 Oven spray......44 Pre-cleaning . -
Page 63: Service And Spare Parts
0870 5 929 929 For Customer Service in the Republic of Ireland please contact us at the ad- dress below: AEG/ Electrolux Group (Ire) Ltd Long Mile Road/ Dublin 12 Republic of Ireland Tel: +353 (0) 1 4090754 Email: service.eid@electrolux.ie... - Page 64 From the Electrolux Group. The world´s No.1 choice. The Electrolux Group is the world´s largest producer of powered appliances for kitchen, cleaning and outdoor use. More than 55 million Electrolux Group products (such as refrigerators, cookers, washing machines, vacuum cleaners, chain saws and lawn mowers) are sold each year to a value of approx. USD 14 billion in more than 150 countries around the world.
Need help?
Do you have a question about the Competence B9879-4 and is the answer not in the manual?
Questions and answers