Advertisement
Quick Links
Read all instructions BEFORE
assembly and USE of product.
KEEP INSTRUCTIONS FOR
FUTURE USE.
Lea todas las instrucciones ANTES
de armar y USAR este producto.
GUARDE LAS INSTRUCCIONES
PARA USO FUTURO.
Lire les instructions AVANT ď
assembler et ď UTILISER le produit.
GARDER CES INSTRUCTIONS
POUR S'Y RÉFÉRER AU BESOIN.
Lullaby LX/SE
Owner's Manual
Manual del propietario • Manuel du propriétaire
IS0041.9ESF
©2012 Artsana USA, INC. 01/12
Advertisement

Related Manuals for Chicco 00060701480070 - Lullaby LX Playard


Summary of Contents for Chicco 00060701480070 - Lullaby LX Playard
- Page 1 Read all instructions BEFORE assembly and USE of product. KEEP INSTRUCTIONS FOR FUTURE USE. Lea todas las instrucciones ANTES de armar y USAR este producto. GUARDE LAS INSTRUCCIONES PARA USO FUTURO. Lire les instructions AVANT ď assembler et ď UTILISER le produit. GARDER CES INSTRUCTIONS POUR S'Y RÉFÉRER AU BESOIN.
- Page 2 • FALL HAZARD: To help prevent falls, entrapment, use only the mattress do not use bassinet when infant pad provided by Chicco. NEVER use begins to push up on hands and additional mattresses or padding. knees or weighs over 15lbs. (6.8kg), •...
- Page 3 WARNING Failure to follow these warnings and the instructions could result in serious injury or death • If a sheet is used with the pad, use • Never leave changing table in place only a fitted playard sheet specifically when child is in the playard. designed to fit snug with at least 2”...
- Page 4 • La cuna ha sido diseñada para uso SOLAMENTE con este corralito Lullaby de Chicco. • Deje de utilizar el cambiador cuando el niño pese 25 libras (11.4 kg).
- Page 5 Nunca producto. sustituya las piezas. • NUNCA use bolsas de plástico como • A pesar de que Chicco NO fundas para el colchón. No use una RECOMIENDA reterminar este película de plástico como funda para producto, si usted elige hacerlo, use el colchón a menos que se venda...
- Page 6 ADVERTENCIA El incumplimiento de estas advertencias e instrucciones puede ocasionar lesiones graves o la muerte. • DEJE de usar la cuna cuando el EVITE OTROS PELIGROS: niño pueda rodar, incorporarse • Mantenga la cuna, juguetes y corralito apoyándose en las manos y las lejos de cocinas, calentadores, estufas rodillas o alcance las 15 libras (6.8 y otros peligros que podrían causar...
- Page 7 • Le petit lit est conçu pour servir entre le coussin et les côtés de UNIQUEMENT avec ce parc Lullaby mailles, causant la suffocation. Chicco. • Cesser d’utiliser le parc dès que • Cesser d’utiliser la table à langer l’enfant mesure 89 cm (35 po), pèse lorsque l’enfant atteint le poids de...
- Page 8 Ne pas substituer de la bonne utilisation des sangles de pièces de rechange. rétention matelas. • Bien que Chicco NE RECOMMANDE • NE PAS laisser l’enfant dans le parc PAS de retoucher le fini du produit, lorsqu’un côté est baissé. S’assurer que s’il est nécessaire de le faire, utiliser...
- Page 9 MISE EN GARDE Ne pas se conformer à toutes les mises en garde et directives peut causer des blessures graves ou même la mort. ÉVITER LES RISQUES DE • NE PAS placer le parc près d’une fenêtre STRANGULATION : munie de stores ou de rideaux dont la •...
- Page 10 Setting Up the Playard Instalación del corralito Montage du parc WARNING ADVERTENCIA MISES EN GARDE Before use remove and Antes del uso, saque y Avant l’utilisation, retirer dispose of any plastic deseche las bolsas de tous les sacs en plastique bags and keep them out plástico y póngalas lejos et les jeter ou les...
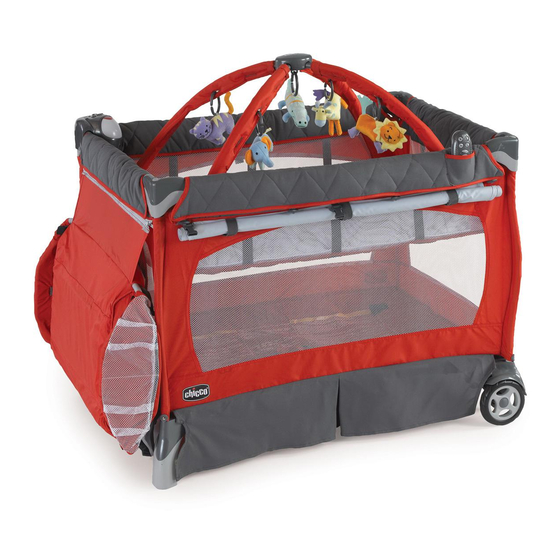
- Page 11 Setting Up the Playard Instalación del corralito Montage du parc Lullaby Playard includes: Portable Playard, Infant Bassinet, Toy Gym and Changing Unit. La cuna corral Lullaby Playard incluye: Corralito portátil, cuna para bebés , gimnasio de juguetes y cambiador. Le parc Lullaby comprend un parc portatif, un petit lit pour bébé, un portique avec jouets suspendus, et une table à...
- Page 12 Setting Up the Playard Instalación del corralito Montage du parc 2. Center floor hub must be pulled up to the level of the top rails before continuing. If needed, pull up on the center floor hub release strap. 2. La base central del piso debe elevarse hasta alcanzar el nivel de los rieles superiores antes de continuar.
- Page 13 Setting Up the Playard Instalación del corralito Montage du parc 3. With the center hub even (or level) with the 4 corners. Lift each top rail until it locks. Check that all four top rails are locked before proceeding to Step 4.
- Page 14 Setting Up the Playard Instalación del corralito Montage du parc 4. Push down on center floor hub until feet rest on floor. The bottom of the playard should be flat. 4. Empuje hacia abajo la base central del piso hasta que los pies toquen el piso.
- Page 15 Setting Up the Playard Instalación del corralito Montage du parc 5. Install Mattress Pad, pad side up. Fold straps under the floor. Do not use playard without Mattress Pad. 5. Instale la Colchoneta del piso, con el lado acolchado mirando hacia arriba.
- Page 16 Setting Up the Playard Instalación del corralito Montage du parc 6. Locate 4 Mattress Pad strap holes on the floor of the playard. Thread the 4 hook and loop straps/D-rings through the floor of the playard as shown. 6. Ubique los 4 orificios para las correas de la colchoneta en el piso del corralito.
- Page 17 Setting Up the Playard Instalación del corralito Montage du parc 7. Turn the playard on its side and pull the straps completely through the floor of the playard. Thread the strap around the frame tube as shown. Pull tight through D-ring and attach hook and loop together to secure.
- Page 18 Assembling Bassinet Armado de la cuna Installation du petit lit 8. Remove Mattress Pad from playard. Lay bassinet over playard, snaps facing down. Push all twelve bassinet clips securely onto top rails. 8. Saque la Colchoneta del piso del corralito. Ponga la cuna sobre el corralito, con los broches de presión mirando hacia abajo.
- Page 19 Assembling Bassinet Armado de la cuna Installation du petit lit 9. Slide metal bars into tubing sleeves inside bassinet and connect metal bars together. 9. Deslice las barras de metal dentro de las fundas de los tubos y dentro de la cuna.
- Page 20 Assembling Bassinet Armado de la cuna Installation du petit lit WARNING ADVERTENCIA MISE EN GARDE Do not place Bassinet No ponga la cuna en la Ne pas placer le petit lit on unit if a child is in the unidad si el niño está en sur le parc lorsqu’un playard.
- Page 21 Changing Table Warnings Advertencias para el cambiador Mises en garde relatives à la table à langer WARNING ADVERTENCIA MISE EN GARDE FALL HAZARD - To PELIGRO DE CAÍDA RISQUES DE CHUTES prevent death or - Para prevenir la – Pour prévenir les serious injury, always muerte o lesiones blessures graves ou la...
- Page 22 Assembling Changing Table Instalación de la mesa para cambiar al bebé Assemblage de la table à langer 12. Pull back the fabric sleeve on the changing table to reveal the metal tube inside it. 12. Tire hacia atrás la funda de tela del cambiador para descubrir el tubo de metal que hay en su interior.
- Page 23 Assembling Changing Table Instalación de la mesa para cambiar al bebé Assemblage de la table à langer 13. Attach both metal end pieces to poles, making sure metal spring button pushes completely through the holes. Do the same on the opposite end of the changing table.
- Page 24 Assembling Changing Table Instalación de la mesa para cambiar al bebé Assemblage de la table à langer 14A, B & C. Stretch fabric cover over metal end pieces. Turn changer over and secure underneath with Velcro. Nets face outward. 14A, B & C. Estire los extremos con malla sobre el soporte de metal.
- Page 25 Assembling Changing Table Instalación de la mesa para cambiar al bebé Assemblage de la table à langer 15A. Attach the two buckles on the end panel of the changing table to the buckles on the long side of the playard. Repeat on other side of changing table.
- Page 26 Assembling Changing Table Instalación de la mesa para cambiar al bebé Assemblage de la table à langer 16. Zip the zipper on the side of the changing table to the end panel of the playard. NOTE: All 4 buckles and the zipper must be securely fastened when changing table is in use.
- Page 27 Assembling the Toy Gym Arch Cómo armar el arco del gimnasio para bebés Montage du module de jouets suspendus WARNING ADVERTENCIA MISE EN GARDE Recommended use from Uso recomendado: del Utilisation recommandée birth to 5 months. The toy nacimiento hasta los 5 de la naissance à...
- Page 28 Assembling the Toy Gym Arch Cómo armar el arco del gimnasio para bebés Montage du module de jouets suspendus 17. Insert all 4 Toy Gym legs into center hub until they "click" into locking position . 17. Inserte las cuatro patas del gimnasio para bebés en el cubo central hasta que se encaje en la posición de bloqueo y se oiga clic.
- Page 29 Assembling the Toy Gym Arch Cómo armar el arco del gimnasio para bebés Montage du module de jouets suspendus WARNING ADVERTENCIA MISE EN GARDE DO NOT attach Toy Gym NO instale el arco del NE PAS fixer les arceaux arch to mattress pad while gimnasio de juguetes (Toy du portique au matelas Gym) a la colchoneta del...
- Page 30 Assembling the Toy Gym Arch Cómo armar el arco del gimnasio para bebés Montage du module de jouets suspendus 19. Use the hook and loop straps at the end of each toy gym leg. Pass the strap through the D-ring under the mattress pad, and fasten.
- Page 31 Assembling the Toy Gym Arch Toys Armado de los juguetes del arco del gimnasio de juguete Assemblage du portique avec jouets suspendus 20. Thread Toy strap through button hole on Toy Gym and secure using hook and loop tabs (as shown). Repeat for remaining toys.
- Page 32 Operate NiteLite Electronics Para utilizar los componentes electrónicos NiteLite Fonctionnement du module électronique NiteLite ADVERTENCIA WARNING MISE EN GARDE No mezcle pilas nuevas y Do not mix old and new Ne pas utiliser ensemble viejas. No mezcla pilas batteries. Do not mix des piles neuves et des alcalinas, comunes (carbo- alkaline, standard (carbon-...
- Page 33 Operate NiteLite Electronics Para utilizar los componentes electrónicos NiteLite Fonctionnement du module électronique NiteLite 21. Before attempting to operate the corner electronics unit, install four AA batteries matching the polarity indicated inside battery compartment. Make sure battery compartment is installed correctly in the corner.
- Page 34 Operate NiteLite Electronics Para utilizar los componentes electrónicos NiteLite Fonctionnement du module électronique NiteLite 22. Place Lullaby NiteLite electronics over any corner cap as shown. Press down gently ensuring that it is resting securely into place. DO NOT force. 22. Ponga los componentes electrónicos Lullaby NiteLite sobre cualquier tapa de la esquina como se indica.
- Page 35 Operate NiteLite Electronics Para utilizar los componentes electrónicos NiteLite Fonctionnement du module électronique NiteLite 23A. The Lullaby NiteLite has (3) modes: SOUND: The SOUND ( ) position plays nature sounds. The SOUND ( selection will cycle through 3 different sounds for 10 minutes and go into standby/sleep mode.
- Page 36 Operate NiteLite Electronics Para utilizar los componentes electrónicos NiteLite Fonctionnement du module électronique NiteLite 23. Lullaby NiteLite tiene (3) modos: SONIDO: La posición SONIDO ( reproduce sonidos de la naturaleza. La selección SONIDO ( ) pasará por 3 sonidos diferentes durante 10 minutos y se pondrá...
- Page 37 Operate NiteLite Electronics Para utilizar los componentes electrónicos NiteLite Fonctionnement du module électronique NiteLite 23. Le modèle Lullaby NiteLite possède (3) modes. SON : La position SON ( permet de faire jouer des bruits de la nature. Le choix de SONS ( ) fait défiler à...
- Page 38 Operating the Remote Control (Select models) Operación del control remoto (modelos selectos) Fonctionnement de la télécommande (certains modèles) 24A. To operate the remote control: Slide the power button on the Nitelite to the Melody or Sound position. Point the remote control directly toward the NiteLite.
- Page 39 Operating the Remote Control (Select models) Operación del control remoto (modelos selectos) Fonctionnement de la télécommande (certains modèles) 24B. With the switch in the MELODY ( ) or SOUND ( ) position you can activate the following: VOLUME: To increase the sound, press the ( ) side of the button.
- Page 40 Operating the Remote Control (Select models) Operación del control remoto (modelos selectos) Fonctionnement de la télécommande (certains modèles) 24B. Con el interruptor en la posición MELODÍA ( ) o SONIDO ( ) puede activar lo siguiente: VOLUMEN: Presione el lateral ( ) del botón para aumentar el sonido.
- Page 41 Operating the Remote Control (Select models) Operación del control remoto (modelos selectos) Fonctionnement de la télécommande (certains modèles) 24B.Lorsque le commutateur est en position MÉLODIE ( ) ou SON ( il est possible d'activer les fonctions suivantes : VOLUME : Pour augmenter le volume, appuyer sur le côté...
- Page 42 Operating the Remote Control (Select models) Operación del control remoto (modelos selectos) Fonctionnement de la télécommande (certains modèles) 25. The bassinet is equipped with a side pocket for the remote control on certain models. 25. La cuna está equipada con un bolsillo en el costado para el control remoto en algunos modelos.
- Page 43 Packing Up the Playard Empaquetado del corralito de juguetes Rangement du parc 26. Top rails cannot be unlocked first. Remove bassinet, gym, pad, and NiteLite. Pull up on the center floor hub release strap and lift the center hub up as far as possible. 26.
- Page 44 Packing Up the Playard Empaquetado del corralito de juguetes Rangement du parc 27. Lift and squeeze center of top rail to release lock. Push down on top rail while continuing to squeeze. Top rail cannot be pushed in until the lock joint is lifted. If top rail will not unlock, pull up on center floor hub release strap to make sure ALL floor rails are unlocked.
- Page 45 Packing Up the Playard Empaquetado del corralito de juguetes Rangement du parc 28. Pull up on the center floor hub release strap and gather playard legs towards the center. 28. Tire de la correa de liberación de la base central del piso y lleve las patas del corralito hacia el centro.
- Page 46 Packing Up the Playard Empaquetado del corralito de juguetes Rangement du parc 29. Turn unit upright with wheels on ground. Place NiteLite in center opening. Wrap Mattress Pad around folded playard (29A). Thread fastening straps through rings on Mattress Pad (29B). Place playard in travel bag.
- Page 47 Packing Up the Playard Empaquetado del corralito de juguetes Rangement du parc 30. Keep instructions for future use. 30. Guarde las istrucciones par uso futuro. 30. Garder ces instructions pour s'y referer au besoin.
-
Page 48: Troubleshooting Guide
Before top rails can be locked, the center floor hub must be pulled up as high as the 4 corners. If needed pull up on the center floor hub release strap. If necessary, pull the release strap up with one hand and lock rails one at a time. Call Chicco Customer Service (p. 54). - Page 49 En caso de ser necesario, tire de la correa de liberación con una mano y trabe las barandas de a una por vez. Comuníquese con el Servicio al Cliente de Chicco (pág. 54). LAS UNIONES DEL PISO NO SE NIVELAN: Dé...
-
Page 50: Guide De Dépannage
Si nécessaire, tirer sur la courroie de dégagement d’une main et verrouiller les traverses, une à la fois. Communiquer avec le service à la clientèle de Chicco (p. 54). LES ARTICULATIONS AU FOND DU PARC NE S’APLATISSENT PAS : Tourner le parc à... -
Page 51: Cleaning And Maintenance
Periodically check the lullaby for loose screws, worn parts, torn material or stitching. Replace or repair the parts as needed. Use only Chicco replacement parts. Keep the lullaby in a dry place. If lullaby becomes wet open lullaby and allow to dry completely. -
Page 52: Limpieza Y Mantenimiento
Reemplace o repare las piezas en caso de que sea necesario. Sólo utilice piezas de repuesto de Chicco. Mantenga el corralito en un lugar seco. Si el corralito se moja, abra la capota y deje que se seque completamente. La exposición prolongada a la luz directa del sol puede hacer que la tela pierda el color y... -
Page 53: Entretien Et Nettoyage
Remplacer ou réparer ces pièces au besoin. Utiliser uniquement des pièces de rechange Chicco. Afin d’éviter la friction susceptible de nuire au fonctionnement de la parc, s’assurer que toutes les pièces mobiles en plastique sont libres de toute trace de poussière, terre ou sable. - Page 54 Si vous avez des questions ou commentaires, au sujet de ce produit, ou si certaines pièces sont manquantes, veuillez ne pas retourner ce produit au magasin. Communiquez avec nous de l'une des façons suivantes : (800)-667-4111 www.chicco.ca 2260, rue Guénette Saint-Laurent (Québec) H4R 2M7 Canada...
- Page 55 This product complies with the requirements of the Playpens Regulations (Canada) Ce produit est conforme aux exigences du Règlement sur les parcs pour enfants (Canada)
- Page 56 www.chiccousa.com...
Need help?
Do you have a question about the 00060701480070 - Lullaby LX Playard and is the answer not in the manual?
Questions and answers