Table of Contents
Advertisement
Available languages
Available languages
Operating Instructions
Instrucciones de Uso
Wrist Blood Pressure Monitor
Monitor de presión arterial de muñeca
EW-BW30
Model No./Nº de Modelo
English
1
Español
S1
Before operating this device, please read these instructions completely and
save this manual for future use.
Antes de utilizar este dispositivo, lea completamente estas instrucciones y
conserve este manual para futura referencia.
Advertisement
Chapters
Table of Contents

Related Manuals for Panasonic EW-BW30S


Summary of Contents for Panasonic EW-BW30S
- Page 1 Operating Instructions Instrucciones de Uso Wrist Blood Pressure Monitor Monitor de presión arterial de muñeca EW-BW30 Model No./Nº de Modelo English Español Before operating this device, please read these instructions completely and save this manual for future use. Antes de utilizar este dispositivo, lea completamente estas instrucciones y conserve este manual para futura referencia.
- Page 2 Panasonic Oscillometric Diagnostec™ Automatic Wrist Blood Pressure Monitor Model EW-BW30 is a device intended to measure systolic and diastolic blood pressure and pulse rate of an adult individual by using a pressurized cuff on the wrist. The device is not intended for use on neonatal, infants and children.
-
Page 3: Table Of Contents
Table of Contents Introduction ....................3 Basics of Blood Pressure ................ 3 Important Instructions Before Use ............4 Precautions to Ensure Safe, Reliable Operation ........6 Easily Check Your Blood Pressure Readings Against the JNC 7* Classification ................. 7 Diagram of the Device ................8 Inserting/Replacing Batteries .............. -
Page 4: Introduction
Introduction Thank you for purchasing the Panasonic Automatic Wrist Blood Pressure Monitor EW-BW30. Measuring your own blood pressure is an important way of monitoring your health. High blood pressure (hypertension) is a major health problem which can be treated effectively once detected. Measuring your blood... -
Page 5: Important Instructions Before Use
Also, if you find that your blood pressure is lower at home, this is not unusual. To accurately compare with your physician’s reading, take your Panasonic blood pressure monitor to your doctor’s office and compare readings in this setting. 5. People suffering from cardiac arrhythmia, vascular constriction, liver... - Page 6 this is not possible, however, try to take measurements at a specified time prior to breakfast, and before you have become active. You should relax for about 5 minutes before taking the measurement. The following situations may cause substantial variations in blood pressure readings and should therefore be avoided at least 30 minutes prior to taking your blood pressure.
-
Page 7: Precautions To Ensure Safe, Reliable Operation
g. Do not short-circuit batteries. h. Do not attempt to recharge the batteries included with the unit. 12. Please remove the cuff if abnormal operation, such as prolonged overinflation, is observed. Differences in Blood Pressure Values Measured at the Wrist Versus at the Upper Arm For persons with peripheral circulatory disorders* resulting from diabetes, liver or kidney disease, arteriosclerosis or hypertension, etc.,... -
Page 8: Easily Check Your Blood Pressure Readings Against The Jnc 7* Classification
E asily Check Your Blood Pressure Readings Against the JNC 7* Classification Blood Pressure Categories Stage 2 Hypertension e.g.: SBP 165 DBP 105 Stage 1 Hypertension e.g.: SBP 150 DBP 95 Prehypertension e.g. SBP 130 DBP 85 e.g.: Normal SBP 115 DBP 75 Systolic Blood Pressure (SBP) If the two blood pressure measurements (systolic, diastolic) fall into separate categories, your level is classified in the higher of the two categories. -
Page 9: Diagram Of The Device
Diagram of the Device * Only use alkaline batteries. Body View from Top Adjust button Set button Display Positioning mark Battery cover Wrist height button Wrist height sensor lamp Graph button Off/On Start Pressure cuff button Memory/Recall button AM/PM comparison button Storage case Can also be used as an armrest. This product includes: •... -
Page 10: Inserting/Replacing Batteries
Inserting/Replacing Batteries *Always use alkaline batteries. (2 AAA-size LR03 alkaline batteries) • When replacing batteries, always use 2 fresh alkaline batteries of the same type from the same manufacturer, and replace them simultaneously. 1. Remove the device from the storage case. Insert the batteries. (1) Slide the battery cover open as shown in the diagram. (2) Insert the two batteries making sure that they are aligned correctly (+/–). -
Page 11: Setting The Time And Date
• The frequency of use for batteries is approximately 300 measurements (3 times per day) with fresh Panasonic alkaline batteries (AAA-size LR03 alkaline batteries). [Measurement conditions: Room temperature 73.4 °F (23 °C); Pressurized to 170 mmHg; Wrist circumference: 6-3/4˝ (17 cm)] •... - Page 12 Setting the Time and Date (cont.) 4 Adjust in order of “month”, “day”, “hour”, and “minutes”, repeating steps 2 and 3. • The clock is stopped while the date or time is flashing. “Month” “Day” “Hour” “Minute” 5 Press the Off/On Start button to turn off the unit. Note) During the setting if the Off/On Start button is pressed, or if no button is pressed for 5 minutes, the settings made up to that point will be used.
-
Page 13: Fitting The Pressure Cuff
Fitting the Pressure Cuff Blood pressure is measured at your left wrist. It is not necessary to roll up your sleeve or to remove any clothing. 1. Place the device on the inside of your wrist. Place the device • Place the device directly in on the inside of your wrist. contact with the skin. - Page 14 Fitting the Pressure Cuff (cont.) Do not remove the hook-and-loop fastener by twisting it off. Be sure to peel it in an horizontal direction in alignment with the cuff. <When wrapping around right wrist> Fit as shown in the figure. The cuff can be used on either wrist. However, the difference in blood pressure between the left and right wrists may be around 10 mmHg, so...
-
Page 15: Obtaining Accurate Measurements
Obtaining Accurate Measurements Always take your blood pressure at the same time while sitting in the same position and using the same wrist. It is recommended to check your blood pressure at least twice a day. It is best in the morning before breakfast and in the evening after work. In the following situations, accurate measurements cannot be taken. • Within 1 hour after eating or drinking alcohol •... - Page 16 Obtaining Accurate Measurements (cont.) Do not take measurements in the positions shown below as they will be inaccurate. Do not bend your wrist inward. Do not clench your fist. If the device is placed at If the device is placed at If you lean forward while a height lower than the a height higher than the taking measurements...
-
Page 17: Wrist Height Sensor
Wrist Height Sensor About the wrist height sensor • This is a support function to ensure that you use the blood pressure monitor at an appropriate height (same height as your heart). Users with a fixed measurement position and measurement environment (height of table, height of chair, etc.) can achieve more stable measurement conditions by using this function. - Page 18 Wrist Height Sensor (cont.) Setting the Height 1. Place the arm to which the device is attached on top of the storage case with the wrist positioned at the level of the heart. 2. Press the wrist height button for 3 seconds or longer. It will notify by flashing the wrist height sensor lamp 3 times. Height sensor setting display 3. Press the Off/On Start button to turn off the unit. • Once the height is set, the range of appropriate height (where the wrist height sensor lamp turns on) becomes narrow in comparison to when it is not set, making it easier to adjust to appropriate height.
- Page 19 Clearing the Height Setting 1. Press the Memory/Recall button. 2. Press the wrist height button for 3 seconds or longer. It will notify by flashing the wrist height sensor lamp 3 times. Height sensor off display 3. Press the Off/On Start button to turn off the unit. English...
-
Page 20: Measuring Your Blood Pressure
Measuring Your Blood Pressure 1. Place the arm to which the device is attached on top of the storage case with the wrist positioned at the level of the heart. (Please see “Obtaining Accurate Measurements” on pages 14 and 15.) 2. Press the wrist height button briefly. • Wrist height sensor function will start. (For wrist height sensor, see pages 16 and 17.) (Measurement will not start until the Off/On Start button is pressed.) Note: Height setting is reset when it is pressed for 3 seconds or longer. - Page 21 4. Press the Off/On Start button. • The display will be lit up for approx. 2 seconds. • The cuff will begin to inflate automatically. As measurements are being taken during pressurization, operating sounds and the rate of pressurization may change. This is perfectly normal. •...
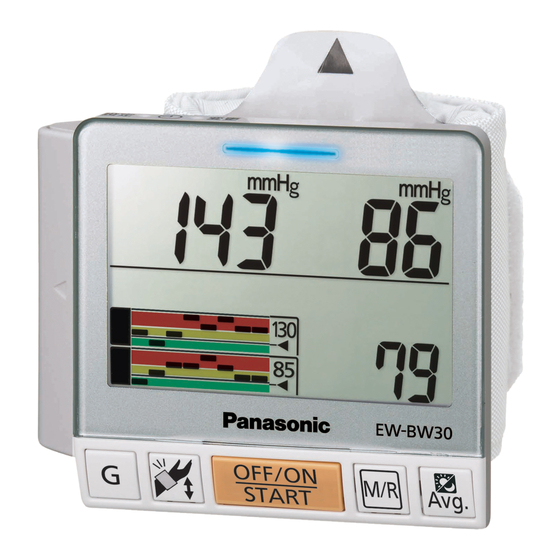
- Page 22 Measuring Your Blood Pressure (cont.) Trend Graph Function This blood pressure monitor can display previous measurement results in a graph to allow you to see the trend in your blood pressure. Measurements taken in the morning are displayed as a graph in stored morning data; measurements taken in the evening as a graph in stored evening data;...
- Page 23 Graph for systolic blood pressure (upper level) Orange: 160 mmH g and over [Hypertension (Stage 1)] Orange: 140 mmH g to 159 mmH g [Hypertension (Stage 2)] Yellow: 130 mmH g to 139 mmH g (Prehypertension) Green: 130 mmH g or less (Normal) Graph for diastolic blood pressure (lower level) Orange: 95 mmH g and over [Hypertension (Stage 1)] Orange: 90 mmH g to 94 mmH g [Hypertension (Stage 2)]...
- Page 24 Measuring Your Blood Pressure (cont.) About the data Weekly average data uses Sunday to Saturday as one week. 8 recent graph display Most current data 1 previous 2 previous 7 previous Weekly average graph display (past 2 months) Current week average data 1 week previous average data 2 weeks previous average data 7 weeks previous average data It is possible to check older data by pressing the Memory/Recall button in each screen.
-
Page 25: Movement Detection Function
Movement Detection Function If movement is detected while measurement is being carried out and more pressure is applied by the pressure cuff, the mark will be displayed. • Please carry out blood pressure measurement again if the mark flashes or is lit. •... -
Page 26: Irregular Pulse Function
Irregular Pulse Function If the pulse rate varies by more than ±25 % from the average while a measurement is being taken, when measurement is completed the mark will be displayed. • mark will lit after approximately 6 seconds of blinking when the measurement is completed. -
Page 27: Saving And Recalling Data
When an Error Occurs During Measurement will appear on the display to indicate that measurement was unsuccessful and should be performed again. Before performing another measurement, always press the Off/On Start button to turn off the unit and make sure to allow a rest period of 4 to 5 minutes before starting again. - Page 28 Saving and Recalling Data (cont.) 2. Saving complete. • Up to 270 sets of readings can be stored in memory and each is assigned a number. When the limit is reached, any new readings are recorded over existing readings starting (After approx. (Data 2 seconds) number) with the oldest ones.
- Page 29 2. Press the Memory/Recall button again to display the most recent reading. • Each time you press the Memory/Recall button another set of readings will be displayed, starting with the next most recent readings. • The memory number, measurement year, date, and time are alternately displayed in (After approx. (Data approximately 2 seconds.
-
Page 30: Comparing Am And Pm Average Blood Pressure
Comparing AM and PM Average Blood Pressure Average AM and PM systolic and diastolic blood pressures are displayed in order to allow you to compare readings from both time periods. Use of the AM and PM average blood pressure comparison function can aid in the detection of a blood pressure pattern known as “early morning surge”... -
Page 31: After Use
After Use Storage 1. Fold the end of the pressure cuff in the direction of the arrow. 2. Next, fold the pressure cuff in on itself and secure it on loop fastener. • Place the device in the storage case. Battery cover side English... -
Page 32: Specifications
Specifications Power source DC 3 V (2 AAA/LR03 size alkaline batteries) Display Digital LCD Method of measurement Oscillometric system Measurement range Pressure: 0 mmHg to 280 mmHg Pulse rate: 30 to 160 beats per minute Accuracy Pressure: Within ±3 mmHg Pulse rate: Within ±5 % Operation temperature/ 50 °F to 104 °F (10 °C to 40 °C), 30 % to... -
Page 33: Care And Maintenance
Care and Maintenance Do not attempt to disassemble, repair or modify the unit. • Doing so may cause fire or cause the unit to malfunction. It may also lead to injury. Do not apply excessive force to the unit or drop the unit. •... -
Page 34: Troubleshooting
Troubleshooting Display Status before error Cause and solution The indication disappears in Batteries are exhausted. the middle of the operation. (Please see page 9.) displayed. (the mark is displayed.) Pressurization to more than Were measurements taken 280 mmHg was performed. according to the proper (Cuff pressurizes several procedure and in the times.) - Page 35 In some cases this will be displayed when you mark flashes have tensed the muscles in your hand. Relax even though I did not the muscles in your hand and take the reading move my hand or again. wrist. (Please see page 24.) If the unit still appears to provide unusual or erroneous readings, consult your physician. If the unit does not appear to be functioning properly, contact Panasonic at 1-800-338-0552. English...
- Page 36 El Monitor de Presión Arterial de Muñeca Automático Oscilometric Diagnostic™ Modelo EW‑BW30 es un dispositivo destinado a medir las presiones arteriales sistólica y diastólica y la frecuencia del pulso de un individuo adulto usando un puño de presión en la muñeca. El dispositivo no está...
- Page 37 Índice Introducción ................... S3 Conceptos Básicos Relativos a la Presión de la Sangre ....... S3 Instrucciones Importantes Previas al Uso ..........S4 Precauciones Para Garantizar un Funcionamiento Seguro y Confiable ..S6 Verifique Sin Dificultad las Lecturas de la Presión de la Sangre Según la Clasificación JNC 7* ...............
-
Page 38: Introducción
Introducción Gracias por haber adquirido el Monitor de Presión Arterial de Muñeca Automático Panasonic EW‑BW30. Tomarse la presión de la sangre es una buena forma de monitorear la salud. La alta presión de la sangre (hipertensión) constituye un grave problema para la salud, que se lo puede tratar con eficacia una vez que se lo detecta. -
Page 39: Instrucciones Importantes Previas Al Uso
Para comparar con exactitud con la lectura del médico, lleve el tensiómetro Panasonic al consultorio y compare ambas lecturas en ese entorno. 5. Quienes padecen arritmia cardiaca, constricción vascular, trastornos del hígado o diabetes, quienes tienen colocado marcapasos o pulso... - Page 40 las mediciones en un momento dado antes del desayuno y antes de entrar en actividad. Debe relajarse unos 5 minutos antes de efectuar la medición. Las siguientes situaciones pueden provocar variaciones considerables en las lecturas de la presión de la sangre y, por lo tanto, se las debe evitar al menos 30 minutos antes de tomar la presión.
-
Page 41: Precauciones Para Garantizar Un Funcionamiento Seguro Y Confiable
disposiciones ambientales aplicables. f. No desarme las pilas ni las arroje al fuego. g. No les provoque un cortocircuito. h. No intente recargar las pilas que vienen incluidas en la unidad. 12. En caso de que se produzca cualquier anormalidad, como puede ser un inflado excesivo, retire el brazalete de inflado. - Page 42 V erifique Sin Dificultad las Lecturas de la Presión de la Sangre Según la Clasificación JNC 7* Categorías de presión de la sangre Hipertensión de estado 2 ejemplo: SBP 165 DBP 105 Hipertensión de estado 1 ejemplo: SBP 150 DBP 95 Prehipertensión ejemplo: SBP 130 DBP 85 ejemplo: Normal SBP 115 DBP 75 Presión de la sangre sistólica (SBP) Si las dos mediciones de presión arterial (sistólica, diastólica) recaen en categorías separadas, su nivel es clasificado en la más alta de las dos categorías.
-
Page 43: Diagrama Del Dispositivo
Diagrama del dispositivo * Utilice sólo pilas alcalinas. Cuerpo Vista Superior Botón Ajustar Botón Fijar Pantalla Cubierta del Marca de posicionamiento compartimento para pilas Botón de altura de la Lámpara del sensor de muñeca altura de la muñeca Botón de gráfica Botón Parar/ Muñequera Encender Botón de memoria/... -
Page 44: Colocación/Sustitución De Las Pilas
Colocación/sustitución de las pilas * Utilice siempre pilas alcalinas. (2 pilas alcalinas LR03 AAA) • Al sustituir las pilas, utilice siempre 2 pilas alcalinas nuevas del mismo tipo del mismo fabricante y sustitúyalas simultáneamente. 1. Saque el dispositivo del estuche. Coloque las pilas. (1) Abra la cubierta del compartimento de las pilas tal como se indica en el diagrama. -
Page 45: Fijando La Hora Y Fecha
Para las pilas • La frecuencia de uso para las pilas es de aproximadamente 300 mediciones (3 veces al día) con pilas alcalinas Panasonic frescas (pilas alcalinas LR03 tamaño AAA). [Condiciones de medición: Temperatura ambiente 73,4 °F (23 °C); presión atomosférica a 170 mmHg;... - Page 46 Fijando la hora y fecha (cont.) 4 Ajuste en el orden de “mes”, “día”, “hora” y “minutos”, repitiendo los pasos 2 y 3. • El reloj permanece detenido mientras la fecha o la hora parpadean. “Mes” “Día” “Hora” “Minutos” 5 Pulse el botón Parar/Encender para apagar el aparato. Nota) Si se pulsa el botón Parar/Encender durante el ajuste, o si no se pulsa ningún botón durante 5 minutos, se usarán los ajustes hechos hasta ese punto.
-
Page 47: Ajuste De La Muñequera
Ajuste de la muñequera La tensión arterial se mide en la muñeca izquierda. No es necesario que se suba la manga de la camisa, ni que se desvista. 1. Sitúe el tensiómetro en la Sitúe el parte interior de la muñeca. tensiómetro en la • Ponga el dispositivo parte interior de directamente en contacto con la muñeca. - Page 48 Ajuste de la muñequera (cont.) No quite el cierre de velcro doblándolo. Asegúrese de que lo despega en dirección horizontal en alineación con la muñequera. <Cuando la coloque en la muñeca derecha> Ajústela tal como se muestra en la figura. La muñequera se puede colocar en cualquiera de las muñecas. Sin embargo, la diferencia de tensión arterial entre las muñecas izquierda y derecha puede ser de...
-
Page 49: Obtención De Mediciones Precisas
Obtención de mediciones precisas Tómese la tensión arterial siempre a la misma hora, sentado en la misma posición y en la misma muñeca. Se recomienda tomar la tensión arterial al menos dos veces al día. Es mejor por la mañana antes del desayuno y por la noche después del trabajo. No se pueden tomar medidas exactas en las siguientes situaciones. • Después de 1 hora de haber ingerido alimentos o bebidas alcohólicas •... - Page 50 Obtención de mediciones precisas (cont.) No tome mediciones en las posiciones que se muestran a continuación, ya que no serán precisas. No doble la muñeca hacia adentro. No cierre el puño. Si el dispositivo se ubica Si el dispositivo se ubica Si se inclina mientras se a una altura inferior a la a una altura superior a la realiza la medición, es...
-
Page 51: Sensor De Altura De Muñeca
Sensor de altura de muñeca Sobre el sensor de altura de muñeca • Esta es una función de soporte para garantizar que usted use el monitor de presión arterial a una altura apropiada (la misma altura de su corazón). Los usuarios con una posición de medición y un entorno de medición fijos (altura de la mesa, altura de la silla, etc.) pueden lograr condiciones de medición más estables mediante el uso de esta función. - Page 52 Sensor de altura de muñeca (cont.) Ajuste de la altura 1. Coloque el antebrazo del brazo en el que está ajustado el dispositivo, encima del estuche de almacenamiento, colocando la muñeca a la altura del corazón. 2. Pulse el botón de altura de la muñeca durante 3 segundos o más. Le notificará con 3 parpadeos de la lámpara del sensor de altura de la muñeca. Pantalla de ajuste del sensor de altura 3. Pulse el botón Parar/Encender para apagar el aparato. • Una vez que la altura esté ajustada, el rango de altura apropiado (donde se enciende la lámpara del sensor de altura de la muñeca) se estrecha en comparación a cuando no está...
- Page 53 Despeje del ajuste de altura 1. Pulse el botón de memoria/recuperar. 2. Pulse el botón de altura de la muñeca durante 3 segundos o más. Le notificará con 3 parpadeos de la lámpara del sensor de altura de la muñeca. Pantalla de apagado del sensor de altura 3. Pulse el botón Parar/Encender para apagar el aparato. Español...
-
Page 54: Medición De La Tensión Arterial
Medición de la tensión arterial 1. Coloque el antebrazo del brazo en el que está ajustado el dispositivo, encima del estuche de almacenamiento, colocando la muñeca a la altura del corazón. (Consulte “Obtención de mediciones precisas” en las páginas S14 y S15.) 2. Pulse el botón de altura de muñeca brevemente. • Se iniciará la función de sensor de altura de muñeca. (Para el sensor de altura de muñeca, consulte las páginas S16 y S17.) (Las mediciones no empezarán hasta que el botón Parar/Encender sea pulsado.) Nota: El ajuste de altura es reposicionado a cero cuando es pulsado durante... - Page 55 4. Pulse el botón Parar/Encender. • El visor se encenderá durante 2 segundos. • La muñequera se inflará automáticamente. Dado que las mediciones se toman durante la presurización, los sonidos de funcionamiento y la tasa de presurización pueden cambiar. Esto se considera normal. •...
- Page 56 Medición de la tensión arterial (cont.) Función de gráfica de tendencia Este monitor de presión arterial puede exhibir los resultados de mediciones previas en una gráfica para permitirle ver la tendencia en su presión arterial. Las mediciones tomadas en la mañana son exhibidas como una gráfica en los datos matutinos almacenados; las mediciones tomadas por la noche como una gráfica en los datos vespertinos almacenados;...
- Page 57 Gráfica para la presión arterial sistólica (nivel superior) Naranja: 160 mmH g y más [Hipertensión (etapa 1)] Naranja: 140 mmH g hasta 159 mmH g [Hipertensión (etapa 2)] Amarillo: 130 mmH g hsta 139 mmH g (Prehipertensión) Verde: 130 mmH g o menor (Normal) Gráfica para la presión arterial diastólica (nivel inferior) Naranja: 95 mmH g y más [Hipertensión (etapa 1)] Naranja: 90 mmH g hasta 94 mmH g [Hipertensión (etapa 2)]...
- Page 58 Medición de la tensión arterial (cont.) Sobre los datos Los datos de promedio semanal usan una semana como el período comprendido de domingo a sábado. 8 visualizaciones gráficas recientes Datos más actuales 1 previo 2 previos 7 previos Visualización de gráfica del promedio semanal (últimos 2 meses) Datos promedio de la semana actual Datos promedio de 1 semana previa Datos promedio de 2 semanas previas...
-
Page 59: Función De Detección De Movimiento
Función de detección de movimiento Si se detecta movimiento ,cuando se realiza la medición y la muñequera aplica más presión, aparecerá la marca • Vuelva a realizar la medición de presión si se enciende o parpadea la marca • Si la mano o muñeca a la que está colocada la muñequera se mueve al realizar la medición (por ejemplo, la muñeca se dobla de repente), en algunos casos, es posible que no se obtengan las mediciones correctas. -
Page 60: Función De Pulso Irregular
Función de pulso irregular Si el pulso varía más de un ±25 % de la media al realizar una medición, cuando se haya completado la medición, aparecerá la marca • La marca e encenderá después de aproximadamente 6 segundos de parpadeo, una vez que se haya completado la medición. •... -
Page 61: Almacenamiento Y Recuperación De Datos
Cuando un error ocurre durante la medición aparecerá en la pantalla para indicar que la medición no fue exitosa y que deberá ser realizada otra vez. Antes de realizar otra medición, pulse siempre el botón Parar/ Encender para apagar la unidad y asegurarse que se le dé un periodo de descanso de 4 a 5 minutos antes de comenzar otra vez. - Page 62 Almacenamiento y recuperación de datos (cont.) 2. Almacenar completamente. • Hasta 270 grupos de lecturas pueden almacenarse en la memoria y a cada una se le asigna un número. Cuando el límite es (Después de alcanzado, no puede almacenarse ninguna (Número aprox. nueva lectura sobre las existentes iniciando de datos) 2 segundos.) con las más antiguas.
- Page 63 2. Pulse el botón de memoria/recuperar otra vez para visualizar la lectura mas reciente. • Cada vez que pulse el botón de memoria/ recuperar otro juego de lecturas será visualizado, iniciando con la más reciente de las lecturas. • El número de memoria, el año de medición, la fecha y la hora son exhibidos (Después de alternativamente en aproximadamente 2 (Número...
-
Page 64: Comparación De La Presión Arterial Promedio Am Y Pm
Comparación de la presión arterial promedio AM y PM Las presiones arteriales sistólica y diastólica promedio en la mañana (AM) y en la noche (PM) son exhibidas para poder permitirle comparar lecturas de ambos períodos de tiempo. El uso de la función de comparación de presión arterial promedio AM y PM puede ayudar en la detección de un patrón de presión arterial conocido como “sobretensión de primeras horas de la mañana”... -
Page 65: Después Del Uso
Después del Uso Almacenamiento 1. Enrolle la punta de la muñequera siguiendo la dirección de la flecha. 2. A continuación, enrollar la muñequera y sujetarla con el velcro. • Guarde el tensiómetro en su estuche. Lado de la cubierta del compartimento de las pilas Español... -
Page 66: Especificaciones
Especificaciones Alimentación eléctrica CC de 3 V (2 pilas alcalinas tamaño AAA LR03) Pantalla Digital LCD Método de medición Sistema oscilométrico Límites de medición Presión: de 0 mmHg a 280 mmHg Frecuencia de pulso: de 30 a 160 latidos por minuto Margen de error Presión: ±3 mmHg... -
Page 67: Cuidado Y Mantenimiento
Cuidado y Mantenimiento No intente desarmar, reparar o modificar la unidad. • El hacerlo así puede causar incendio o hacer que la unidad falle. También puede causar herida. No aplique fuerza excesiva sobre la unidad ni la deje caer. • Hacer esto puede causar daño. No inserte polvo u objetos extraños en la unidad. -
Page 68: Localización De Averías
Localización de averías Pantalla Estado antes del error Causa y solución La indicación desaparece a Se visualiza Las pilas están gastadas. la mitad de la operación. (Consulte la página S9.) (Se visualiza la marca ¿Las mediciones se realizaron Se presurizó a más de siguiendo el procedimiento 280 mmHg. (La muñequera correcto y con la postura se presuriza varias veces.) corporal correcta? (Consulte... - Page 69 En algunos casos, aparece cuando tiene los La marca músculos de la mano en tensión. Relaje los parpadea, aunque no músculos de la mano y vuelva a realizar la lectura. he movido la mano ni (Consulte la página S24.) la muñeca. Si la unidad aún parece que provee lecturas inusuales o erróneas, consulte con su médico. Si la unidad no parece que está funcionando correctamente, póngase en contacto con Panasonic al tel. 1-800-338-0552. Español...
- Page 70 Panasonic Corporation of North America One Panasonic Way, 1H-1 Secaucus, NJ 07094 1-800-338-0552 (USA only) for questions and comments W9030BW30202 Revision date: 2010-07-02 B No.2 Issued date: 2010-06-18 No.2 EN, SP Printed in China © Panasonic Electric Works Co., Ltd. 2010 Impreso en China...
Need help?
Do you have a question about the EW-BW30S and is the answer not in the manual?
Questions and answers