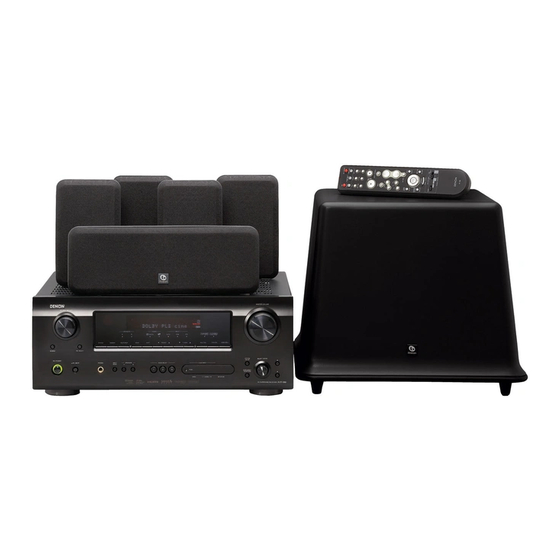
Denon DHT-589BA Owner's Manual
Owners manual - english
Hide thumbs
Also See for DHT-589BA:
- Specifications (2 pages) ,
- Getting started (2 pages) ,
- Specification (2 pages)
Table of Contents
Advertisement
Quick Links
Advertisement
Table of Contents

Related Manuals for Denon DHT-589BA


Summary of Contents for Denon DHT-589BA
- Page 1 AV SURROUND RECEIVER AVR-589 Owner’s Manual Manuel de l’Utilisateur...
-
Page 2: Safety Instructions
ENGLISH FRANCAIS SAFETY INSTRUCTIONS SAFETY PRECAUTIONS Read Instructions – All the safety and operating instructions should be read 13. Power-Cord Protection – Power-supply cords should be routed so that they before the product is operated. are not likely to be walked on or pinched by items placed upon or against CAUTION Retain Instructions –... - Page 3 2. IMPORTANT NOTICE: DO NOT MODIFY THIS PRODUCT This product, when installed as indicated in the instructions contained in this manual, meets FCC requirements. Modification not expressly approved by DENON may void your authority, granted by the FCC, to use the product. 3. NOTE This product has been tested and found to comply with the limits for a Class B digital device, pursuant to Part 15 •...
-
Page 4: Table Of Contents
ENGLISH n Contents Operations Surround Modes Menu Map ·····················································································16 q Standard Playback ···································································27 Getting Started Examples of Front Display ···························································16 Surround Playback of 2-channel Sources ·····································27 Playing Multi-channel Sources (Dolby Digital, DTS, etc.) ·············27 Accessories ·····················································································2 w DSP Simulation Playback ························································28 Cautions on Handling ·····································································3 Auto Setup e Direct Playback ·········································································28... -
Page 5: Getting Started
Turning the Power On ··································································34 Troubleshooting ····························································· 50 Selecting the Input Source ···························································34 Thank you for purchasing this DENON product. To ensure proper Setting the Input Mode ································································34 operation, please read this owner’s manual carefully before using the product. Operations During Playback ·························································35 Playing Video and Audio Equipment ··········································35... -
Page 6: Cautions On Handling
Point the remote control unit at the remote sensor when operating it. no problems with the connection cables. q DENON system components w Non-DENON system components • Power is supplied to some of the circuitry even when the unit is •... -
Page 7: Part Names And Functions
ENGLISH INPUT mode indicators ······························ (34) DYNAMIC VOLUME button ······················· (32) Part Names and Functions b About Dynamic Volume SIGNAL indicators Audyssey Dynamic Volume™ solves the problem Display For buttons not explained here, see the page indicated in parentheses ( ). of large variations in volume level between SPEAKERS indicators ·································... -
Page 8: Rear Panel
ENGLISH Rear Panel Digital audio connectors Power cord ·················································· (15) (OPTICAL / COAXIAL) ·················· (10 ~ 12, 14) Speaker terminals (SPEAKERS) ·················· (9) VIDEO / S-VIDEO connectors ············ (11 ~ 13) FM/AM antenna terminals (TUNER ANTENNA) ···································· (15) Analog audio connectors (AUDIO) ···············································... -
Page 9: Remote Control Unit
ENGLISH Remote Control Unit [ Front ] [ Rear ] Indicator ······················································ (42) Power buttons ············································ (44) Power buttons ············································ (34) Source select buttons ································ (34) b : To select “SIRIUS” as the input source, use QUICK SELECT buttons ····························· (41) SAT TU button. -
Page 10: Connections
ENGLISH Connections Connections for all compatible audio and video signal formats Preparations are described in this owner’s manual. Please select the types of connections suited for the equipment you are connecting. With some types of connections, certain settings must be made Cables Used for Connections on the AVR-589. -
Page 11: Speaker Connections
ENGLISH Speaker Connections Speaker Installation The illustration below shows a basic example of installation of the amplifier combined with 6 speakers and a monitor. Subwoofer Center speaker Front speakers Place the front speakers to the Surround speakers sides of the monitor or screen and as flush with the screen surface as possible. -
Page 12: Speaker Connections
AVR-589 has failed, please con- tact DENON Service center after switching off. When using a banana plug Tighten the speaker terminal firmly before inserting the banana plug. -
Page 13: Connecting Equipment With Hdmi Connectors
ENGLISH NOTE Connecting Equipment with HDMI connectors • The AVR-589 cannot be controlled from another device via the HDMI cable. • Video signals are not output if the input video signals do not match the monitor’s resolution. In this case, DVD player Monitor switch the DVD player’s resolution to a resolution with which the monitor is compatible. -
Page 14: Connecting The Monitor
ENGLISH Connecting the Monitor Connecting the Playback Components Select the terminal to use and connect the device. Carefully check the left (L) and right (R) channels and the inputs and outputs, and be sure to interconnect correctly. Monitor NOTE • The AVR-589 supports four video input formats: DVD Player HDMI, component video, S-video and video. -
Page 15: Cd Player
® Select the terminal to use and connect the device. Use a DENON control dock for iPod (ASD-1R, ASD-11R, ASD-3N Select the terminal to use and connect the device. or ASD-3W, sold separately) to connect the iPod to the AVR-589. -
Page 16: Connecting The Recording Components
ENGLISH Connecting the Recording Components Connections to Other Devices Carefully check the left (L) and right (R) channels and the inputs and outputs, and be sure to interconnect correctly. Carefully check the left (L) and right (R) channels and the inputs and outputs, and be sure to interconnect correctly. -
Page 17: Component With Multi-Channel Output Connectors
ENGLISH Component with Multi-channel Output SIRIUS connector connectors ® • The AVR-589 is a SIRIUS Satellite Radio Ready receiver. You can ® receive SIRIUS Satellite Radio by connecting to the SiriusConnect Select the terminal to use and connect the device. When connecting the Optical terminal, set the input Optical terminal Home Tuner and subscribing to the SIRIUS service. -
Page 18: Antenna Terminals
ENGLISH Antenna terminals Connecting the Power Cord An F-type FM antenna cable plug can be connected directly. n AM loop antenna assembly Wait until all connections have been completed before connecting the power cord. Remove the vinyl tie and take out Direction of broadcasting station the connection line. -
Page 19: Operations
ENGLISH ENGLISH Operations Menu Map Examples of Front Display Some typical examples are described below. Auto Setup (vpage 17 ~ 19) b When the setup microphone is connected. Item number n Start Menu • Step 1: Speaker Detection Currently selected line •... -
Page 20: Preparations
ENGLISH Auto Setup • Audyssey MultEQ automatically measures the acoustical problems Preparations in the listening environment to create the best audio experience for Symbols used to indicate buttons in this manual your home theater. Button located on both the main unit and the remote control SPEAKERS>... -
Page 21: Auto Setup
ENGLISH About the Auto Setup NOTE NOTE • Do not disconnect the setup microphone until the auto setup Do not change the speaker connections or subwoofer volume after The Audyssey MultEQ auto setup function detects the presence of procedure is completed. “Step 1”. -
Page 22: Error Messages
ENGLISH Step 4 : Check s Error Messages When analysis is complete, “Parameter Check<” is displayed. If the auto setup procedure could not be completed due to speaker installation, the measuring environment, Press and check the analysis results for the following four items. etc. -
Page 23: System Setup
ENGLISH System Setup Make detail settings for various parameters. Symbols used to indicate buttons in this manual System Setup Operation Button located on both the main unit and the remote control * S y s t e m S e t u p BUTTON unit The same operation is possible on the main unit or remote control... -
Page 24: Speaker Setup
ENGLISH Subwoofer 1. Speaker Setup g Subwoofer Mode Setup Select subwoofer use. Use this procedure to set the speakers manually or if you wish to Select low range signal to be reproduced by subwoofer. change the settings made with the auto setup procedure. [Selectable items] [Display] a ~ f Speaker Configuration... -
Page 25: H ~ A1 Distance
ENGLISH h ~ A1 Distance A2 ~ A6 Crossover Frequency • If in the “Advanced” settings, “Subwoofer Mode Setup” (vpage Set distance from listening position to speakers. Select crossover frequency from which subwoofer handles low 21) in the “System Setup” is set to “Norm”, it is possible to make Before making the settings, measure the distance from the range signal. -
Page 26: A8 Restore
ENGLISH Test Tone Start 2. Input Setup A8 Restore Press o to select “Yes”, then press o p to select “Auto” or After the Auto Setup measurements, it is possible to return those Use this procedure to select the input source and make the settings “Manual”. -
Page 27: D ~ H Digital In Assign
ENGLISH d ~ h Digital In Assign k Audio Delay l EXT. IN Subwoofer Level Select digital input connector to assign to this source. Compensate for mismatched timing between video and audio. Set the subwoofer level for playback. Select according to the player in use. [Display] [Display] [Display]... -
Page 28: A1 Parental Lock
ENGLISH A1 Parental Lock A2 Edit Lock Code For any channel, set the radio reception limits. Change the password (See “Parental Lock”). q P ress q P ress ENTER w U sing uiop , input the password (4 digits number) and press w I nput old password (4 digits) using uiop , and press... -
Page 29: Option Setup
ENGLISH Power On Level 3. Option Setup This sets the volume set when the main zone’s power is turned on. The auto surround mode function lets you store in the memory the Make various other settings. surround mode last used for playing the three types of input signals [Selectable items] listed below. -
Page 30: Surround Modes
ENGLISH Surround Modes Playing Multi-channel Sources Standard Playback Symbols used to indicate buttons in this manual (Dolby Digital, DTS, etc.) This is the mode for enjoying surround sound according to the Button located on both the main unit and the remote control program source. -
Page 31: Dsp Simulation Playback
DSP Simulation Playback e Direct Playback The desired mode according to the program source and viewing situation can be selected from among 7 DENON original surround Selecting the mode modes. The surround parameters can be adjusted (vpage 47, 48) to <SELECT/ENTER>... -
Page 32: Parameter
ENGLISH Parameter Adjusting the Parameters Surround Parameter Symbols used to indicate buttons in this manual Adjust surround sound parameters. Button located on both the main unit and the remote control <SURR. PARA> [PARA] Press BUTTON unit Parameter is displayed. The parameters (items) which can be adjusted differ <BUTTON>... -
Page 33: Mode
ENGLISH Mode D. Comp Center Width (Dynamic Range Compression) Select the mode to match the source (cinema source, music source, Compress dynamic range (difference between loud and soft sounds). Assign center channel signal to front left and right channels for wider etc.). -
Page 34: A2 Sw Att (Subwoofer Attenuation)
ENGLISH A2 SW ATT A7 MultEQ A8 Dynamic EQ (Subwoofer Attenuation) Attenuate subwoofer level when using EXT. IN mode. Select the type of room correction desired from the following list: Audyssey Dynamic EQ solves the problem of deteriorating sound quality as volume is decreased by taking into account human perception [Selectable items] [Selectable items] and room acoustics. -
Page 35: A9 Dynamic Volume
ENGLISH A9 Dynamic Volume S0 DV Setting S1 RESTORER (Dynamic Volume Setting) Audyssey Dynamic Volume solves the problem of large variations in Set Dynamic Volume effect. This function restores compressed audio signals to how they were volume level between television programs, commercials, and between before compression and corrects the sense of volume of the bass and [Selectable items] the soft and loud passages of movies. -
Page 36: S2 Night Mode
ENGLISH S2 Night Mode Information Optimized setting for late-night listening. Set the dynamic range compression of the output audio. [Selectable items] Information on the main unit’s various settings (Status) and on input signals (Audio Input Signal) is shown on the display. Symbols used to indicate buttons in this manual : Turn night mode off. -
Page 37: Preparations
ENGLISH Playback Setting the Input Mode Symbols used to indicate buttons in this manual Preparations Button located on both the main unit and the remote control Set the input mode for this source. BUTTON unit Turning the Power On <BUTTON> <INPUT MODE>... -
Page 38: Operations During Playback
ENGLISH Checking the currently playing program source, etc. Operations During Playback Symbols used to indicate buttons in this manual <STATUS> Press Button located on both the main unit and the remote control The current program source and various settings are indicated on Adjusting the Master Volume BUTTON unit... -
Page 39: Listening To Fm/Am Broadcasts
ENGLISH Presetting Radio Stations Listening to FM/AM Broadcasts Listening to Preset Stations (Preset Memory) SHIFT Press to select the memory block (A to G). Your favorite broadcast stations can be preset so that you can tune Basic Operation them in easily. Up to 56 stations can be preset. <PRESET CHANNEL>... -
Page 40: Listening To Sirius Satellite Radio Programs
ENGLISH Listening to SIRIUS Satellite Checking the SIRIUS Signal Strength Symbols used to indicate buttons in this manual and Radio ID Radio Programs Button located on both the main unit and the remote control BUTTON unit <SOURCE SELECT> [SAT TU] Either turn or press <BUTTON>... -
Page 41: Searching Categories
ASD-1R or ASD-11R and iPod. • “SIRIUS UPDATING” is displayed when updating SIRIUS tuner firmware. q S et the iPod in the DENON control dock for iPod. • Refer to “Troubleshooting” (vpage 52) regarding other messages. (vSee the control dock for iPod’s operating instructions.) •... -
Page 42: Listening To Audio
• Depending on the type of iPod and the software version, some When viewing a still picture, perform the same operation as with ASD- functions may not operate. 1R or ASD-11R. • DENON will accept no responsibility whatsoever for any loss of iPod data. -
Page 43: Other Operations And Functions
ENGLISH Other Operations and Functions Symbols used to indicate buttons in this manual Other Operations <REC SELECT> <SOURCE SELECT> • To cancel, press , then turn until Button located on both the main unit and the remote control BUTTON “RECOUT SOURCE” is displayed. unit •... -
Page 44: Quick Select Function
ENGLISH Quick Select Function Last Function Memory Symbols used to indicate buttons in this manual With this function, the currently playing input source, volume This stores the settings as they were directly before the standby Button located on both the main unit and the remote control level, surround mode, MultEQ, Dynamic Volume, DV setting and mode was set. -
Page 45: Remote Control Unit Operations
Presetting b Set to the AUDIO side for the CD position, and to the VIDEO side • DENON and other makes of components can be operated by for the DVD/HDP , VCR, SAT/CABLE or TV position. setting the preset memory. - Page 46 ENGLISH n Front Functions of Buttons by Component n Fr nt [ON/SOURCE] [OFF] Blu-ray Video Disc Satellite Device CD Player iPod Tuner DVD Player Video Deck Cable TV operated Disc Player Player (VDP) Receiver (Monitor) SOURCE AUDIO VIDEO CONTROL 1 [1], [2], SOURCE iPod/...
-
Page 47: Punch Through Function
RETURN – – – Return Return – – Return Return Return iPod/NETWORK Default DENON DENON b2 DENON HITACHI HITACHI TUNER setting – – – – (111) (111) (108) (007) (134) (121) DVD/HDP (Preset code) Special –... -
Page 48: Playback Other Information
ENGLISH Other Information About Speaker Installation Surround DTS Surround The AVR-589 is equipped with a digital signal processing circuit that DTS Digital Surround lets you play program sources in the surround mode to achieve the Examples of speaker layouts same sense of presence as in a movie theater. DTS Digital Surround is the standard digital surround format of DTS, Inc., compatible with a sampling frequency of 44.1 or 48 kHz and up Below we introduce examples of speaker layouts. - Page 49 ENGLISH Audyssey HDMI (High-Definition Multimedia Interface) Audyssey MultEQ ® HDMI is a digital interface standard for next generation TVs based Audyssey MultEQ is a room equalization solution that calibrates any on DVI (Digital Visual Interface) standards and optimized for use in audio system so that it can achieve optimum performance for every consumer equipment.
-
Page 50: Surround Modes And Parameters
ENGLISH Surround Modes and Parameters Signals and adjustability in the different modes Channel output Parameter (default values are shown in parentheses) Surround mode D. Comp Front L/R Center Surround L/R Subwoofer Cinema EQ. Mode Room Size Effect Level Delay Time Subwoofer DIRECT S (OFF) - Page 51 ENGLISH Signals and adjustability in the different modes Parameter (default values are shown in parentheses) NEO:6 MUSIC Surround mode PRO LOGIC g MUSIC mode only EXT. IN only mode only Tone Control Night Mode Dynamic EQ Dynamic Volume MultEQ DV Setting RESTORER (NOTE5) (NOTE5)
- Page 52 ENGLISH Differences in Surround Mode Names Depending on the Input Signals Input signals Button LINEAR PCM Surround mode ANALOG LINEAR PCM DOLBY DIGITAL DOLBY DIGITAL (Multi ch) DTS (5.1ch) DTS 96/24 DOLBY DIGITAL (2ch) (5.1/5/4ch) (4/3ch) STANDARD DTS SURROUND DTS SURROUND DTS 96/24 DTS NEO:6 CINEMA DTS NEO:6 MUSIC...
-
Page 53: Troubleshooting
• Switch off the power and please – operate properly. causing the set to malfunction. power, the power failed. contact the DENON service Power does not • Connection of the power cord is • Check the insertion of the power display flashes adviser. - Page 54 ENGLISH GAudioH GHDMIH Symptom Cause Countermeasure Page Symptom Cause Countermeasure Page No sound is • You are playing a monaural • The mode is set to something HDMI audio – • The audio signal input to the produced from source (TV, AM radio broadcast, other than “STANDARD”...
-
Page 55: Specifications
ENGLISH GSIRIUS Satellite RadioH Specifications Symptom Cause Countermeasure Page “CHECK SR • The Sirius Tuner unit is not • Check that the connections are TUNER” is connected. correct. Audio section displayed in the SIRIUS mode. • Power amplifier Rated output: Front (A, B): “ANTENNA •... - Page 56 024, 049 Cybernex Daytron 003, 049 Aiwa 004, 005, 006, 018, 026, 029, 087, 092 025, 055, 059, 074, 089, 093, Denon 014, [111] , 121 Dimensia 045, 061, 062, 085 Daewoo 013, 017, 020, 041, 059, 089, 095, 096...
- Page 57 100, 104, 121 Burmster Regency Siemens Carvery 003, 035 Samsung 014, 023 Signature 045, 144 [111]*, 044 Denon Scientific Atlanta 004, 024, 025 Simpson Emerson 004, 005, 006, 007 Signal Sony 043, 046, 138, 146, 150 Fisher 003, 008, 009, 010...
- Page 58 Denon Brand Company, D&M Holdings Inc. Printed in China 5411 10042 105D...
- Page 59 HOrIZOn MCS 90 5.1 surround speaker system español francais MCS 90 MCS 90 Sistema Multicanal Boston Haut-parleur multivoix Boston...
-
Page 60: Important Safety Instructions
Important Safety Instructions This symbol found on the apparatus WARNING! To reduce the risk of re or electric indicates hazards arising from danger- shock, do not expose this apparatus to rain or ous voltages. moisture. This symbol found on the apparatus This symbol found on the apparatus indi- indicates the user should read all safety cates that the apparatus must be placed in a... -
Page 61: Unpacking The System
Specifications Satellites Center Channel Subwoofer Frequency Response: 120Hz – 20kHz 120Hz – 20kHz 40 - 180Hz Recommended Amplifier Power Range: 10 – 100 watts 10 – 100 watts — Sensitivity: 88dB [2.8v at 1m] 88dB [2.8v at 1m] — Nominal Impedance: 8 ohms 8 ohms —... -
Page 62: Placement Options
Placement Options The MCS 90 satellites and center channel are easily placed on a tabletop or wall-mounted. The speakers are configured for tabletop use when you first unpack the system. The foot installed on the rear of the speaker will keep it upright. The MCS 90 satellites and center channel are designed to easily mount on the wall using the keyhole slot(s) on the back of the speaker. -
Page 63: Subwoofer Controls
Subwoofer Controls Power On MCS 90 Plug the subwoofer’s AC cord into a wall outlet. We do not recommend using use the outlets on the back of the receiver. The subwoofer features auto on/standby. An LED indicator next to the volume control indicates what mode the subwoofer is in. RED = STANDBY (No signal detected, Amp Off ) GREEN = ON (Signal detected, Amp On) LED indicator... -
Page 64: Limited Warranty
Limited Warranty Boston Acoustics warrants to the original purchaser of our MCS 90 system that it will be free of defects in materials and workmanship in its mechanical parts for a period of 5 years from the date of purchase. The warranty period for the electrical components of MCS 90 is 1 year. -
Page 65: Instrucciones De Seguridad Importantes
Instrucciones de Seguridad Importantes ñ ¡ADVERTENCIA! Para reducir el riesgo de Este símbolo que aparece en el aparato indica incendio o de descarga eléctrica, no riesgos derivados de voltajes peligrosos. exponga este aparato a la lluvia o a la humedad. Este símbolo que aparece en el aparato Este símbolo que aparece en el aparato indica indi-ca que el aparato debe colocarse en un... -
Page 66: Desembalaje Del Sistema
Especificaciones Satélites Canal Central Subwoofer Respuesta de Frecuencia: 120Hz – 20kHz 120Hz – 20kHz 40 - 180Hz Gama de Potencia Recomen- dada del Amplificador: 10 – 100 vatios 10 – 100 vatios — Sensibilidad: 88dB [2.8v at 1m] 88dB [2.8v at 1m] —... - Page 67 Opciones de Colocación Los satélites del MCS 90 y el canal central son fáciles de situar en sobremesa o en montaje mural. Los altavoces están configurados para ser utilizados en sobremesa al desembalar por primera vez el sistema. El pie montado en la parte trasera del altavoz lo mantendrá derecho. Los satélites del MCS 90 y el canal central están diseñados para un fácil montaje mural utilizando la(s) ranura(s) de bocallave de la parte trasera del altavoz.
-
Page 68: Control Del Volumen
Controles del Subwoofer Conexión MCS 90 Enchufe el cable de CA del subwoofer en una toma de pared. No recomendamos utilizar las tomas de salida de la parte trasera del receptor. El subwoofer presenta los modos “auto on/ standby” (encendido auto/en espera). Un indicador LED junto al control de volumen indica el modo en el cual se encuentra el subwoofer. - Page 69 Garantía Limitada Boston Acoustics garantiza al comprador original de nuestro sistema MCS 90 que éste estará libre de defectos en materiales y mano de obra en sus piezas mecánicas por un periodo de 5 años a partir de la fecha de compra. El periodo de garantía para los componentes eléctricos del MCS 90 es de 1 año.
- Page 70 ç Instructions de sécurité importantes AVERTISSEMENT ! Pour réduire le risque Ce symbole sur l’appareil indique des d’incendie ou de choc électrique, n’exposez dangers provenant de tensions dangereuses. pas cet appareil à la pluie ou à l’humidité. Ce symbole sur l’appareil indique que Ce symbole sur l’appareil indique que l’appareil doit être placé...
- Page 71 Spécifications Enceintes satellites Canal central Caisson de grave Réponse en fréquence : 120Hz – 20kHz 120Hz – 20kHz 40 - 180Hz Domaine de puissance recommandé de l’amplificateur : 10 – 100 watts 10 – 100 watts — Sensibilité : 88dB[2,8v à 1m] 88dB[2,8v à...
- Page 72 Options de placement Les enceintes satellites et le haut-parleur canal arrière MCS 90 sont facilement placés sur un plateau ou mur. Les haut-parleurs sont configurés pour une utilisation sur plateau lorsque vous déballez le système pour la première fois. Le pied installé à l’arrière du haut-parleur le maintient debout. Les enceintes satellites et le haut-parleur canal arrière MCS 90 sont conçus pour être facilement montés au mur en utilisant la/les encoche(s) en trou de serrure au dos du haut-parleur.
- Page 73 Commandes du caisson de grave Mise en marche MCS 90 Branchez le cordon CA du caisson de grave dans une sortie murale. Nous recommandons de ne pas d’utiliser les sorties au dos du récepteur. Le caisson de grave est équipé des modes auto allumé/veille.
- Page 74 Garantie limitée Boston Acoustics garantit à l’acheteur d’origine de notre système MCS 90 une fabrication de la plus haute qualité extrême- ment soignée et que pendant une période de 5 ans à partir de la taille d’achat, les matériaux ne subiront aucune défaillance. La période de garantie pour les composants électriques du MCS 90 est 1 an.
- Page 78 300 Jubilee Drive, Peabody, MA 01960 USA www.bostonacoustics.com Boston, Boston Acoustics, MagnaGuard, Kortec, and the Boston Acoustics logo are registered trademarks of Boston Acoustics, Inc. Dolby Digital, and Dolby Pro Logic are registered trademarks of Dolby Laboratories. DTS is a registered trademarks of DTS, Inc.
Need help?
Do you have a question about the DHT-589BA and is the answer not in the manual?
Questions and answers