Table of Contents
Advertisement
Quick Links
Thank You....
...for purchasing an Edelbrock Nitrous Oxide Injection System.
Nitrous Oxide injection is one of the most exciting performance enhancements, for the dollar invested, on the market today.
With the use of nitrous oxide come some important safety considerations. This manual has been written to help you during
the installation and use of your Edelbrock Nitrous System. Please read it completely before you install and use your
system. Please pay close attention to the safety information at the beginning of each section. The information contained
there specifically pertains to each of the components and installation methodologies within the section.
Please take the time to read and understand the following....
By installing your Edelbrock Nitrous System, you indicate you have read this document and you agree with the terms stated
below:
It is the responsibility of the purchaser to follow all installation instruction guidelines and safety procedures supplied with
the Edelbrock Nitrous Systems. It is also the responsibility of the purchaser to determine the compatibility of the product
with the vehicle or the device on which the purchaser intends to install it.
Edelbrock Corporation assumes no responsibility for damages occurring from misuse, abuse, improper installation,
improper operation, lack of responsible care, or all previously-stated reasons resulting from incompatibility with other
manufacturer's products and/or systems.
Edelbrock Corporation neither recommends nor condones the use of products manufactured or sold by Edelbrock
Corporation for use on vehicles, which may be driven on public roads or highways, and assumes no responsibility for
damages incurred by such use.
Edelbrock Corporation assumes no responsibility for damages incurred by the use of products manufactured or sold by
Edelbrock Corporation on vehicles used for competition or racing.
Edelbrock General Warranty
It is the constant endeavor of Edelbrock Corporation to give our customers the highest quality products obtainable.
Edelbrock warrants each new product, except Performer Series Carburetors, Race Division Parts, Tubular Exhaust
Systems, RPM Series Mufflers, Cat-Back Systems and Performer IAS Shock Absorbers which are warranted separately,
to be free from defects in both workmanship and material for a period of one (1) year from the date of purchase, provided
that the product is properly installed, subjected to normal use and service and that the product is not modified or changed
in any way, negligence by customer or installer or used for racing or competition purposes.
Our warranty service and repair facility is located at 2700 California Street, Torrance, California 90503. Customers who
believe they have a defective product should either return it to the dealer from which it was purchased or ship it directly to
Edelbrock along with proof of purchase and a complete description of the problem. The product must be returned freight
pre-paid. If a thorough inspection of the product by the factory indicates defects in workmanship or material, our sole
obligation shall be to repair or replace the product. Warranty covers only the product itself and not the cost of installation
or removal.
Edelbrock Corporation shall not be liable for any and all consequential damages occasioned by the breach of any
written or implied warranty pertaining to this sale in excess of the purchase price of the product sold.
If you have any questions regarding a product or installation, please contact our Technical Department, toll free
at 1-800-416-8628 from 7:00am to 5:00pm PST, Monday through Friday.
Thank you again for choosing Edelbrock Nitrous Systems.
Advertisement
Table of Contents

Related Manuals for Edelbrock Performer 70070


Summary of Contents for Edelbrock Performer 70070
- Page 1 Please take the time to read and understand the following…. By installing your Edelbrock Nitrous System, you indicate you have read this document and you agree with the terms stated below: It is the responsibility of the purchaser to follow all installation instruction guidelines and safety procedures supplied with the Edelbrock Nitrous Systems.
-
Page 2: Table Of Contents
Before You Install Your Edelbrock Nitrous System ....... . . -
Page 3: Before You Install Your Edelbrock Nitrous System
Proper electrical assembly techniques • Basic engine operation and tuning techniques which include: -Fuel pressure measurement techniques -Timing adjustment techniques Anytime you have questions or concerns with your Edelbrock Nitrous System, please © 2001 Edelbrock Corporation Brochure No. 63-0040 Caution!! call our technical support hotline at 1-800-416-8628 before you start your engine. -
Page 4: What Is Nitrous Oxide
Tighten the nitrous line to the bottle. Slowly open the nitrous bottle valve, listening for leaks. Perform leak checks on all effected fittings and the bottle fitting. © 2001 Edelbrock Corporation Brochure No. 63-0040 Page 3 of 25 free of oils, and solvents. -
Page 5: General Information
Introduction to your Edelbrock Performer RPM Nitrous System ….about this manual! Within the pages of this manual is information, safety tips and operation instructions for your new Edelbrock Nitrous System. Watch for these symbols to know where to go for information. -
Page 6: Jet Map Information
59/39 72/50 The dyno tests were conducted at Edelbrock using a mildly modified 350 cubic inch engine Modifications included Edelbrock intake manifold, dyno headers and improved ignition. These tests were conducted with 950 psi nitrous and 48.5 psi fuel pressure. -
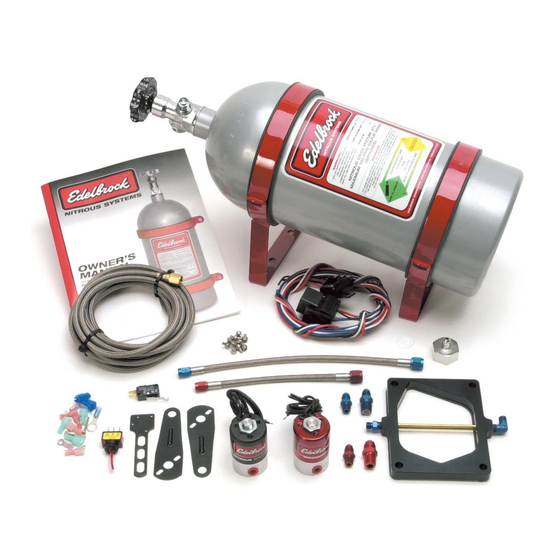
Page 7: Performer Rpm System Bill Of Materials
4 ea. 1 ea. 1 pr. 1 ea. 1 ea. 1 ea. 1 ea. © 2001 Edelbrock Corporation Brochure No. 63-0040 Description Plates and Plate Hardware Performer RPM Pro-Flo Plate, 70070 System Pro-Flo Gaskets Carb Studs Solenoids and Solenoid Hardware... -
Page 8: Performer Rpm System Installation
Device (PRD) Bottle Safety Information Do not attempt to remove the bottle valve. Please return your bottle to Edelbrock if service is required to the siphon tube inside the bottle or the bottle valve itself. Never heat the outside of your nitrous bottle with an open flame like that of a torch. -
Page 9: Bottle Orientation
An Edelbrock nitrous bottle cannot be mounted upside-down. Edelbrock does not offer a non-siphon tube bottle for automotive use. If the bottle must be mounted parallel to the axles of the vehicle (sideways), the label must be angled at approximately 45 degrees toward the front of the vehicle. -
Page 10: Nitrous Bottle Installation
Install the bottle brackets in accordance to race track and/or sanctioning body rules. Contact the factory for assistance with meeting sanctioning body rules. 2.3.3 Nitrous Bottle Installations For Vehicles With Hatchbacks Or Trunk Areas That Are Connected With The Passenger Compartment. Please contact Edelbrock for more information. © 2001 Edelbrock Corporation Brochure No. 63-0040 Shown here is a bottle with a bottle bracket properly installed with the rubber insulator. -
Page 11: Nitrous Feed Line Mounting
The modifications can be performed by clamping the solenoid bracket in a bench vise, or by using wide jaw pliers. © 2001 Edelbrock Corporation Brochure No. 63-0040 Page 10 of 25 Rev. 11/01... -
Page 12: Nitrous Solenoid Mounting And Installation
Leave wires loose for electrical system installation. Attach nitrous feed line to solenoid. (Blue fitting 4AN X 1/4 NPT) Pictured here is the Performer RPM solenoid mounted on an Edelbrock intake manifold using a modified solenoid bracket. The modifications performed to a solenoid bracket depend on many factors. The considerations of solenoid placement are the same for both Nitrous and Fuel. -
Page 13: Fuel Solenoid Mounting And Installation
Remove all foreign matter and dirt. Make sure solenoid body is clean, dry and free of oils before assembly. Replace the O-Ring, plunger and piston spring. Re-assemble the solenoid by reversing the disassembly procedure. © 2001 Edelbrock Corporation Brochure No. 63-0040 Page 12 of 25 Rev. 11/01... -
Page 14: Nitrous Injection Plate Installation
Nitrous Injection Plate Installation The Edelbrock Nitrous System injection plate is a precision-designed CNC-machined component. It has been designed to safely introduce a precise, metered nitrous and fuel signal to promote proper mixing and distribution into the intake manifold. The jet map on page 5 will give you the proper jets to use for each of the power levels available for this plate. -
Page 15: Electrical System Installation
Important: The wiring hardware and instructions included with this kit are intended for 12-volt electrical systems only. Before attempting to wire your Edelbrock Performer nitrous oxide system, examine and follow the wiring diagram on the following page. Please call the Edelbrock Technical department with any questions concerning electrical wiring. -
Page 17: Nitrous Electrical System Installation Procedures
The wire harness attached to the relay and fuse holder includes 8 feet of color-coded wires to make the electrical system installation for your Edelbrock Nitrous System as easy as possible. We recommend that you do not cut any lengths of wires from the wire harness or complete the wiring of the nitrous system until all of the mechanical components are securely mounted in their permanent locations. -
Page 18: Arming Switch
The microswitch must be located in such a way as to be clear of the normal operation of the throttle linkage. Do not directly expose the microswitch to liquids such as water or gasoline. © 2001 Edelbrock Corporation Brochure No. 63-0040 This is a picture of an un-modified and “ready to install” microswitch assembly. -
Page 19: Microswitch Installation And Wiring
Before You Run Your Vehicle Using Your Edelbrock Nitrous System You have just completed the installation of your Edelbrock Nitrous System. It is time to perform some basic system checks to ensure all of the work you have done is correct and ready to operate properly. The following procedure... -
Page 20: Baseline Tuning Suggestions
Nitrous Bottle Pressure...Always keep your bottle pressure between 900 and 950 psi. Yes, there are racers that use different pressures, but the testing we did here at Edelbrock to ensure the jetting maps within the manual are correct, was done in this pressure range. Use any higher pressure than 950 psi and you will be nitrous “rich”. -
Page 21: Ignition Timing And Nitrous Oxide
Note vehicle mph increase and compare it to your baseline. Note: Listen for any knocking sounds when running the vehicle. Watch your temperature gauges. more testing methodology helpful hints. © 2001 Edelbrock Corporation Brochure No. 63-0040 38 degrees “total” 4 degrees “retard” 2 degrees “retard” 32 degrees “total”... -
Page 22: Testing Checklist
It is also good practice to have a book that specializes on the specialized techniques required when working with vehicular ignition systems. Anytime you have questions or concerns with your Edelbrock Nitrous System, please call our technical support hotline at 1-800-416-8628 before you start your engine. -
Page 23: Troubleshooting Your Edelbrock Nitrous System
Troubleshooting Your Edelbrock Nitrous System How to use our Troubleshooting Flowchart: The troubleshooting of a nitrous system is basic and straightforward. The symptom chart is divided by symptom, cause and action required. Determine your problem (symptom), identify the potential problem (cause) and correct the problem (action required). - Page 24 Consult a book concerning proper wiring methods. Malfunctioning nitrous solenoid. Inspect solenoid wiring. See manual pages 16 for wiring information. Repair wiring. Inspect solenoid. See symptom # 2 Rebuild/replace solenoid. © 2001 Edelbrock Corporation Brochure No. 63-0040 Page 23 of 25 Rev. 11/01...
- Page 25 Contact the manufacturer of your plugs for more information. Weak ignition/ignition component failure. Inspect ignition components. Replace worn components. Upgrade ignition system to high performance high load capable ignition components. © 2001 Edelbrock Corporation Brochure No. 63-0040 Page 24 of 25 Rev. 11/01...
- Page 26 Bottle should be 10 lbs. above empty bottle weight listed on bottle label when full. Check bottle temperature. Maintain 80 to 85 degrees of bottle surface temperature. Check bottle valve. Open valve fully Check bottle orientation. Mount bottle properly © 2001 Edelbrock Corporation Brochure No. 63-0040 Page 25 of 25 Rev. 11/01...
Need help?
Do you have a question about the Performer 70070 and is the answer not in the manual?
Questions and answers