Advertisement
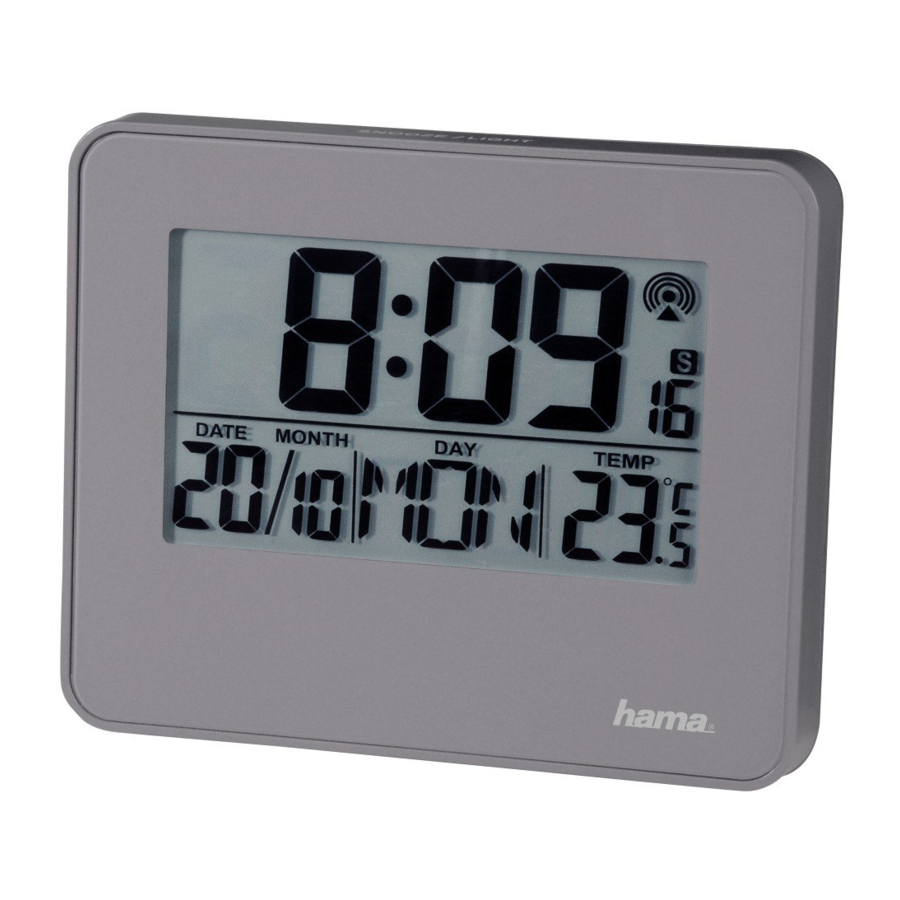
Controls and Displays

- Snooze function/light
- Radio icon
- Time
- Date
- Weekday
- Room temperature
- AL1 (Alarm 1) button
- UP button (set value up)
- SET button (confirms the set value)
- DOWN button (set value down; switches between °C and °F)
- AL2 (Alarm 2) button
- Battery compartment
Explanation of Warning Symbols and Notes

This symbol is used to indicate safety instructions or to draw your attention to specific hazards and risks.
 Note
Note
This symbol is used to indicate additional information or important notes.
Package Contents
- "RC 650" radio-controlled alarm clock
- 2 x AAA batteries
- These operating instructions
Safety Instructions
- The product is intended for private, non-commercial use only.
- Protect the product from dirt, moisture and overheating, and only use it in a dry environment.
- Do not use the product in areas where the use of electronic devices is not permitted.
- Do not place the product near interference fields, metal frames, computers, TVs, etc. Electronic devices and window frames can negatively affect the product's functionality.
- Do not drop the product and do not expose it to any major shocks.
- Do not attempt to service or repair the product yourself. Leave any and all service work to qualified experts.
- Do not modify the product in any way. Doing so voids the warranty.
- Keep the packaging material out of the reach of children due to the risk of suffocation.
- Dispose of packaging material immediately according to locally applicable regulations.
Batteries
- Immediately remove and dispose of dead batteries from the product.
- Only use batteries (or rechargeable batteries) that match the specified type.
- When inserting batteries, note the correct polarity (+ and - markings) and insert the batteries accordingly. Failure to do so could result in the batteries leaking or exploding.
- Do not overcharge batteries.
- Keep batteries out of the reach of children.
- Do not short circuit the batteries/rechargeable batteries and keep them away from uncoated metal objects.
Getting Started
Open the battery compartment cover (12), remove the contact breaker and then close the battery compartment cover again.
Operation
Automatic time setting using the DCF signal
- Once you have removed the contact breaker, an acoustic signal sounds and the alarm clock automatically starts searching for a DCF signal. During the search, the radio icon
![]() (2) will flash.
(2) will flash. - After 5-10 minutes (depending on how quickly the radio signal is received), the clock sets itself to the correct time.
- When the wireless signal is received, the date, time, weekday and temperature are automatically set and the radio icon
![]() (2) is displayed.
(2) is displayed. - If the clock is unable to receive a time signal wirelessly, the time/weekday/ temperature are displayed and the radio icon
![]() (2) is not visible. In this case, you can set the time manually.
(2) is not visible. In this case, you can set the time manually.
| Display | Searching for the DCF signal |
 Display flashing | Active |
| Displayed continuously | Successful – signal is being received |
| Not displayed | Deactivated |
Manual setting
Manually setting the date/time/calendar
- Press and hold theDown (10) button for approx. 3 seconds to stop the search for the DCF signal. The radio icon (2) goes out and you can set the time manually.
- Press and hold theSET button (9) for approx. 3 seconds to start manually setting the date/time.
- Set the following information in the order listed:
- To select the individual values, press theUP (8) button or the Down (10) button and confirm each selection by pressing the SET button (9).
- After setting the date, you will be able to select the language in which the weekday will be displayed. You can choose between the following languages: GER for German, ENG for English, FRA for French, ITA for Italian, NET for Dutch, ESP for Spanish, DAN for Danish
Note – Summer time
The clock automatically switches to summer time. S appears on the display as long as summer time is activated.
Note – Time zone
- The time zone is used if the DCF time signal is received in a country whose time zone does not correspond to German time.
- If the time shift is +1 hour, for example, you need to set the time zone to +1. This will automatically set the clock forward one hour.
Setting the alarm
Setting Alarm 1
- Press the AL1 (7) button. The bell icon appears.
- Press the AL1 (7) button for approx. 3 seconds until the hour digits start flashing. You can set the hours with the UP (8) and DOWN (10) buttons.
- Press the SET (9) button until the minutes digits start flashing. You can set the minutes with the UP (8) and DOWN (10) buttons.
- Press the SET (9) button to save the set alarm time.
Setting Alarm 2
- Press the AL2 (11) button. The (bell) icon appears.
- Press the AL2 (11) button for approx. 3 seconds until the hour digits start flashing. You can set the hours with the UP (8) and DOWN (10) buttons.
- Press the SET (9) button until the minutes digits start flashing. You can set the minutes with the UP (8) and DOWN (10) buttons.
- Press the SET (9) button to save the set alarm time.
Activating Alarm 1/Alarm 2
- Press AL 1 to activate Alarm 1. The bell icon appears above the time
- Press AL 2 to activate Alarm 2. The bell icon appears below the time
- Alarm 1 and Alarm 2 can both be activated at the same time.
Deactivating Alarm 1/Alarm 2
- When ALARM 1 / ALARM 2 goes off, the corresponding alarm symbol (bell with AL1 / bell with AL2) flashes.
- Press the alarm button AL1 to switch off Alarm 1.
- Press the alarm button AL2 to switch off Alarm 2.
- Moving your hand over the SNOOZE/LIGHT sensor (1) stops the alarm and turns on the backlight for 5 seconds.
- The display for repeating the alarm Zz flashes. The alarm will start again after 5 minutes.
Backlighting
- Press the SNOOZE / LIGHT button on the top of the clock to activate the backlight.
Switch between Celsius and Fahrenheit
- Press the DOWN button to switch between °C and °F.
Care and Maintenance
Only clean this product with a slightly moist, lint-free cloth, and do not use aggressive cleaning agents. Make sure that water does not get into the product.
Technical Data
| RC 650 radio-controlled alarm clock |
| Power supply | 2 x AAA batteries |
| Measuring range Temperature | 0°C to 50°C (32°F to 122°F) |
Documents / ResourcesDownload manual
Here you can download full pdf version of manual, it may contain additional safety instructions, warranty information, FCC rules, etc.
Advertisement


Need help?
Do you have a question about the RC 650 and is the answer not in the manual?
Questions and answers