Hama RCR 110 Manual
- Operating instructions manual (71 pages) ,
- Operating instruction (19 pages) ,
- Operating instructions manual (13 pages)
Advertisement
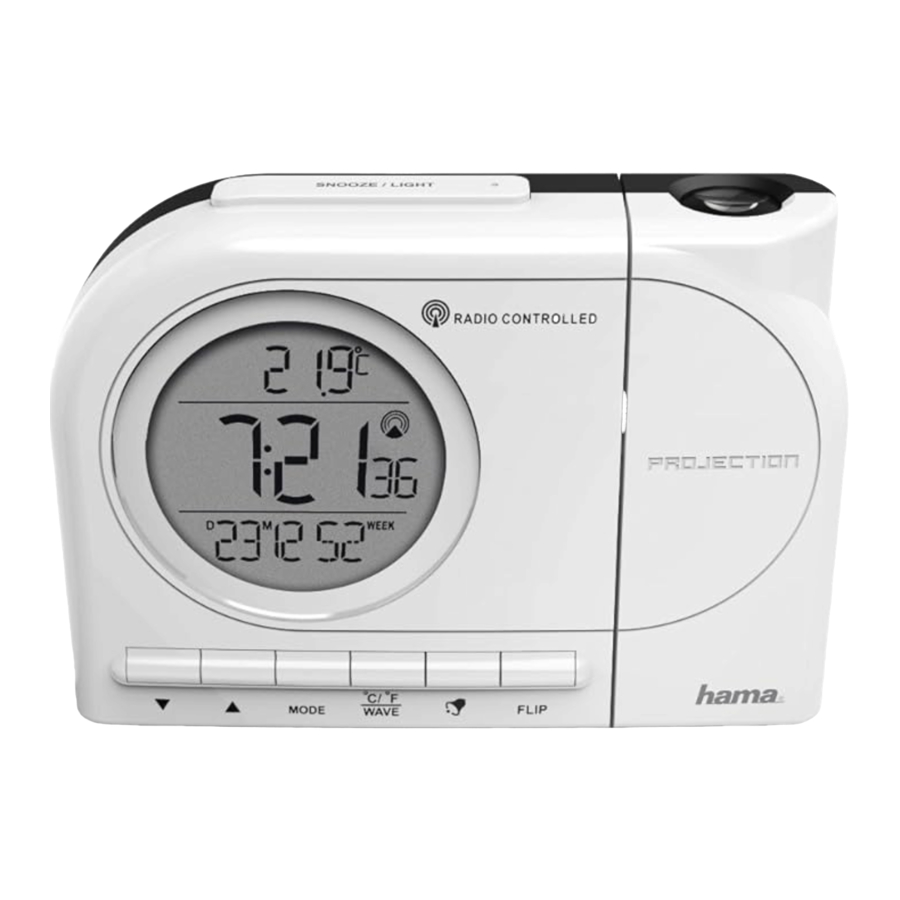
Controls and Displays

- Display
![]() button = decrease the current set time/ set weekday/ switch display between weekday and calendar week
button = decrease the current set time/ set weekday/ switch display between weekday and calendar week![]() button = increase the current set time/ display and set time zone/ toggle 12/24-hour format
button = increase the current set time/ display and set time zone/ toggle 12/24-hour format- MODE button = settings / confirm a set value / switch the display mode
- °C/°F/WAVE button = activate/deactivate manual radio signal reception / switch between °C and °F
![]() button = activate/deactivate the alarm
button = activate/deactivate the alarm- FLIP button = turn projection 180° / switch display projection
- Projection arm
- CONTINUE PROJECTION sliding switch = activate/deactivate sustained projection
- 1DC socket
- SNOOZE/LIGHT button = activate the backlight (approx. 5 seconds) / stop the alarm for 5 minutes
- ROTATE control dial = manually rotate the projection up to +/–90°
- FOCUS control dial = focusses the projection
- Battery compartment
| Display | Meaning | Display | Meaning |
 | Radio signal | SECOND TIME | Secondary time |
 | Weak radio signal |  | Alarm 1 time |
| PM | 12:00-23:59 (12-hour time) |  | Alarm 2 time |
| AM | 0:00-11:59 (12-hour time) | Zz | Snooze function |
| T | Day |  | Summer time |
| M | Month |  | Time zone-shifted time |
Explanation of Warning Symbols and Notes Risk of electric shock
Risk of electric shock
 This symbol indicates product parts energized with a dangerous voltage of su cient magnitude to constitute a risk of electric shock.

This symbol is used to indicate safety instructions or to draw your attention to speci c hazards and risks.
 Note This symbol is used to indicate additional information or important notes.
Package Contents
- RC 110 radio-controlled alarm clock
- 2 AA batteries
- power supply unit
- These operating instructions
Safety Notes
- The product is intended for private, non-commercial use only.
- Protect the product from dirt, moisture and overheating, and only use it in a dry environment.
- Do not use the product in areas where the use of electronic devices is not permitted.
- Only connect the product to a socket that has been approved for the device. The socket must be installed close to the product and easily accessible.
- Do not drop the product and do not expose it to any major shocks.
- Do not attempt to service or repair the product yourself. Leave any and all service work to qualified experts.
- Do not modify the product in any way. Doing so voids the warranty.
- Keep the packaging material out of the reach of children due to the risk of suffocation.
- Dispose of packaging material immediately according to locally applicable regulations.
- Use the product for its intended purpose only.
- Do not use the product in the immediate vicinity of heaters or other heat sources or in direct sunlight.
- Do not operate the product outside the power limits given in the specifications.
- Keep this product, as all electrical products, out of the reach of children!
- Use the item only in moderate climatic conditions.
- The product is intended for indoor use only.
- Do not use the product in moist environments and avoid splashes.
- Lay all cables so that they do not pose a tripping hazard.
- Do not bend or crush the cable.
- Always pull directly on the plug when disconnecting the cable, never on the cable itself.
Batteries
- When inserting batteries, note the correct polarity (+ and markings) and insert the batteries accordingly. Failure to do so could result in the batteries leaking or exploding.
- Only use batteries (or rechargeable batteries) that match the specified type.
- Before you insert the batteries, clean the battery contacts and the polar contacts.
- Do not allow children to change batteries without supervision.
- Do not mix old and new batteries or batteries of a different type or make.
- Remove the batteries from products that are not being used for an extended period (unless these are being kept ready for an emergency).
- Do not short-circuit batteries.
- Do not charge batteries.
- Do not throw batteries in a fire.
- Keep batteries out of the reach of children.
- Never open, damage or swallow batteries or allow them to enter the environment. They can contain toxic, environmentally harmful heavy metals.
- Immediately remove and dispose of dead batteries from the product.
- Avoid storing, charging or using the device in extreme temperatures and extremely low atmospheric pressure (for example, at high altitudes).
Risk of electric shock
- Do not open the device or continue to operate it if it becomes damaged.
- Do not use the product if the AC adapter, the adapter cable or the mains cable are damaged.
- Do not attempt to service or repair the product yourself. Leave any and all service work to qualified experts.
Getting Started
Inserting the batteries
- Open the battery compartment (14) and remove the contact breaker. Replace the battery compartment cover.
Replacing the batteries
- Open the battery compartment (14), remove and properly dispose of the dead batteries and insert two new AA batteries with the correct polarity. Replace the battery compartment cover.
Power supply
- Only operate the product from a socket that has been approved for the device. The socket must be installed close to the product and must be easily accessible.
- Disconnect the product from the power supply using the On/ Off switch – if this is not available, unplug the power cord from the socket.
- If using a multi-socket power strip, make sure that the total power consumption of all connected devices does not exceed the power strip's maximum throughput rating.
- If you will not be using the product for a prolonged period, disconnect it from mains power.
- First connect the power supply unit to the socket (10) of the alarm clock and then to an approved mains socket.
Note
- Sustained projection is only possible on mains power.
- However, batteries are required even on mains power, since the other functions of the alarm clock are powered by the batteries.
Installation
Note – Input
Hold down the  button (3) or the
  button (2) to select values faster.
- Press theMODE button (4) repeatedly to switch between the following displays:
- Temperature
- Alarm mode 1 (ALM1)
- Alarm mode 2 (ALM2)
- Secondary time
Automatic date/time setting using the DCF signal
- Once you have inserted the batteries, the display is switched on, an acoustic signal sounds and the alarm clock automatically starts searching for a DCF radio signal. During the search, the radio icon will flash.
- When the wireless signal is received, the date and time are automatically set.
- The search for the DCF signal takes about 7 minutes.
Note – Time settings
- If, during initial setup of the device, no DCF radio signal is received within the first few minutes, the search is aborted. The radio icon (6) will go out.
- If there are reception problems, we recommend leaving the clock to sit overnight, since interference is generally less at night.
- In the meantime, you can start a manual search for the DCF radio signal at another location or you can manually set the time and date.
- The clock automatically continues to search for the DCF signal every hour. If the signal is received successfully, the manually set time and date are overwritten.
| Display (6) | Searching for the DCF signal |
 Display flashing | Active |
 Display steady (not flashing) | Successful – signal is being received |
| Display steady (not flashing) | Success – weak signal reception |
| Not display | Inactive – no signal reception |
- Press and hold the °C/°F/WAVE button (5) for approx. 3 seconds to start a manual search for the DCF radio signal.
Note – Manual search
- The manual search is automatically aborted after 3-5 minutes.
- Using the wave°C/°F/WAVE (5) frequently will drain the battery. We recommend only using this function to seek out an optimal location for the device.
Note – Summer time
The clock automatically switches to summer time.  appears on the display as long as summer time is activated.
Manually setting the date/time
- Press and hold theMODE button (4) for approx. 3 seconds until the hours display begins to flash.
- Set the following information in the order listed:
- Year
- Month
- Day
- Hours
- Minutes
- To select the individual values, press the
![]() button (3) or the
button (3) or the ![]() button (2) and confirm each selection by pressing theMODE button (4).
button (2) and confirm each selection by pressing theMODE button (4). - Press the MODE button (4) immediately to adopt the set value displayed and skip ahead.
- If you do not make an entry for 30 seconds, you automatically exit the setup mode.
Weekday
- To change the language in which the weekday is displayed, press the
![]() button (2) for 3 seconds. The current language will be displayed.
button (2) for 3 seconds. The current language will be displayed. - Hold down the
![]() button (2) to change to the other languages.
button (2) to change to the other languages.
Note – Day of the week
You can choose German (GE), English (EN), Italian (IT), Spanish (SP) or French (FR) for the weekday display.
Setting the time zone
Note – Time zone
- The DCF signal can be received over long distances, but always transmits the current Central European Time in Germany. Make sure you account for the time difference in countries with another time zone.
- If you are in Moscow, the time is 3 hours later than in Germany. This means that you should set +3 for the time zone. The clock then automatically sets the time to 3 hours after the DCF signal received or relative to the manually set time.
- Press and hold the
![]() button (3) for approx. 3 seconds until the time zone symbol
button (3) for approx. 3 seconds until the time zone symbol ![]() is displayed.
is displayed. - Press and hold theMODE button (4) for approx. 3 seconds to set the required time zone difference.
- To select the individual values, press the
![]() button (3) or the
button (3) or the ![]() button (2) and confirm each selection by pressing theMODE button (4).
button (2) and confirm each selection by pressing theMODE button (4). - Press and hold the
![]() button (3) for 3 seconds to switch the display between local and time zone-shifted time.
button (3) for 3 seconds to switch the display between local and time zone-shifted time.
Selecting 12 or 24-hour format
- Press the p button (3) to switch between the 12 and 24-hour formats.
Selecting weekday/calendar week display
- Press the
![]() button (2) to switch between displaying the weekday and the calendar week (WEEK).
button (2) to switch between displaying the weekday and the calendar week (WEEK).
Temperature display
- Press the °C/°F/WAVE button (5) to choose between °C and °F for the temperature display.
Alarm
Note – Alarm
The alarm time always depends on the time displayed, that is, the local or time zone-shifted time (  ).
).
Setting the alarm time
- Repeatedly press theMODE button (4) to access alarm mode 1 (AL1) or 2 (AL2).
- Press and hold theMODE button (4) to set the alarm time for the alarm displayed. The hours display begins to flash.
- Press the
![]() button (3) or the
button (3) or the ![]() button (2) to select the hour for the alarm time and confirm your selection by pressing theMODE button (4). The minutes display begins to flash.
button (2) to select the hour for the alarm time and confirm your selection by pressing theMODE button (4). The minutes display begins to flash. - Repeat the process to set the minutes for the alarm time.
- Press theMODE button (4) repeatedly to also set the other alarm mode or return to the temperature display.
Activating/deactivating the alarm
- Press the
![]() button (9) repeatedly to activate/deactivate alarm 1 or alarm 2.
button (9) repeatedly to activate/deactivate alarm 1 or alarm 2. - If an alarm is activated, the corresponding symbol
![]() will be displayed.
will be displayed.
Stopping the alarm/snooze function
- If the alarm is triggered, the alarm symbol
![]() will begin to flash and an alarm will sound.
will begin to flash and an alarm will sound. - Press the
![]() button (9) to stop the alarm. Otherwise, it will stop automatically after 4 minutes.
button (9) to stop the alarm. Otherwise, it will stop automatically after 4 minutes.
 button (9) to stop the alarm. Otherwise, it will stop automatically after 4 minutes.
Note – Snooze function
While the alarm signal is sounding, press the LIGHT-SNOOZE button (1) to activate the snooze function. The alarm symbol (7)  and Zz will begin to flash. The alarm signal will be stopped for 4 minutes, after which it will sound again.
Dual Time settings and display
- Dual Time allows you to set and display a second, completely independent time (8).
- Press theMODE button (4) repeatedly until SECOND TIME is displayed.
- Press and hold theMODE button (4) for approximately 3 seconds. The hours display begins to flash.
- Press the
![]() button (3) or the
button (3) or the ![]() button (2) to select the hour and confirm your selection by pressing the MODE button (4). The minutes display begins to flash.
button (2) to select the hour and confirm your selection by pressing the MODE button (4). The minutes display begins to flash. - Repeat the process to set the minutes.
- To select the individual values, press the
![]() button (3) or the
button (3) or the ![]() button (2) and confirm each selection by pressing the MODE button (4).
button (2) and confirm each selection by pressing the MODE button (4).
Backlight
If you press the LIGHT-SNOOZE button (11), the display will light up for approx. 5 seconds.
Projection
Activating/deactivating
Power supply from  batteries
- Press the LIGHT-SNOOZE button (11) to project the display onto the wall or ceiling for five seconds.
Power supply from batteries + mains:
- Slide theCONTINUE PROJECTION sliding switch (9) up towards
![]() to set the projection to sustained mode.
to set the projection to sustained mode. - Slide theCONTINUE PROJECTION sliding switch (9) down/ away from
![]() to deactivate sustained mode.
to deactivate sustained mode.
 to set the projection to sustained mode.
Projection settings:
- Turn the projection arm (8) forward/back to project the display onto the wall or ceiling.
- Press theFLIP button (7) to rotate the projection by 180°.
- Turn theROTATE control dial (12) to further rotate the projection by up to +/–90°.
- Turn theFOCUS control dial (13) to focus the projection.
- Press and hold theFLIP button (7) for approx. 3 seconds to switch the projection between displaying the time and displaying the time and temperature.
Note – Projection
- At a distance from the projection lens to the wall/ceiling of about 2 m / 4 m, the size of the display projection on the wall is about 10 cm / 18 cm.
- By default, the projection shows the time. See the instructions above to set the projection to alternate between the time and the temperature.
Care and Maintenance
Only clean this product with a slightly damp, lint-free cloth and do not use aggressive cleaning agents. Make sure that water does not get into the product.
Note
Disconnect the device from the power supply before cleaning it or if it is not going to be used for a long period of time.
Technical Data
(EU) 2019/1782
Specifications in accordance with Regulation (EU) 2019/1782
| Manufacturer's name or trade mark, commercial registration number and address | Hama, HRA12159, Dresdner Str. 9, 86653 Monheim |
| Model identi er | HX06-0500300-BG |
| Input voltage | 100 –240 V |
| Input AC frequency | 50 / 60 Hz |
| Output voltage / Output current / Output power | 5.0 V DC / 0.3 A / 1.5 W |
| Average active e ciency | 70.7 % |
| E ciency at low load (10%) | 51.4 % |
| No-load power consumption | 0.06W |
RCR 110 radio-controlled alarm clock
| Power supply | 2 x AA batteries Power supply unit: In: 100-240 V  50 / 60 Hz 50 / 60 HzOut: 5.0 V  0.3 A 0.3 A |
| Measuring range Temperature | 0°C – +50°C/ 32°F – +122°F |
Documents / ResourcesDownload manual
Here you can download full pdf version of manual, it may contain additional safety instructions, warranty information, FCC rules, etc.
Advertisement


Need help?
Do you have a question about the RCR 110 and is the answer not in the manual?
Questions and answers