Advertisement
Quick Links
Advertisement

Related Manuals for Hem Infinity


Summary of Contents for Hem Infinity
- Page 1 Lift Shelf Assembly Instruction...
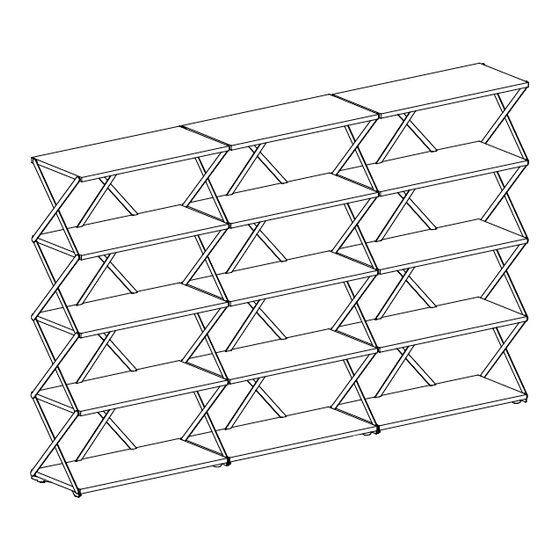
- Page 2 Lift Shelf Staffan Holm’s Lift Shelf effortlessly and elegantly expands to accommodate your ever-growing collections. Extra shelves can be stacked on top of, or alongside, an existing system for additional capacity, making this modular solution as flexible as it is handsome. The construction is economical and functional, just like the industrial scissor lifts that inspired its fundamental form.
- Page 3 Possible Lift configurations explained in these assembly instructions Lift 3 Lift 6 Go to page 12 Go to page 4 Lift 9 Lift 12 Go to page 4 Go to page 4 Lift 5 Lift 10 Go to page 6...
-
Page 4: Start Here
Lift 6, 9, 12 — Preparing the middle crosses Parts 4 × Screw-B 2 × Screw-C 6 × Screw-D These screws come already attached to the side crosses. Screw-D is in the fitting bag. Start here Prepare the middle crosses. Replace screws as shown. - Page 5 Lift 6 Unscrew all screws on the middle cross and replace screws as shown on page 4. Lift 9 Unscrew all screws on the 2 middle crosses and replace screws as shown on page 4. Lift 12 Unscrew all screws on the 3 middle crosses and replace screws as shown on page 4.
- Page 6 Lift 5 — Preparing the side crosses Parts 2 × Screw-A 2 × Screw-C Screw-C is in the fitting bag. These screws come already attached to the side crosses. Start here Prepare the side crosses. Replace screws as shown. See on page 7 which crosses need to be adjusted for the specific Lift variant.
- Page 7 Lift 5 Unscrew the screws on the 2 side crosses and replace screws as shown on page 6. Now go to page 12...
- Page 8 Lift 10, 15 — Preparing the side crosses Parts for side crosses 2 × Screw-A 2 × Screw-C Screw-C is in the fitting bag. These screws come already attached to the side crosses. Start here Prepare the side crosses. Replace screws as shown. See on page 9 which crosses need to be adjusted for the specific Lift variant.
- Page 9 Lift 10 Unscrew the screws on the 2 side crosses and replace screws as shown on page 8. Lift 15 Unscrew the screws on the 2 side crosses and replace screws as shown on page 8. Now go to page 10...
- Page 10 Lift 10, 15 — Preparing the middle crosses Parts for middle crosses 4 × Screw-B 6 × Screw-C 10 × Screw-D These screws come already attached to the side crosses. Screw-D is in the fitting bag. Start here Prepare the middle crosses. Replace screws as shown.
- Page 11 Lift 10 Unscrew all screws on the middle cross and replace screws as shown on page 10. Lift 15 Unscrew all screws on the 2 middle crosses and replace screws as shown on page 10. Now go to page 12...
- Page 12 Repeat on the other side. Please note: All configurations can be build by starting from Lift 3, sideways, upwards or both. Depending on what configuration you build, there will possibly be components left over.
- Page 13 Step 3 Add the back cross by pushing it into the holes on the back of the shelf. Step 4 Add the middle shelf using approach outlined in step 2. Place the second shelf. First match the holes to the back cross in the back.
- Page 14 Step 5 Repeat step 3 and 4 with the final shelf. Step 6 For hanging shelves skip step 6 and proceed to page 15. To avoid tipping, attach the upper wall hanger to the shelf, measure distance from floor to the top of the shelf. Then, remove the wall hanger from the shelf and screw it to the wall with appropriate...
-
Page 15: Wall Hanging
Wall hanging Step 1 Once the base is built, screw the top wall hanger to the wall with appropriate screws and plugs for your type of wall (if you’re uncertain, seek professional advise). The height must be a minimum of 720mm/28.3in. - Page 16 Lift infinity configurations Building up You can always re-configure your lift shelf anytime you’d like. Either rearrange your current shelves or add more shelves. To build upwards, go to page 8. Building sideways To build sideways, go to page 5.
- Page 17 Building up and sideways To build upwards, go to page 8. To build sideways, go to page 5. Other configurations There are endless configurations on how you can build and extend your Lift shelf. Get creative and find your favorite Lift.
- Page 18 Notes...
- Page 19 Notes...
- Page 20 Notes...
- Page 21 Notes...
- Page 22 Notes...
- Page 23 Notes...
- Page 24 Should you have any problems assembling your product, contact us at info@hem.com. We’re always happy to help! We have carefully selected the materials used in this product, and ask you to treat it responsibly too. Please recycle all packaging according to your local disposal rules.
Need help?
Do you have a question about the Infinity and is the answer not in the manual?
Questions and answers