
Related Manuals for ANFIM Alba


Summary of Contents for ANFIM Alba
- Page 1 / a lba ON DEMAND PROFESSIONAL GRINDER Original instructiOns * Exemplary illustration www.anfim-milano.com...
-
Page 2: Table Of Contents
/ a lba | En contents Overview Touchscreen /Main menu Symbols Scope of delivery Opening and using the main menu General information Cleaning Reading and storing the instructions Cleaning the surface Explanation of symbols used underneath the grinder... -
Page 3: Overview
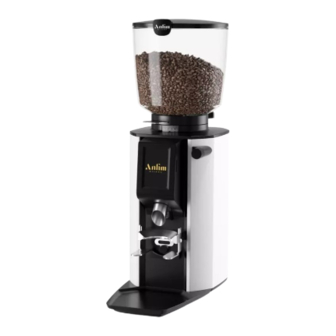
/ a lba | En Overview * Exemplary illustration... -
Page 4: Scope Of Delivery
/ a lba | En scope of delivery name Bean hopper (with lid) Hopper intake adjusting the degree of grinding card holder (for micro SD card) micro SD card slot Spout guide (adjustable) on/off switch Release button (thermal overcurrent circuit-breaker) Power cable (with power plug) Screw for adjusting the portafilter support (left and right), 2×... -
Page 5: General Information
Before you start using the luna or alba Single Espresso Grinder, care- fully read through these original instructions and the safety information. only then will you be able to use the Single Espresso Grinder safely and without danger. -
Page 6: Safety
/ a lba | En This symbol provides you with useful information about operation or handling. Declaration of conformity: Products marked with this symbol fulfill all applicable community provisions of the European Economic area. UKca mark: Products marked with this symbol comply with the electri- cal product safety requirements of the United Kingdom of Great Britain and northern ireland. -
Page 7: Safety Information
/ a lba | En safety information Risk of electric shock! waRninG ! improper use, incorrect electrical installation, or a voltage that is too high can all lead to electric shock. » connect the grinder only if the supply voltage of the socket complies with the information indicated on the type plate. - Page 8 / a lba | En » Keep children away from the grinder. » make sure that children do not insert any objects into the grinder. » if you are not currently using the grinder, if you are cleaning it, or if there is a malfunction, switch the grinder off and remove the power plug from the socket.
- Page 9 / a lba | En Risk of tipping and injury! caUTion ! incorrect set-up of the grinder can result in injury. » lay out the power cable in such a way that nobody can become entangled in it and cause the grinder to fall.
-
Page 10: Before Using For The First Time
/ a lba | En before using for the first time Functioning The shot sizes, i.e. the volume of grounds per serving, are defined by the grinding time in this grinder. The user can specify up to three different recipes (grinding times) and also has the option to control the grinding time manually (manual grinding). -
Page 11: Checking The Grinder And Scope Of Delivery
/ a lba | En Updates and user-defined logos can be transferred via the integrated micro SD card slot (5). The micro SD card (20) must be inserted in the enclosed card holder (4) for this purpose. You will find detailed information about this in the software manual (see “Reading and storing the instructions”... -
Page 12: Setting The Portafilter Support And Spout
/ a lba | En setting the portafilter support and spout adjust the portafilter support (12) to the size of the portafilter of your espresso machine as described in the following. 1. Ensure that the grinder is switched off (on/off switch (7) in the 0 position). -
Page 13: Operation
/ a lba | En Operation The grinder has a thermal overcurrent circuit-breaker which interrupts the electric circuit of the grinder in the event of an electrical overload. Place the on/off switch (6) in the 0 position (off) to return the grinder to service. -
Page 14: Setting The Grinding Degree
/ a lba | En setting the grinding degree You can infinitely adjust the desired grinding degree with the grinding degree adjust- ment (3). You can read the pre-set value on the grinding degree scale (17). » Turn the grinding degree adjustment counterclockwise to reduce the grinding degree (= finer ground coffee). -
Page 15: Grinding Espresso Beans
/ a lba | En grinding espresso beans 1. Select the desired recipe or the manual grinding option by tapping the respective display on the touchscreen. The selected recipe or the manual grinding option is highlighted in color. -
Page 16: Touchscreen /Main Menu
/ a lba | En touchscreen / Main menu symbols Symbol meaning open main menu (This symbol is only displayed in the Pro mode .) Edit entry (This symbol is only displayed in the Pro mode .) change to Basic mode change to Pro mode (The owner password must be entered for the change.) -
Page 17: Opening And Using The Main Menu
/ a lba | En Recipe name symbol Ristretto chemex Opening and using the main menu 1. if required, change to the Pro mode ( ) (owner password: 1932) (see “functioning” section). 2. Tap the symbol to go to the main menu. -
Page 18: Cleaning
/ a lba | En cleaning Risk of injury! caUTion ! The grinder can fall over and cause injury when it is being moved. » always place the grinder on a stable surface that will not tilt. » ask another person for help if the grinder is too heavy. -
Page 19: Cleaning The Surface Underneath The Grinder
/ a lba | En cleaning the surface underneath the grinder 1. Switch off the grinder (on/off switch (7) in the 0 position) and pull the power plug (9) out of the socket. 2. lift the grinder by its casing with both hands and place it on another surface that is clean. -
Page 20: Cleaning The Hopper
/ a lba | En cleaning the hopper The bean hopper should be cleaned daily to remove any coffee oil residue, which can have a negative effect on the taste. 1. open the bean hopper (1) by pulling out the slider (19) . - Page 21 / a lba | En 3. Use the manual grinding function to grind the espresso beans that remain in the grinding mechanism until the grinder runs idle. 4. Undo the securing screw (18) for the bean hopper. 5. Rotate the bean hopper counterclockwise to loosen it from the grinder, and remove it from the grinder by lifting it upwards.
-
Page 22: Troubleshooting
/ a lba | En troubleshooting Problem cause Solution The grinder The power plug has not » insert the power plug into a properly is not been inserted. installed socket. grinding, The hopper is not inserted. » Re-insert the bean hopper (see the display “inserting the hopper”... - Page 23 / a lba | En Problem cause Solution The grinder The grinding discs are worn » contact your supplier (see “mainte- is not grind- out or need to be read- nance and service” section). ing finely justed. enough.
-
Page 24: Technical Data
/ a lba | En technical data model: luna alba Voltage / frequency: 220–240 V; 50/60 Hz 220–240 V; 50/60 Hz 110–127 V; 60 Hz 110–127 V; 60 Hz 100 V; 50/60 Hz 100 V; 50/60 Hz Power: 460 w (50 Hz) 520 w (50 Hz) 530 w (60 Hz) 600 w (60 Hz) -
Page 25: Disposal
/ a lba | En Disposal Disposing of the packaging Dispose of the packaging by correctly sorting the recyclable materials. Dispose of cardboard as paper waste and plastic as recyclable materials. Disposing of the grinder Electrical appliances labeled... -
Page 26: Maintenance And Service
Maintenance and service » if service or maintenance is required, contact an authorized customer service center for anfim products. The customer service department can answer any questions you may have regarding repair and maintenance of your product or spare parts. - Page 27 / a lba | En You can also refer to the videos about the luna / alba on the YouTube channel of anfim for useful information on handling the grinder. » Scan the QR code below to go directly to the YouTube channel with the videos...
- Page 28 Hemro International AG Thurgauerstrasse 80 | 8050 Zurich, Switzerland T: +41 44 864 18 00 | F: +41 44 864 18 01 info@hemrogroup.com | www.hemrogroup.com...
Need help?
Do you have a question about the Alba and is the answer not in the manual?
Questions and answers