Table of Contents
Advertisement
Quick Links
Advertisement
Table of Contents
Troubleshooting

Related Manuals for DeLonghi ESAM03.126.S


Summary of Contents for DeLonghi ESAM03.126.S
- Page 1 De’Longhi Appliances via Seitz, 47 31100 Treviso Italia www.delonghi.com...
- Page 2 ESAM03.12X BEAN TO CUP ESPRESSO AND CAPPUCCINO MACHINE Instruction for Use...
-
Page 3: Electrical Requirements
page 6 ELECTRICAL REQUIREMENTS Before using this appliance ensure that the voltage indicated on the product corresponds with the main voltage in your home, if you are in any doubt about your supply contact your local electricity company. The flexible mains lead is supplied connected to a B.S. 1363 fused plug having a fuse of 13 amp capacity. Should this plug not fit the socket outlets in your home, it should be cut off and replaced with a suitable plug, following the procedure outlined below. - Page 4 A4 A5 B12 B13...
-
Page 7: Table Of Contents
CONTENTS DESCALING ............14 SETTING WATER HARDNESS ........15 ELECTRICAL REQUIREMENTS ........2 Measuring water hardness ..........15 FUNDAMENTAL SAFETY WARNINGS ......7 Set water hardness ............15 IMPORTANT SAFEGUARDS ........8 SETTING THE TEMPERATURE ........15 Symbols used in these instructions ........8 MEANING OF LIGHTS DURING NORMAL OPERATION 16 Designated use ..............8 Instruction for Use..............8 TECHNICAL SPECIFICATION ........16... -
Page 8: Fundamental Safety Warnings
FUNDAMENTAL SAFETY WARNINGS • The appliance is not intended for use by persons (including children) with reduced physical, sensory or mental capabilities, or lack of experience and knowledge, unless they have been given supervision or instruction concerning use of the appliance by a person responsible for their safety. -
Page 9: Important Safeguards
• When not in use and before putting on or taking off parts or cleaning, always unplug the appliance. Surfaces marked with this symbol become hot during use (the symbol is present in certain models only). IMPORTANT SAFEGUARDS Instruction for Use Read this Instruction for Use carefully before using the appli- Symbols used in these instructions ance. -
Page 10: Description
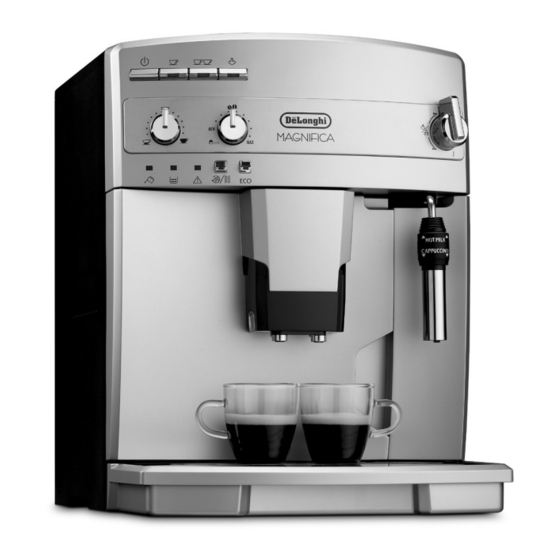
DESCRIPTION PRELIMINARY CHECKS Description of the appliance Checking the appliance (page 3 - A ) After removing the packaging, make sure the product is com- plete and undamaged and that all accessories are present. A1. Grinding adjustment dial Do not use the appliance if it is visibly damaged. A2. -
Page 11: Turning The Appliance On
3. Turn the cappuccino maker outwards and place a container To turn the appliance off, press the button (fig. 4). The ap- with a minimum capacity of 100 ml underneath (fig. 2). pliance performs a rinse cycle. 4. Place the main switch on the back of the appliance in the I position (fig. -
Page 12: Making Coffee
MAKING COFFEE If the coffee is delivered too slowly or not at all, turn one click clockwise Selecting the coffee taste towards “7”. For fuller bodied creamier Turn the dial (B8) to select the required taste. Turning it clock- coffee, turn one click anticlockwise to- wise increases the quantity of coffee beans the appliance will wards “1”... -
Page 13: Making Coffee Using Pre-Ground Coffee
• If the coffee is delivered a drop at a time, too weak and not indicating that the appliance is heating up; creamy enough or too cold, read the tips in the “Trouble- 4. Make sure the ring on the cappuccino maker is positioned shooting”... -
Page 14: Hot Water
coffee spouts (A19), 1. Deliver a little water for a few seconds by rotating the pre-ground coffee funnel (A8), steam knob to the I position. inside of the machine, accessible after opening the infuser Then turn the steam knob to the 0 position to stop the flow door (A19), of hot water. -
Page 15: Cleaning The Water Tank
(see “Turning off”) and unplugged from the mains power sup- ply. Never immerse the coffee maker in water. 1. Check regularly (about once a month) that the inside of the appliance (accessible after removing the drip tray) is not dirty. If necessary, remove coffee deposits with a brush and a sponge. -
Page 16: Setting Water Hardness
gramme has begun (the lights go out as coffee cannot be made). level 1 6. Turn the steam knob a half turn anticlockwise. The descaler solution flows out of the cappuccino maker into the under- level 2 lying container. The descale programme automatically performs a series of level 3 rinses and pauses to remove limescale deposits from inside the machine. -
Page 17: Meaning Of Lights During Normal Operation
TECHNICAL SPECIFICATION This product complies with European regulation no. 1935/2004 on materials and articles intended to come Voltage: 220-240 V~ 50/60 Hz max. 10 A into contact with food. Absorbed power: 1450 W Pressure: 15 bar DISPOSAL Water tank capacity: 1,7 L The appliance must not be disposed of with house- Size: LxHxD:... -
Page 18: Meaning Of The Alarm Lights
MEANING OF THE ALARM LIGHTS LIGHTS DESCRIPTION MEANING WHAT TO DO The light is on steadily Insufficient water in the Fill the tank with water and insert tank or the tank is not cor- it correctly, pushing it as far as it rectly inserted will go until it clicks into place. -
Page 19: Troubleshooting
The light flashes The machine must be de- The descaling procedure described scaled in the section “Descaling” needs to be performed as soon as possible The lights flash The pre-ground coffee Empty the funnel with the help of funnel is clogged a brush as described in the section “Cleaning the pre-ground coffee funnel”. - Page 20 The coffee is weak or not The coffee is ground too coarsely. Turn the grinding adjustment knob one click creamy enough. anticlockwise towards “1” while the coffee mill is in operation (fig. 7). Continue one click at a time until coffee delivery is satisfactory. The effect is only visible after delivering 2 coffees (see the section: “Adjusting the coffee mill”...
Need help?
Do you have a question about the ESAM03.126.S and is the answer not in the manual?
Questions and answers