
Related Manuals for Nikon NPL-332


Summarization of Contents
Notices
USA
FCC Class B compliance and interference mitigation measures.
European Union
Compliance with EU EMC Directive.
Canada
Compliance with Canadian Interference Causing Equipment Regulations.
Taiwan
Battery Recycling Requirements
Taiwanese regulations for battery recycling.
Notice to Our European Union Customers
Recycling in Europe
Instructions for recycling Trimble WEEE.
Safety
Introduction
Overview of the NPL-302 series instrument.
Welcome
Thank you for purchasing the Nikon product and manual overview.
Instrument accuracy and display
Details ease-of-use and software similarities across Nikon models.
Laser Safety
Specifications for laser emission
Lists wave length, drive method, output power, and pulse width.
Conforming standards
Lists standards met in E.U. and USA for laser safety.
Warnings
Never look at the sun through the telescope
Warning about potential eyesight damage.
Explosion-proof warning
Avoid use in hazardous environments like coal mines.
Class 1 laser instrument hazards
Laser beam is hazardous to eyes and body; avoid direct sighting.
Self-repair prohibition
Warning against unauthorized repair due to electric shock/fire risk.
Warnings
Battery charger warning
Use specified charger to avoid fire or rupture.
Battery charger ventilation warning
Ensure charger can dissipate heat to prevent overheating.
Battery recharging environment warning
Avoid humid, dusty, wet, or direct sunlight conditions.
Battery short circuit warning
Avoid short circuiting battery contacts to prevent fire.
Battery burning warning
Avoid burning or heating battery to prevent leaks or rupture.
Battery storage contact warning
Cover contacts with tape to prevent short circuits.
Battery waterproof warning
Keep battery dry to prevent fire or burns.
Cautions
Unauthorized procedure warning
Avoid exposure to hazardous radiation by following specified procedures.
Tripod ferrule sharpness warning
Handle tripod carefully to avoid injuring yourself on sharp ferrules.
Laser objective capping caution
Cap objective when not in use to avoid laser emissions.
Carrying case strap caution
Check strap and clasp before carrying to prevent drops.
Tripod setup leg placement caution
Ensure no one's hands or feet are under tripod legs during setup.
Tripod leg screw caution
Secure tripod leg screws to prevent collapse.
Cautions
Tripod clamp screw caution
Secure clamp screw to prevent instrument falling.
Leveling base clamp knob caution
Secure knob to prevent leveling base becoming loose.
Carrying case usage caution
Avoid stacking or sitting on carrying case due to instability.
Plumb bob handling caution
Avoid injuring yourself or others by swinging or throwing plumb bob.
Battery charging manual caution
Read quick charger manual before charging battery pack.
Laser disabling caution before disposal
Ensure laser is disabled before instrument disposal.
Introduction
Introduction
Overview of the NPL-302 series instrument.
Laser Safety
Information on laser hazards and precautions.
Warnings and Cautions
Safety instructions and warnings.
Introduction
Welcome
Greeting and manual overview.
Instrument accuracy and display
Details ease-of-use and software similarities.
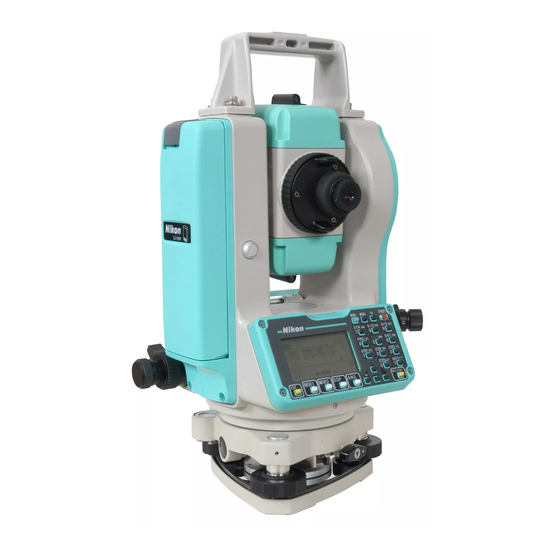
Parts of the Instrument
Identifies main components of the NPL-302 series instrument.
Maintenance
Instructions for proper care and upkeep of the instrument.
Introduction
Unpacking and Packing the Instrument
Procedures for safely handling the instrument case.
Charging and Discharging the Battery Pack
Steps for charging and discharging the battery pack.
Detaching and Re-Attaching the Battery Pack
How to remove and install the battery pack.
Setting Up the Tripod
Instructions for stable tripod setup.
Centering
Aligning the instrument precisely over the station point.
Leveling
Making the instrument's vertical axis perfectly vertical.
Sighting
Aiming the telescope at the target and focusing.
Measurement Mode and Target Preparation
Selecting measurement modes and preparing targets.
Measurement with a Prism
Instructions for using prisms in measurements.
Reflectorless Mode Measurement
Measuring without a prism using reflective surfaces.
Preparing the Reflector Sheet
Assembling the reflector sheet for measurements.
Setting Up the Prism Reflector
Assembling and setting up prism reflectors.
Face-1/Face-2 Measurements
Taking measurements from both sides of the instrument.
Preparation
Adjusting Tribrach Adapter Height
Adjusting the tribrach adapter for lower height setting.
Changing Prism Direction
Rotating the prism on the tribrach adapter.
Setting Prism Constant
Inputting the prism constant value for measurements.
Setting Target Plate Position
Aligning the target plate with the tribrach adapter and prism.
Face-1/Face-2 Measurements
Taking measurements from both sides of the instrument.
Getting Started
Turning Instrument On and Off
Procedures for powering the instrument on and off.
Selecting a Language
Choosing the display language for the instrument.
Changing Regional Configuration Pre-sets
Setting default regional configurations for easier setup.
Display and Key Functions
Overview of the instrument's LCD display and keyboard layout.
List Display
How available jobs or data appear in a list format.
Inputting Data
Entering point names, numbers, and coordinates.
Jobs
Managing jobs for data recording.
Measuring Distances
Taking distance measurements using the instrument.
Getting Started
Sighting a Prism Reflector
Aiming at a prism reflector for measurement.
Applications
HA Reset and Angle Operations
Resetting horizontal angle and general angle operations.
Station Setup
Procedures for setting up the instrument's station.
Stakeout
Guiding users to stake out points in the field.
Program Key Functions
Accessing and using measurement programs.
Recording Measurement Data
Saving measurement data from any observation screen.
Measuring Offsets
Taking offset measurements for points.
Applications
Setting the horizontal angle to 0
Resetting the horizontal angle to 0 degrees.
Entering the horizontal angle
Manually inputting horizontal angles.
Recording Foresight Point in Repeat Angle Measurement
Storing foresight points during repeat angle measurements.
F1/Face-2 Measurement
Performing measurements using both instrument faces.
Applications
Horizontal angle hold
Holding the horizontal angle at its current value.
Setting Up Station with Known Coordinates or Azimuth
Establishing station position using known data.
Advanced Feature: Measuring F1 and F2
Special F1/F2 measurement techniques.
Setting Up Station Using Multiple Point Resection
Determining station position via resection from known points.
Advanced Feature: Viewing and Deleting Resection Measurements
Managing resection measurements.
Setting Up Station Quickly Without Coordinates
Fast station setup when coordinates are not available.
Determining Station Elevation
Calculating the station's elevation.
Checking and Resetting Backsight Direction
Verifying and adjusting backsight direction.
Two-Point Resection Along a Known Line
Resecting station position using a known line.
Specifying Stakeout Point by Angle and Distance
Guiding stakeout using angle and distance.
Specifying Stakeout Point by Coordinates
Guiding stakeout using coordinate data.
Advanced Feature: Specifying Stakeout List by Range Input
Inputting stakeout points using a range.
DivLine S-O Function
Dividing a line and staking out points.
RefLine S-O Function
Staking out points based on a specified line.
Introduction
Welcome
Greeting and manual overview.
Parts of the Instrument
Identifies main components of the NPL-302 series instrument.
Maintenance
Instructions for proper care and upkeep of the instrument.
Introduction
Welcome
Thank you and manual introduction.
Instrument Accuracy and Display
Ease-of-use and software similarities across Nikon models.
Introduction
Instrument Accuracy and Display
Accuracy specifications and display resolution table.
Introduction
Parts of the Instrument
Identifies main components of the NPL-302 series instrument.
Introduction
Parts of the Instrument
Identifies main components of the NPL-302 series instrument.
Introduction
Maintenance
Instrument care, cleaning, and storage instructions.
Introduction
Maintenance
Cleaning optical lenses, attaching battery, and connector cap.
Preparation
Unpacking and Packing the Instrument
Procedures for safely handling the instrument case.
Charging and Discharging the Battery Pack
Steps for charging and discharging the battery pack.
Detaching and Re-Attaching the Battery Pack
How to remove and install the battery pack.
Setting Up the Tripod
Instructions for stable tripod setup.
Centering
Aligning the instrument precisely over the station point.
Leveling
Making the instrument's vertical axis perfectly vertical.
Sighting
Aiming the telescope at the target and focusing.
Measurement Mode and Target Preparation
Selecting measurement modes and preparing targets.
Preparing the Reflector Sheet
Assembling the reflector sheet for measurements.
Setting Up the Prism Reflector
Assembling and setting up prism reflectors.
Face-1/Face-2 Measurements
Taking measurements from both sides of the instrument.
Preparation
Unpacking and Packing the Instrument
Procedures for safely handling the instrument case.
Charging and Discharging the Battery Pack
Steps for charging and discharging the battery pack.
Preparation
Charging and Discharging the Battery Pack
Warnings and important notes for battery charging.
Preparation
Charging and Discharging the Battery Pack
Detailed steps for charging the battery pack.
Preparation
Discharging the Battery Pack
Steps to discharge the battery pack.
Detaching and Re-Attaching the Battery Pack
How to remove the battery pack.
Preparation
Attaching the BC-65 Battery Pack
Steps for securely attaching the battery pack.
Setting Up the Tripod
Instructions for stable tripod setup.
Preparation
Centering
Aligning the instrument precisely over the station point.
Centering Using the Optical Plummet
Using the optical plummet for precise centering.
Preparation
Centering Using a Plumb Bob
Using a plumb bob for precise centering.
Leveling
Making the instrument's vertical axis perfectly vertical.
Preparation
Adjusting the Diopter
Focusing the reticle crosshairs.
Eliminating Parallax
Checking for target image movement relative to crosshairs.
Measurement Mode and Target Preparation
Selecting measurement modes and preparing targets.
Measurement with a Prism
Using prisms, recommendations for accuracy.
Preparation
Measurement with a Prism
Maintaining accuracy when using prisms.
Measurement in Reflectorless Mode
How target reflection affects reflectorless measurements.
Preparation
Measurement in Reflectorless Mode
Factors affecting reflectorless measurement distance.
Customizing Items in the Basic Measurement Screen (BMS)
Modifying displayed items on the BMS.
Header Characters
Meaning of characters used in DSP screen headers.
Preparation
[DSP] Key Functions
Changing display screens and settings.
[MODE] Key Functions
Changing keyboard input modes.
Quick Code Measurement Mode
Using quick codes for measurements.
[COD] Key Functions
Changing the default feature code.
Setting the Default Code
Window for entering feature codes.
Qcode Observations
Entering quick code observations.
Preparation
[HOT] Key Functions
Accessing HOT key menu for target settings.
Changing Target Height
Adjusting target height in HOT menu.
Setting Temperature and Pressure
Inputting ambient temperature and pressure.
Selecting the Target Set
Specifying target type, prism constant, and height.
Preparation
Selecting the Target Set
Changing settings defined in a target set.
Entering a Field Note
Adding text notes to measurements.
Setting the Default Point Name
Changing the default point name for records.
Bubble Indicator
Displaying instrument leveling status.
Preparation
Setting the Prism Constant
Prism constant value for Nikon prisms.
Setting Target Plate Position
Aligning target plate with tribrach adapter.
Face-1/Face-2 Measurements
Averaging measurements to cancel errors.
Preparation
Face-1/Face-2 Measurements
How Face-1 and Face-2 measurements are made.
Getting Started
Turning Instrument On and Off
Procedures for powering the instrument on and off.
Selecting a Language
Choosing the display language for the instrument.
Changing Regional Configuration Pre-sets
Setting default regional configurations for easier setup.
Display and Key Functions
Overview of the instrument's LCD display and keyboard layout.
List Display
How available jobs or data appear in a list format.
Inputting Data
Entering point names, numbers, and coordinates.
Jobs
Managing jobs for data recording.
Measuring Distances
Taking distance measurements using the instrument.
Getting Started
Turning on the Instrument
Powering on the instrument and viewing the start-up screen.
Getting Started
Turning off the Instrument
Procedures for powering down the instrument.
Sleep Mode
Instrument power-saving mode and wake-up conditions.
Getting Started
Selecting a Language
Choosing the display language for the instrument.
Getting Started
Changing Regional Configuration Pre-sets
Setting default regional configurations for easier setup.
Getting Started
Changing Regional Configuration Pre-sets
Table of regional configuration settings.
Getting Started
Display and Key Functions
Overview of the instrument's LCD display and keyboard layout.
Getting Started
Key Functions Overview
Summary of key functions and their details.
Getting Started
Key Functions Overview (Continued)
Summary of key functions and their details.
Getting Started
Status Bar Information
Icons indicating system function status.
Signal Indicator
Shows reflected light intensity.
Getting Started
Input Mode Indicator
Shows data input mode (numeric or alphabetic).
Battery Indicator
Shows battery voltage level.
Getting Started
Adjusting Lighting and Sound Levels
Adjusting LCD backlight and sound settings.
2-Switch Window Adjustment
Using the window to adjust lighting and sound.
Contrast Adjustment Window
Adjusting display contrast level.
Getting Started
Switching Between Display Screens
Navigating through available display screens.
Getting Started
Customizing Items in the Basic Measurement Screen (BMS)
Modifying displayed items on the BMS.
Header Characters
Meaning of characters used in DSP screen headers.
Getting Started
[MODE] Key Functions
Changing keyboard input modes.
Changing Input Mode for Points or Codes
Switching between alphanumeric and numeric input.
Quick Code Measurement Mode
Using quick codes for measurements.
Getting Started
Quick Code Measurement Mode
Assigning new feature codes to numeric keys.
[COD] Key Functions
Changing the default feature code.
Setting the Default Code
Window for entering feature codes.
Qcode Observations
Entering quick code observations.
Getting Started
[HOT] Key Functions
Accessing HOT key menu for target settings.
Changing Target Height
Adjusting target height in HOT menu.
Setting Temperature and Pressure
Inputting ambient temperature and pressure.
Selecting the Target Set
Specifying target type, prism constant, and height.
Getting Started
Selecting the Target Set
Changing settings defined in a target set.
Entering a Field Note
Adding text notes to measurements.
Getting Started
Setting the Default Point Name
Changing the default point name for records.
Bubble Indicator
Displaying instrument leveling status.
Getting Started
[USR] Key Functions
Assigning functions to user-defined keys.
[DAT] Key Functions
Accessing data quickly using the DAT key.
Getting Started
[DAT] Key Functions
Changing the data type assigned to the DAT key.
List Display
Navigating lists of jobs or data.
Getting Started
List Display
Moving the cursor and paging through lists.
Getting Started
Entering a Point Name or Number
Identifying points with names or numbers.
Entering an Existing Point
Inputting known point names and viewing coordinates.
Getting Started
Entering a New Point
Inputting new point coordinates.
Pressing ENT Without a Point Name
Using input coordinates without saving them.
Specifying a Wildcard (*)
Searching for points using wildcard characters.
Getting Started
Recording an Instant Measurement
Inputting points by recording instant measurements.
Getting Started
Entering a Point from the Stack
Using recently used points from the stack.
Entering a Point from the Point List
Selecting points from an existing list.
Entering a Code
Entering feature codes for points.
Getting Started
Entering a Code Directly
Inputting codes using the keypad.
Entering a Code from the Stack
Using recently used codes from the stack.
Entering a Code from the Code List
Selecting codes from an existing list.
Getting Started
Advanced Feature: Searching for a Code by First Character
Quick code search using the initial character.
Getting Started
Entering Values in Feet and Inches
Inputting measurements in feet and inches format.
Qcodes (Quick Codes)
Using quick codes for shooting and recording points.
Getting Started
Entering Values in Feet and Inches
Examples of entering feet and inches values.
Creating a New Job
Steps to create a new job for data recording.
Getting Started
Creating a New Job
Checking job settings before creating.
Creating a Control Job
Setting up a control job for shared coordinate data.
Getting Started
Creating a Control Job
How control jobs are used for point searches.
Jobs Created Before Version 1.10
Compatibility issues with older job versions.
Sighting a Prism Reflector
Aiming at a prism reflector for measurement.
Getting Started
Sighting a Prism Reflector
Indicating signal level when lightwave is detected.
Measuring Distances
Taking distance measurements using MSR1 or MSR2 keys.
Getting Started
Measuring Distances
How prism constant appears and distance update.
Measurement Settings
Viewing and changing measurement settings.
Getting Started
Target Field Settings
Prism vs. N-prism symbols and their meaning.
Rec Mode Field Settings
How MSR keys operate in BMS based on Rec mode.
Applications
HA Reset and Angle Operations
Resetting horizontal angle and general angle operations.
Station Setup
Procedures for setting up the instrument's station.
Stakeout
Guiding users to stake out points in the field.
Program Key Functions
Accessing and using measurement programs.
Recording Measurement Data
Saving measurement data from any observation screen.
Measuring Offsets
Taking offset measurements for points.
Applications
HA Reset and Angle Operations
Opening the Angle menu.
Setting Horizontal Angle to Zero
Resetting the horizontal angle to 0 degrees.
Entering Horizontal Angle
Manually inputting horizontal angles.
Recording Foresight Point in Repeat Angle Measurement
Storing foresight points during repeat angle measurements.
Applications
Recording Foresight Point in Repeat Angle Measurement
Storing foresight points during repeat angle measurements.
F1/Face-2 Measurement
Performing measurements using both instrument faces.
Applications
Horizontal Angle Hold
Holding the horizontal angle at its current value.
Station Setup
Opening the Stn Setup menu.
Applications
Setting Up Station with Known Coordinates or Azimuth
Entering station name and instrument height.
Applications
Sighting Backsight by Entering Coordinates
Entering coordinates for the backsight point.
Applications
Sighting Backsight by Entering Coordinates
Completing setup by sighting the backsight.
Advanced Feature: Measuring F1 and F2
Taking an angle shot for Face-2 measurement.
Applications
Setting Up Station Using Multiple Point Resection
Starting the resection process.
Specifying Stakeout Point by Angle and Distance
Displaying input screen for target distance and angle.
Applications
Setting Up Station Using Multiple Point Resection
Entering point names for resection.
Specifying Stakeout Point by Angle and Distance
Rotating instrument to align with stakeout point.
Applications
Setting Up Station Using Multiple Point Resection
Entering second point and its height for resection.
Specifying Stakeout Point by Angle and Distance
Sighting target and pressing MSR to complete stakeout.
Applications
Setting Up Station Using Multiple Point Resection
Recording station results and entering instrument height.
Recording the Stakeout Point
Recording the stakeout point.
Applications
Advanced Feature: Viewing and Deleting Resection Measurements
Managing resection measurements.
Applications
Setting Up Station Quickly Without Coordinates
Entering station setup details quickly.
Measuring Remote Elevation
Measuring the elevation of a target point.
Applications
Measuring Remote Elevation
Updating target height using REM measurement.
Applications
Checking and Resetting Backsight Direction
Verifying and adjusting backsight direction.
Applications
Base XYZ Function
Entering new instrument XYZ values.
Applications
Two-Point Resection Along a Known Line
Entering the Known Line function.
Specifying Stakeout Point by Angle and Distance
Displaying input screen for target distance and angle.
Applications
Two-Point Resection Along a Known Line
Recording station results and entering station name.
Specifying Stakeout Point by Angle and Distance
Recording stakeout point and entering station name.
Applications
Stakeout
Displaying the Stakeout menu.
Specifying Stakeout Point by Angle and Distance
Displaying input screen for target distance and angle.
Applications
Specifying Stakeout Point by Angle and Distance
Rotating instrument to align with stakeout point.
Applications
Using [DSP] to Switch Between Stakeout Display Screens
Switching between different stakeout display screens.
Recording the Stakeout Point
Recording the stakeout point.
Applications
Specifying Stakeout Point by Coordinates
Starting stakeout by coordinates.
Applications
Specifying Stakeout Point by Coordinates
Recording the stakeout point.
Applications
Advanced Feature: Specifying Stakeout List by Range Input
Inputting stakeout points using a range.
Applications
DivLine S-O Function
Dividing a line and staking out points.
Applications
RefLine S-O Function
Staking out points based on a specified line.
Applications
RefLine S-O Function
Entering offsets to the line and sighting the target.
Applications
Program Key Functions
Accessing measurement programs.
Measuring Distance and Offset Values Along a Specified Line
Entering the first point for the reference line.
Applications
Measuring Distance and Offset Values Along a Specified Line
Entering the second point for the reference line.
Using [DSP] to Switch Between Stakeout Display Screens
Switching between REF display screens.
Applications
Measuring Distance and Offset Values on Arc-Curve
Entering the start of the curve point and azimuth.
Applications
Measuring Distance and Offset Values on Arc-Curve
Entering radius and calculating the curve.
Using [DSP] to Switch Between Stakeout Display Screens
Switching between ARC display screens.
Applications
Measuring Distance and Offset Values on Arc-Curve
Recording the arc point.
Menu Key
Introduction
Accessing important functions and settings via MENU.
Job Manager
Opening, creating, deleting, and managing jobs.
Cogo (Coordinate Geometry) Functions
Performing coordinate geometry calculations.
Settings
Configuring initial job settings.
Data Management
Viewing and editing records.
Communication
Downloading or uploading data.
1sec-Keys Configuration
Configuring settings for one-second keys.
Calibration
Calibrating the instrument.
Time Setting
Setting the current date and time.
Menu Key
Introduction
Displaying the MENU screen.
Job Manager
Opening, creating, deleting, and managing jobs.
Opening an Existing Job
Opening a stored job from the job list.
Menu Key
Creating a New Job
Entering a job name of up to eight characters.
Job Settings
Scale Factor, T-P correction, Sea Level, C&R correction.
Menu Key
Job Settings
VA zero, AZ zero, Order, HA settings.
Deleting a Job
Procedures for deleting a job from the list.
Menu Key
Deleting a Job
Confirmation screen and cancellation options for deletion.
Setting the Control Job
Assigning a job as the control job.
Menu Key
Displaying Job Information
Showing job records, free space, and creation date.
Cogo (Coordinate Geometry) Functions
Accessing the Cogo menu.
Calculating Angle and Distance Between Two Coordinates
Opening the Inverse menu for PT-PT calculations.
Menu Key
PT-PT Inverse Calculation
Calculating distance and angle between two points.
3Pt Angle Calculation
Calculating angle between two lines defined by three points.
Menu Key
3Pt Angle Calculation
Entering second and third points to define lines.
Menu Key
Calculating and Manually Inputting Coordinates
Accessing the Input menu for coordinate entry.
Azimuth+HD Input for Coordinate Calculation
Calculating coordinates using angle and distance.
Menu Key
Traverse Function
Calculating new points based on defined points and distances.
Menu Key
Entering Coordinates Manually
Entering XYZ coordinates using numeric keys.
Calculating Area and Perimeter
Calculating area and perimeter of a lot.
Menu Key
Calculating Area and Perimeter
Storing calculated area values.
Menu Key
Advanced Feature: Entering a Range of Points
Inputting stakeout points using a range.
Calculating Coordinates from Line and Offset
Entering the base point (P1).
Menu Key
Calculating Coordinates from Line and Offset
Entering horizontal distance perpendicular to the line.
Menu Key
Calculating Coordinates Using Intersection Functions
Accessing the Intersection menu.
Calculating a Bearing-Bearing Intersection
Calculating the intersection of two lines by azimuth.
Menu Key
Calculating a Bearing-Bearing Intersection
Defining the second line by points or azimuth.
Menu Key
Calculating a Bearing-Bearing Intersection
Calculating intersection coordinates and entering PT/CD.
Calculating a Distance-Distance Intersection
Calculating intersection of two lines by distance.
Menu Key
Calculating a Distance-Distance Intersection
Calculating intersection coordinates and entering Z coordinate.
Menu Key
Calculating a Distance-Distance Intersection
Calculating intersection coordinates and entering PT/CD.
Calculating a Point-Line Intersection
Calculating intersection of a point and a line.
Menu Key
Calculating a Point-Line Intersection
Entering azimuth or another point for the line.
Advanced Feature: Entering Angle and Distance Offsets
Rotating a line and specifying offsets.
Menu Key
Settings
Configuring initial job settings.
Angle Settings
Setting VA zero and HA values.
Menu Key
Angle Settings
Resolution and HA settings.
Distance Settings
Scale, T-P corr., Sea Level, C&R corr. settings.
Menu Key
Distance Settings
Temperature and Pressure corrections, Sea Level correction.
Menu Key
Coordinate Settings
Setting coordinate order and AZ zero.
Power Saving Settings
Configuring main unit, EDM unit, and sleep timer.
Communication Settings
Setting communication parameters like baud rate.
Stakeout Settings
Setting default point number for stakeout.
Menu Key
Unit Settings
Setting angle, distance, temp, and press units.
Recording Settings
Determining raw/coordinate data storage.
Menu Key
Others Settings
Defining display speed, units, and beep settings.
Owner's Detail
Entering name or company name for start-up display.
Menu Key
Data Management
Displaying the Data menu.
Viewing Records
Viewing records in various formats.
Viewing Raw Data
Showing raw data records in a list.
Menu Key
Viewing Records
Seeing detailed information for selected records.
Menu Key
Searching Records
Searching records by type, name, or code.
Searching Raw Records
Accessing raw data search function.
Menu Key
Searching Records
Searching for points by name or type.
Menu Key
Searching Records
Searching for points using wildcard characters.
Entering Coordinates
Displaying a new input point screen.
Point Name List and Code List
Instrument storage of PT names and CD names.
Menu Key
Point Name List and Code List
Editing items in point or code lists.
Menu Key
Point Name List and Code List
Deleting points, codes, or layers.
Menu Key
Editing an item in the point list or code list
Editing text in point, code, or layer fields.
Menu Key
Editing an item in the point list or code list
Accepting changes and updating the list.
Menu Key
Editing station records
Editing station records.
Menu Key
Searching Records
Searching records by type, name, or code.
Searching Raw Records
Accessing raw data search function.
Menu Key
Searching Records
Searching for points by name or type.
Menu Key
Searching Records
Searching for points using wildcard characters.
Menu Key
Entering Coordinates Manually
Entering XYZ coordinates using numeric keys.
Point Name List and Code List
Instrument storage of PT names and CD names.
Menu Key
Point Name List and Code List
Deleting points, codes, or layers.
Menu Key
Editing an item in the point list or code list
Editing text in point, code, or layer fields.
Menu Key
Editing an item in the point list or code list
Accepting changes and updating the list.
Menu Key
Adding a point name
Adding a new point name to the current layer.
Adding a code
Adding a new feature code to the current layer.
Adding a layer
Adding a new layer to the list.
Menu Key
Adding a layer
Adding a new layer to the list.
Menu Key
Downloading Data
Going to the download settings screen.
Uploading Coordinate Data
Uploading coordinate records from a computer.
Menu Key
Uploading Coordinate Data
Changing data field order for upload.
Uploading Coordinate Data
Changing communication settings.
Menu Key
Advanced Feature: Editing the Data Order for Upload
Opening the Data Fields screen.
Uploading Coordinates Without Points
Uploading data without including point names.
Uploading a Point Name List or Code List
Uploading point or code lists via cable.
Menu Key
Uploading a Point Name List or Code List
Uploading code lists via cable.
Menu Key
[MSR] Key Settings
Changing settings for the MSR1 and MSR2 keys.
[DSP] Key Settings
Changing display items in BMS and Stakeout screens.
Menu Key
[USR] Key Settings
Changing functions assigned to USR1 and USR2 keys.
[S-O] Key Settings
Entering the Stakeout settings screen.
Menu Key
[DAT] Key Settings
Changing settings for the DAT key.
Calibration
Calibration
Opening the Calibration screen.
Time Setting
Time Setting
Setting the current date and time.
Setting the Date
Entering the date in Year-Month-Day format.
Time Setting
Time Setting
Entering the time in 24-hour format.
CHAPTER 6
Checking and Adjusting the Plate Level
Checking and adjusting the instrument's plate level vial.
Checking and Adjusting the Circular Level
Checking and adjusting the instrument's circular level.
Checking and Adjusting the Optical Plummet
Aligning the optical plummet with the vertical axis.
Zero Point Errors of Vertical Scale and Horizontal Angle Corrections
Checking and correcting angle errors.
Checking the Instrument Constant
Verifying the instrument's distance measurement constant.
Checking and Adjusting the Plate Level
Checking and Adjusting the Plate Level
Checking and adjusting the instrument's plate level vial.
Checking and Adjusting the Circular Level
Checking and Adjusting the Circular Level
Checking and adjusting the instrument's circular level.
Checking and Adjusting the Optical Plummet
Checking and Adjusting the Optical Plummet
Aligning the optical plummet with the vertical axis.
Checking the Instrument Constant
Checking the Instrument Constant
Verifying the instrument's distance measurement constant.
Specifications
Main Body
Specifications for the telescope and EDM.
Standard Components
List of items included with the instrument.
External Device Connector
Specifications for connecting external devices.
Dual-axis tilt sensor (NPL-332 single-axis)
Angle measurement
Specifications for reading system and display increments.
Precision
Accuracy specifications for Prism and Reflectorless modes.
Measurement intervals
Clamps/tangent screws
Specifications for coaxial tangent/clamp knobs.
Tribrach
Specification for detachable tribrach.
Level vial sensitivity
Specifications for plate and circular level vials.
Optical plummet
Specifications for image, magnification, and focusing.
Display and keypad
Connections in the base of instrument
Specifications for communication and external power input.
Battery pack BC-65
Specifications for battery operation time.
Environmental performance
Dimensions
Specifications for main unit and carrying case dimensions.
Weight
Specifications for unit, battery, and charger weight.
Standard Components
List of items included with the instrument.
External Device Connector
External Device Connector
Connector pinouts for power and data communication.
Caution - Except for the connection shown in Figure 8.1 on page 186, use of this connector is at your own risk.
Warning about using the external device connector at own risk.
Caution - Use only the male connectors specified above. Using other connectors will damage the instrument.
Warning against using unauthorized connectors that can damage the instrument.
Caution - Use only the pin connections shown above. Using other connections will damage the instrument.
Warning against using incorrect pin connections that can damage the instrument.
Specifications
External Device Connector
Connecting to external power source and devices.
Caution - Make sure that the power supplied is within the rated input range (7.2 V to 11 V, 1 A maximum). Power supplied outside this range will damage the instrument.
Warning about power supply range for the instrument.
Caution - Use only the pin connections shown above. Using other connections will damage the instrument.
Warning against using incorrect pin connections that can damage the instrument.
CHAPTER 8
System Components
Overview of system components.
System Diagrams
System Components
Diagram showing instrument and its accessories.
System Diagrams
Prism reflector side
Diagram of prism reflector components.
CHAPTER 9
Uploading Coordinate Data
Configuring transmission settings for coordinate data upload.
Uploading Point Lists and Code Lists
Uploading point and code lists.
Downloading Data
Downloading data from the instrument.
Communications
Uploading Coordinate Data
Configuring transmission settings for coordinate data upload.
Record format
Coordinate record formats for upload.
Communications
Record format
Codes used in coordinate record formats.
Data example
Examples of Nikon raw coordinate data.
Uploading Point Lists and Code Lists
Uploading point and code lists.
Communications
File format
Record format for PT lists and code lists.
Communications
Data example
Example data structure for code lists.
Communications
Downloading Data
Going to the download settings screen.
Nikon raw record formats
Formats for coordinate and station records.
Communications
Nikon raw record formats
Formats for CP and SS records.
Communications
Nikon raw record formats
Formats for SO, F1/F2, and Comment/note records.
Communications
SDR2x and SDR33 record formats
Header record format specifications.
Communications
SDR2x and SDR33 record formats
Instrument and station details record formats.
Communications
SDR2x and SDR33 record formats
Target, Backsight, and Coordinates record formats.
Communications
SDR2x and SDR33 record formats
Observation record format specifications.
Communications
SDR2x and SDR33 record formats
Job identifier and note record formats.
Communications
Nikon raw data format
Example data in Nikon raw format.
Nikon coordinate data format
Example data in Nikon coordinate format.
Communications
SDR2x raw data format
Example data in SDR2x raw format.
Communications
SDR2x coordinate data format
Example data in SDR2x coordinate format.
CHAPTER 10
Angle
Error messages related to angle measurements.
Cogo
Error messages related to Cogo calculations.
Communications
Error messages related to data upload.
Data
Error messages related to data editing.
External Communication
Error messages related to external communication.
Job Manager
Error messages related to job management.
Programs
Error messages related to instrument programs.
Recording Data
Error messages related to data recording.
Reflectorless Mode Measurement
Error messages for reflectorless measurements.
Searching
Error messages when searching for points.
Settings
Error messages related to instrument settings.
Stakeout
Error messages related to stakeout function.
Station Setup
Error messages related to station setup.
Error Messages
Angle
Error messages related to angle measurements.
Cogo
Error messages related to Cogo calculations.
Communications
Error messages related to data upload.
Error Messages
Communications
Error messages for duplicate points and data range issues.
Data
Error messages related to data editing.
Error Messages
Data
Error messages for editing ST and coordinate records.
External Communication
Error messages related to external communication.
Job Manager
Error messages related to job management.
Error Messages
Job Manager
Error messages for MAX 32Jobs and Programs function.
Programs
Error messages for Programs function.
Error Messages
Recording Data
Error messages for data storage and duplicate points.
Error Messages
Recording Data
Error messages for NO Stn Setup and OVER RANGE.
Reflectorless Mode Measurement
Error messages for reflectorless measurements.
Searching
Error messages when searching for points.
Error Messages
Station Setup
Error messages for station setup failures.
Error Messages
Station Setup
Error messages for Z-coordinate requirements.
Need help?
Do you have a question about the NPL-332 and is the answer not in the manual?
Questions and answers