Table of Contents
Advertisement
Advertisement
Table of Contents

Related Manuals for MSI MS-7191


Summarization of Contents
Getting Started with the Mainboard
Mainboard Specifications Overview
Details the CPU, Chipset, Memory, Slots, IDE, and SATA specifications.
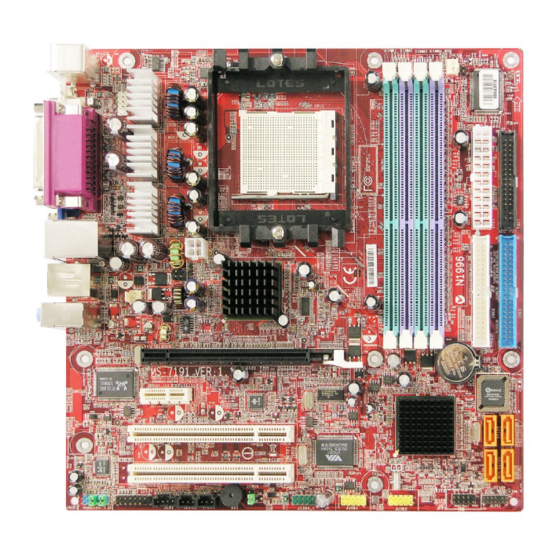
Mainboard Component Layout
Visual diagram showing the location of various connectors and components.
Motherboard Package Contents
Lists all items included in the motherboard package.
Hardware Setup Guide
Quick Components Identification
Identifies key components and their page references on the mainboard.
CPU Installation and Cooling
Information and precautions for installing the CPU and ensuring proper cooling.
CPU Cooler Installation Steps
Instructions for attaching the CPU cooler and retention mechanism.
Memory Module Installation
Explains how to install DDR DIMMs and the rules for dual-channel configuration.
Power Supply Connections
Details ATX 24-pin and 12V power connectors and their functions.
Back Panel Connector Descriptions
Describes Mouse/Keyboard, VGA, Digital Panel, USB, LAN, Audio, IEEE 1394, and Parallel ports.
Internal Connector Identification
Details Floppy, Fan, IDE, and Serial ATA connectors on the mainboard.
Front Panel and Audio Connectors
Covers CD-In, Front Panel Audio, Chassis Intrusion, SPDIF, and Audio-out connectors.
Serial and Expansion Port Connectors
Details Serial Port, IEEE 1394, Front USB, and TV-Out connectors.
Jumpers and Expansion Slots
Explains jumpers like Clear CMOS and different types of expansion slots.
BIOS Setup Configuration
Entering BIOS Setup Utility
Instructions on how to enter the BIOS Setup utility by pressing the DEL key.
BIOS Navigation and Control Keys
Lists the keyboard keys used for navigation and control within BIOS setup.
BIOS Setup Menu Overview
Overview of the main BIOS setup menu and navigation options.
Standard CMOS Features Setup
Menu for basic system configurations like time and date.
Advanced BIOS Features Configuration
Menu for configuring special enhanced BIOS features.
Advanced Chipset Features Optimization
Menu for optimizing system performance by adjusting chipset registers.
Integrated Peripherals Configuration
Controls settings for USB, LAN, 1394, and HD Audio controllers.
Power Management Setup Options
Configures ACPI functions and standby states (S1/S3).
PNP/PCI Configurations
Configures Plug & Play and PCI bus systems.
Hardware Monitor (H/W Monitor) Status
Displays the system's hardware health status.
Cell Menu CPU, PCIE, and DRAM Settings
Settings for CPU, PCIE, and DRAM clocks and frequencies.
BIOS Defaults and Password Security
Restores BIOS settings to defaults and sets a BIOS password.
Introduction to DigiCell Utility
DigiCell Utility Main Interface
Overview of the DigiCell utility and its functions.
Key DigiCell Utility Features
Details on Live Update, PC Alert, MEGA STICK, and Power Agent features.
Network Access Point and Communication Setup
Configures network access points, WLAN, and Bluetooth connections.
Live Update for System Software
Tool for detecting and updating BIOS, drivers, and utilities online.
MEGA STICK Media Management
Manages MSI MEGA STICK settings and media files.
Non-Unicode Program Character Support
Installs supplemental language support for East-Asian characters.
PC Alert System Monitoring
Detects and displays PC hardware and system status in real-time.
Power On Agent and Auto Login Configuration
Configures power-on schedules and automatic user login.
Appendix A: Using Audio Functionality
Installing Audio Drivers
Procedures for installing Realtek HD Audio drivers for Windows 2000/XP.
Audio Software Configuration
Activates HD Audio Configuration via system tray or Control Panel.
Sound Effects and Equalizer Settings
Selects sound effects and adjusts equalizer settings.
Karaoke Mode and Mixer Controls
Enables Karaoke features and adjusts audio playback volumes.
Recording Control and AudioIO Configuration
Configures microphone settings and multi-channel audio jack assignments.
Speaker Connection and Configuration
Guides speaker connection to appropriate jacks for different audio modes.
S/PDIF and Speaker Testing Procedures
Settings for digital audio transfer and testing speaker functionality.
Microphone and 3D Audio Demo
Sets microphone functions and adjusts 3D positional audio for gaming.
Appendix B: ATI SATA RAID Setup Guide
SATA RAID Features and Concepts
Lists features of RAID 0 and RAID 1, and supported technologies.
Creating and Managing RAID Sets
Steps to create, delete, and rebuild RAID sets within the BIOS utility.
Installing RAID Drivers
Guides for installing RAID drivers during OS installation and updating them.
SATARaid Utility Installation and GUI
Steps to install the SATARaid utility and use its Graphical User Interface.
Configuring RAID 0 with Windows Disk Manager
Sets up RAID 0 using Windows Disk Manager, allowing custom stripe sizes.
Appendix C: ATI SURROUNDVIEW™
Getting Started with SURROUNDVIEW™
Introduces SURROUNDVIEW™ and its multi-monitor capabilities.
SURROUNDVIEW™ System Requirements
Lists hardware and software requirements for SURROUNDVIEW™.
Graphics Card Installation Procedures
General and basic installation steps for adding a graphics card.
Enabling SURROUNDVIEW™ in BIOS
Steps to enable SURROUNDVIEW™ in the BIOS settings.
Multi-Monitor Display Setup
Connects and configures multiple monitors for display.
SURROUNDVIEW™ Usage Scenarios
Demonstrates using SURROUNDVIEW™ for business applications and games.
Appendix D: Using the TV-Out Function
Installing the TV-Out Bracket
Steps to install the TV-out bracket onto the mainboard.
Connecting Video Cables to TV
Connects S-Video, RCA, or HDTV cables from the mainboard to the TV.
Display Setup for TV-Out Function
Configures display settings for TV-Out function in Windows XP.
Need help?
Do you have a question about the MS-7191 and is the answer not in the manual?
Questions and answers