Table of Contents
Advertisement
Quick Links
Advertisement
Table of Contents

Related Manuals for Asus P9D-MV


Summarization of Contents
Chapter 1: Product Introduction
1.1 Welcome!
Welcome message and introduction to the ASUS P9D-M Series motherboard.
1.2 Package contents
List of items included in the motherboard package for standard and bulk packaging.
1.3 Serial number label
Instructions for locating the motherboard's serial number for technical support.
1.4 Special features
Overview of the motherboard's key features and technologies.
1.4.1 Product highlights
Details on the motherboard's main product highlights and technological advantages.
1.4.2 Innovative ASUS features
Description of specific innovative features developed by ASUS for this motherboard.
Chapter 2: Hardware Information
2.1 Before you proceed
Essential precautions and safety guidelines before installing hardware or changing settings.
2.2 Motherboard overview
Guide to the motherboard layout, placement, and screw hole locations for chassis installation.
2.2.1 Placement direction
Correct orientation for installing the motherboard into the chassis.
2.2.2 Screw holes
Locations of screw holes for securing the motherboard to the chassis.
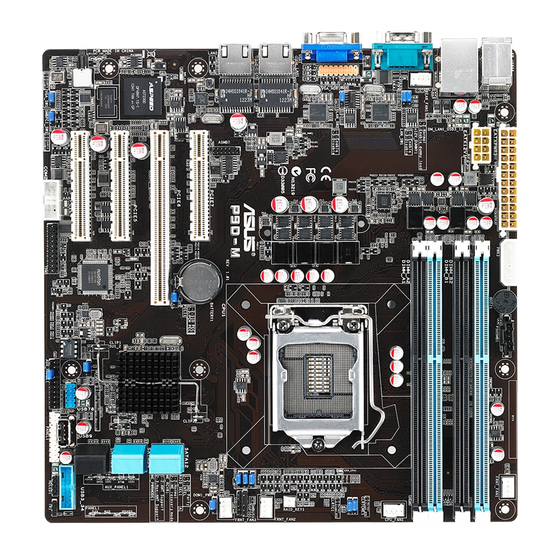
2.2.3 Motherboard layout
Diagram and identification of components on the P9D-M motherboard.
2.2.4 Layout contents
Detailed listing of motherboard slots, sockets, LEDs, jumpers, and connectors.
2.3 Central Processing Unit (CPU)
Information about the LGA1150 socket and procedures for installing the CPU.
2.3.1 Installing the CPU
Step-by-step guide for installing the Central Processing Unit into the socket.
2.3.2 Installing the CPU heatsink
Instructions for mounting the CPU heatsink and fan assembly.
2.3.3 Uninstalling the CPU heatsink and fan
Procedure for safely removing the CPU heatsink and fan assembly.
2.4 System memory
Details on system memory, including overview, configurations, and DIMM installation.
2.4.1 Overview
General overview of the system memory capabilities.
2.4.2 Memory Configurations
Guidelines for configuring system memory modules.
2.4.3 Installing a DIMM on a single clip DIMM socket
Step-by-step instructions for installing a DIMM into a socket.
2.5 Expansion slots
Details on installing and configuring various expansion cards in PCIe slots.
2.5.1 Installing an expansion card
Procedure for installing an expansion card into a slot.
2.5.2 Configuring an expansion card
Information on configuring installed expansion cards.
2.5.3 Interrupt assignments
Explanation of interrupt assignments for expansion devices.
2.5.4 PCI Express x16 slot (x8 link)
Details on the PCI Express x16 slot with x8 link.
2.5.5 PCI Express x8 slot (x4 link)
Details on the PCI Express x8 slot with x4 link.
2.5.6 Connecting the Thermal sensor cable
Instructions for connecting the thermal sensor cable.
2.5.7 Installing the Baseboard Management Card
Procedure for installing the Baseboard Management Card.
2.6 Onboard LEDs
Explanation of the onboard LEDs and their functions.
2.7 Jumpers
Configuration options using jumpers on the motherboard for various settings.
2.8 Connectors
Identification and description of rear and internal motherboard connectors.
2.8.1 Rear panel connectors
Description of the connectors located on the rear panel of the motherboard.
2.8.2 Internal connectors
Description of the internal connectors on the motherboard.
Chapter 3: Powering Up
3.1 Starting up for the first time
Instructions for the initial startup procedure of the motherboard.
3.2 Powering off the computer
Methods for properly shutting down the computer system.
Chapter 4: BIOS setup
4.1 Managing and updating your BIOS
Procedures for managing and updating the system's BIOS.
4.1.1 ASUS CrashFree BIOS 3 utility
Using the ASUS CrashFree BIOS 3 utility for BIOS recovery.
4.1.2 ASUS Easy Flash Utility
Instructions for updating BIOS using the ASUS Easy Flash utility.
4.1.3 BUPDATER utility
Guide to using the BUPDATER utility for BIOS updates.
4.2 BIOS setup program
Overview and navigation of the BIOS setup utility interface.
4.2.1 BIOS menu screen
Description of the main BIOS menu screen layout.
4.2.2 Menu bar
Explanation of the menu bar in the BIOS setup.
4.2.3 Menu items
Details on the various menu items available in BIOS.
4.2.4 Submenu items
Description of submenu items within the BIOS setup.
4.2.5 Navigation keys
Key combinations used for navigating the BIOS setup.
4.2.6 General help
Accessing general help information within the BIOS setup.
4.2.7 Configuration fields
Understanding configuration fields in the BIOS.
4.2.8 Pop-up window
Description of pop-up windows in the BIOS setup.
4.2.9 Scroll bar
Usage of the scroll bar in BIOS for navigating long lists.
4.3 Main menu
Description of settings available in the main BIOS menu.
4.3.1 System Date
Setting the system date in the BIOS.
4.3.2 System Time
Setting the system time in the BIOS.
4.4 Advanced menu
Detailed configuration options within the advanced BIOS menu.
4.4.1 CPU Configuration
Settings related to the CPU configuration in BIOS.
4.4.2 PCH-IO Configuration
Configuration options for the Platform Controller Hub I/O.
4.4.3 SATA Configuration
Settings for SATA controllers and drives in BIOS.
4.4.4 System Agent (SA) Configuration
Configuration options for the System Agent.
4.4.5 PCI Subsystem Settings
Settings for PCI subsystems and devices.
4.4.6 USB Configuration
Configuration options for USB ports and devices.
4.4.7 TPM
Trusted Platform Module settings and configuration in BIOS.
4.4.8 ACPI Settings
Advanced Configuration and Power Interface settings in BIOS.
4.4.9 WHEA Support
Windows Hardware Error Architecture support configuration.
4.4.10 NCT6779D Super IO Configuration
Configuration for the Nuvoton NCT6779D Super I/O controller.
4.4.11 Intel® Server Platform Services
Settings related to Intel Server Platform Services.
4.4.12 Onboard LAN Configuration
Configuration options for the onboard LAN controllers.
4.4.13 Serial Port Console Redirection
Enabling and configuring serial port console redirection.
4.4.14 Runtime Error Logging Support
Enabling support for runtime error logging.
4.4.15 APM
Advanced Power Management settings.
4.4.16 Network Stack
Configuration for the network stack in BIOS.
4.4.17 Intel RC Drivers Version Detail
Displaying version details for Intel RC drivers.
4.5 Event Logs menu
Accessing and interpreting system event logs through the BIOS.
4.6 Boot menu
Configuring boot order and related settings in the BIOS.
4.7 Monitor menu
Viewing system hardware status and monitoring information in BIOS.
4.8 Security
BIOS security features and password settings.
4.9 Tool menu
Utilizing built-in BIOS tools for system management.
4.10 Exit menu
Options for saving or discarding BIOS changes and exiting the setup.
Chapter 5: RAID Configuration
5.1 Setting up RAID
Instructions for setting up RAID configurations on the motherboard.
5.1.1 RAID definitions
Explanation of RAID levels and their definitions.
5.1.2 Installing hard disk drives
Procedure for installing hard disk drives for RAID setup.
5.1.3 Setting Jumpers
Configuring jumpers for RAID functionality.
5.1.4 Setting the RAID mode in BIOS
Selecting the RAID mode within the BIOS settings.
5.1.5 RAID configuration utilities
Overview of utilities used for RAID configuration.
5.2 Intel® Rapid Storage Technology Enterprise Option ROM Utility
Using the Intel RSTe Option ROM utility for RAID management.
5.2.1 Creating a RAID set
Steps to create a RAID set using the utility.
5.2.2 Deleting a RAID set
Procedure to delete an existing RAID set.
5.2.3 Resetting disks to Non-RAID
How to reset RAID disks back to Non-RAID mode.
5.2.4 Exiting the SATA Option ROM utility
Exiting the SATA Option ROM utility interface.
5.2.5 Rebuilding the RAID
Steps for rebuilding a RAID array.
5.2.6 Setting the Boot array in the BIOS Setup Utility
Configuring the boot array in the BIOS setup.
5.3 Intel® Rapid Storage Technology enterprise (Windows®)
Configuring Intel RSTe for RAID arrays within the Windows operating system.
5.3.1 Creating a RAID set
Steps to create a RAID set using the Windows utility.
5.3.2 Changing a Volume Type
Modifying the volume type of a RAID array.
5.3.3 Deleting a volume
Procedure to delete a RAID volume.
5.3.4 Preferences
Adjusting preferences for the Intel RSTe utility.
Chapter 6: Driver installation
6.1 RAID driver installation
Procedures for installing RAID drivers for system operation.
6.1.1 Creating a RAID driver disk
Steps to create a bootable RAID driver disk.
6.1.2 Installing the RAID controller driver
Procedure for installing the RAID controller driver.
6.2 Management applications and utilities installation
Installing essential management applications and system utilities.
6.3 Running the Support DVD
Guide to using the included support DVD for drivers and software.
6.4 Installing the LAN driver
Steps to install the network interface card (LAN) drivers.
6.5 Installing the VGA driver
Instructions for installing the video graphics adapter (VGA) drivers.
6.6 Installing the Intel® C22x MEI NULL HECI driver
Installing specific Intel MEI HECI drivers for system functionality.
6.7 Installing the Intel® I210 Gigabit Adapter driver
Procedures for installing the Intel I210 Gigabit LAN adapter driver.
Appendix A: Reference Information
A.1 P9D-M block diagram
Block diagram illustrating the P9D-M motherboard components and connections.
A.2 P9D-MV block diagram
Block diagram illustrating the P9D-MV motherboard components and connections.
A.3 P9D-MX block diagram
Block diagram illustrating the P9D-MX motherboard components and connections.
Notices
Federal Communications Commission Statement
FCC compliance statement for the device and its operation.
Canadian Department of Communications Statement
Canadian compliance statement for radio noise emissions.
REACH
Information regarding compliance with REACH chemical regulations.
Australia statement notice
Details on Australian warranty and consumer law compliance.
Safety information
Electrical safety
Essential electrical safety precautions during system handling and installation.
Operation safety
Guidelines for safe operation and handling of the motherboard and system.
About this guide
How this guide is organized
Explanation of the structure and content of the user guide.
Where to find more information
Resources for additional information and product updates.
Conventions used in this guide
Typography
Explanation of typographical conventions used in the manual.
Need help?
Do you have a question about the P9D-MV and is the answer not in the manual?
Questions and answers