Table of Contents
Advertisement
Advertisement
Table of Contents

Related Manuals for GE 24959


Summary of Contents for GE 24959
- Page 1 24959 Universal Remote Instruction Manual...
-
Page 2: Table Of Contents
Table of Contents Introduction ..........3 Button Functions........4 Initial Setup ..........6 Battery Installation ........6 Battery Saver ........6 Code Saver ..........6 Code Setup ..........6 Direct Code Entry ........7 Code Search..........8 Code Identifi cation Feature ......9 Setup ............10 Programming Combo Device Codes ..10 DVD/DVR Punch-Through Feature ..10 Volume/Mute Control Feature ....10 Setting All Volume/Mute Controls ..11... -
Page 3: Introduction
Introduction Congratulations on your purchase of this GE Universal Remote Control. Your new remote is one of the most easy to use remote controls available today. Juggling multiple remote controls is a thing of the past! Your GE Remote controls up to 8 devices, including the most popular brands of TV, DVD, DVR, Cable, etc. -
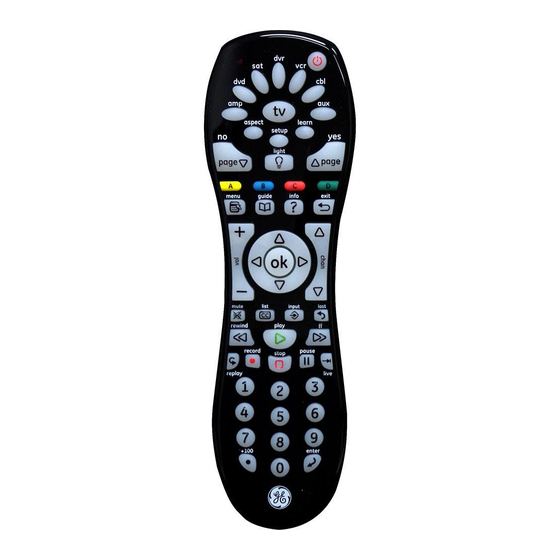
Page 4: Button Functions
Button Functions aspect learn setup light page page menu guide info exit list input mute last play rewind record pause stop replay live +100 enter Note: The REC button must be pressed twice to record from your DVD/DVR. For some DVD/DVR brands, you might need to press REC button once, then press it again for 3 seconds. - Page 5 Button Functions (cont.) Red Indicator: Lights when any button is pressed. TV, DVD, DVR, etc.: Selects the product to be operated. ASPECT: Selects viewing format for the displayed picture (See 14 below). SETUP: Used for setting up your remote. PAGE DOWN: Sets your Favorites ratings. ABCD: Used to store learned commands.
-
Page 6: Initial Setup
Initial Setup Battery Installation 1. On the back of the remote, push down on the tab and lift the cover off. 2. Match the batteries to the + and - marks inside the battery case, then insert 2 AAA Alkaline batteries. -
Page 7: Direct Code Entry
Direct Code Entry Direct Code Entry NOTE: You can store any kind of code under any mode (except TV). I.E. you can store a VCR code under the CBL button, or a DVD code under the AUX button, etc. However, you can only store TV codes under the TV button. -
Page 8: Code Search
Code Search Code Search If your product does not respond after you have tried all the codes for your brand, or if your brand is not listed, try searching for your code by following these steps. 1. Manually turn on the device (TV, DVD, etc.) to be controlled. -
Page 9: Code Identifi Cation Feature
Code Identifi cation Feature Code Identifi cation Feature The Code Identifi cation Feature allows you to identify the 4 digit library code stored under your device key. For example, if you want to fi nd out what 4 digit code is stored under your TV device key, follow the six steps below: 1. -
Page 10: Setup
Setup Programming Combo Device Codes Some combo (combination) devices (TV/DVR, TV/ DVD, DVD/DVR, etc.) require you to set up 2 dif- ferent modes to control both parts of the combo. For example, if you have a TV/DVD combo, you might need to set up one code under the TV mode to control the TV and a separate code (under other modes) to control the DVD. -
Page 11: Setting All Volume/Mute Controls
Setup (cont.) Setting ALL Volume/Mute Controls to Any Mode You can set all modes to “punch-through” to any mode for Volume/Mute control without needing to change to that mode by doing the following. 1. Press and hold SETUP until the indicator remains on, then release SETUP. -
Page 12: Code Learning
Tips On Learning (cont.) The learning feature lets you “learn” functions from your original remote control. For example - you may want to use your remote to operate the RANDOM PLAY feature from your original CD remote control. This remote is equipped with an “easy learning”... - Page 13 Code Learning g. Place the original remote end-to-end with the Learning Remote so the IR transmitters on both remotes are directly in line with each other. You may need to adjust the height of either remote to achieve this. Use the IR Transmitter Finder feature to assist you.
-
Page 14: Ir Transmitter Finder
IR Transmitter Finder This feature assists you in identifying where your original remote’s IR transmitter is located and is particularly useful if your original remote’s IR transmitter is hidden behind a lens. 1. Point both remotes facing each other by approximately 1 inch apart (see Tips on Learning on previous pages). -
Page 15: Learning Commands
Learning Commands 1. Press and hold the SETUP button until the red indicator turns on, then release the button. 2. Press and release the desired mode button (TV, DVD, etc.), the red indicator blinks then stays on. 3. Press and release the LEARN button, the red indicator blinks then stays on. -
Page 16: Clearing Commands
Clearing Commands To Clear all Learned Commands under a mode 1. Press and hold the SETUP button until the red indicator turns on. Release the SETUP button. 2. Press and release the button for the mode you want to clear (TV, DVD, etc.). The red indicator blinks off. -
Page 17: Troubleshooting
Troubleshooting Remote does not operate your product 1. Select the mode for the product you want to control. 2. Program the remote with a new code. 3. Install new batteries in the remote. (You might have to reprogram your remote after installing new batteries.) 4. - Page 18 90 Day Limited Warranty Jasco Products Company warrants this product to be free from manufacturing defects for a period of ninety days from the original date of consumer purchase. This warranty is limited to the repair or replacement of this product only and does not extend to consequential or incidental damage to other products that may be used with this unit.
- Page 20 24959 Universal Remote Instruction Manual Jasco Products Company 10 E. Memorial Road Oklahoma City, OK 73114-2205 Manual Version 4 Made in China 24959-05/11...
Need help?
Do you have a question about the 24959 and is the answer not in the manual?
Questions and answers